Greetings to the Hive DIY community, I wish you all a great December and that next year is full of good achievements and growth.
These days my father has asked me to get him a PC power supply of at least 500 Watt, so I took advantage of the opportunity to search through the junkyard.

I've been trying several of the ATX power supplies, as a note the first thing you have to take into account is to use a safety lamp or a series connection lamp, to avoid problems with some kind of short circuit.
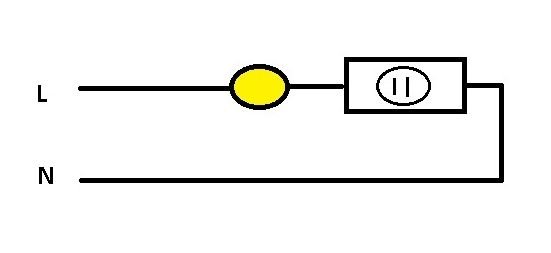
This is a rather simplified image of a series connection lamp, it is a conventional filament bulb, connected in series with a socket, it can be one, two or three bulbs in series depending on the current consumption of the devices being tested.

The first thing we do in this type of ATX source is to feed it through the series connection of the lamp, and measure with the tester on the green cable and one of the black cables.

We must obtain 5 volts, which is the voltage of the Stand-by source, when we work recycling or recovering equipment we always try to take the device as little damaged as possible, if the five volts are not present it is certain that the power source is quite damaged.
If we already have the 5 volts in the green cable of the connector, we then proceed to give it the power signal, making a bridge between the green cable and any of the black cables.

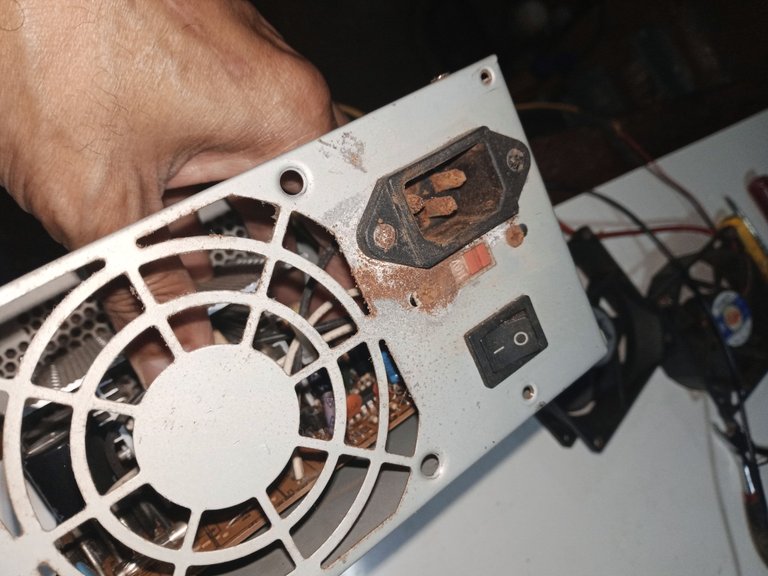
In my case, I had taken a power supply corroded by ambient humidity, and I did not get any voltage on the stand-by cable when applying voltage to the connector pins.

Rust was a problem, so I connected the voltage directly to the wires on the inner side of the power supply, I insisted on this power supply at first glance, as it looked much better than the other PC power supplies I had in the warehouse.

Over the years of work you end up developing a strange sixth sense in repairs, it's not something I can explain clearly, it happens after about ten or twenty years of work, that's why I insisted so much with this power supply, somehow you know which power supply to take apart and which equipment to leave, but somehow sometimes you get it wrong, we are only human after all.
I got the 5 volts from the stand-by power supply, and the 12 volt, 5 volt and 3 volt voltages from the power supply output. The power supply fan was not working even though it was getting 12 volts of power.
 |  |
|---|---|
I managed to get the fan that was blocked by dust to work, thanks to the help of WD 40 (God bless, I just need to use WD 40 like toothpaste), but for safety I ended up using another fan that I had stored in the workshop storage.

There was no way to use the original housing or connector due to rust, I looked for other power sources that would act as a parts donor.

It's really lucky that the damage was only superficial on this ATX power supply, in the end I used a fan and another metal box that I had recycled and saved some time ago from the chassis of another ATX power supply.

Finally, after assembling all the parts, connect the power supply to the test lamp in series and check the output voltages, everything works fine, without any news.

The recovery of the Atx source was completed, it has been a satisfactory recycling.
I cannot say that this post is a tutorial, I only share with you the logical reasoning of the way to approach the work, there are power sources in which the stand-by voltage is 12 volts and all the cables are black, I think that logical reasoning is more important than following a procedure step by step, we do not always have the perfect conditions to do the work mechanically.
It is always more important to reason than to follow a mechanical procedure step by step without thinking.
Thank you very much for stopping by and reading me.
Have a great week.
Peace.

- Images unless otherwise noted are screenshots of my work in the workshop.
- I used Google Translate for the English language.
- I used TextStudio for the decorative header in Spanish.


Saludos a la comunidad de Hive DIY, les deseo que tengan un excelente mes de diciembre y que el próximo año sea lleno de buenos logros y crecimiento.
En estos días mi padre me ha pedido que le consiguiera una fuente para PC de por lo menos 500 Watt, así que aproveche de rebuscar en el depósito de chatarra.

Estuve probando varias de las fuentes Atx, como dato lo primero que tienes que tomar en cuenta es usar una lámpara de seguridad o lámpara de conexión en serie, para evitar problemas con algún tipo de cortocircuito.
Esta es una imagen bastante simplificada de una lámpara de conexión en serie, es un bombillo de filamento convencional, conectado en serie con un tomacorriente, pueden ser uno, dos o tres bombillos en serie dependiendo del consumo de corriente de los artefactos que se ponen a prueba.

Lo primero que hacemos en este tipo de fuente Atx es alimentarla por medio de la conexión de la lámpara en serie, y medir con el tester sobre el cable verde y uno de los cables negro.

Debemos obtener 5 volts, que es el voltaje de la fuente de Stand-by, cuando trabajamos reciclando o recuperando equipos se procura siempre tomar el aparato lo menos dañado posible, si no están presente los cinco volts es de seguro que está bastante dañada esa fuente de poder.
Si ya tenemos los 5 volts en el cable verde del conector, procedemos luego a darle la señal de encendido, haciendo un puente entre el cable verde y cualquiera de los cables de color negro.

En mi caso, había tomado una fuente corroída por la humedad del ambiente, y no obtenía ningún voltaje en el cable del stand-by al aplicar voltaje en las espigas del conector.

El óxido era un problema, por lo que conecte el voltaje directamente sobre los cables por el lado interno de la fuente, insistí con esta fuente de primera vista, ya que lucia mucho mejor que las demás fuentes de PC de las que tenía en el depósito.

Con los años de trabajo terminas desarrollando un extraño sexto sentido en las reparaciones, no es algo que yo pueda explicar claramente, sucede después de unos diez o veinte años de trabajo, por eso insistí tanto con esta fuente, de alguna manera sabes cuál fuente tomar y desarmar y qué equipo dejar, pero de alguna manera algunas veces te equivocas, solo somos humanos después de todo.
Conseguí los 5 volts de la fuente stand-by, y los voltajes de 12 volt, los 5 volts y los 3 volts de la salida de la fuente. El ventilador de la fuente de alimentación no funcionaba a pesar de que estaba recibiendo los 12 volts de alimentación.
 |  |
|---|---|
Logre hacer trabajar el ventilador que estaba bloqueado por la suciedad de polvo, gracias a la ayuda del WD 40 (Dios bendito, solo falta que use el WD 40 como pasta dental), pero por seguridad termine usando otro ventilador que tenía guardado en el depósito del taller.

No había manera de usar la carcasa ni el conector original debido al óxido, busque otras fuentes de poder que hicieran de donante de partes.

Es una verdadera suerte, que el daño solo fuese superficial en esta fuente de poder Atx, al final use un ventilador y otra caja metálica que había reciclado y guardado hace un tiempo del chasis de otra fuente de poder Atx.

Finalmente, después del montaje de todas las partes, conecte la fuente de poder a la lámpara de pruebas en serie y verifique los voltajes de salida, todo funciona bien, sin ninguna novedad.

La recuperación de la fuente Atx fue completada, ha sido un reciclaje satisfactorio.
No puedo decir que esta publicación sea un tutorial, yo solo les comparto el razonamiento lógico de la forma de encarar el trabajo, hay fuentes de poder en que el voltaje de stand-by es de 12 volts y todos los cables son de color negro, pienso que es más importante el razonamiento lógico que seguir paso a paso un procedimiento, no siempre tenemos las condiciones perfectas para hacer los trabajos mecánicamente.
Siempre es más importante razonar que seguir un procedimiento mecánico paso a paso sin pensar.
Muchas gracias por pasar y leerme.
Que tengan una excelente semana.
Paz.

- Las imágenes a menos que se indique son capturas de mi trabajo en el taller.
- He usado el traductor del Google para el idioma inglés.
- He usado el TextStudio para el encabezado decorativo en español.

 )
)