Hello my dear creative Hive Diy family! Very good evening to everyone here, blessed, prosperous and happy Friday family. I hope you are feeling great, that this week you have started off on the right foot and work day by day to be productive and constantly improving, I also hope that in this month you do not lack creativity and love for the things you do, may it be a month full of beautiful things and learnings.♡
¡Hola a todos! El día de hoy les traigo un tutorial paso a paso de como elaborar desde cero y en casa una hermosa caja de regalo, que nos ayudará a dar un obsequio único, distinto y especial. Está es una caja que pueden adaptar a su tamaño requerido e igualmente se puede personalizar a nuestro gusto, según nuestra creatividad y temática, así que si quieres aprender a hacerla, te invito a seguir leyendo, a continuación comienzo con los materiales.
Hello everyone! Today I bring you a step by step tutorial on how to make from scratch and at home a beautiful gift box, which will help us to give a unique, different and special gift. This is a box that can be adapted to your required size and can also be customized to our liking, according to our creativity and theme, so if you want to learn how to make it, I invite you to read on, then I start with the materials.
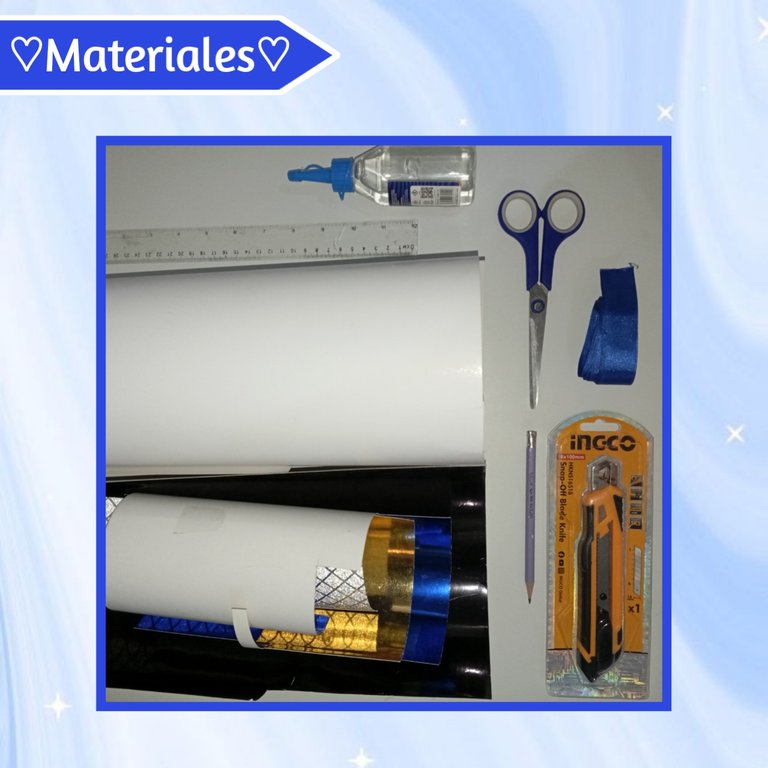
♡🤍💙Materials💙🤍♡
- Cartón de su preferencia (Yo use cartón reverso)
- Cinta de tela
- Cartulinas metalizadas y/o decoradas
- Silicón
- Regla
- Lápiz
- Cutter/exacto
- Tijeras
- Cardboard of your choice (I used cardboard backing)
- Cloth tape
- Metallic and/or decorated cardboard
- Silicone
- Ruler
- Pencil
- Cutter/acto knife
- Scissors
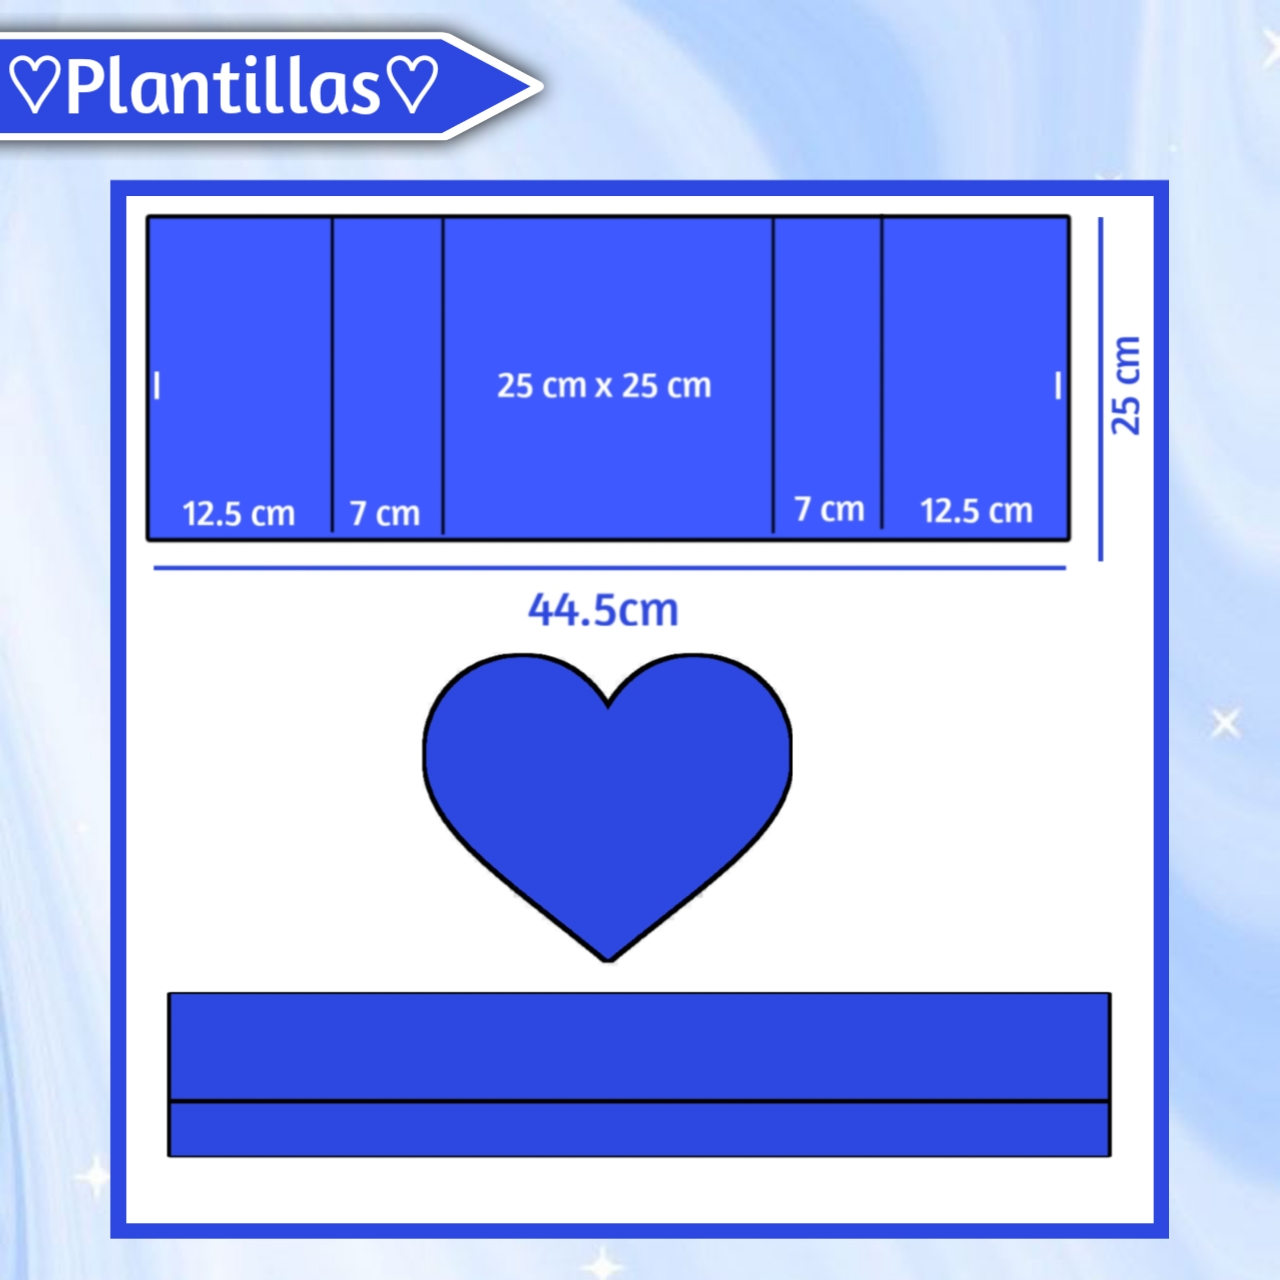
♡💙✨Templates✨💙♡
♡🎀💙Step by Step💙🎀♡
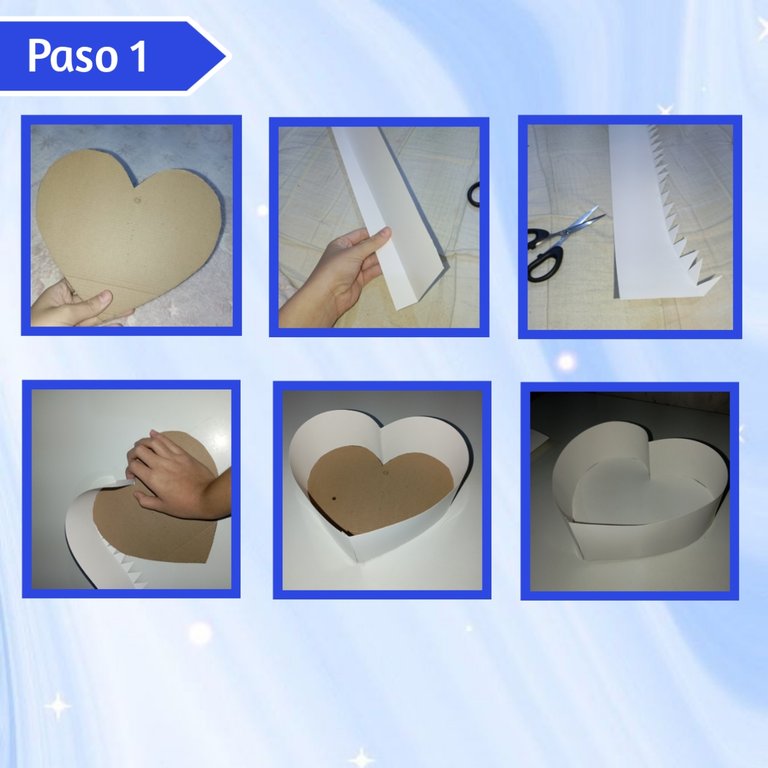
Paso 1:
Step 1:
Empezaremos armado la caja en forma de corazón que va en la parte interna, para esto necesitaremos una plantilla de un corazón adaptada a nuestra medida, siendo 1cm menor de cada lado que las medidas de la caja aproximadamente. Así marcamos y recortamos muy bien está pieza en cartón grueso, después marcaremos y recortaremos una tira del alto que queremos nuestra caja (yo elegí 7cm), más el espacio del doblez que en este caso fue de 2.5cm.
We will start assembling the heart-shaped box that goes on the inside, for this we will need a template of a heart adapted to our size, being 1cm smaller on each side than the measures of the box approximately. Then we mark and cut this piece of thick cardboard very well, then we will mark and cut a strip of the height we want our box (I chose 7cm), plus the space of the fold that in this case was 2.5cm.
Continuando, marcaremos el doblez de la tira y a lo largo recortaremos pequeños triángulos, ya que esto nos permitirá mayor flexibilidad, así está tira la iremos pegando alrededor del corazón formando la caja y pegando los triángulos a la base, también forraremos está con la misma cartulina blanca de la tira.
Continuing, we will mark the fold of the strip and along the length we will cut small triangles, as this will allow us more flexibility, so this strip will be glued around the heart forming the box and gluing the triangles to the base, we will also line it with the same white cardboard of the strip.
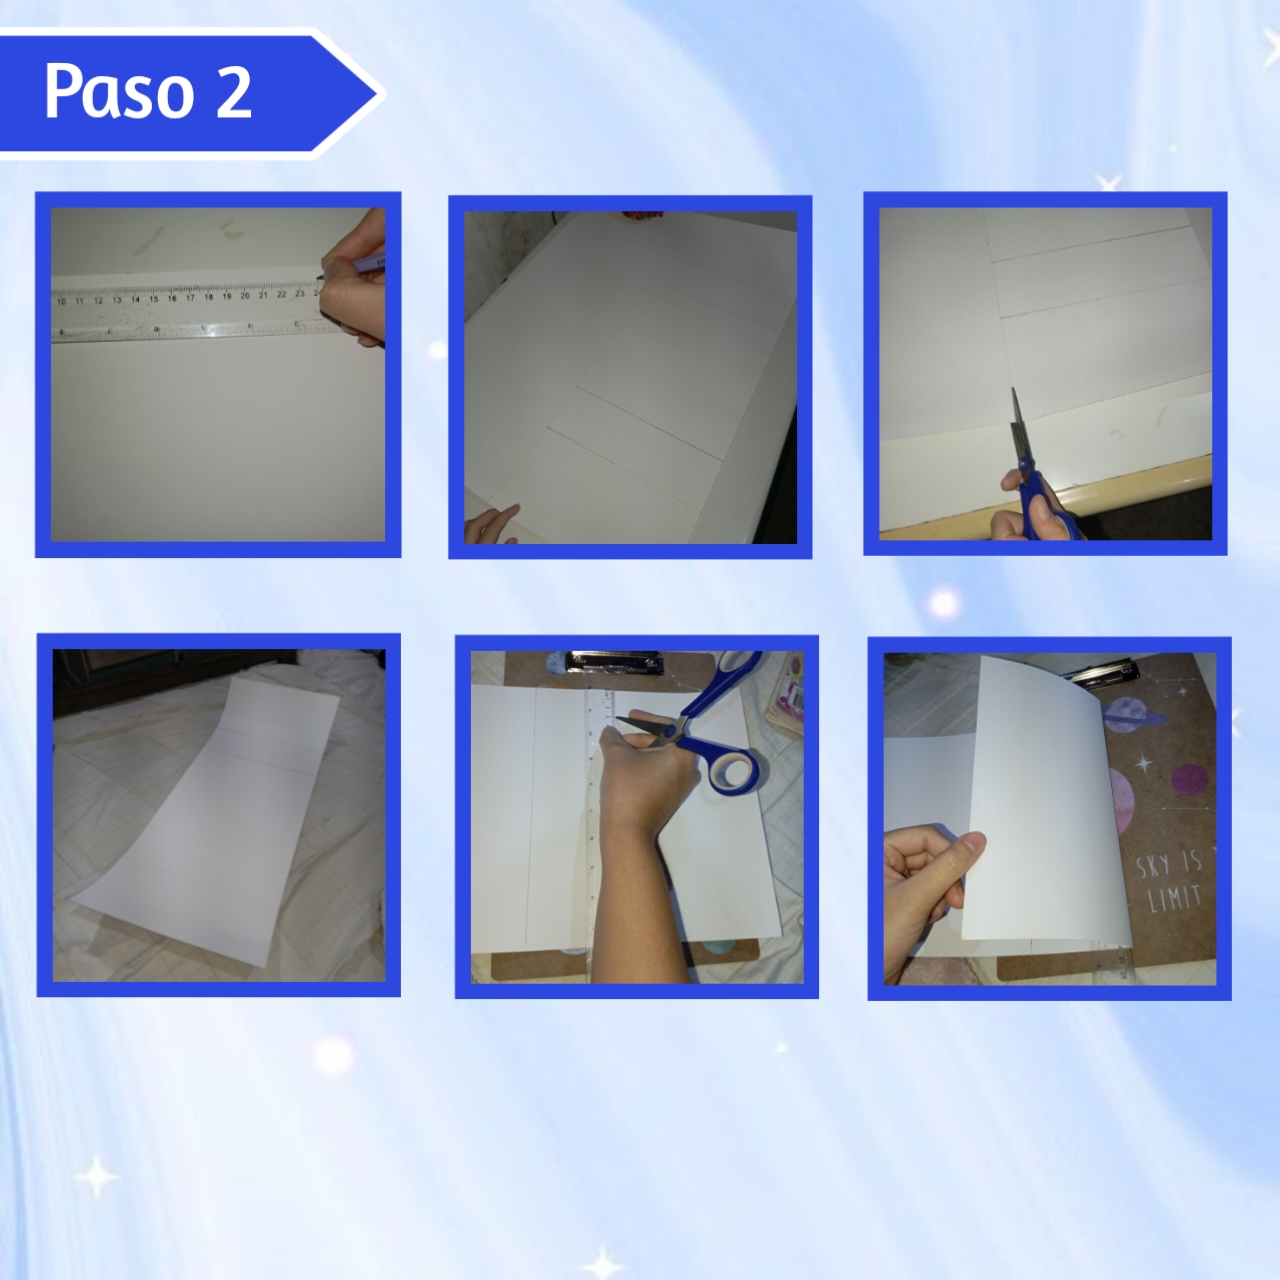
Paso 2:
Step 2:
Proseguimos con la cobertura de la caja, de está manera tomaremos nuestra plantilla larga, regla, al igual que lápiz y marcaremos muy bien sobre la cartulina blanca, del lado más corrugado (se puede decir). Luego con todo esto marcado, tomamos nuestras tijeras o si es de su preferencia un exacto, para realizar los cortes y obtener la pieza grande, también marcaremos sus dobleces con la regla y la punta de la tijera.
We continue with the covering of the box, in this way we will take our long template, ruler, as well as pencil and we will mark very well on the white cardboard, on the most corrugated side (you can say). Then with all this marked, we take our scissors or if you prefer an exacto, to make the cuts and get the big piece, we will also mark its folds with the ruler and the tip of the scissors.
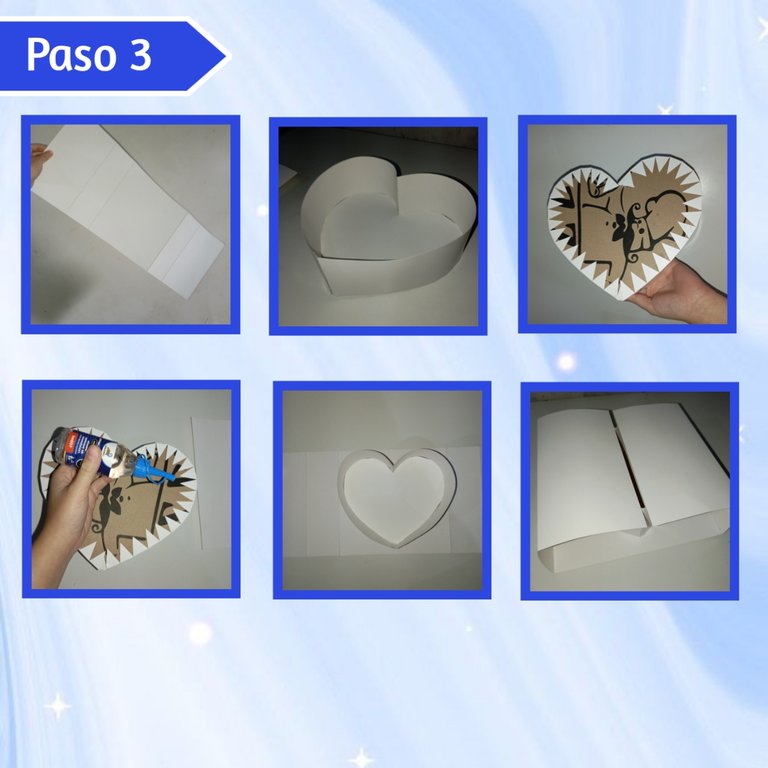
Paso 3:
Step 3:
Ya con los dobleces bien marcados, vamos a armar la caja, por lo tanto, tomaremos nuestra pieza de corazón que hicimos anteriormente, le agregaremos silicón e igualmente esparciremos bastante bien hasta cubrir toda la superficie. A continuación pegaremos está pieza en el cuadrado central, centrando muy bien y manteniendo cada espacio correctamente, sostenemos por unos cuantos segundos hasta que pegue y probamos que quede bien.
Once the folds are well marked, we are going to assemble the box, so we will take our heart piece that we made earlier, add silicone and spread it well until it covers the entire surface. Then we will glue this piece in the central square, centering it very well and keeping each space correctly, hold it for a few seconds until it sticks and test it well.
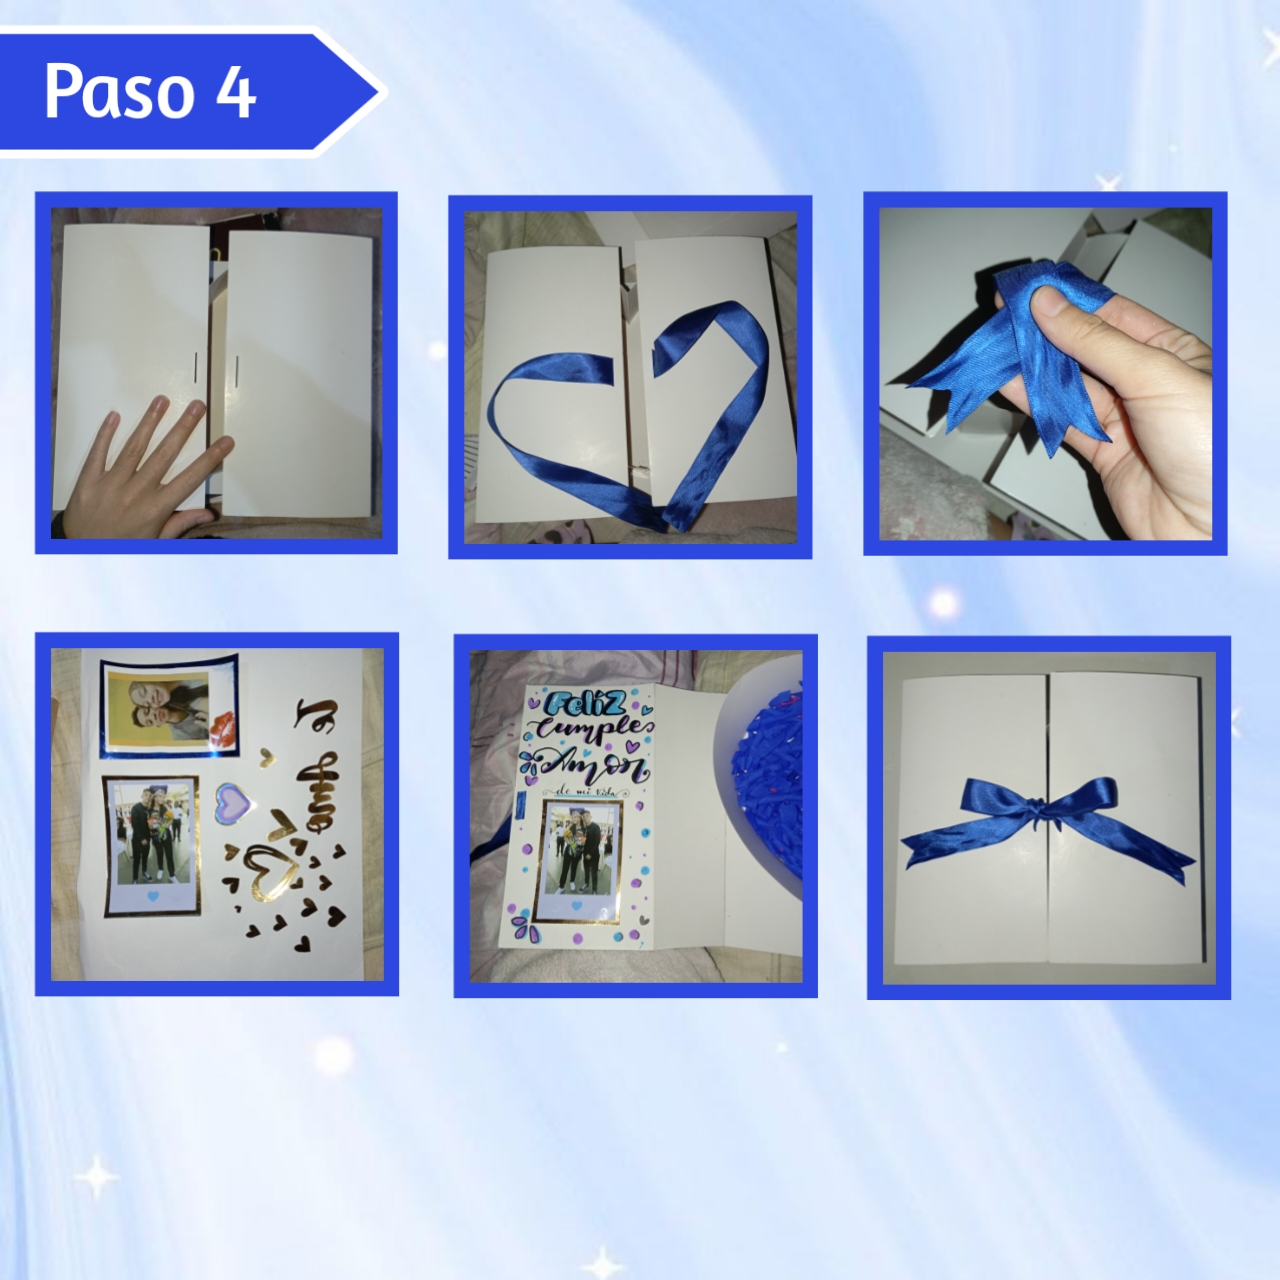
Paso 4:
Step 4:
Continuamos con la decoración, así antes en la tapa de la caja marque dos pequeñas líneas paralelas entre sí en el centro de está, dejando unos milímetros de separación del borde, así también los recorte con ayuda de un exacto, luego tome dos trozos de cinta de más o menos 30cm de largo y las introduje por estos orificios y pegue las esquinas por dentro, también corté las puntas de la cinta.
We continue with the decoration, so before in the lid of the box mark two small lines parallel to each other in the center of it, leaving a few millimeters of separation from the edge, so also cut them with the help of an exact, then take two pieces of tape about 30cm long and introduced them through these holes and glue the corners inside, I also cut the ends of the tape.
Por último, hice algunas decoraciones con cartulina dorada y otras, en su mayoría corazones, además tomé dos fotos, les agregué un borde de cartulina y pegué con silicón todas estás en la parte interior, también agregué papelillo que yo misma hice, en azul, al final cerré la caja e hice el lazo y ya está.
Finally, I made some decorations with gold cardboard and others, mostly hearts, I also took two photos, added a border of cardboard and glued with silicone all these on the inside, I also added some paper I made myself, in blue, at the end I closed the box and made the bow and that's it.
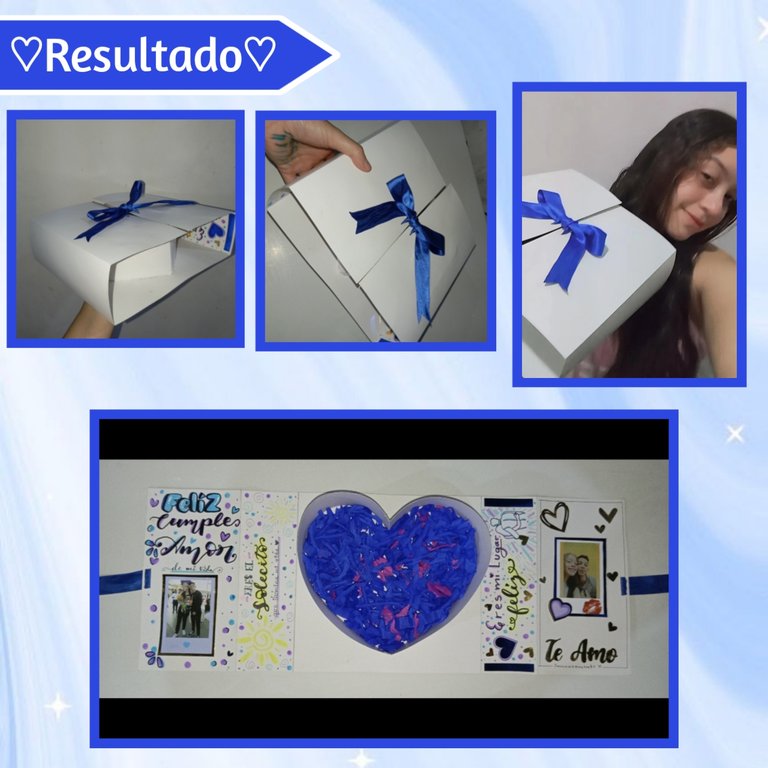
En definitiva, es realmente útil que podemos hacer nuestras propias cajas de regalo en casa, ya que nos permite ahorrar un poco de dinero, personalizar a nuestro gusto, además por supuesto del detallazo que resulta ser, ya que es un regalo hecho totalmente a mano desde el comienzo por nosotros mismos, lleno de amor, es único y diferente, una caja creativa y bonita para nuestras personas especiales en cualquier ocasión.💙☄️
In short, it is really useful that we can make our own gift boxes at home, as it allows us to save a little money, customize to our liking, plus of course the detallazo that turns out to be, as it is a gift made entirely by hand from scratch by ourselves, full of love, it is unique and different, a creative and beautiful box for our special people on any occasion.💙☄️
Esto es todo por hoy mi gente creativa, espero que les haya gustado este súper DIY y puedan inspirarse a crear sus lindas cajas en casa, ha sido un placer compartir junto a ustedes está tarde de hoy, espero leer sus comentarios, los quiero familia.🤍✨
This is all for today my creative people, I hope you liked this super DIY and you can be inspired to create your nice boxes at home, it has been a pleasure to share with you this afternoon, I hope to read your comments, I love you family.🤍✨
💙🤍¡Gracias por leer! Hasta el siguiente DIY🤍💙
💙🤍Thanks for reading! Until the next DIY🤍💙
Photos of my authorship taken from my Xiaomi Redmi 13C phone, edited in the free version of PixeLab
