✦ Full Step-by-Step Tutorial 👌 - Collage & Edition in FotoJet, photos by @Tesmoforia ✦

🇪🇸 ~ Una amiga psicóloga me preguntó la semana pasada qué se podía hacer con los envases vacíos de Pringles, de los que ella es muy fan y siente mucha pena al desecharlos.
Como ella trabaja con niños, le propuse hacer lapiceros temáticos de postres como obsequios o decoraciones para su consultorio.
Creo que la última vez que hice un lapicero temático fue en 2022, ¡pero nunca he hecho uno tematizado de postre!, así que vamos a experimentar, y como siempre recordándote que a pesar de mis ejemplos e instrucciones, debe prevalecer tu libertad creativa así que cualquier cambio en los materiales, método o paleta de colores que decidas hacer es perfectamente válido y lo apoyo 🥇 👏 💖
🇺🇸 ~ A psychologist friend of mine asked me last week what could be done with the empty Pringles containers, of which she is a big fan and feels very sorry to throw away.
Since she works with children, I suggested making dessert themed pens as gifts or decorations for her office.
I think the last time I made a themed pencil was in 2022, but I've never made a dessert themed one!, so let's experiment, and as always reminding you that despite my examples and instructions, your creative freedom must prevail so any changes in materials, method or color palette you decide to make are perfectly valid and I support it 🥇 👏 💖
✦ Step by Step Tutorial ✦
💖 🍰 "Pen Holder with a Cake Design" 🍰 💖


✅ Los materiales y herramientas que necesitaras para realizar este proyecto son: Fieltro escolar de diferentes colores, troque cortador con forma de rosa, apliques de diferentes tipos, perlas de 0.5 cm, silicón frio, cinta métrica, pinzas largas, paletas de madera, tijera, toallitas húmedas y envases vacíos de cartón.
👉 The materials and tools you will need to make this project are: School felt of different colors, rose-shaped cutter, different types of appliqués, 0.5 cm beads, cold silicone, tape measure, long tweezers, wooden trowels, scissors, wet wipes and empty cardboard containers.
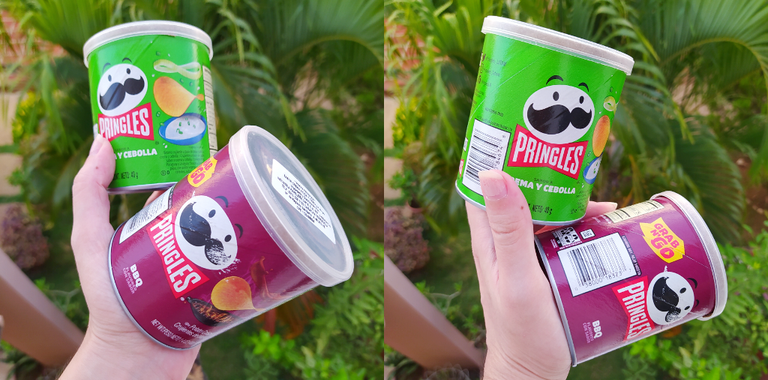
✧ Lo primero que necesitas hacer es esterilizar los envases, humedecerlos es una opción riesgosa ya que estan hechos de cartón, por eso las toallitas húmedas son una manera efectiva y segura para retirar todos los pequeños residuos y grasa del interior.
✩ The first thing you need to do is to sterilize the containers, wetting them is a risky option as they are made of cardboard, so wet wipes are an effective and safe way to remove all the small residues and grease from the inside.
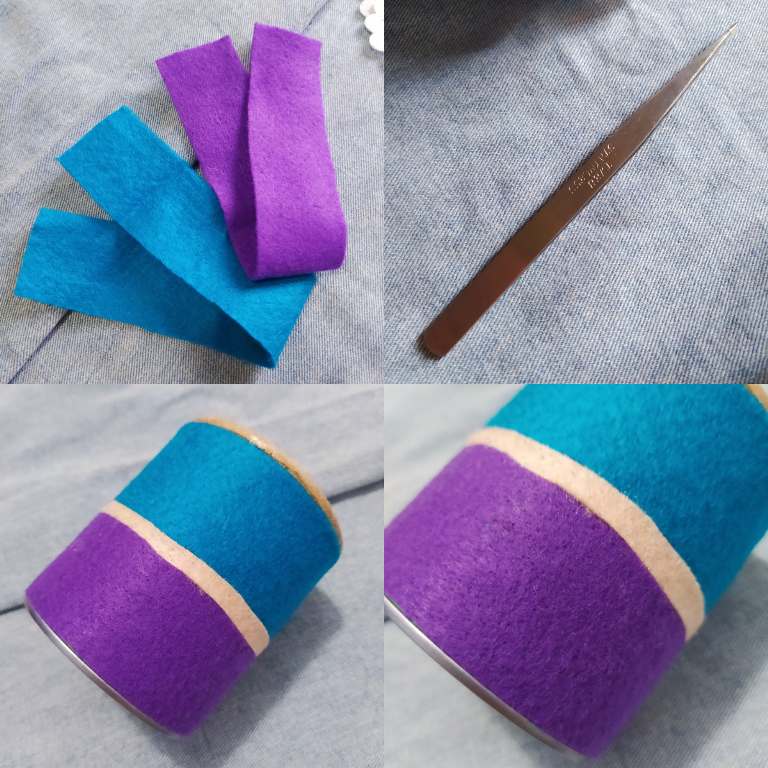
✧ A continuación puedes empezar a decorar escogiendo los colores base, que pueden ser más de uno. Con la cinta métrica medirás cuanto fieltro necesitas para cubrir ambos lados superior e inferior del envase, dejando un pequeño espacio en el centro para un tercer color que simule el relleno del pastel. Utiliza silicón frio en cantidad moderada y espera a que seque.
✩ Next you can start decorating by choosing the base colors, which can be more than one. With the tape measure you will measure how much felt you need to cover both top and bottom sides of the container, leaving a small space in the center for a third color to simulate the filling of the cake. Use a moderate amount of cold silicone and wait for it to dry.
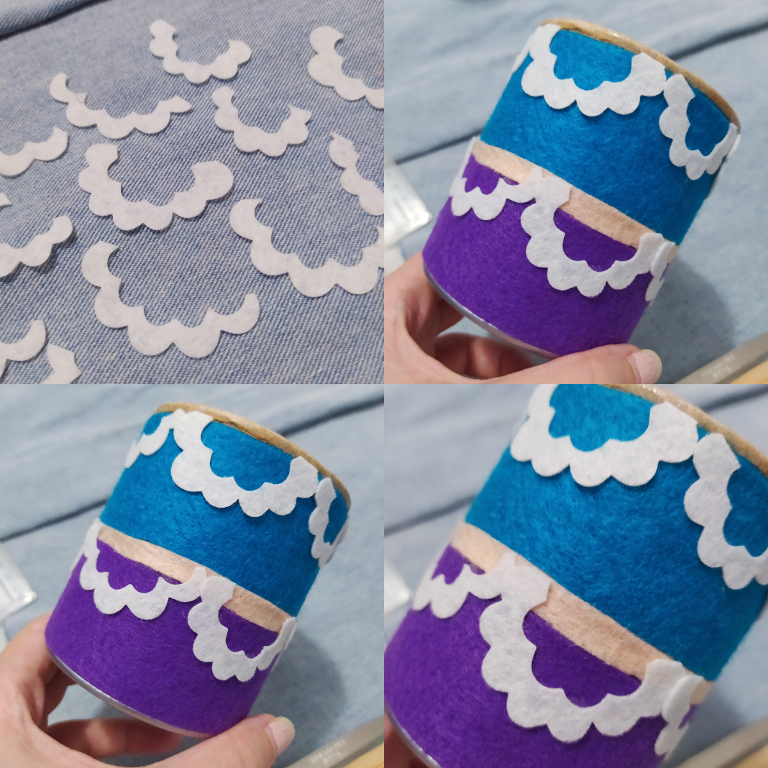
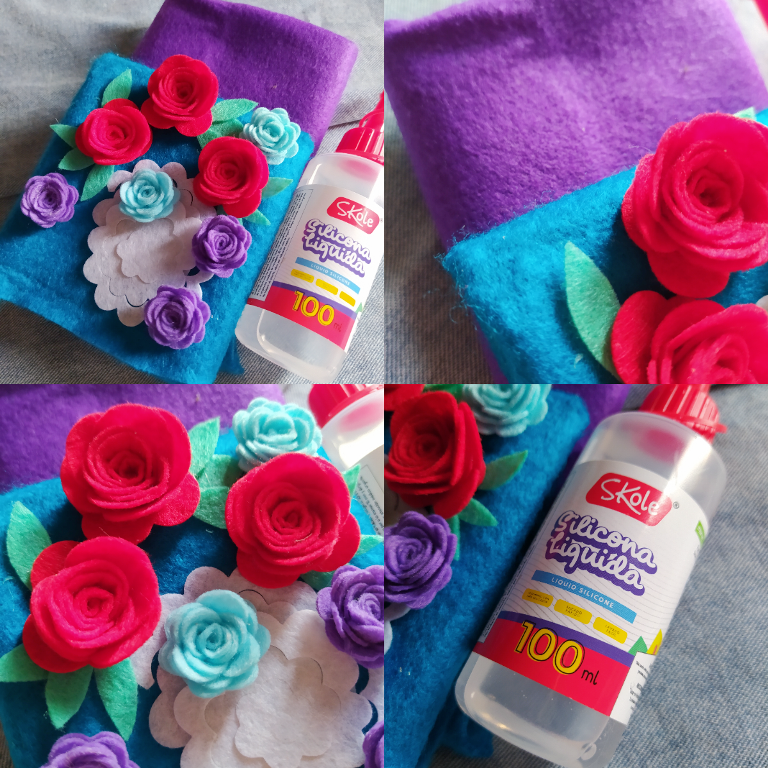
✧ El siguiente paso es emular decoraciones de crema pero planas, todavía no agregaremos mucho relieve al diseño. Para eso puedes cortar figuras esponjosas con la tijera o desarmar en varias partes una figura pre-recortada de las rosas, yo corté en varias partes 3 unidades para cubrir todo el envase.
✩ The next step is to emulate cream decorations but flat, we will not add much relief to the design yet. For that you can cut fluffy figures with the scissors or disassemble in several parts a pre-cut figure of the roses, I cut in several parts 3 units to cover the entire container.
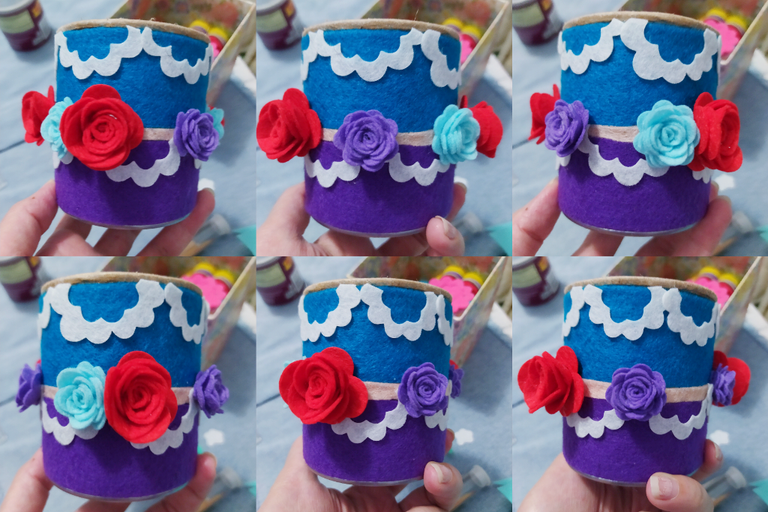
✧ Respetado los tiempos secado, más o menos en interludios de 10 minutos, ahora vas a pegar las rosas en la secuencia que prefieras. Yo recomiendo juntar una rosa grande con una mediana, y luego agregar una pequeña, siempre encima de las uniones de las decoraciones anteriores para ocultar los puntos de unión y pequeños desperfectos.
✩ Respecting the drying times, more or less in interludes of 10 minutes, now you are going to glue the roses in the sequence you prefer. I recommend joining a large rose with a medium one, and then add a small one, always on top of the joins of the previous decorations to hide the joins and small flaws.
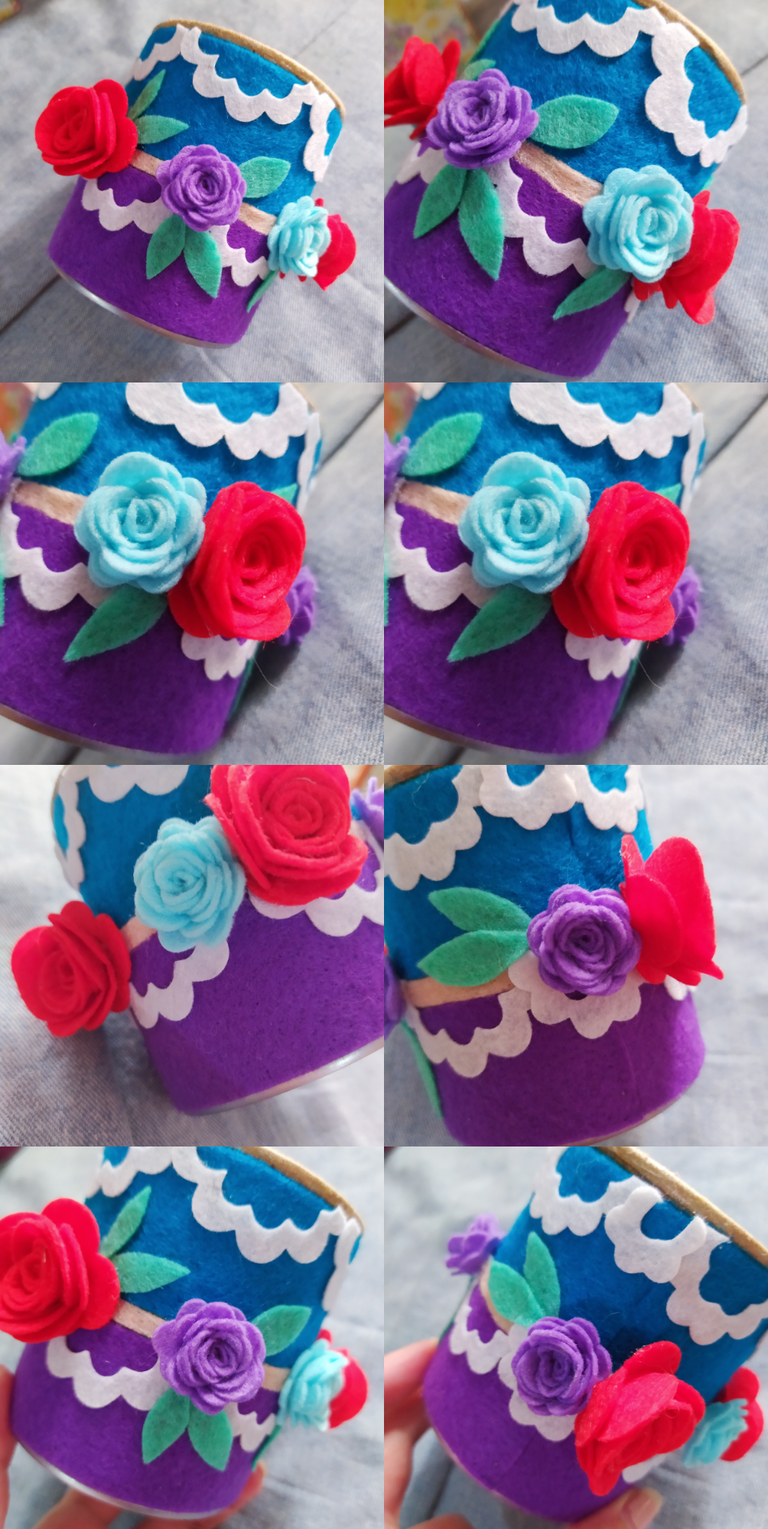
✧ En un color distinto de fieltro, recorta hojas pequeñas alargadas y pégalas de manera que parezca que salen de cada conjunto de rosas, pueden ser tantas como quieras pero sugiero que no supere el numero 4 por rosa, y que sean de diferentes largos y anchos, tambien caria el ángulo, que toda apunten en direcciones diferentes.
✩ In a different color of felt, cut out small elongated leaves and glue them so that they seem to come out of each set of roses, they can be as many as you want but I suggest that you do not exceed the number 4 per rose, and that they are of different lengths and widths, also caria the angle, that all point in different directions.
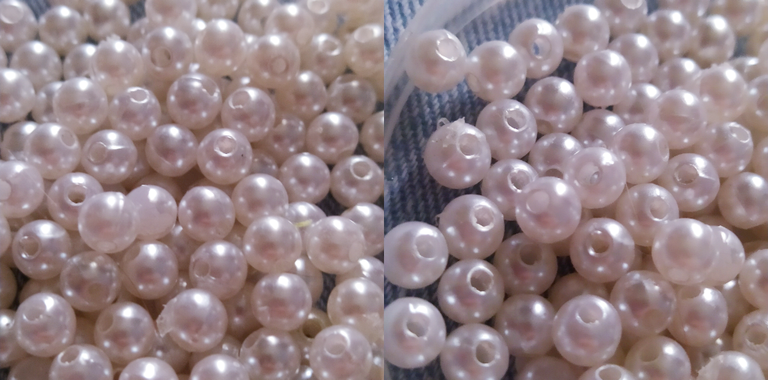
✧ Para esta etapa necesitamos un material distinto en textura, color y apariencia para darle un toque extra de encanto al diseño por contraste. Puedes utilizar perlas o algún otro aplique sintético de tu preferencia, pero que sea pequeño.
✩ For this stage we need a different material in texture, color and appearance to give an extra touch of charm to the design by contrast. You can use pearls or any other synthetic applique of your choice, but keep it small.
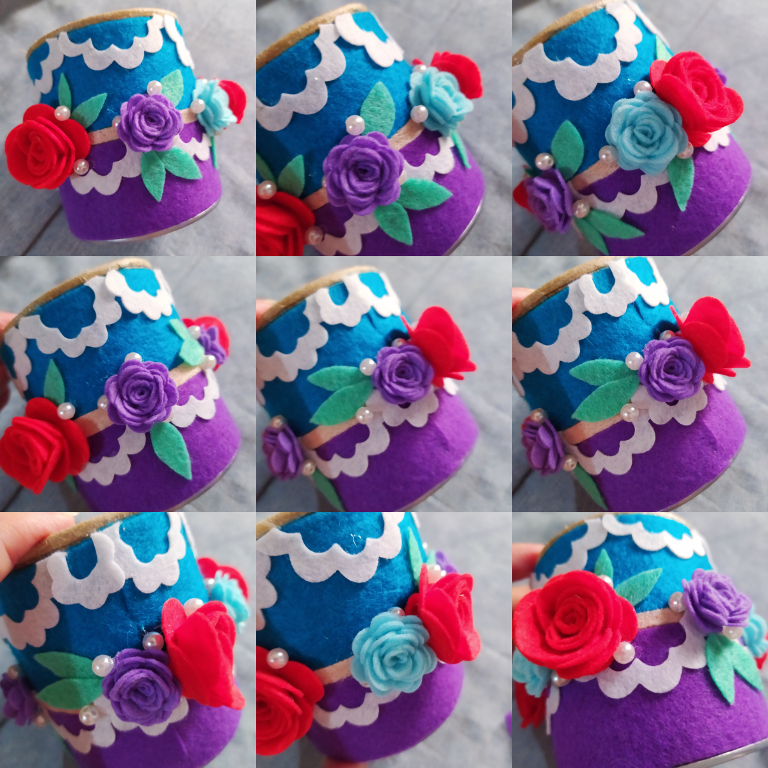
✧ En las coyunturas alrededor de cada conjunto de rosas o rosa solitaria, pega una sola perla de forma que encaje entre la decoración y el cuerpo del envase. Agrega tantas como quieras o creas necesario, ¡nota el cambio en la apariencia del proyecto a medida que las agregas al diseño!.
✩ At the joints around each set of roses or single rose, glue a single bead so that it fits between the decoration and the body of the container. Add as many as you want or think necessary, note the change in the look of the project as you add them to the design!.
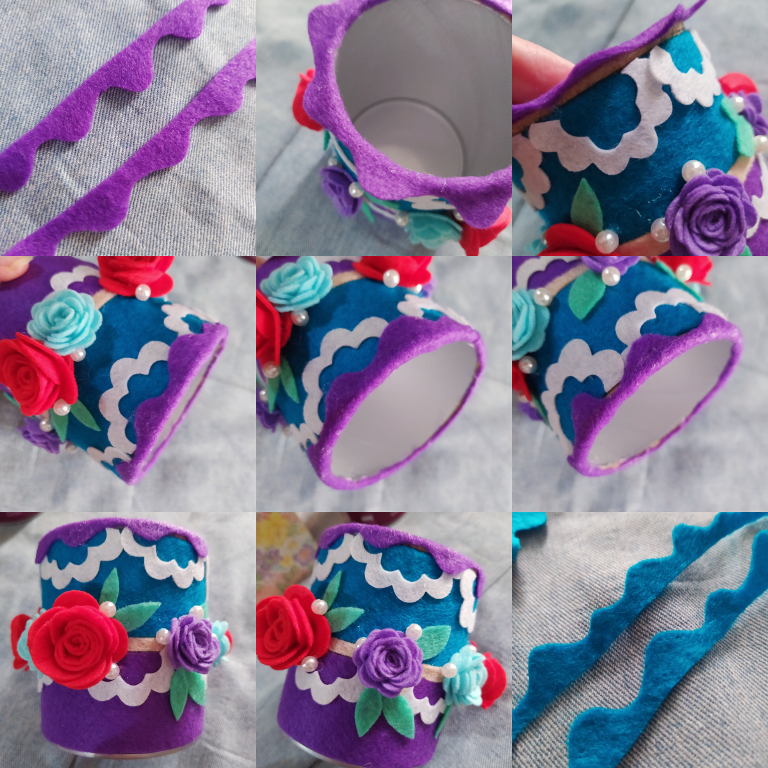
✧ Cuando estes seguro que las perlas estan completamente fijas, vas a elaborar una pieza alargada de fieltro que simule un topping cayendo a gotas, pero que las gotas no sean demasiado pronunciadas.
✧ Agrega silicón frio a todo el borde del envase, espera 1 minuto, y luego instala esta pieza de fieltro con mucho cuidado haciendo presión con la yema de los dedos.
✧ Agrega más pegamento al interior de cada "gota o curva" y presiona contra el cuerpo del envase hasta que esté completamente pegado. Repite este paso con un color de fieltro opuesto en la parte inferior.
✩ When you are sure that the pearls are completely fixed, you are going to make an elongated piece of felt that simulates a topping falling in drops, but the drops should not be too pronounced.
✩ Add cold silicone to the entire edge of the container, wait 1 minute, and then install this piece of felt very carefully by applying pressure with your fingertips.
✩ Add more glue to the inside of each "drop or curve" and press it against the body of the container until it is completely glued. Repeat this step with an opposite color of felt on the bottom.
✧ Por ultimo, hagamos unas decoraciones finales en forma de gota para el borde superior con una perla extra en cada uno.
✧ Para hacerlos solo debes cortar una pequeña tira de fieltro de 3 o 4 milímetros de ancho y 2 o 3 cm de largo, agregar un poco de pegamento en sus puntas y juntarlos uno contra otro en una sola dirección.
✧ Para refinar el acabado corta con la tijera el excedente de pegamento de "cada gota" o dale una "forma afilada" antes de pegarlo al envase. Y deja secar mínimo 60 minutos antes de utilizar tu lapicero.
✩ Finally, let's make a final drop-shaped decoration for the top edge with an extra pearl on each one.
✩ To make them just cut a small strip of felt 3 or 4 millimeters wide and 2 or 3 cm long, add a little glue at their ends and join them one against the other in one direction.
✩ To refine the finish cut with scissors the excess glue from "each drop" or give it a "sharp shape" before gluing it to the container. And let dry at least 60 minutes before using your pencil.
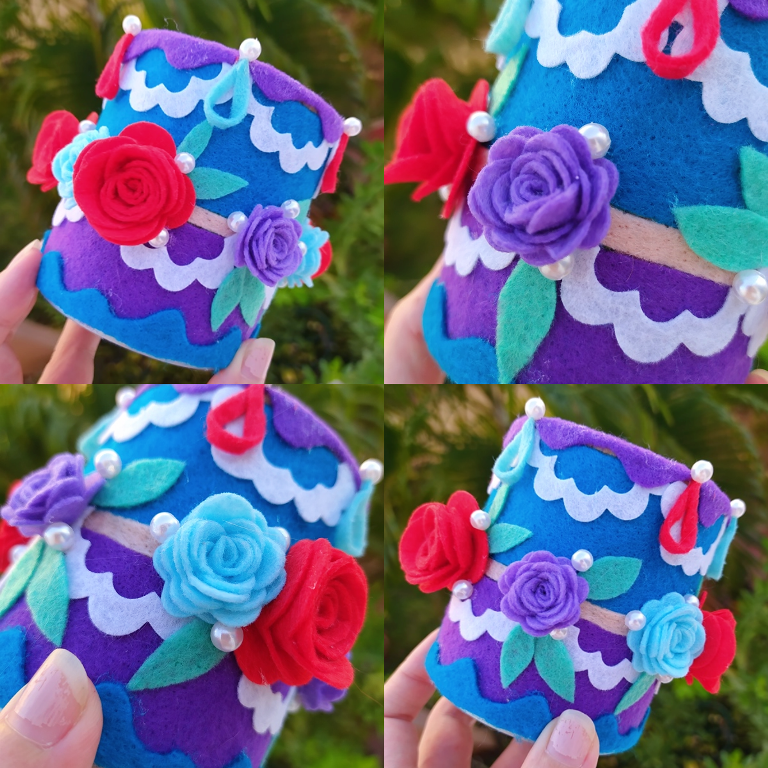
✦ PROJECT SUCCESSFULLY COMPLETED ✦
"Sweet Inspiration: "Pen Holder with a Cake Design"

El fieltro es uno de los materiales que menos utilizo en mis jornadas crafteriles, actualmente cuento con una cantidad más o menos decente en mi stock de materiales porque lo utilizo como base para los bordados pesados que llevan incrustaciones como joyas sintéticas o de cristal.
Felt is one of the materials that I use the least in my crafteriles days, currently I have a more or less decent amount in my stock of materials because I use it as a base for heavy embroideries that carry inlays such as synthetic or crystal jewelry.

Sin embargo, hoy mi cariño por este material se ha renovado porque he descubierto un nuevo uso con resultados sobresalientes, éste proyecto a tomado muy poco tiempo y la verdad, no tengo quejas al respecto porque el material reacciono muy bien al pegamento en cada una de las etapas.
However, today my love for this material has been renewed because I have discovered a new use with outstanding results, this project has taken very little time and the truth is, I have no complaints about it because the material reacted very well to the glue in each of the stages.

Otra cosa que me ha llamado la atención es que el resultado es muy resistente, si este lapicero se cae o golpea accidentalmente, todas las decoraciones se mantienen en su lugar como si nada hubiera pasado. ¡Estoy encantada! ('. • ω •.`) 🥂
En conclusión y resumiendo: Ésta es una propuesta diferente y más elaborada en decoración de un viejo clásico infaltable en la lista de todo fan del craft, como es la fabricación o reciclaje de envases como lapiceros.
Todos en algún momento hemos hecho lapiceros y vale la pena explorar todas sus configuraciones, especialmente si es para un propósito especial como decorar un lugar donde se le presta atencion médica a niños o personas con circunstancias sensibles 🫂 🏨 ❤️🩹
Another thing that caught my attention is that the result is very resistant, if this pen is accidentally dropped or knocked, all the decorations stay in place as if nothing happened. I'm thrilled! ('. • ω •.`) 🥂
In conclusion and in summary: This is a different and more elaborate proposal in decorating an old classic on the list of every craft fan, as is the manufacture or recycling of containers as pencils.
We have all made pencils at some point and it is worth exploring all its configurations, especially if it is for a special purpose such as decorating a place where medical care is provided to children or people with sensitive circumstances 🫂 🏨 ❤️🩹

 |  |  |  |  |  |  |  |  |
|---|
✨ 🍓 All texts and images by @Tesmoforia 🍓 ✨
📸 Tools: Smartphone 📲 Snow 🎬 Remini 🌓 FotoJet 📐
🚨 ¡Please do not take, edit or republish my material without my permission! 🚨
💌 ¿Do you wish to contact me? Discord #tesmoforia 💌
🌙 Banner, signature and separators by Keili Lares
Posted Using InLeo Alpha