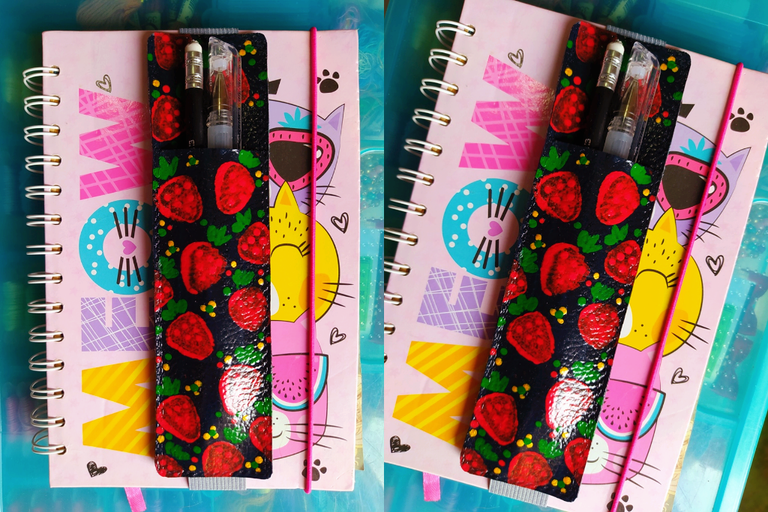
✦ Let's make pencil holders in 15 minutes with a special twist 🫶 🩷 - Collage & Edition in FotoJet, photos by @Tesmoforia ✦

🇪🇸 ~ ¿Es posible estampar cuero sintético con materiales económicos y no abrasivos?, claro que si:
Pero vamos a empezar con algo pequeño, porque los proyectos pequeños son controlables y si no sale bien la perdida de material no es tan dolorosa 😂
🇺🇸 ~ Is it possible to stamp synthetic leather with inexpensive, non-abrasive materials?, of course it is:
But let's start small, because small projects are controllable and if it doesn't go well the loss of material is not so painful 😂
 |  |
|---|
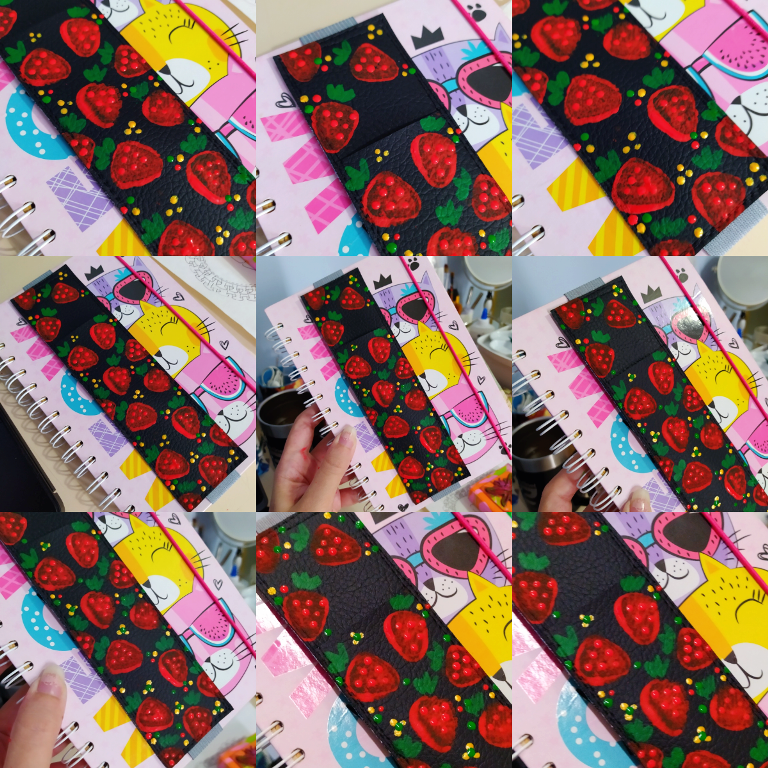
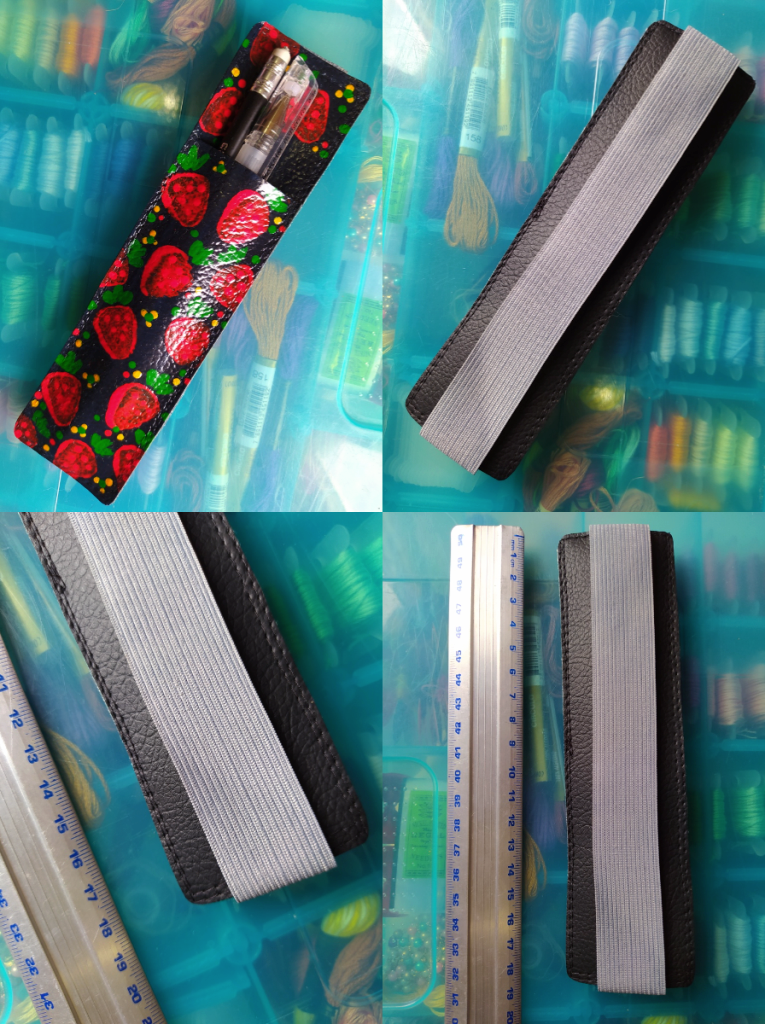
Este diseño de porta lápiz con elástico para agenda o cuadernos es un amor, tiene todo lo que te puede gustar si eres fan del material de papelería, journaling, dibujo o escritura.
Puedes personalizarlo para la cantidad de piezas que quieras y aquí te enseñare no solo cómo elaborar este portalápiz desde cero en un material económico y súper resistente, sino tambien te compartiré cómo personalizarlo y hacerlo durable en el tiempo.
This pencil holder design with elastic for planner or notebooks is a love, it has everything you could like if you are a fan of stationery, journaling, drawing or writing.
You can customize it for as many pieces as you want and here I will show you not only how to make this pencil holder from scratch in an economical and super resistant material, but I will also share with you how to customize it and make it durable over time.
✦ 💫 🍓 Step by Step Tutorial: "Strawberry Pencil Holder" 🍓 💫 ✦

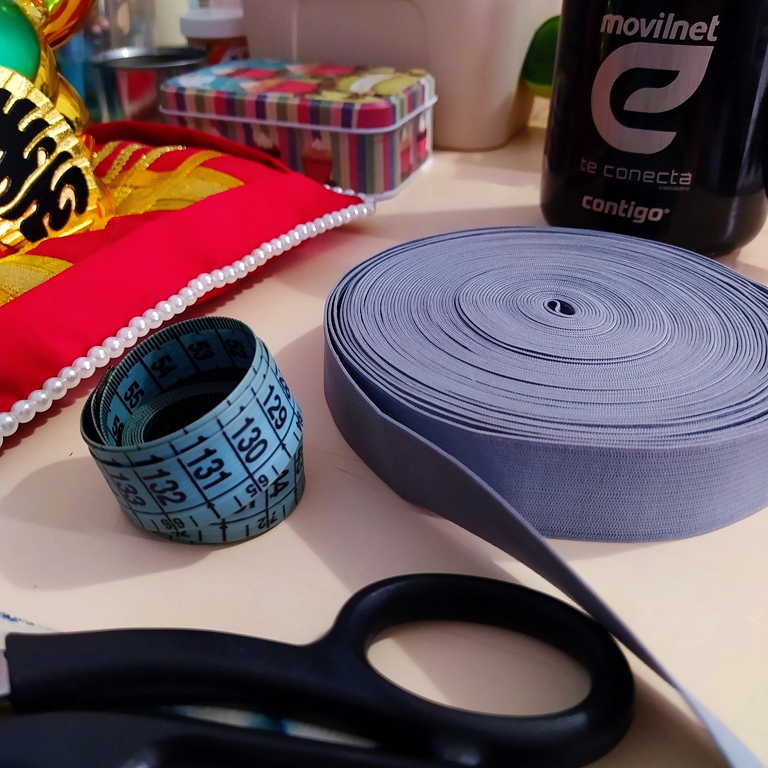
| 🇪🇸 ✦ Las herramientas y materiales que necesitas para elaborar este proyecto son: Lápiz, regla, cinta métrica, tijera, papel regular, cuero sintético, pinzas de costura, cinta elástica de 2 o 3 cm de ancho, hilo, maquina de coser o aguja regular, pintura acrílica, surpass, foami, pincel fino. |
|---|
| 🇺🇸 ✦ The tools and materials you need to make this project are: Pencil, ruler, tape measure, scissors, regular paper, synthetic leather, sewing pliers, 2 or 3 cm wide elastic tape, thread, sewing machine or regular needle, acrylic paint, surpass, foami, fine brush. |
Comenzando anotando las medidas de alto y ancho del cuaderno, libro o agenda al que este porta lápiz con elástico está destinado. En base a esas medidas, escoge el largo que quieras para tu porta lápiz, y el ancho no debe ser menor a 5 cm.
Start by writing down the height and width measurements of the notebook, book or diary for which this pencil holder with elastic is intended. Based on these measurements, choose the length you want for your pencil holder, and the width should not be less than 5 cm.
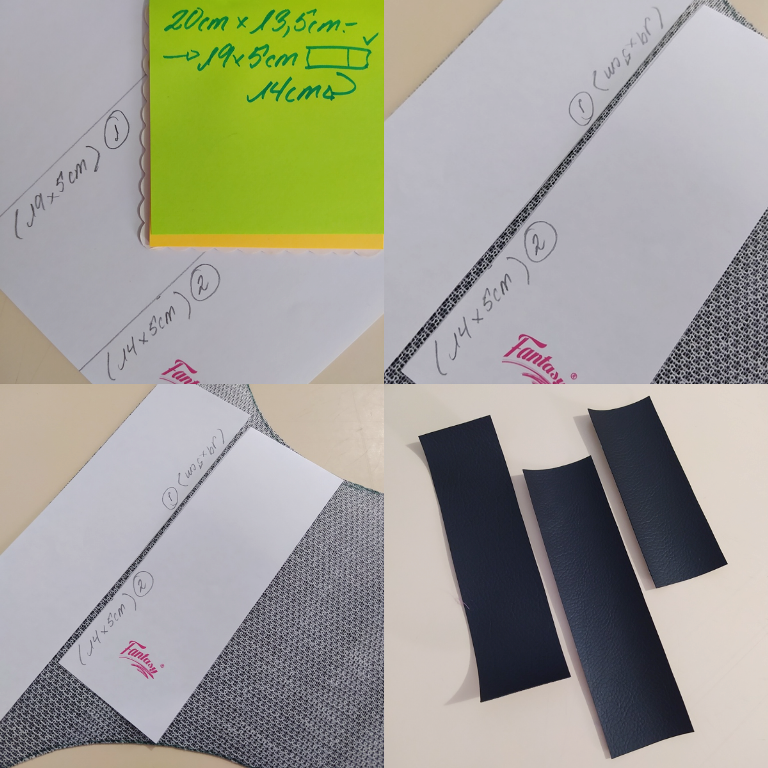
En base a las medidas que escogiste, dibuja un rectángulo en el papel, tambien un segundo rectángulo un poco más corto que será "el bolsillo" del porta lápiz; recorta tus patrones, pásalos al cuero sintético utilizándolos como plantillas para dibujar, y recorta 2 piezas del rectángulo más grande, y 1 del más pequeño.
Based on the measurements you chose, draw a rectangle on the paper, also a second rectangle a little shorter that will be “the pocket” of the pencil holder; cut out your patterns, transfer them to the synthetic leather using them as templates to draw, and cut out 2 pieces from the larger rectangle, and 1 from the smaller one.
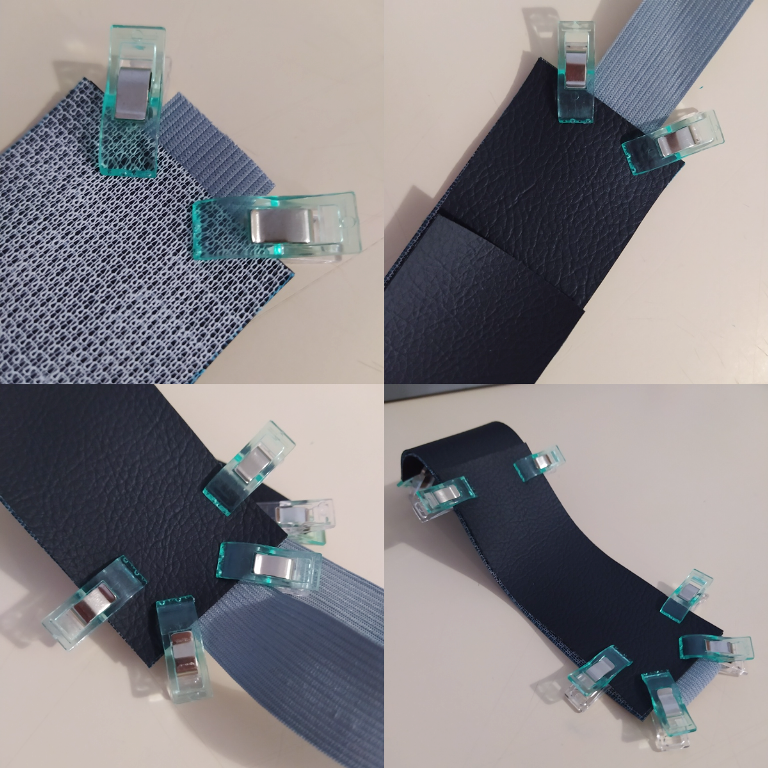
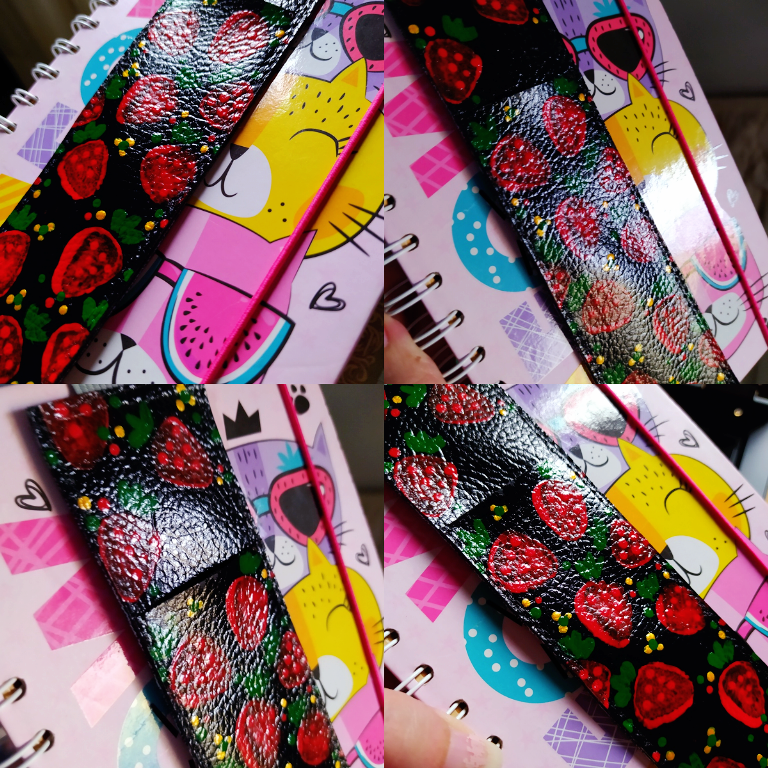
Para la siguiente etapa tienes dos opciones, la primera es coser la cinta elástica entre ambas caras frontales del cuerpo del porta lápiz y luego voltear la pieza (foto número 1); la segunda opción es sujetar en su lugar con ayuda de las pinzas de costura, todas las piezas del porta lápiz tal cual se vería como si estuviera terminado (foto número 3, 4 y 4). El largo del recorte de la cinta elástica es el alto de la agenda + 2 cm.
For the next step you have two options, the first is to sew the elastic band between both front sides of the pencil holder body and then flip the piece over (photo number 1); the second option is to hold in place with the help of the sewing clamps, all the pieces of the pencil holder as it would look as if it were finished (photo number 3, 4 and 4). The length of the elastic band trimming is the height of the agenda + 2 cm.
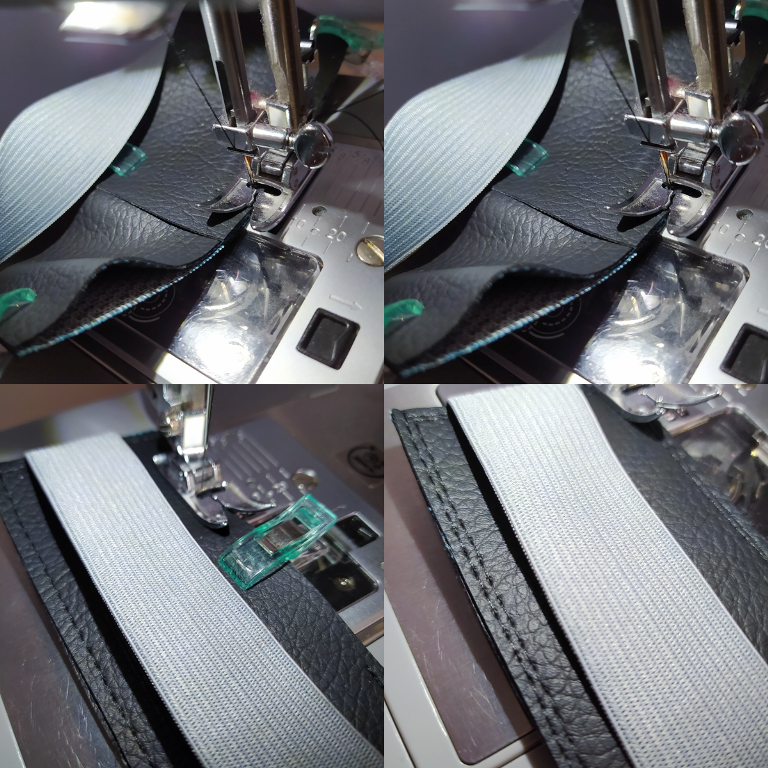
Coser a mano es una opción, pero por razones estéticas recomiendo la máquina de coser. En esta etapa hay que hacer 2 costuras en línea recta con puntada número 3 por todo el borde de las piezas sujetas con las pinzas de costura. Has este paso con lentitud y cuidado, y retira las pinzas a medida que avanzas.
Sewing by hand is an option, but for aesthetic reasons I recommend the sewing machine. At this stage you have to make 2 seams in a straight line with stitch number 3 all along the edge of the pieces held in place with the sewing clamps. Do this step slowly and carefully, and remove the clamps as you go along.
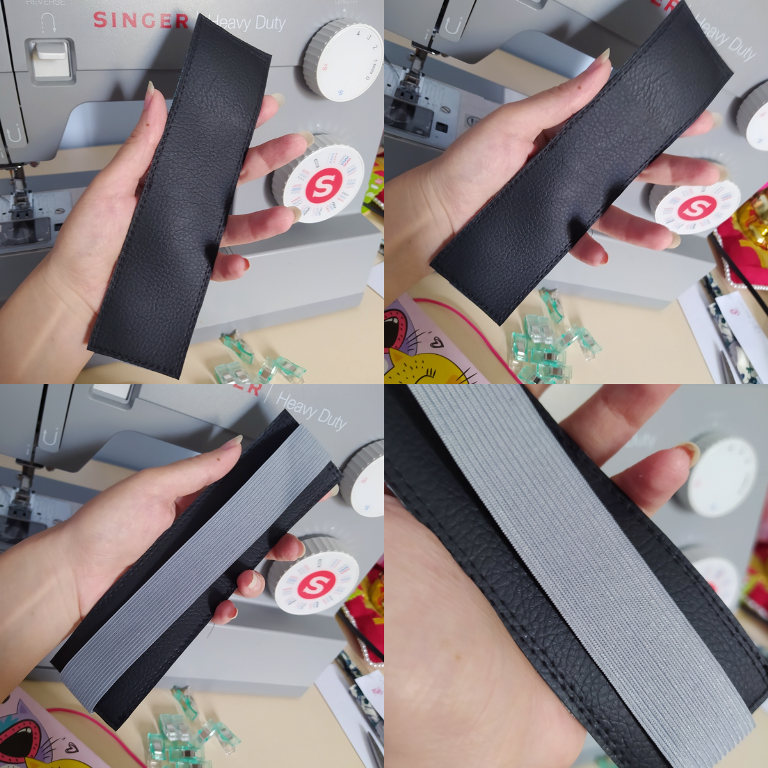
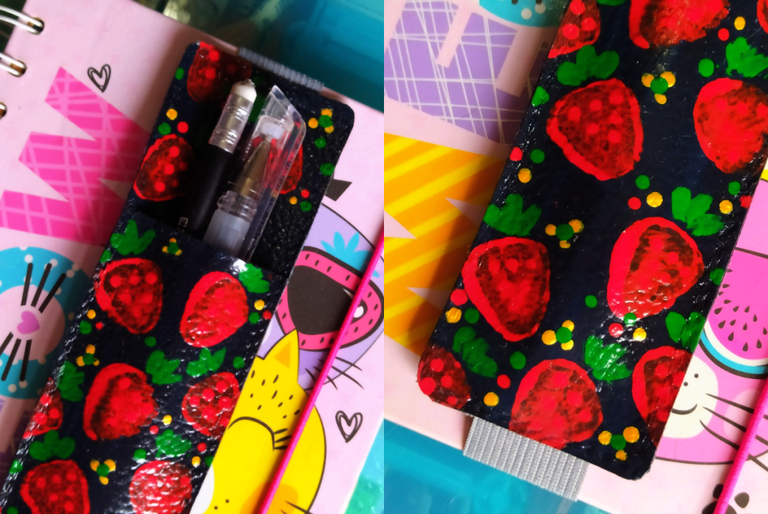
¡Felicitaciones!, en esta etapa tu porta lápiz con elástica está completamente listo; vamos a hacer una prueba a continuación para saber si ha salido bien.
Congratulations!, at this stage your pencil holder with elastic is completely ready; let's do a test next to see if it has turned out well.
Sabrás si el porta lápiz ha quedado bien si al colocarlo en la tapa de tu agenda se mantiene estable y no se mueve de su sitio, con la cinta elástica estirada moderadamente, no demasiado.
You will know if the pencil holder has fit properly if when you place it on the cover of your diary it remains stable and does not move from its place, with the elastic band stretched moderately, not too much.
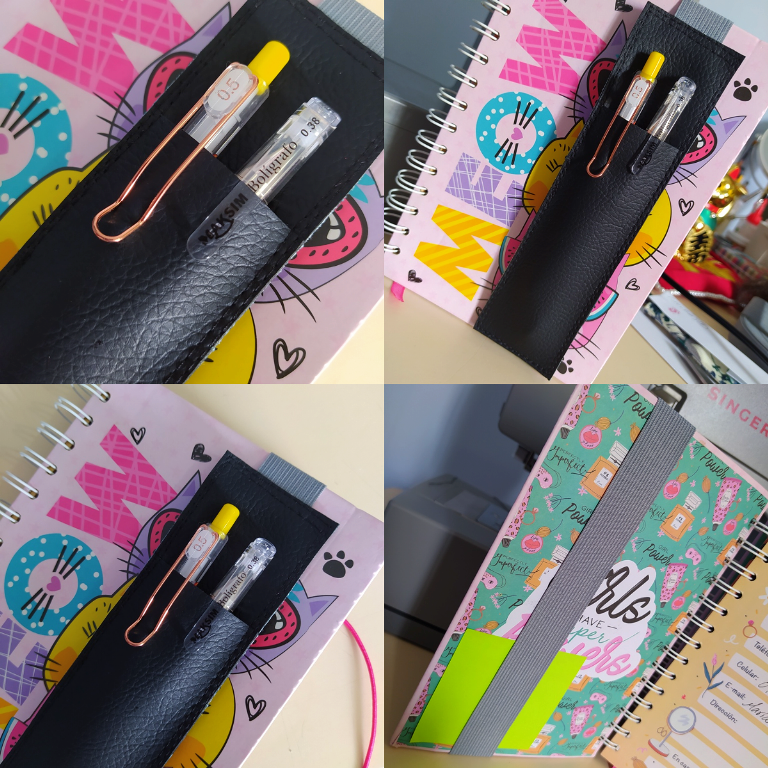
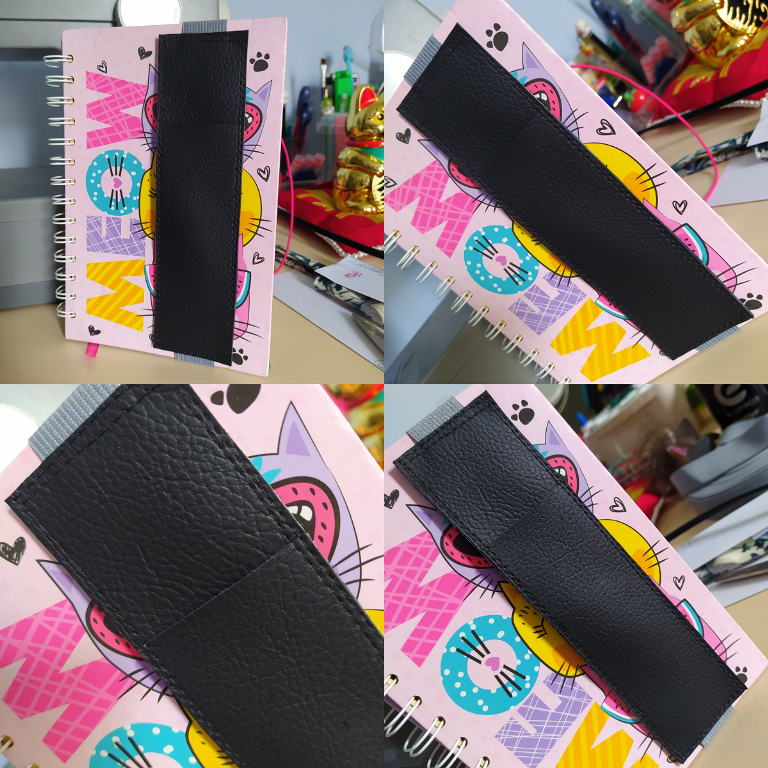
Las medidas utilizadas y sugeridas en este tutorial son para almacenar 2 bolígrafos o lápices de tamaño normal, incluso 3. Y así es como debería verse en uso tu porta lápiz con cinta elástica. Pero aquí prometimos compartir cómo estampar este material, asi que si quieres elevar este mini proyecto sigue leyendo 💖 ⬇
The measurements used and suggested in this tutorial are to store 2 normal sized pens or pencils, even 3. And this is how your elastic band pencil holder should look in use. But here we promised to share how to stamp this material, so if you want to elevate this mini project keep reading 💖 ⬇
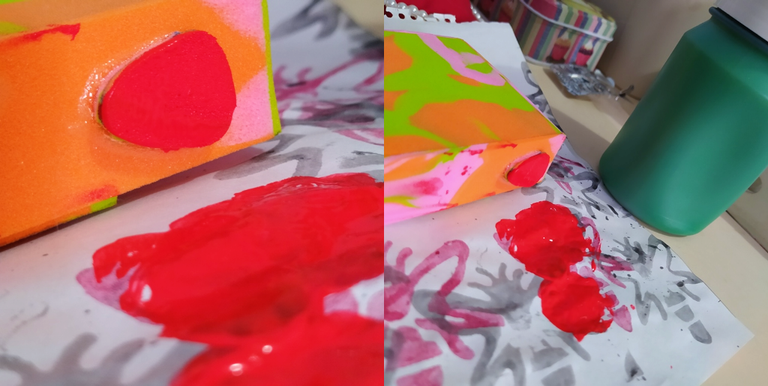
En un post anterior donde elaboramos una "Lámpara Shoji Japonesa" está el proceso completo de cómo elaborar un sello de foami y es justo ese sello el que utilicé para crear en uno de sus lados, un pequeño sello en forma de fresa sin hojas: Deposité un poco de pintura acrílica roja en un papel, aplique el sello, descargue un poco el exceso para hacer una prueba previa aparte.
In a previous post where we made a "Japanese Shoji Lamp" is the complete process of how to make a foami stamp and it is just that stamp that I used to create on one of its sides, a small stamp in the shape of a strawberry without leaves: I deposited some red acrylic paint on a piece of paper, applied the stamp, discharged a little excess to make a separate pre-test.
Ahora, carga el sello de fresa con pintura, descarga el exceso presionando primero en el papel, y a continuación presiónalo con cuidado sobre el porta lápiz de cuero sintético, repite la carga del sello por cada fresa.
Now, load the strawberry stamp with paint, discharge the excess by first pressing it onto the paper, then press it carefully onto the leatherette pencil holder, repeat loading the stamp for each strawberry.
Este paso puede ser en el patrón que tú quieras, con pocas o muchas fresas (a mí me gustan los estampados abundantes). Espera que seque totalmente, dejando reposar la pieza en una superficie limpia donde no haya corrientes de viento (para evitar que la pintura se llene de partículas de polvo).
This step can be in the pattern of your choice, with few or many strawberries (I like abundant prints). Wait for it to dry completely, leaving the piece to rest on a clean surface where there are no wind currents (to prevent the paint from getting full of dust particles).
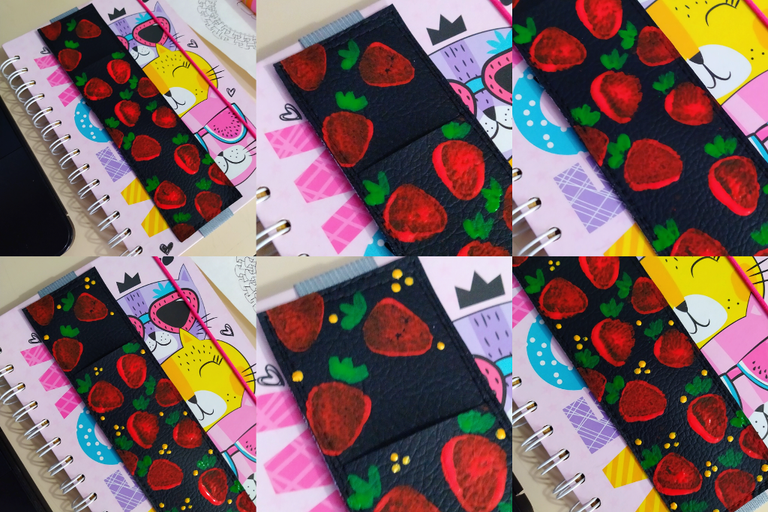
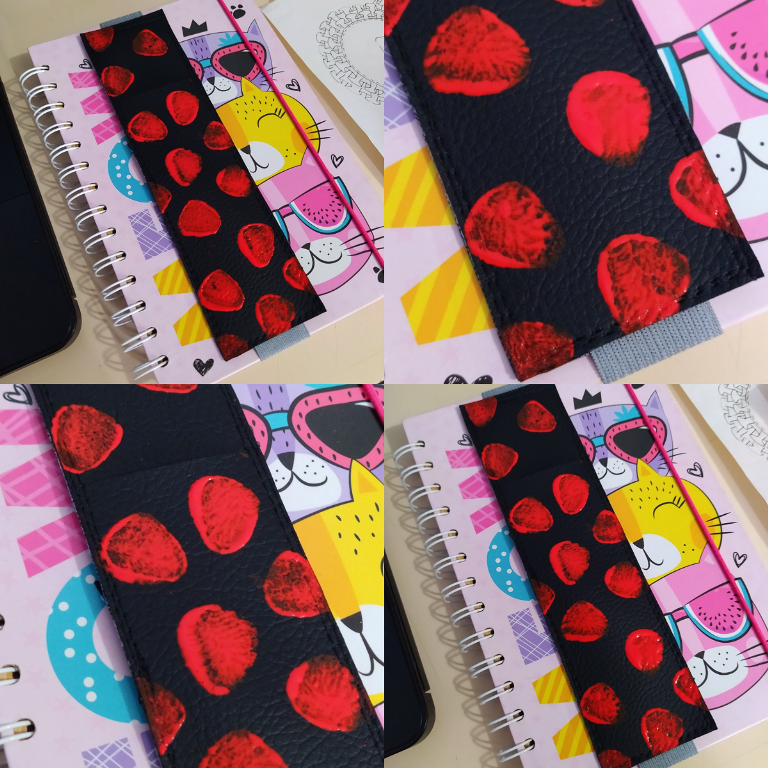
A continuación con el pincel y pintura acrílica verde, vamos a pintar las hojas de cada fresa. Yo agregué algunos puntos en pintura acrílica dorada con el reverso del pincel, para hacer contraste entre el fondo negro y el estampado rojo.
Next with the brush and green acrylic paint, we are going to paint the leaves of each strawberry. I added some dots in gold acrylic paint with the back of the brush, to make contrast between the black background and the red pattern.
El diseño y estilo del estampado puede ser completamente a tu gusto, yo quise emular un diseño retro de un tipo de papel adhesivo que se utilizaba mucho entre los años 80s y 90s. A partir de aqui hay que dejar reposando el porta lápiz mínimo 2 horas, para que toda la humedad de la pintura se evapore.
The design and style of the print can be completely to your liking, I wanted to emulate a retro design of a type of adhesive paper that was widely used in the 80s and 90s. From here on you have to leave reposition the pencil holder for at least 2 hours, so that all the humidity of the paint evaporates.
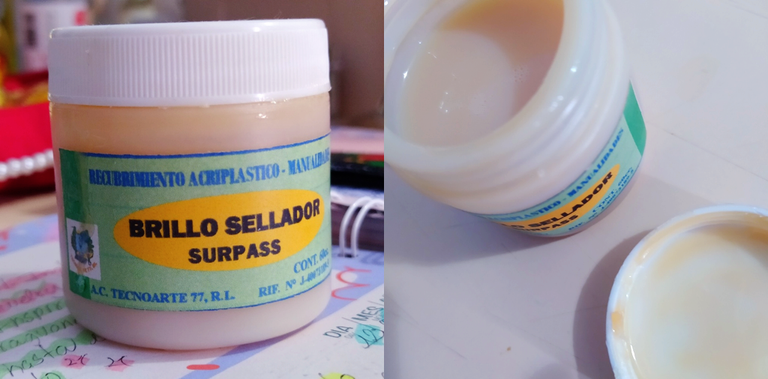
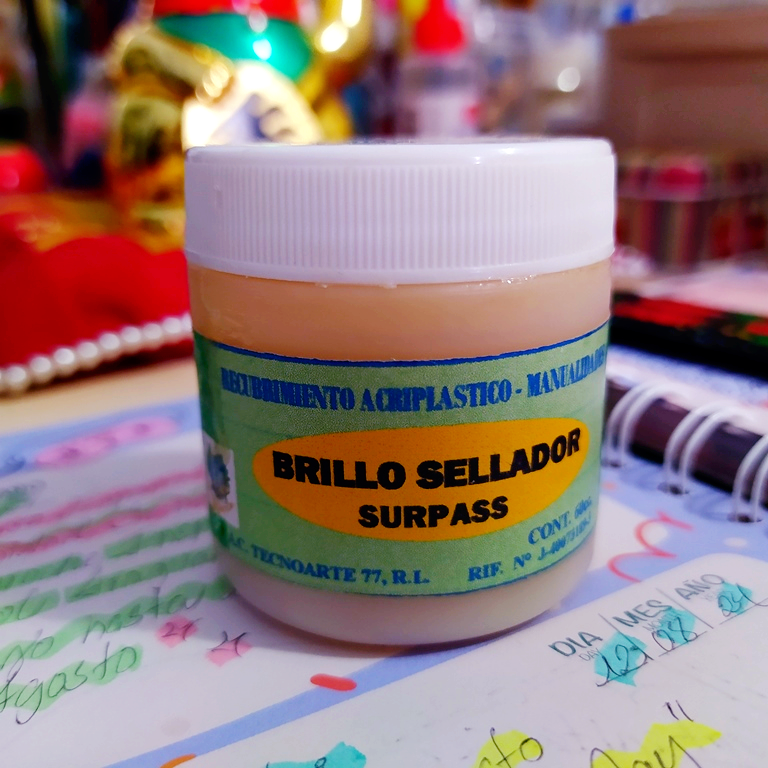
Para sellar y proteger el diseño que has pintado necesitaras surpass. Originalmente es un producto para pulir pisos pero lo consigues en pequeñas cantidades en tiendas de manualidades, especialmente en talleres de cajas y cofres decorativos o de decoupage.
To seal and protect the design you have painted you will need surpass. Originally it is a floor polish product but you can get it in small quantities in craft stores, especially in box shops and decorative chests or decoupage shops.
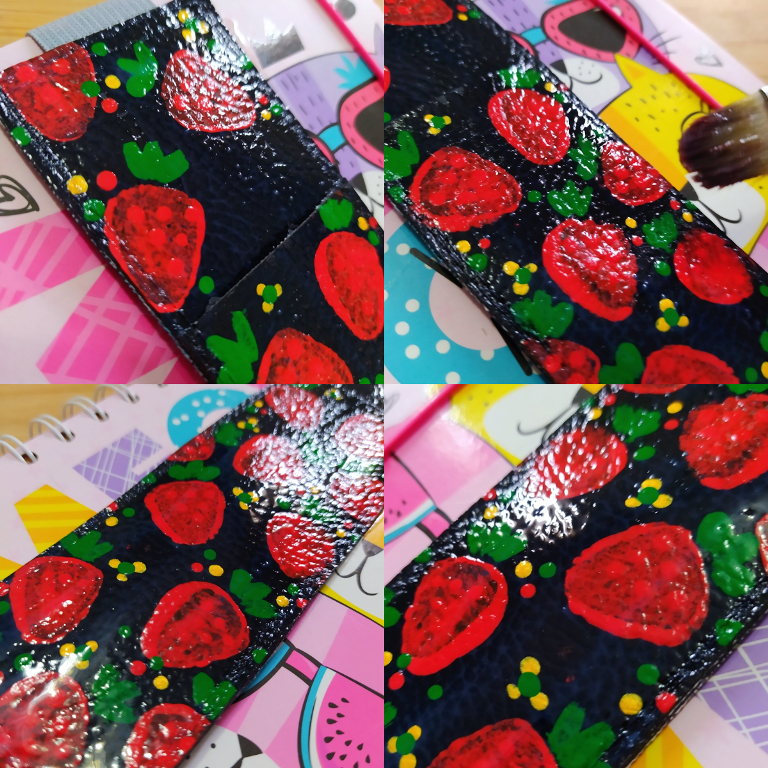
Este producto se aplica con pincel de paleta, de cerda larga y fina, y solo debe pasarse una vez (muy suavemente y como si fuera agua), es decir no se utiliza como la pintura, si pasas el pincel de arriba a abajo el producto se aglutina.
This product is applied with a paddle brush, with a long, fine bristle, and it should only be applied once (very gently and as if it were water), that is to say, it is not used like paint, if you pass the brush from top to bottom the product will agglutinate.
Debes aplicarlo rápidamente pero con gentileza, sin presionar demasiado el pincel, o arrastraras la pintura en el camino. Notaras que el producto comienza a secarse bastante rapido, corre a lavar el pincel con abundante agua y sin jabón.
You must apply it quickly but gently, without pressing too hard on the brush, or you will drag the paint along the way. You will notice that the product begins to dry quite quickly, run to wash the brush with plenty of water and without soap.
¡MIRA ESE BRILLO!, el surpass tarda aproximadamente de 10 a 15 minutos en secarse. Su efecto es asombroso, potencia los colores y al tacto es satinado, y no se cuartea si doblas la pieza de cuero sintético. Es una maravilla.
Look at that shine!, surpass takes approximately 10 to 15 minutes to dry. Its effect is amazing, it enhances the colors and is satin to the touch, and does not crack if you bend the synthetic leather piece. It is a marvel.
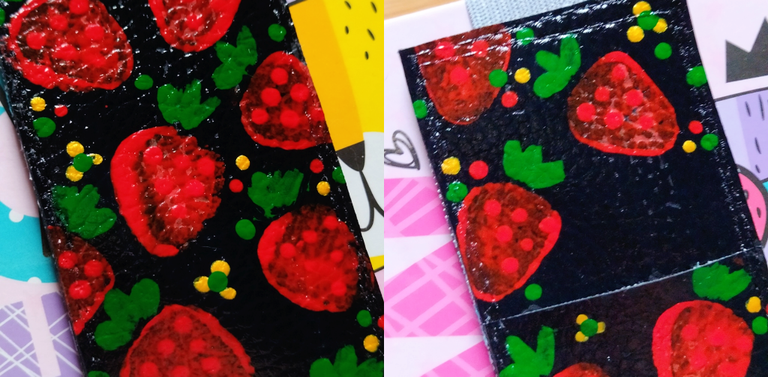
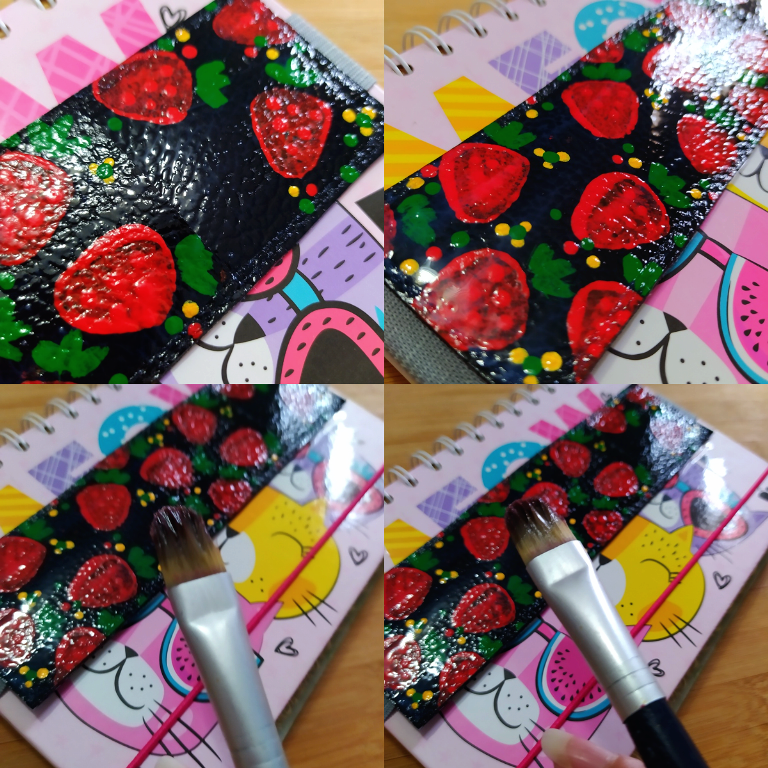
Y aunque con una capa es suficiente, si notas que hay espacios que el producto no alcanzo, y solo cuando la primera capa este 100% seca, puedes aplicar una segunda capa del producto (por ejemplo, en la imagen número 2 puedes ver pequeños puntos opacos, son espacios que no alcanzó a cubrir el surpass, es normal que suceda y no debes preocuparte si aparecen después de la aplicación de la primera capa de surpass).
And although one coat is enough, if you notice that there are spaces that the product did not reach, and only when the first coat is 100% dry, you can apply a second coat of the product (for example, in image number 2 you can see small opaque spots, these are spaces that the surpass did not reach, this is normal and you should not worry if they appear after the application of the first coat of surpass).
✦ ✨ 🍓 "Strawberry Pencil Holder" 🍓 ✨ ✦

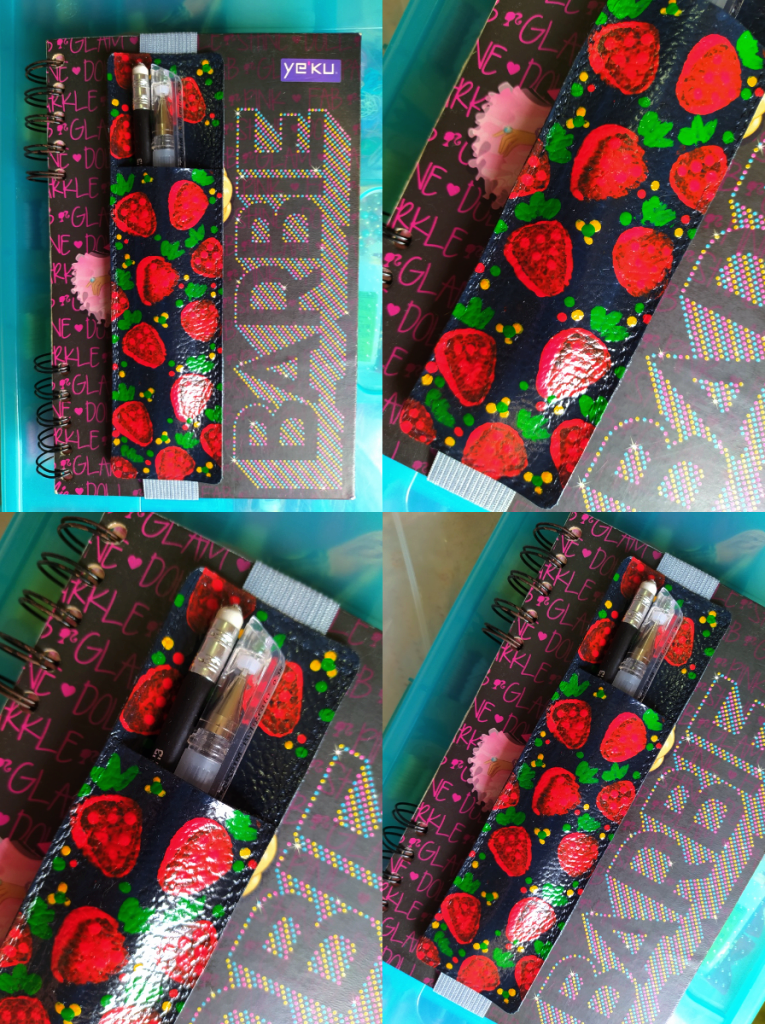
✦ Imagine the possibilities! Designs in different sizes and colors! I was very curious to make a pencil holder with these materials; and the Surpass is quite inexpensive, the bottle costs about 2 or 3$ and yields a lot, and the synthetic leather in my city, well, the meter costs less than 4$ ✦


Estoy enamorada de estos porta lápices y aunque primero quería hacer una prueba en tela, esta combinación de cuero sintético color oscuro con fresas rojas hace un alto contraste irresistible.
¿Alguna sugerencia final?, si: Experimenta distintos tipos de estampado o pinta frases, también puedes coser apliques al cuero sintético antes de coserlo. Experimenta con las medidas y con la cantidad de compartimientos ✅ ✨
Dime en los comentarios qué es lo que más te ha gustado de este recorrido y también puedes sugerirme qué manualidad te gustaría que hiciera próximamente; un abrazo a todos ! ! ╰ (▔∀▔) ╯ 💞
I am in love with these pencil holders and although I wanted to do a test on fabric first, this combination of dark colored faux leather with red strawberries makes an irresistible high contrast.
Any final suggestions?, yes: Experiment with different types of prints or paint phrases, you can also sew appliques to the faux leather before sewing. Experiment with measurements and with the number of compartments ✅ ✨
Tell me in the comments what you liked the most from this tour and also you can suggest me what craft you would like me to do next; hugs to all ! ! ╰ (▔∀▔) ╯ 💞

 |  |  |  |  |  |  |  |  |
|---|
✨ 🍓 All texts and images by @Tesmoforia 🍓 ✨
📸 Tools: Smartphone 📲 Snow 🎬 Remini 🌓 FotoJet 📐
🚨 ¡Please do not take, edit or republish my material without my permission! 🚨
💌 ¿Do you wish to contact me? Discord #tesmoforia 💌
🌙 Banner, signature and separators by Keili Lares
Posted Using InLeo Alpha


