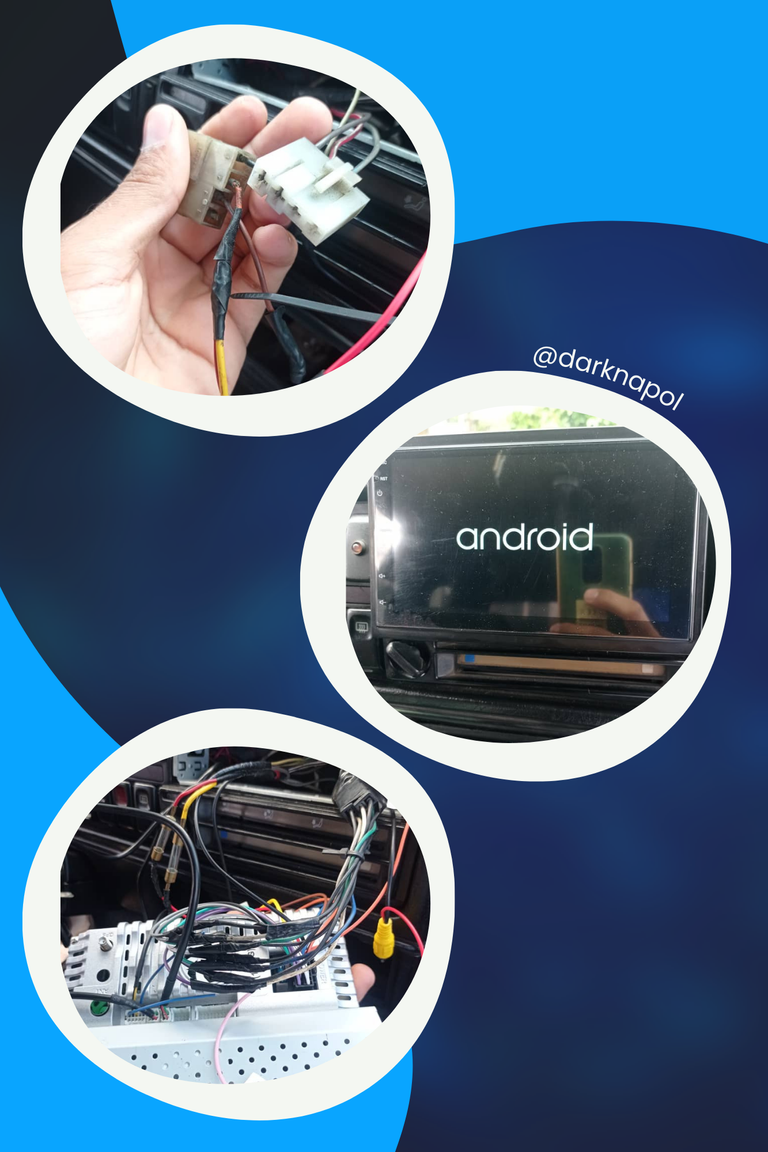
ENGLISH
Hello friends, greetings to all, I hope you are well today. I want to tell you about my experience during the solution of a failure in the stereo player of my father-in-law's car. It is a VW Golf Mk2 that little by little some improvements have been made to it.

He recently had an Android Stereo installed with a few features that in addition to Bluetooth, built-in GPS, 1080p touch screen, camera and more, it also has a 4x45W output power which says the full system power is 180W.
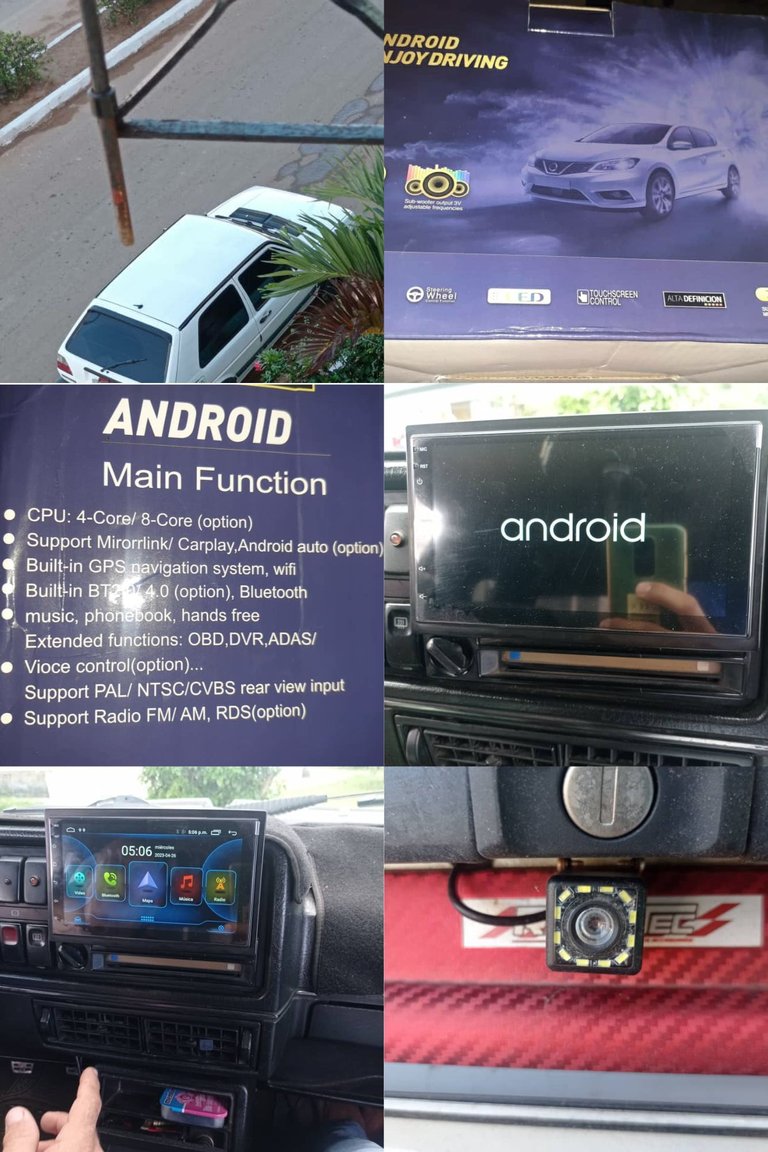

The stereo amplifier started to present problems and the symptom was that the audio output was intermittent when the volume was increased and more power was demanded, however when the volume was kept below a certain value everything worked perfectly.

When analyzing this symptom, I already had a suspicion of what could be happening but the first thing I did was to measure the battery and make sure that it had the 12volt, the measurement yielded a correct result and as the battery is new, I ruled out that the cause was caused by the same.

After ruling out the battery, I gave credence to my suspicions that the amplifier was not receiving the power needed to give a more powerful audio output, that power was being lost somewhere between the battery and the stereo, and the cause could be due to bad connections, sulfated plugs, loose splices, or cables in poor condition.

First I checked the closest connections to the stereo and luckily there I confirmed my suspicions when I saw deficient and unnecessary splices between the cable coming from the positive of the battery and the stereo power supply, besides finding a connection plug in bad condition with loose and dirty pins, this plug connected the power supply of the stereo previous to the one I am talking about in this writing.

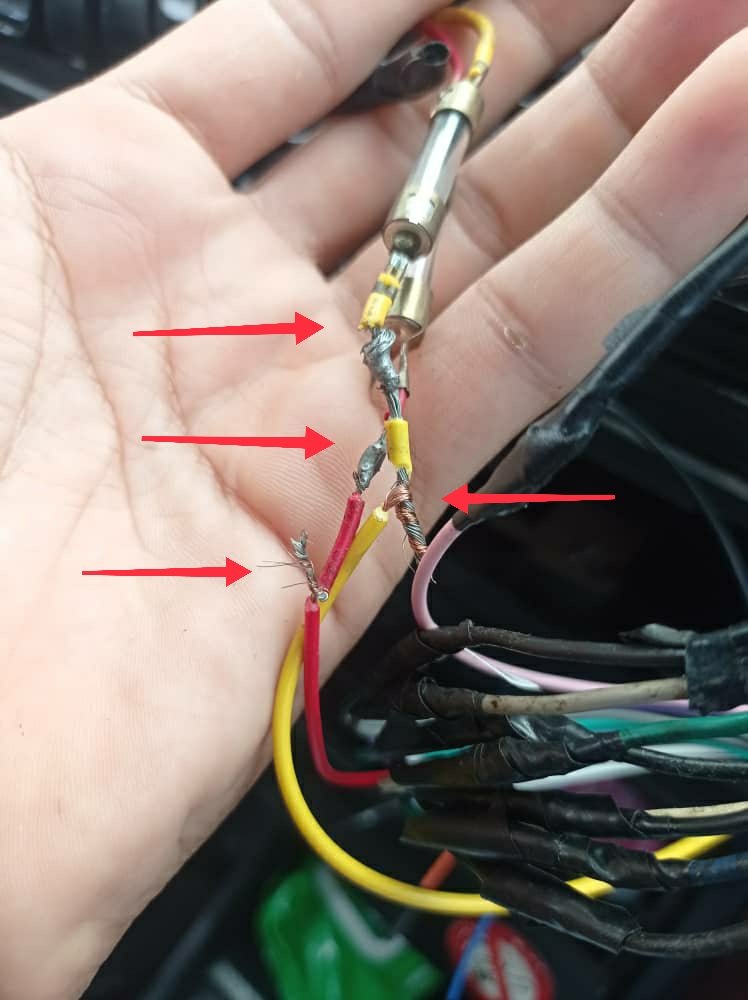
Loose and unnecessary splices
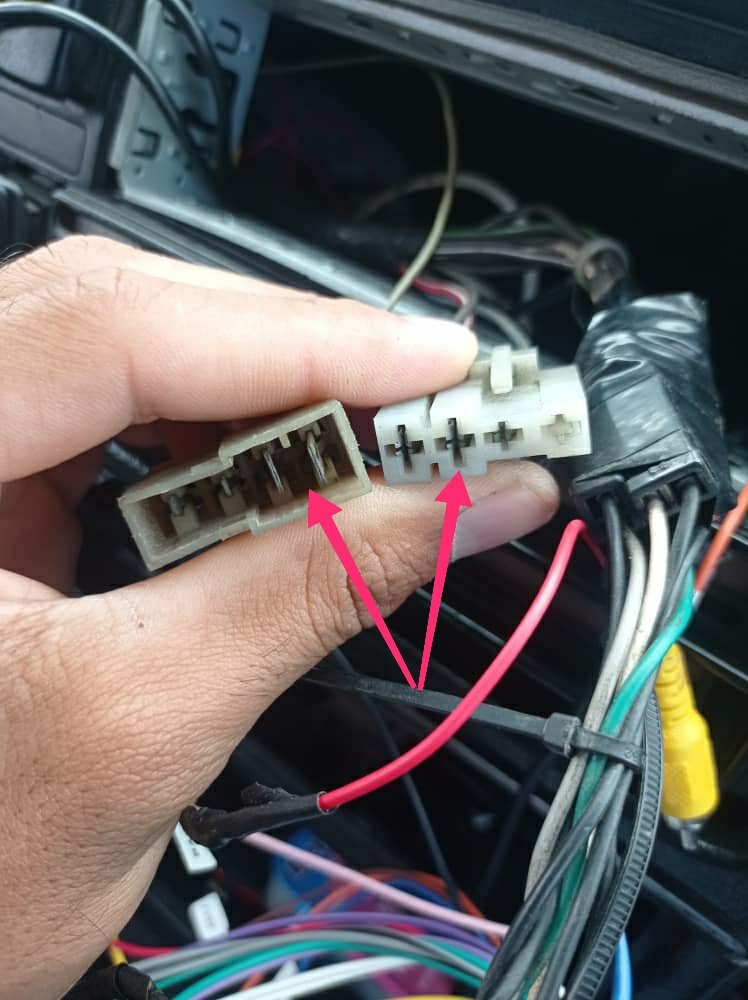
Plug that connects the stereo power supply with loose and dirty pins.
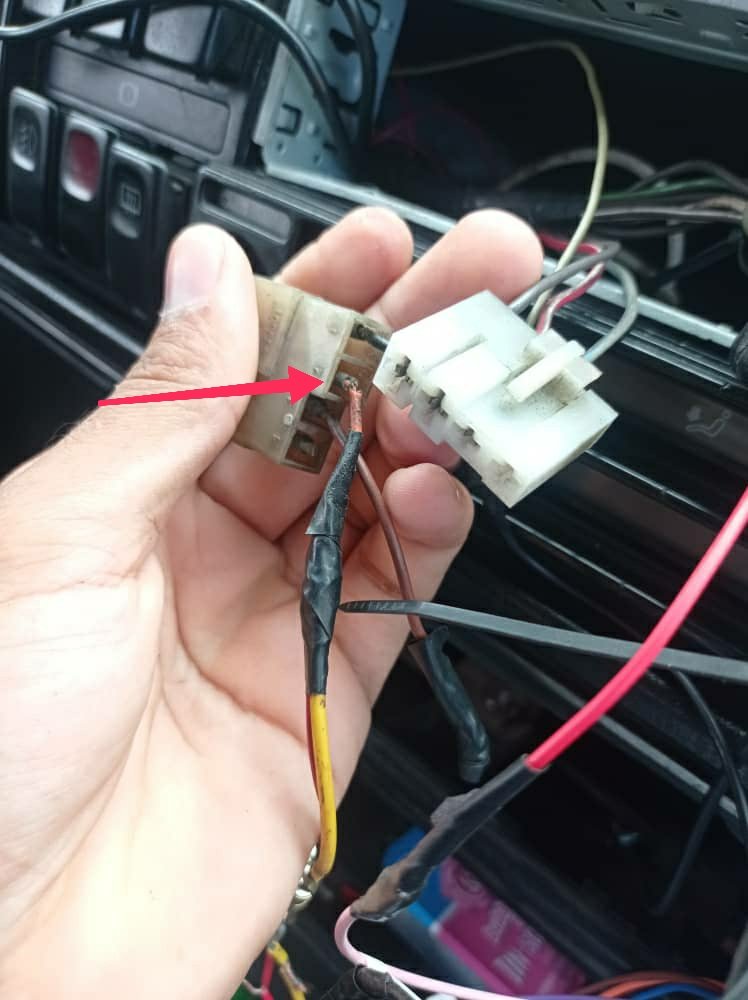
Positive plug wire almost broken

When I realized the state of these connections I knew that therein lay the cause of the problem, however I always like to do every last test, so with the multimeter in direct voltage scale, I made a measurement of the 12 volts in the main card of the stereo and with this connected and amplifying the audio. The results were that with a low volume where little amperage was demanded the 12 volts remained stable and the stereo worked correctly but when the volume was raised and demanded more amperage to increase the power of the audio the voltage oscillated between 12 volts and 5 volts depending on the amplified audio, that in the moments where more amplification was demanded those 5 volts were not enough to make the stereo work, causing intermittency in the output of the amplifier of the stereo.

Already with this test I was satisfied and I set out to improve the connections and to eliminate the bad plug because it was not necessary since the stereo has its own connection plug. The solution was to reduce the splices, to improve them and when eliminating the defective plug to connect the main plug of the stereo directly to the cables that come from the battery through the fuses as I show them in the following images.

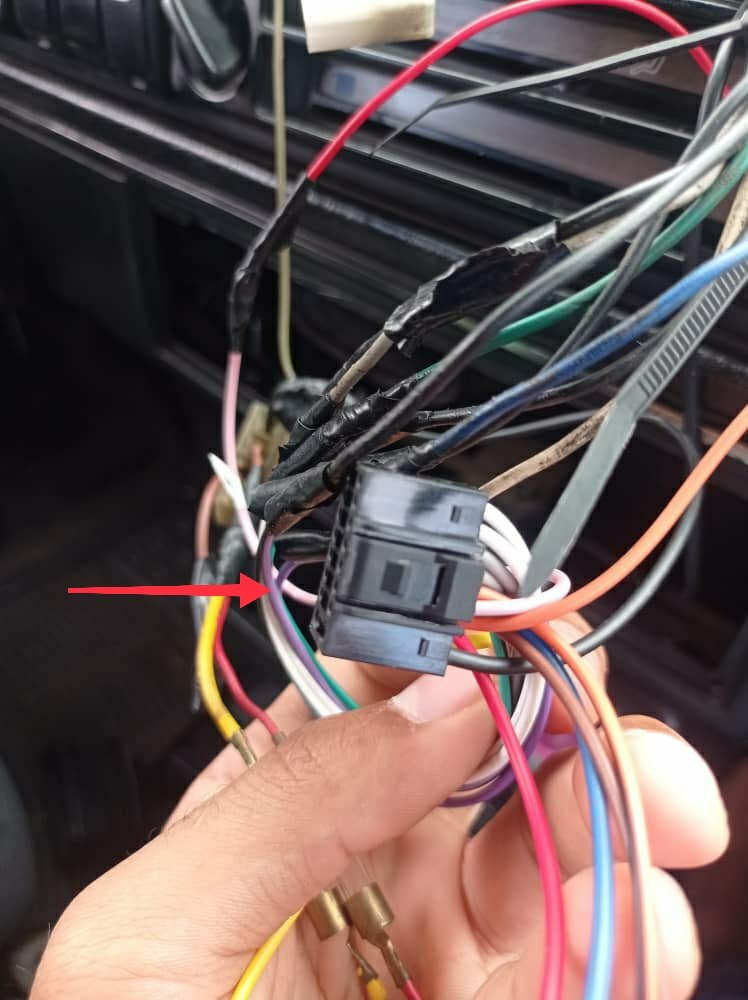
Main stereo card.
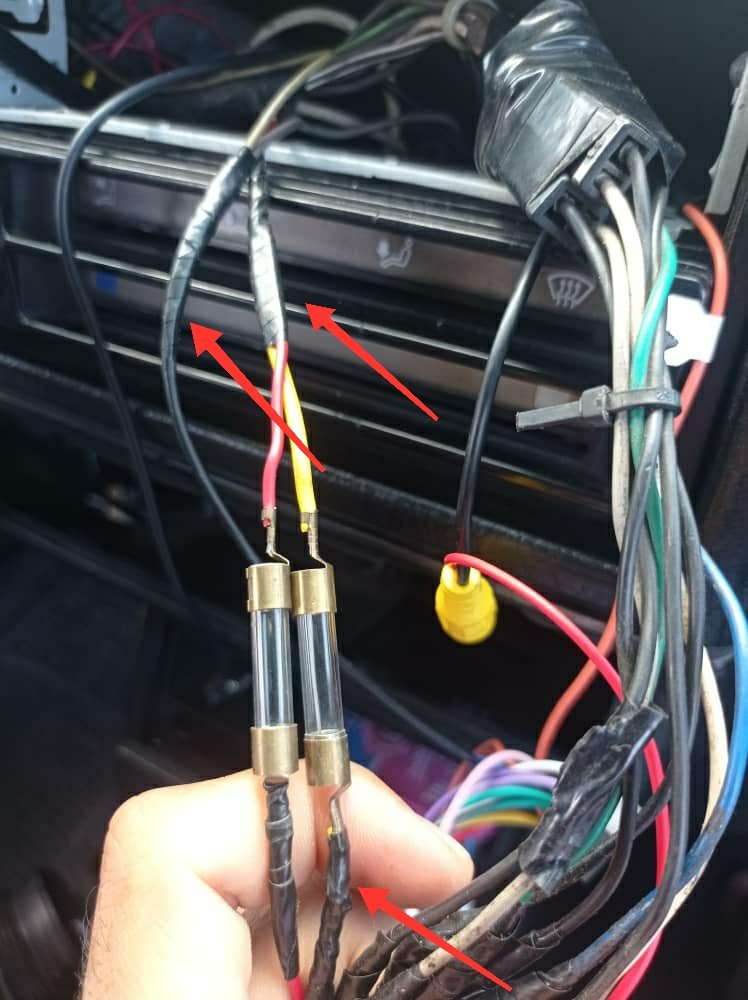
Connection with improved splices, and connected directly to one of the wires coming from the positive of the battery, eliminating the faulty chip, the red and yellow wires are positive going to the stereo chip, and the black wire is the negative or GND going to the stereo.

After making the improvements I just mentioned, and protecting the fuses in their plastic encapsulation, I test the stereo again and give it maximum volume, the result was excellent sound quality with good power and working properly without intermittency.

Stereo test after correcting the fault

WHY DOES THIS FAILURE OCCUR WHEN THERE ARE LOOSE SPLICES OR SULFATED PLUGS?

When there are loose or sulfated connections the resistance at that connection point increases and the power coming from the battery becomes weaker when there is a demand for more amperage from the stereo amplifier.

The voltage drop in the cables and their connections is given by the internal resistance of the cable, the resistance in the joints and by the intensity of the current that circulates through them, and the greater the resistance or the intensity of the current that circulates, the greater the voltage drop. The stereo I am talking about according to the manufacturer has 45 watts of power for each channel, this power is generally not the RMS which is the power that an amplifier can deliver continuously, but it is the maximum power that the amplifier can develop in short periods of time, or as it is known, PMPO power, and it is always higher than the RMS, so manufacturers use this number which is higher, as it is more attractive to sell their products. In any case, the stereo could develop a significant current consumption if this maximum peak power or values close to it were to be reached. Now, adding the four channels of the stereo would be a total power of 180 watts, knowing this power and the value of the voltage in this case is 12 volt, you can calculate the intensity of the current consumed, using one of the formulas for calculating the power:

P=UxI
Where: P is the output power of the amplifier.
U is the battery voltage
I is the current intensity.

As the value of the power and voltage is known, the intensity of the current is cleared, leaving that:
I= P/U
I= 180W/12V
I=15A

This means that the stereo can consume a current of up to 15 amps which is significant when there is a resistance in the connections or splices due to sulfation or loose joints, since significant current values caused a considerable voltage drop in that defective joint (drops of up to 7 volts according to the measurements I made with the multimeter, because at the input of the amplifier there were 5 volts sometimes), sometimes preventing the necessary voltage to reach the amplifier for proper operation. As long as the volume was not too high the current consumption was not significant so the voltage drop was not significant either, and this is what allowed it to work correctly with a low volume even with a poor connection.

As you can see, deficient or sulfated connections are the cause of many evils among which could be ignition problems, consumers that work poorly due to not having the proper voltage, for example a bulb with a dimmer light, they can also lead to heating of the cables or joints, which could gradually degrade the insulation and consequently present greater evils, hence the importance of making tight splices, cleaning the connection cards if necessary, and if possible, apply lubricants in the joints with the greatest possibility of corrosion, etc.

Well friends this was my experience in the repair, it was simple, but this same thing could happen with other consumers in the car and find the defective point can be more difficult and frustrating at times, so I share with you this writing, I hope it will be helpful, even knowing that in this community there are more experienced in the subject, so I am willing to accept any suggestions or corrections in what I have said.

Greetings to you who read me, and until the next post😉.

*The images are of my authorship and were taken with a Xiaomi Redmi Note 9 cell phone.
Images edited in the "Gallery" application of the phone and the Canva application.
Text translated to English in Deepl translator
The separators used were created by the user @tripode for the Hive-Motors community.

You can see me at Facebook


ESPAÑOL
Hola amigos, saludos a todos, espero se encuentren bien en el día de hoy. Les quiero comentar mi experiencia durante la solución de una falla en el reproductor estéreo del auto de mi suegro. Es un VW Golf Mk2 que poco a poco se le han hecho algunas mejoras.

Recientemente le instalaron un Estéreo Android con unas cuantas características que además de Bluetooth, GPS incorporado, pantalla táctil de 1080p, cámara y otras más, también tiene una potencia de salida de 4x45W lo que dice que la potencia del sistema completo es de 180W.


El amplificador del estéreo empezó a presentar problemas y el síntoma consistía en que la salida de audio era intermitente cuando se le aumentaba el volumen y se le exigía más potencia, sin embargo cuando el volumen se mantenía por debajo de cierto valor todo funcionaba perfectamente.

Al analizar este síntoma, ya tenía una sospecha de lo que pudiese estar ocurriendo pero de igual manera lo primero que hice fue medir la batería y cerciorarme de que tuviese los 12volt, arrojando la medición un resultado correcto y como la batería es nueva, descarté que la causa fuera provocada por la misma.

Luego de descartar la batería, di crédito a mis sospechas las que me decían que el amplificador no estaba recibiendo la energía necesaria para dar una salida de audio con mayor potencia, esa energía se estaba perdiendo en algún punto entre la batería y el estéreo, y la causa podría deberse a malas conexiones , fichas sulfatadas, empalmes flojos, o cables en malas condiciones.

Primeramente revisé las conexiones mas cercanas al estéreo y por suerte ahí confirmé mis sospechas al ver empalmes deficientes e innecesarios entre el cable que viene del positivo de la batería y la toma de alimentación del estéreo, además de encontrar una ficha de conexión en mal estado con sus pines flojos y sucios, esta ficha conectaba la alimentación del estéreo anterior al que les comento en este escrito.


Empalmes flojos e innecesarios

Ficha que conecta la alimentación del estéreo con los pines flojos y sucios

Cable positivo de la ficha casi partido

Al darme cuenta del estado de éstas conexiones supe que ahí radicaba la causa del problema, sin embargo siempre me gusta hacer hasta la última prueba, por lo que con el multímetro en escala de tensión de directa, hice una medición de los 12 volt en la ficha principal del estéreo y con este conectado y amplificando el audio. Los resultados fueron que con un volumen bajo donde se exigía poco amperaje los 12 volt se mantenían estables y el estéreo funcionaba correctamente pero al elevar el volumen y exigir más amperaje para aumentar la potencia del audio la tensión oscilaba entre los 12 volt y los 5 volt en función del audio amplificado, que en los momentos donde se exigía mayor amplificación esos 5 volt no eran suficientes para hacer funcionar el estéreo, provocando intermitencia en la salida del amplificador del mismo.

Ya con esta prueba quedé satisfecho y me dispuse a mejorar las conexiones y eliminar la ficha en mal estado pues no era necesaria ya que el estéreo tiene su propia ficha de conexión. La solución fue disminuir los empalmes , mejorarlos y al eliminar la ficha defectuosa conectar la ficha principal del estéreo directamente a los cables que vienen de la batería a través de los fusibles como se los muestro en las siguientes imágenes.


Ficha principal del estéreo.

Conexión con empalmes mejorados, y conectados directamente a uno de los cables que viene desde el positivo de la batería, eliminando la ficha defectuosa, los cables rojo y amarillo son positivos que van a la ficha del estéreo, y el cable negro es el negativo o GND que va al estéreo.

Después de hacer las mejoras que acabo de comentar, y proteger los fusibles en su encapsulado de plástico, pruebo el estéreo nuevamente y le doy volumen al máximo, el resultado fue una excelente calidad de sonido con buena potencia y funcionando correctamente sin intermitencias.

Prueba del estéreo después de corregir la falla

¿POR QUÉ SE DA ESTA FALLA CUANDO HAY EMPALMES FLOJOS O FICHAS SULFATADAS?

Cuando existen conexiones flojas o sulfatadas aumenta la resistencia en ese punto de conexión y la energía que proviene desde la batería se debilita cuando hay una exigencia de más amperaje por parte del amplificador del estéreo.

La caída de tensión en los cables y sus conexiones está dada por la resistencia interna del cable, la resistencia en las uniones y por la intensidad de la corriente que circula por ellos , y es mayor dicha caída mientras mayor sea la resistencia o la intensidad de la corriente que circula. El estéreo del que les hablo según el fabricante tiene 45 watt de potencia por cada canal, esta potencia generalmente no es la RMS que es la potencia que pude entregar un amplificador en forma continua, sino que es la potencia máxima que pude desarrollar el amplificador en breves periodos de tiempo, o como se le conoce, potencia PMPO, y siempre es mayor que la RMS, por lo que los fabricantes emplean este número que es mayor, ya que es más atractivo para vender sus productos. En cualquier caso, el estéreo pude llegar a desarrollar un consumo significativo de corriente si se llegara a alcanzar este pico máximo de potencia o valores cercanos a él. Ahora bien, sumando los cuatro canales del estéreo sería una potencia total de 180 watt, conociendo esta potencia y el valor de la tensión que en este caso es de 12 volt, se pude calcular la intensidad de la corriente que se consume, empleando una de las fórmulas para calcular la potencia:

P=UxI
Dónde: P es la potencia de salida del amplificador
U es la tensión de la batería
I es la intensidad de la corriente.

Cómo se conoce el valor de la potencia y la tensión, se despeja la intensidad de la corriente quedando que:
I= P/U
I= 180W/12V
I=15A

Esto quiere decir que el estéreo puede llegar a consumir una corriente de hasta 15 amperios lo que es significativo cuando existe una resistencia en las conexiones o empalmes debido a sulfatación o uniones flojas, ya que valores significativos de corriente provocaban una caída de tensión considerable en esa unión defectuosa (caídas de hasta 7 volts según las mediciones que hice con el multímetro, pues en la entrada del amplificador habían 5 volt en ocasiones), evitando que llegara en ocasiones el voltaje necesario al amplificador para su correcto funcionamiento. Mientras el volumen no estaba demasiado alto el consumo de corriente no era significativo por lo que la caída de tensión tampoco lo era, y es lo que le permitía funcionar correctamente con un volumen bajo aún teniendo una conexión deficiente.

Cómo ven conexiones deficientes o sulfatadas son causantes de muchos males dentro de los que pudieran estar problemas de encendido, consumidores que funcionan deficientemente producto a no tener el voltaje adecuado, por ejemplo un bombillo con una luz más tenue, también pueden derivar en calentamiento de los cables o las uniones, lo que pude ir degradando poco a poco el aislamiento y en consecuencia presentarse males mayores, de ahí la importancia de realizar empalmes ajustados, realizar la limpieza de las fichas de conexión si fuera necesario, y de tener la posibilidad, aplicar lubricantes en las uniones con mayor posibilidad de corrosión, etc.

Bueno amigos esta fue mi experiencia en la reparación, fue sencilla, pero esto mismo pude pasar con otros consumidores en el auto y encontrar el punto defectuoso puede ser más difícil y frustrante en ocasiones, por eso comparto con ustedes este escrito, espero les sirva de ayuda , aún sabiendo que en esta comunidad los hay más experimentados en el tema, por lo que estoy en la disposición de aceptar alguna sugerencia o corrección en lo que he comentado.

Un saludo para ti que me lees, y hasta el próximo post 😉.

Las imágenes son de mi autoría y fueron tomadas con un celular Xiaomi Redmi Note 9.
Imágenes editadas en la aplicación "Galería" del teléfono y la aplicación Canva.
Los separadores utilizados fueron creados por el usuario @tripode para la comunidad Hive -Motors.

Puedes verme en Facebook


