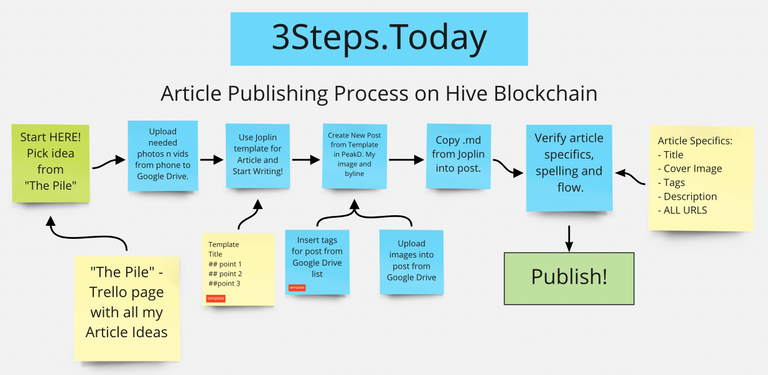
I mapped out my article publishing process, and how I get my articles ready to go out the door. This is a process that I go through when I post to make my work consistent and hopefully of a high standard and quality.
I use miro.com quite often to mindmap or flow map an idea or process. It definitely helps me to understand the different pieces and sub-processes to any of the larger items I undertake.
Recently @ hirohurl commented that it seemed counter to my post content that I would have the brain injury diagnosis I received recently as the result of my fall. However, the image above shows how I compensate and make things work. I map them out.
Let's go through this diagram so you can see how all the pieces fit together.
Pick an Idea from "The Pile"
First from the "Start Here" portion of my mindmapped process, it seems that in order to get something on to the Hive blockchain, I need to pick something from what I call "The Pile".

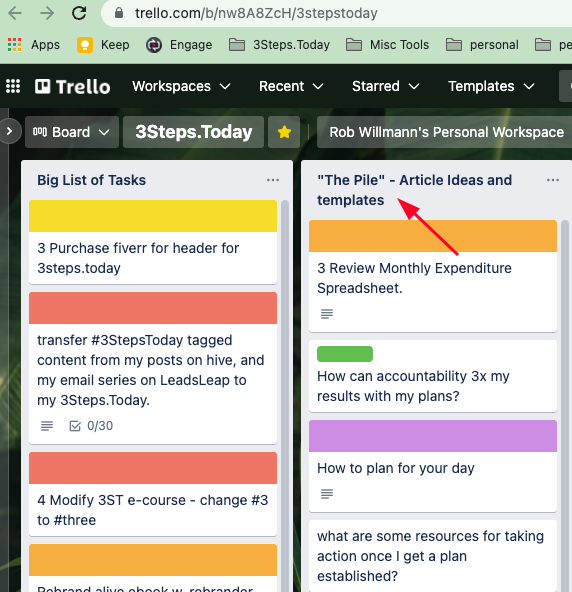
What's the Pile? It's a Trello page with all of my article ideas.
I use Trello and keep a rather lengthy list of potential article topics. I've come up with this list over time and sorted it based on which items I think I should work on first. I use Trello at work as well so I am quite familiar with the kanban methodology of moving ideas from left to right and into the "Completed" or "Done" column.
The point is - I pick something from my list of potential articles to write.
Upload needed photos and videos from phone to Google Drive.
Typically my decision to write something isnt 'spur of the moment' but planned. I write better that way.
It also means that I may have photos or videos to add to my content. The easiest way for me to access my multimedia from anywhere is to store my photos and videos in the cloud somewhere. I choose to use Google Drive. That way I can write from any device anywhere.
After I have my images uploaded to Google Drive, it's time to write!
Use Joplin template for Article and Start Writing!
There's not enough room to write about the skills needed to write well. We all are working to improve our writing skills (I hope). I won't talk about how I write because it's personal and everyone does it a little differently. I'll just discuss logistics.
I use Joplin (an open source note-taking app https://joplinapp.org/) since it leverages markdown format. That's the same as the main condensers on Hive as well as PeakD.
I can write in Joplin, and the output is .md format - precisely what I need on the blockchain!
Login to PeakD and leverage a template (has my image and byline)
If I'm following my process, the article is written in markdown, my photos are accessible from Google Drive, and I have a template ready in PeakD.
This blog post you're reading came from a template. Everything from the Peace and Love on down in my posts are my template. Makes publishing easier and brands me.
Insert tags for post from Google Drive\Keep list
I formerly used Google Drive to store my tags that I used on posts, but now I use Google Keep, since it's easy to keep them in a short list pinned to the top.
The screenshot just above is from my list of tags that I keep for when I am posting 3Steps.Today material. As you can seem the second one is my own, and I try to tag my own stuff to build the tag usage.
Upload images into post
Now that I have the post started in PeakD, I upload my images. Easy. This doesn't need much explanation. It's just image upload. Once the images are uploaded, it's on to the nexy step.
Copy .md from Joplin into post.
This is literally just a copy-pasta job at this point. I write in Joplin because I love the templates and markdown format. Since I can take my markdown text and simply copy-paste it into PeakD, it makes it simple.
I take the post I wrote in Joplin and copy the .md contents (using good ol' copy paste) directly in to PeakD.
Verify article specifics, spelling and flow.
Once I have the main body in PeakD along with images, I go over a checklist to make sure that everything is in the right spot:
- Title
- Cover Image
- Tags
- Description
- ALL URLS
That list above is what I check before I hit the publish button.
Title - I want my titles to be short, snappy, and if I am sharp enough, an action verb or call to action.
Cover Image - I either make a new image, or have one ready from Google Drive.
Tags - Boy oh boy. I've written about this several times. Great tags make a difference with your post and readership. Get your post in front of the right people\audience with the right tags. Just don't spam or misuse tags that are not related to your article.
Description - PeakD allows a "summative" of your post in 120 characters or less. This is shown on the front of the blog collector\aggregator along with the cover image. Use them well. I find it helps if I think of ONE person when writing this and in my head I am talking directly to them.
All URLS - Do I have any URLs in the article? Nearly every time I do. Therefore I gotta check em. Nothing worse than writing a blog post, finding a great resource URL, and mis-posting it. What a waste. Check your URLs.
When all that is done, it's time to hit the button and....
Publish!
Finally! All of the hard work has paid off, and a new blog post is on the Hive blockchain.
I use this process to make sure that I publish posts that are tidy, accurate, have good URLs, and a decent chance of getting read. Once the raw product is made, time to spread that URL around like mayo on a sandwich. Blog promotion is another story altogether, and I'll save that for another post.
Peace and Love,
-Rob

P.S. Don't consider my posts financial advice. Do your own research. I write for entertainment. One more thing - I'd love it if you signed up for my 3 Steps Today email list - I cover how to accomplish your daily goals in 3 steps.

