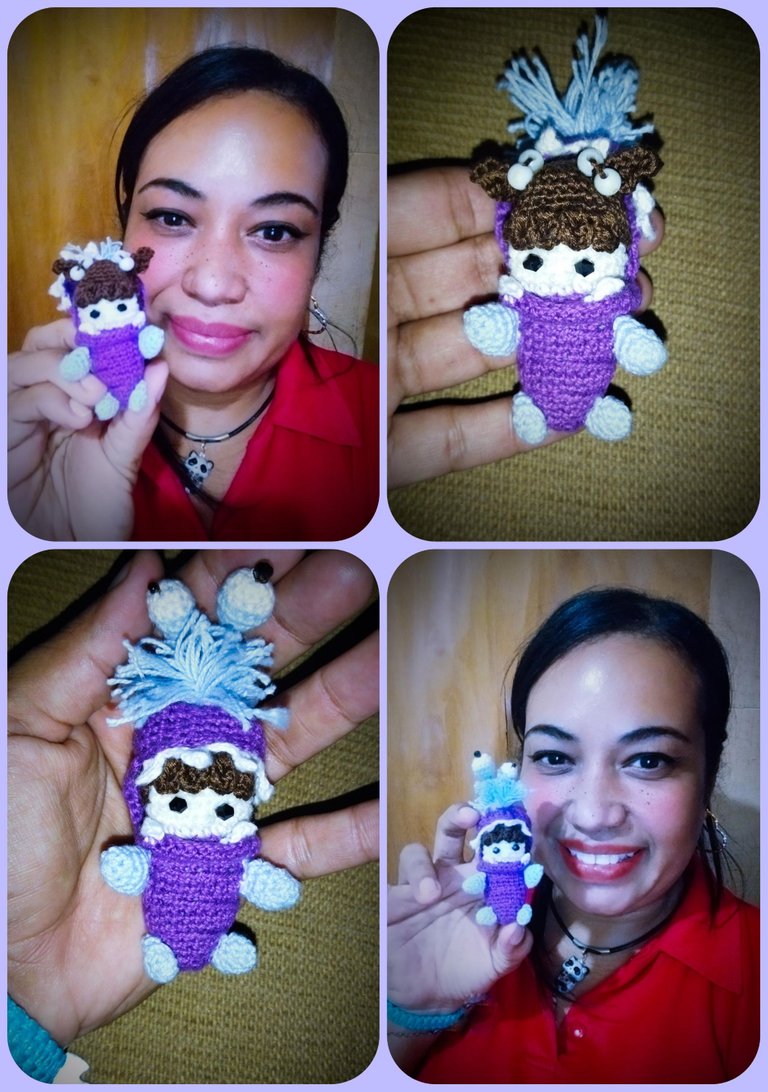
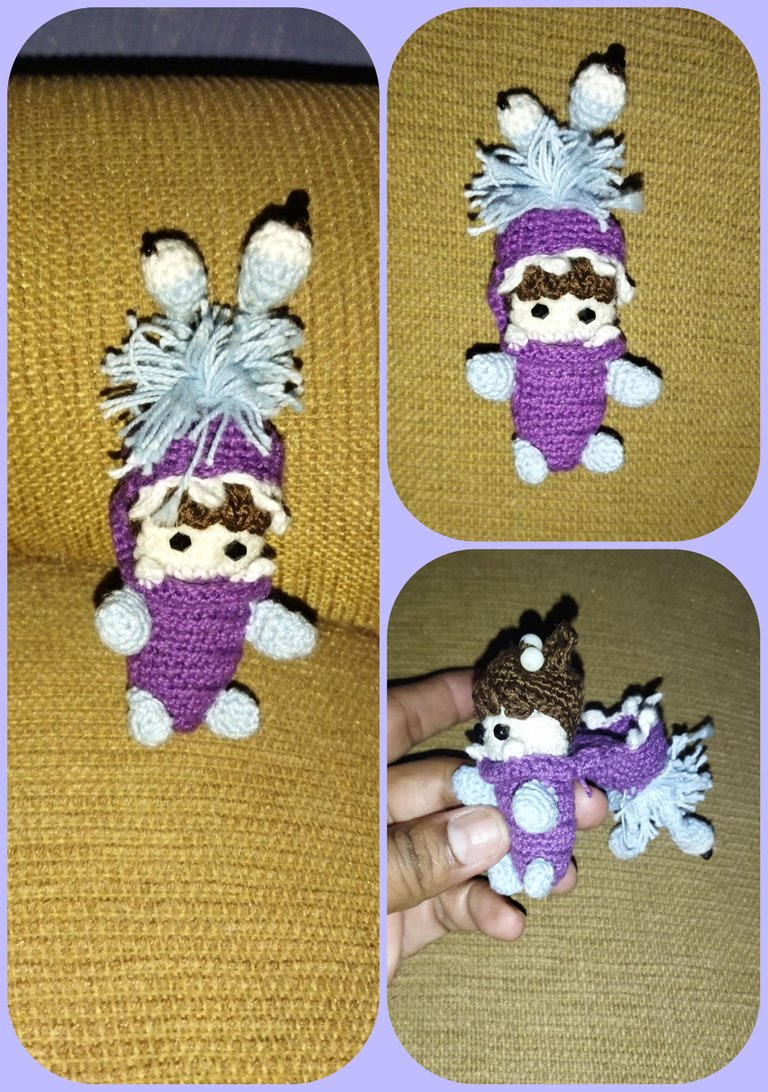
Eng/ ESP: Crocheting Boo, The Girl from the movie Monster Inc. in her Funny Monster Costume.💖✨🌸 Elaborando a Boo, La Niña de La película Monster Inc. En Crochet Con su Divertido Traje de Mostruo. By Danhyelita24

in #hive-1305602 years ago

💕🌺💞💘💖✨🌸💕🌺💞💘💖✨🌸

PSX_20220728_194009.jpg

💕🌺💞💘💖✨🌸💕🌺💞💘💖✨🌸

Hello dear little bees!
Today I show you a very creative and super nice post, since I have been able to complete one of the most ambitious projects in the field of crochet amigurumi technique that I had proposed to myself, it is the representation in this art of the cute character Boo, from the movie Monster Inc.

Hola queridas abejitas!! El día de hoy les muestro un post muy creativo y súper bonito, ya que he podido culminar uno de los proyectos más ambicioso en el ámbito del crochet técnica amigurumi que me había propuesto, se trata de la representación en este arte del tierno personaje Boo, de la Película Monster Inc.
💕🌺💞💘💖✨🌸💕🌺💞💘💖✨🌸

PSX_20220728_193343.jpg

💕🌺💞💘💖✨🌸💕🌺💞💘💖✨🌸

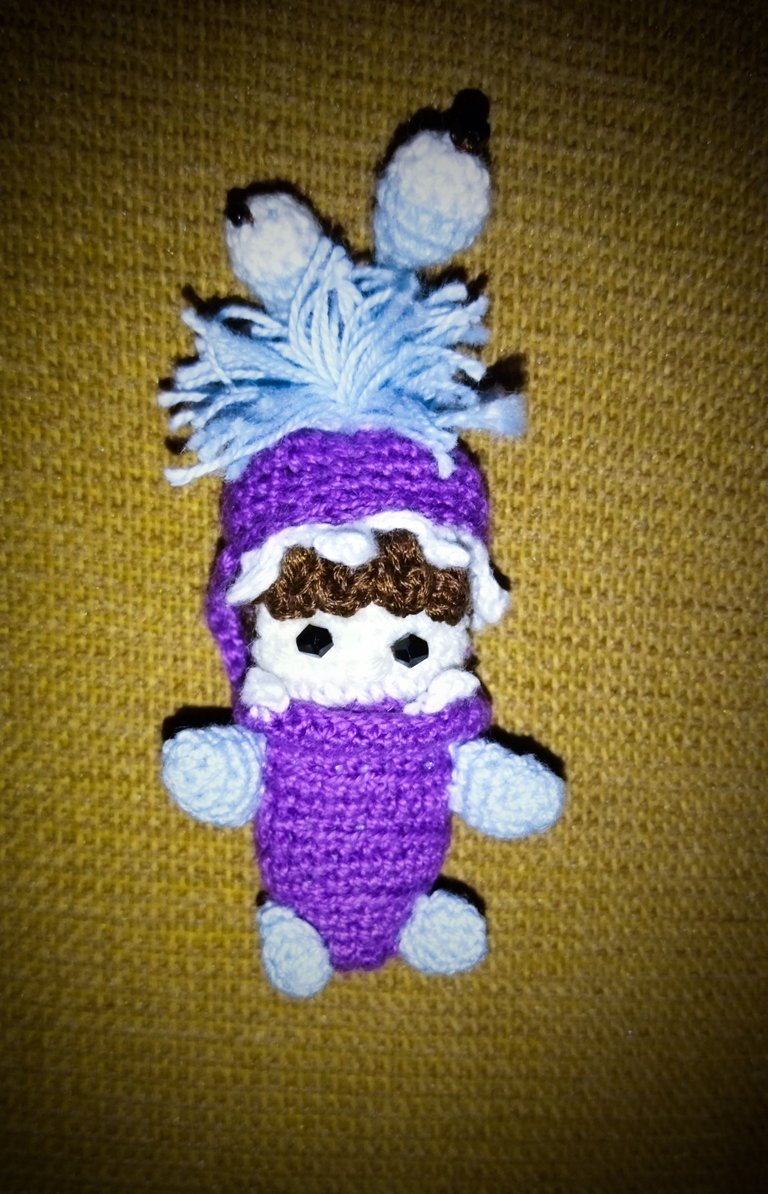
This time I wanted to make her with one of her most iconic and super funny outfits such as her monster costume without leaving aside the main shape of the doll.

En esta oportunidad quise realizarla con uno de sus atuendos más icónicos y súper gracioso como lo es su traje de mostruo sin dejar de lado la forma principal de la muñeca.
💕🌺💞💘💖✨🌸💕🌺💞💘💖✨🌸

PSX_20220728_193912.jpg

💕🌺💞💘💖✨🌸💕🌺💞💘💖✨🌸

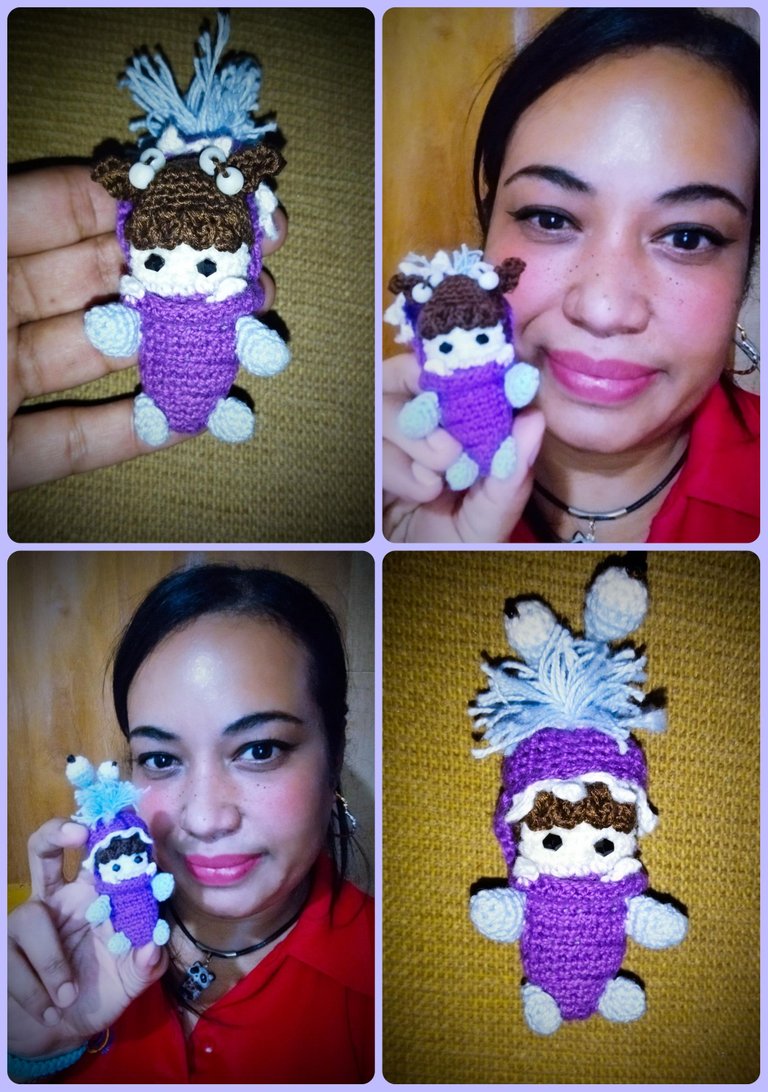
The result made me completely fall in love with it and for that reason I feel super proud and here I show you the step by step so you can try it and if you haven't tried it yet, I'm sure you will be hooked with the art of knitting.

El resultado me enamoro por completo y por ello me siento súper orgullosa y aquí les muestro el paso a paso para que se animen a intentarlo y si aún no lo han probado segura estoy que quedarán enganchadas con el arte de tejer.

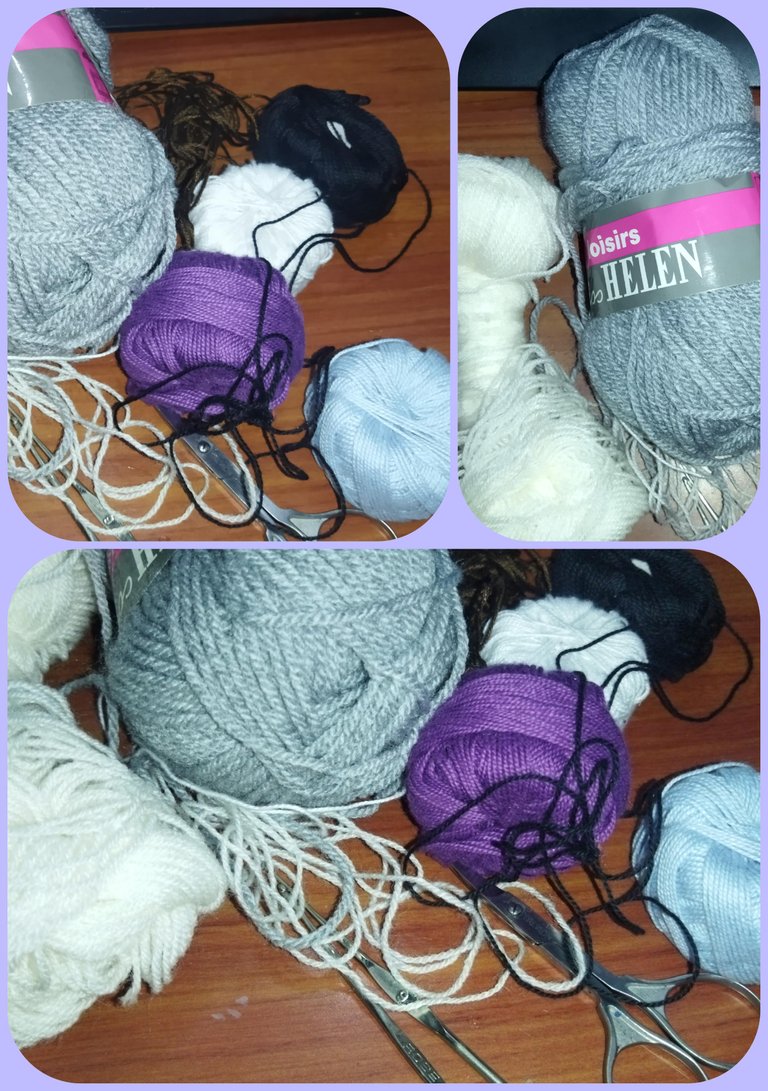
The materials used were silk knitting yarn in shades of lilac, gray, white, brown and fur, 4 black eye sockets, 3 mm and 2.5 mm knitting needles, sewing needle and sewing thread in white, a school clip, hypoallergenic stuffing and scissors.

Los materiales utilizados fueron hilo de tejer de seda en en tonos lila, gris, blanco, marrón y piel, 4 cuencas de color negro para los ojos, aguja de tejer de 3 mm y de 2.5 mm, aguja de coser e hilo para coser en tonos blanco, un clip escolar, relleno hipoalergénico y tijera.
💕🌺💞💘💖✨🌸💕🌺💞💘💖✨🌸

PSX_20220728_192731.jpg

💕🌺💞💘💖✨🌸💕🌺💞💘💖✨🌸

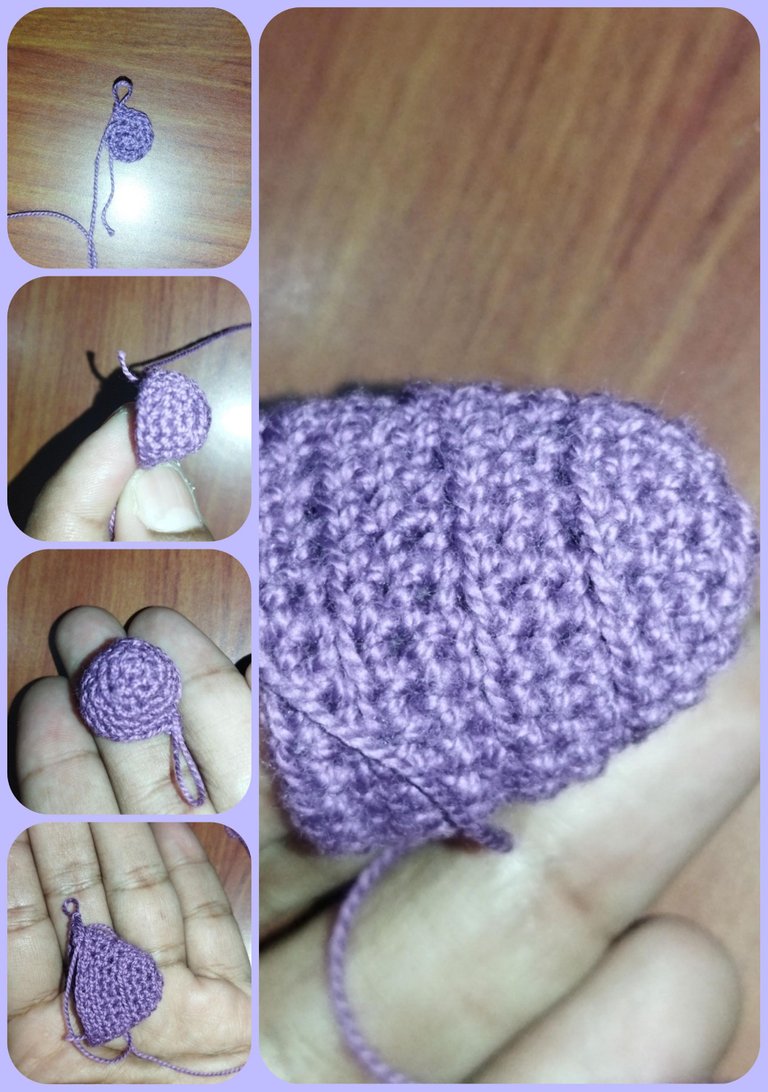
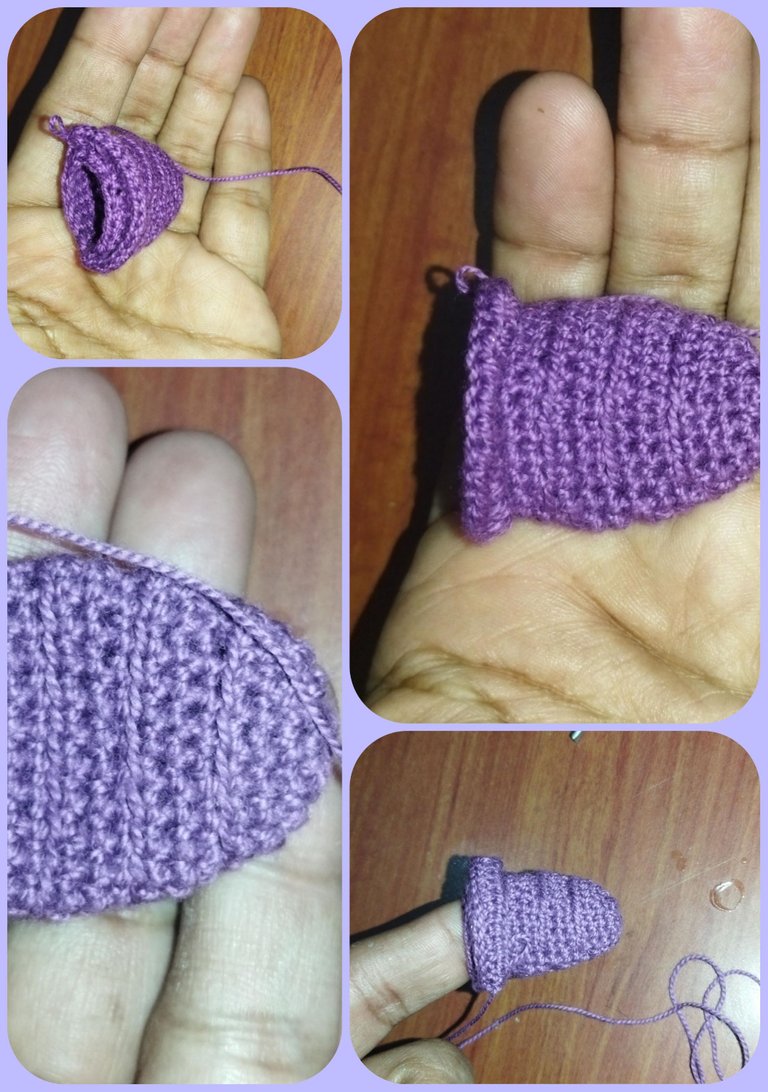
We start with the part of the monster's bag that basically constitutes the body, knitting in single crochet starting with a magic ring of six stitches for two equal rows, we make an increase and continue for 4 rows, we make a single crochet and an increase and two rows of equal stitches, we continue this pattern until completing the desired length and thickness, and we knit a border of 12 high stitches for two rows complemented with single crochets and we close.

Iniciamos con la parte de la bolsita del monstruo que básicamente constituye el cuerpo, tejiendo en puntos bajos comenzando con un anillo mágico de seis puntos por dos vueltas iguales, hacemos un aumento y continuamos por 4 vueltas, hacemos un punto bajo y un aumento y dos vueltas de puntos iguales, continuamos este patrón hasta completar el largo y grosor deseado, y tejemos un borde de 12 puntos altos por dos filas complementados con puntos bajos y cerramos.
💕🌺💞💘💖✨🌸💕🌺💞💘💖✨🌸

PSX_20220728_192809.jpg

💕🌺💞💘💖✨🌸💕🌺💞💘💖✨🌸

PSX_20220728_192844.jpg

💕🌺💞💘💖✨🌸💕🌺💞💘💖✨🌸

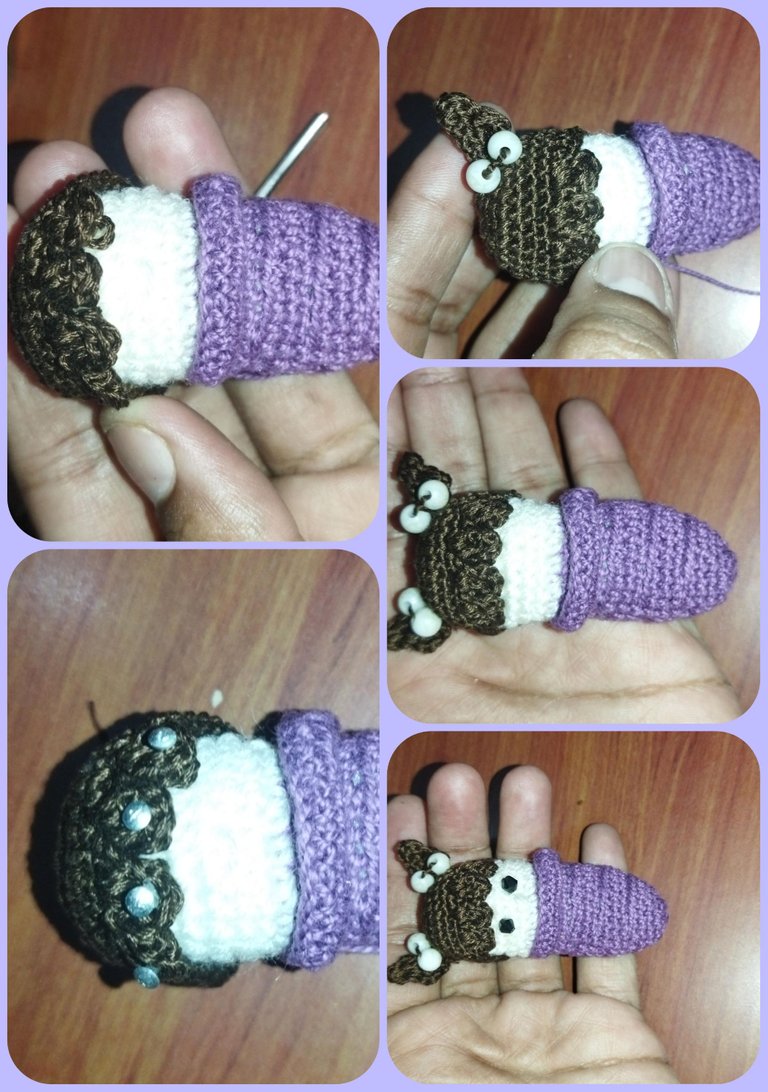
The face is made in skin tone starting with a stitch in each stitch by the inside thread and we increase until we reach the round, fill and sew. We place the eyes in rows 3 and 4 and sew a nose with two rows in skin tone thread.

La carita la hacemos en tono piel comenzando con un punto en cada punto por el hilo de adentro y vamos aumentando hasta lograr el redondes, rellenamos y cosemos. colocamos sus ojitos en las hilera 3 y 4 y cosemos una nariz con dos vueltas en hilo tono piel.
💕🌺💞💘💖✨🌸💕🌺💞💘💖✨🌸

PSX_20220728_192913.jpg

💕🌺💞💘💖✨🌸💕🌺💞💘💖✨🌸

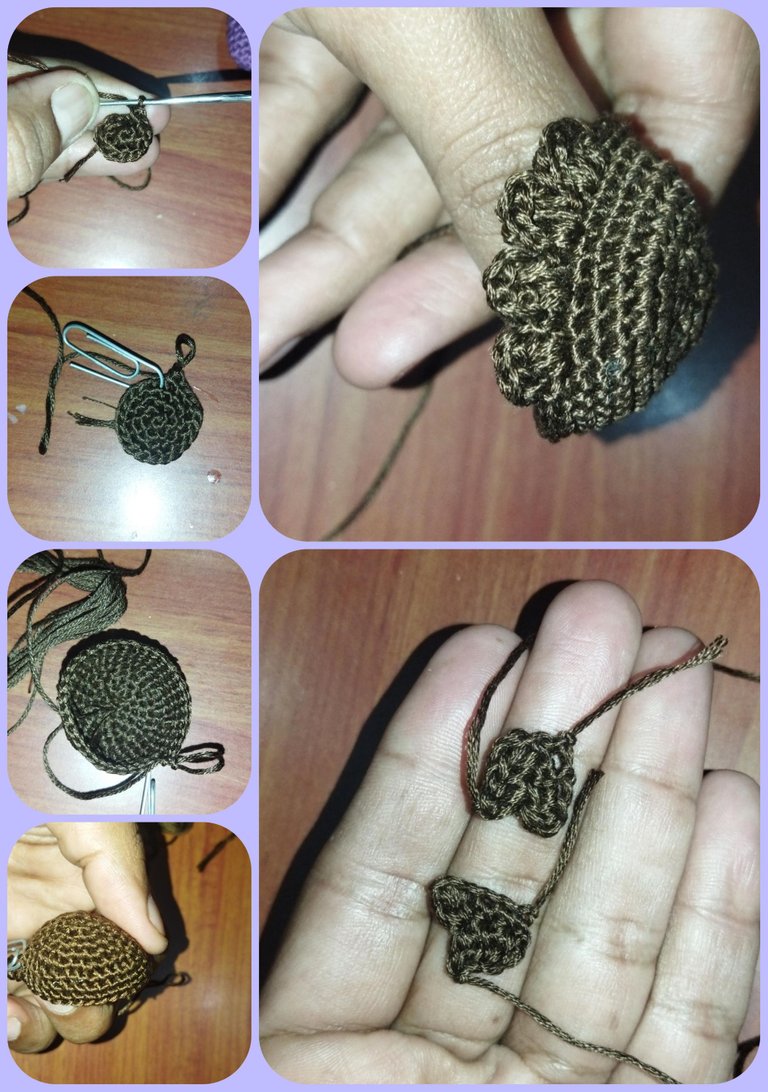
For the hair we use brown thread, making a circle starting with six low stitches and increasing according to the width of the head, we make four small bangs with three high half stitches and separated with a slipped stitch. And we elaborate the two pigtails making a chain of five stitches and four medium high stitches for the second round only two stitches and we close with slipped stitch.

Para la cabellera utilizamos hilo marrón, haciendo un círculo comenzando con seis puntos bajos y vamos aumentando según el ancho de la cabeza, hacemos cuatro pequeños flequillos con tres medios puntos altos y separados con un punto deslizado. Y elaboramos las dos coletas haciendo una cadena de cinco puntos y cuatro puntos medio altos para la segunda vuelta solo dos puntos y cerramos con punto deslizado.
💕🌺💞💘💖✨🌸💕🌺💞💘💖✨🌸

PSX_20220728_192937.jpg

💕🌺💞💘💖✨🌸💕🌺💞💘💖✨🌸

We sew with needle and thread the hair and the pigtails and on top of them we place some pearls as decoration.

Cosemos con aguja e hilo la cabellera y las coletas y encima de ellas colocamos unas perlitas cómo decoración.
💕🌺💞💘💖✨🌸💕🌺💞💘💖✨🌸

PSX_20220728_193021.jpg

💕🌺💞💘💖✨🌸💕🌺💞💘💖✨🌸

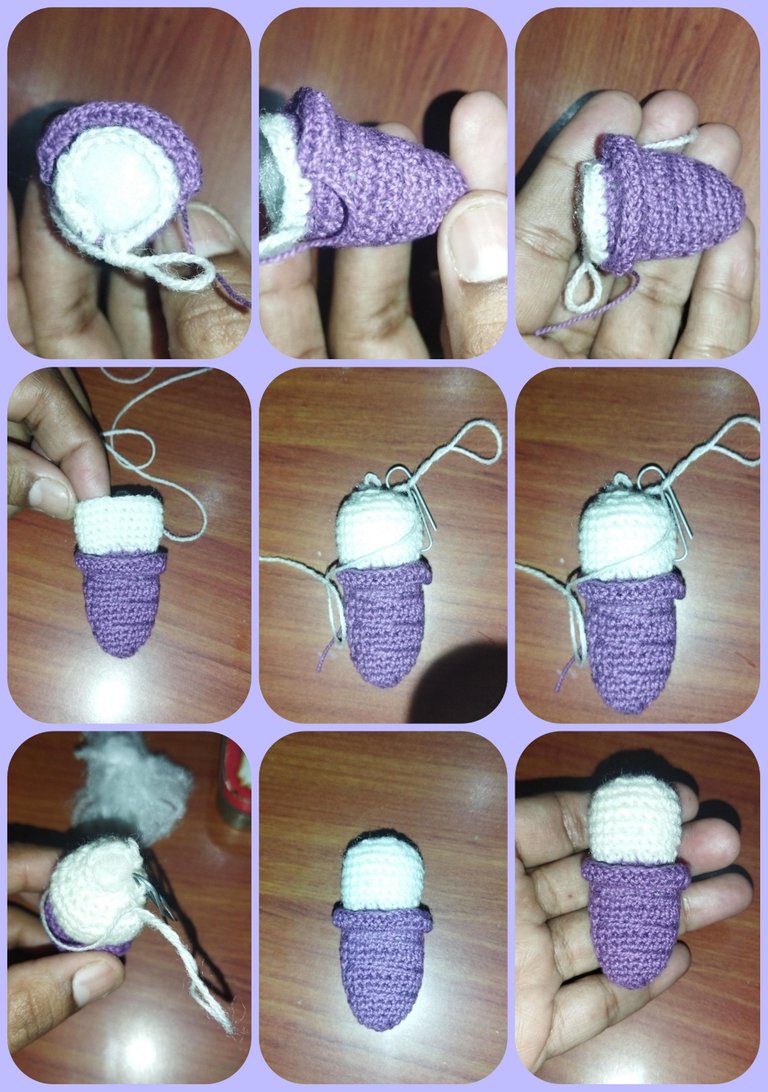
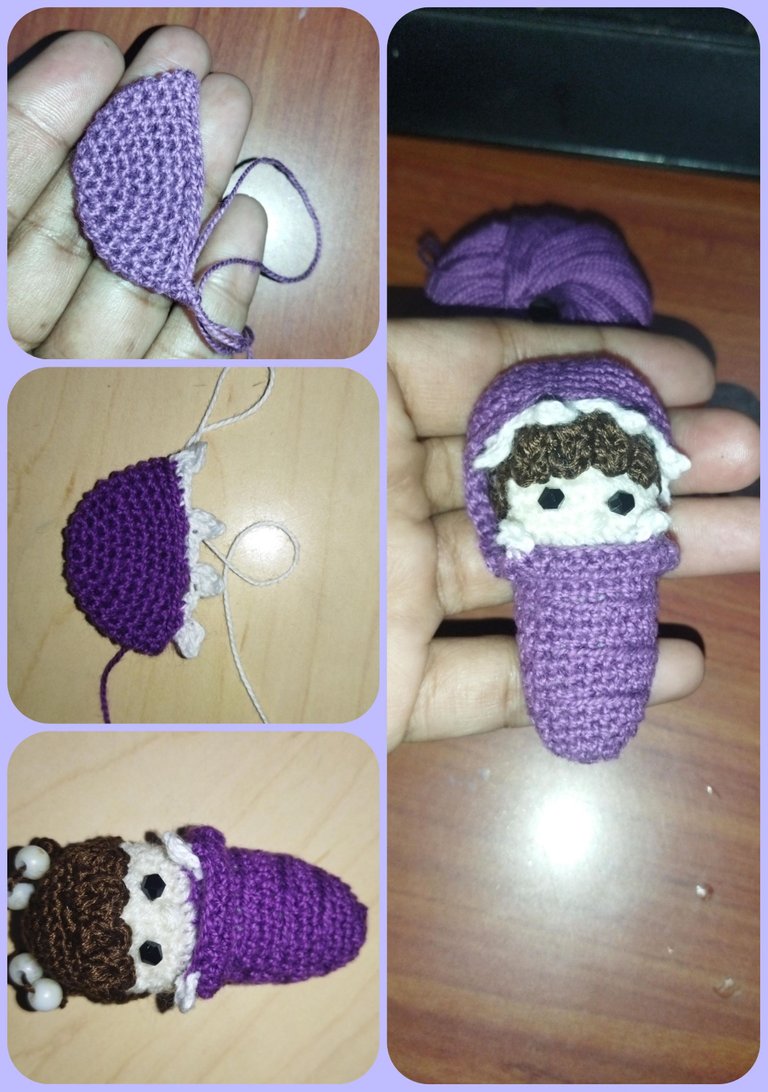
For the part of the hood we start with a magic ring of 6 stitches the second row one increase for each stitch. The third row one stitch One increase 2 rows with one stitch in each row. The next round: One increase and 4 rows of one stitch in each. It is important that for the elaboration of this piece we are going to change the needle to a bigger thickness of 3 mm so that it is a little wider than the head of the doll in the front part we are going to elaborate the teeth of the monster in white tone that basically are going to make two medium high stitches divided by slipped stitches according to the separation that we want to give him between tooth and tooth.

Para la parte de la capucha iniciamos con un anillo mágico de 6 puntos la segunda vuelta Un aumento por cada. La tercera vuelta un punto Un aumento 2 vueltas con un punto en cada. La próxima vuelta: Un aumento y 4 vueltas de un punto en cada. Es importante que para la elaboración de esta pieza vamos a cambiar la aguja a un grosor más grande de 3 mm para que nos quede un poco más ancha que la cabeza de la muñeca en la parte frontal vamos a elaborar los dientes del monstruo en tono blanco que básicamente van a hacer dos puntos medios altos divididos por puntos deslizados según la separación que deseemos darle entre diente y diente.
💕🌺💞💘💖✨🌸💕🌺💞💘💖✨🌸

PSX_20220728_193111.jpg

💕🌺💞💘💖✨🌸💕🌺💞💘💖✨🌸

We sew the part of the hood to the back of the monster costume, and in the front part we are going to make two small fangs in white tone by the inside thread of a high slipped stitch.

Cocemos la parte de la capucha a la parte de atrás del traje de monstruo, y en la parte delantera vamos a hacer dos pequeños colmillitos en tono blanco por el hilo de adentro de un punto alto deslizado.

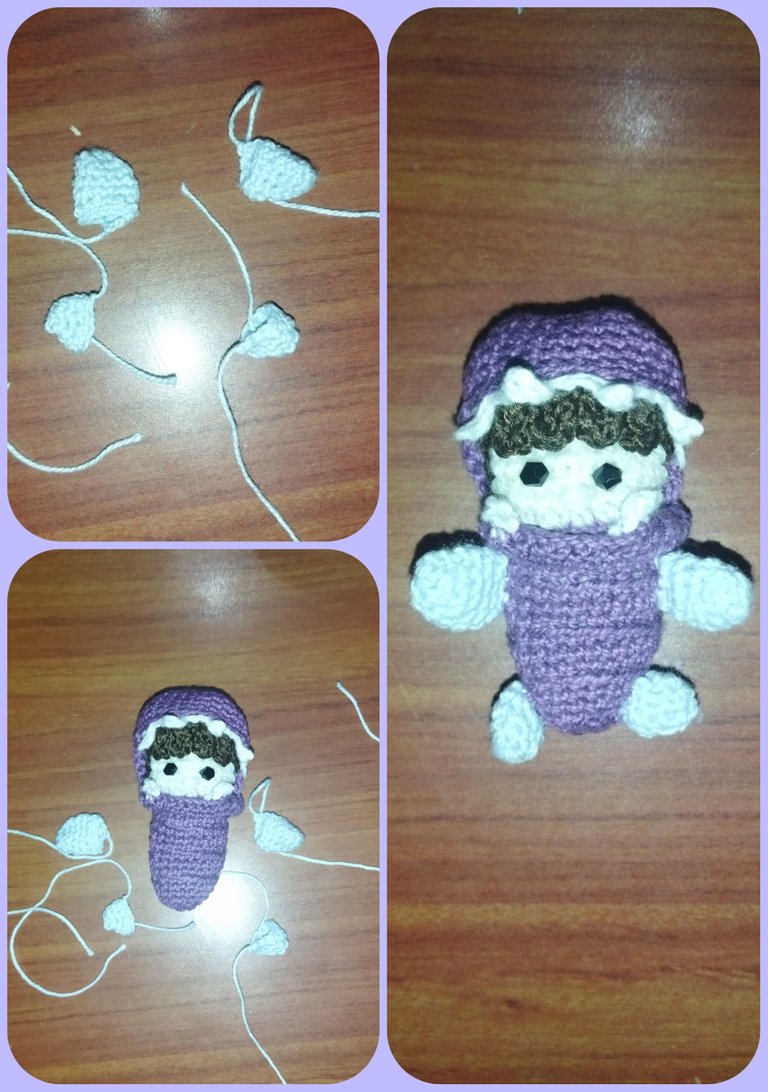
We are going to work the small tentacles for this we are going to change to gray tone we were going to make kind of small conitos with magic ring of 4 points and we are going to be increasing according to the size and the desired thickness we fill and we bake in the inferior and superior part of the bag of the monster that basically is the body of our doll.

Vamos a laborar los pequeños tentáculos para esto vamos a cambiar a tono gris íbamos a hacer especie de pequeños conitos con anillo mágico de 4 puntos y vamos a ir aumentando según el tamaño y el grosor deseado rellenamos y cocemos en la parte inferior y superior del la bolsita del monstruo que básicamente es el cuerpo de nuestra muñeca.
💕🌺💞💘💖✨🌸💕🌺💞💘💖✨🌸

PSX_20220728_193133.jpg

💕🌺💞💘💖✨🌸💕🌺💞💘💖✨🌸

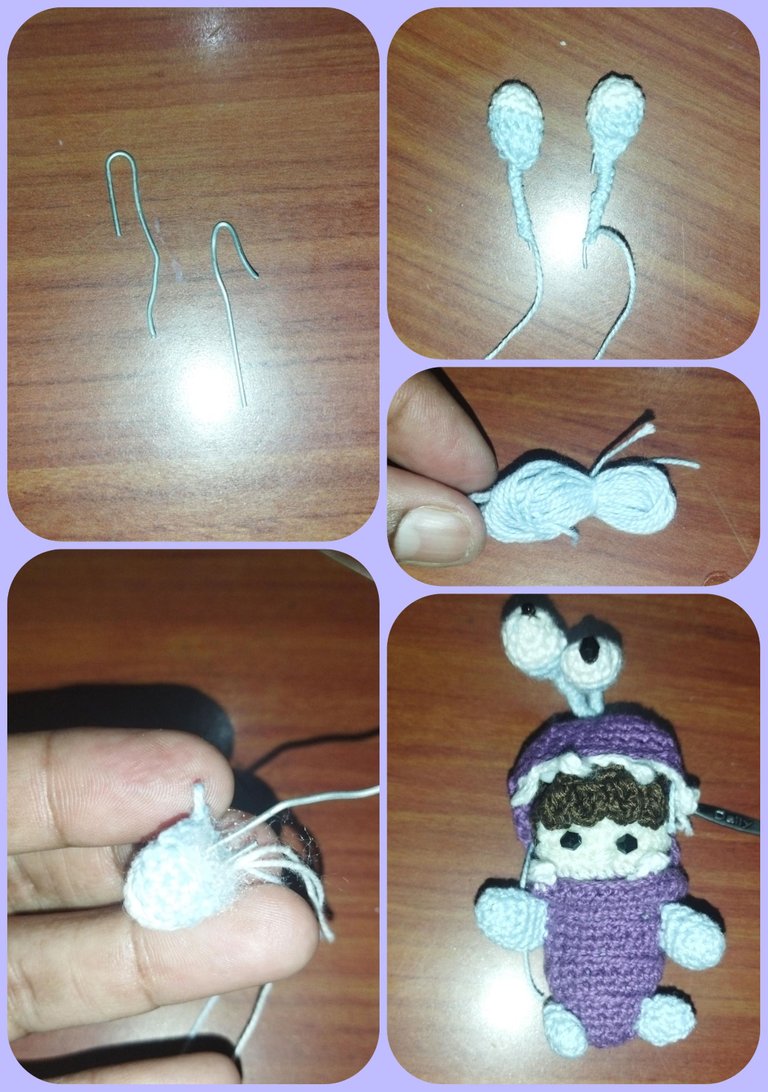
Now we only need to make the eyes of the monster that we are going to make a circle of 6 stitches of two equal turns in white tone we change to gray tone and we will use a clip that we are going to chop in half and we will introduce it inside this piece filling a little with hypoallergenic cotton and bordering the entire length of the clip with thread, we fix very well on the inside of the hood and we place two small black sockets above the eye piece in white preferably one larger than the other to give that crazy and fun touch. For the part of the little hair we are going to make a roll of thread in gray tone that we are going to divide in the middle as a kind of a small bow and we cut both ends fixing it in the front part of where we positioned the crazy eyes.

Ya solo nos restaría elaborar los ojos del monstruo que vamos hacer un círculo de 6 puntos de dos vueltas iguales en tono blanco cambiamos al tono gris y vamos a utilizar un clip que vamos a picar a la mitad y vamos a introducirlo dentro de esta pieza rellenando un poco con algodón hipoalergénico y bordeando toda el largo del clip con hilo, fijamos muy bien por la parte de adentro de la capucha y colocamos dos pequeñas cuencas negras encima de la pieza del ojo en blanco de preferencia una más grande que la otra para darle ese toque alocado y divertido. Para la parte de las melenita vamos a hacer un rollito de hilo en tono gris que vamos a dividir en el medio como especie de un pequeño lacito y cortamos ambos extremos fijándolo en la parte delantera de donde posicionamos los ojitos locos.
💕🌺💞💘💖✨🌸💕🌺💞💘💖✨🌸

PSX_20220728_193209.jpg

💕🌺💞💘💖✨🌸💕🌺💞💘💖✨🌸

And thus we have completed this beautiful character Boo from the movie monster inc, beautiful result and pleasantly proud to be able to prove to myself that with dedication, patience and hard work you can achieve many great things with small materials and very little experience. For my part I say goodbye until a new opportunity wishing you many blessings and success and hoping soon to meet in a new post with quality and useful content, until next time.

Y de esta manera tenemos culminado este bello personaje Boo de la película monster inc, bello el resultado y gratamente orgullosa de poder demostrarme a mí misma que con dedicación paciencia y mucho esfuerzo se puede lograr muchas cosas grandes con pequeños materiales y muy poca experiencia. Por mi parte me despido hasta una nueva oportunidad deseándoles muchísimas bendiciones y éxitos y esperando pronto poder encontrarnos en un nuevo post con contenido de calidad y útil, hasta la próxima.
💕🌺💞💘💖✨🌸💕🌺💞💘💖✨🌸

PSX_20220728_193304.jpg

💕🌺💞💘💖✨🌸💕🌺💞💘💖✨🌸

All images are my own taken with Redmi 9t and edited with Photoshop Express for Android and translated with Deepl application in its free version for Android.

Todas las imágenes son de mi propiedad tomadas con Redmi 9t y editadas con Photoshop Express para Android y traducido con la aplicación Deepl en su versión libre para Android

💕🌺💞💘💖✨🌸💕🌺💞💘💖✨🌸

IMG-20220728-WA0038.jpg

💕🌺💞💘💖✨🌸💕🌺💞💘💖✨🌸

Sort:  

Hay que cosita más hermosa me encantó, que habilidad tienes para hacer estás miniaturas. Exitos

Muchas gracias @mayifiestas siempre tan amable y consecuente. Saludos!!

Your content has been voted as a part of Encouragement program. Keep up the good work!

Use Ecency daily to boost your growth on platform!

Support Ecency
Vote for new Proposal
Delegate HP and earn more

Thanks @ecency ☺️☺️☺️💞

Woooow amiga quedo súper hermoso tu trabajo 😮😮😮

Está súper tierno!! Me encantó

Gracias @karlagon saludos!!

Muy Bonita!!!🥰💕

Gracias muy amable saludos!!☺️☺️💖

Wow, te quedó increíble esta muñequita 😍, todos los detalles y los colores me encantaron, no me quiero imaginar la cantidad de tiempo que estuviste concentrada para lograr este resultado tan genial, yo me hubiera vuelto un ocho jajajaja, pero me encanta tu trabajo. Saludos!

Holaaaaa maiga gracias!!en realidad no fue mucho tiempo ya que el tamaño ayudó bastante ☺️, me encanta realizar estos personajes icónicos.. saludos

Congratulations, your post has been upvoted by @dsc-r2cornell, which is the curating account for @R2cornell's Discord Community.

Curated by Blessed-girl

r2cornell_curation_banner.png

Enhorabuena, su "post" ha sido "up-voted" por @dsc-r2cornell, que es la "cuenta curating" de la Comunidad de la Discordia de @R2cornell.

Visit our Discord - Visita nuestro Discord