Hello everyone... 🐱🐾💕
Hello to my beautiful people of Hive, and to all my community of great artists of #Hivediy, wishing you first of all to have a week full of blessings, abundance, love, peace and prosperity, I am here to show you a new and simple work, full of love for you.
For today I bring you a short work, quite simple, and with very few materials, I am going to make a pair of pompom-shaped tendrils decorated with a small pearl, and what is the best thing, you can do it like everything I present you, in the combination and size that you like so you can use them with the oufit of your preference.
In this step by step, you will see how in a matter of minutes you can make a super simple piece, which you can direct to the use that is most profitable, I will always emphasize that each of the pieces that I make can be used to decorate a thousand things, make key chains, pendants, etc, but often I direct it to the part of jewelry because it is my passion.
That is why I have been thinking of making some more complex pieces, so that you can learn how to make them, and use them for whatever you consider most convenient. Although I will never lose to present you, combinations of sets in the part of costume jewelry.
That said, for today I present you this simple tutorial, with some tendrils in the form of pompom that dress, and like a lot.
Let's get started:😃
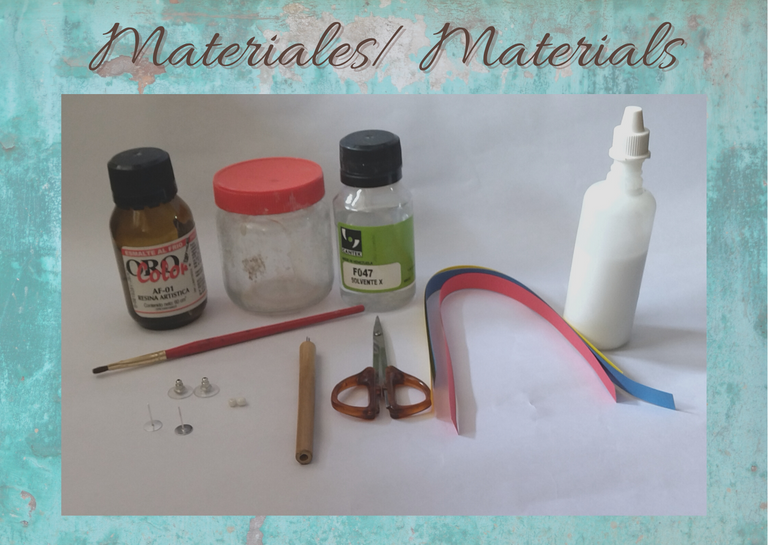
Materials:📏✏️✂️
- White colored quilling ribbon 9mm wide (colors of your choice).
- Quilling needle.
- Scissors.
- White glue.
- Pearls of the color of your preference.
- Base for small fixed tendrils.
- Anti-allergic covers for tendrils.
- Artistic resin.
- Solvent x.
- Glass bottle.
- Brush.

Hola a todos... 🐱🐾💕
Hola a mi gente bella de Hive, y a toda mi comunidad de grandes artistas de #Hivediy, deseándoles ante todo que tengan una semana llena de bendiciones, abundancia, amor, paz y prosperidad, me encuentro por aquí para mostrarle un nuevo y sencillo trabajo, lleno de cariño para ustedes.
Para hoy les traigo un trabajo corto, bastante sencillo, y con muy poquitos materiales. Les voy a elaborar un par de zarcillos con forma de pompón decorados con una pequeña perla, ¿y qué es lo mejor?, que lo pueden hacer como todo lo que les presento, de la combinación y tamaño que más les guste para que los puedan usar con el oufit de su preferencia.
En este paso a paso, verán como en cuestiones de minutos pueden elaborar una pieza súper sencilla, la cual pueden dirigir al uso que más le sea de provecho, siempre les voy a recalcar que cada una de las piezas que elaboro pueden ser usadas para adornar mil cosas, elaborar llaveros, colgantes, etc, pero en muchas ocasiones yo lo dirijo a la parte de bisutería ya que es mi pasión.
Es por ello que vengo pensando en elaborarles algunas piezas más complejas, para que ustedes las aprendan a realizar, y las usen para lo que más consideren conveniente. Aunque jamás perderé de presentarles, combinaciones de conjuntos en la parte de bisutería.
Dicho esto, para hoy les presento este sencillo tutorial, con unos zarcillos en forma de pompón que visten, y gustan mucho.
Comencemos:😃
Materiales:📏✏️✂️
• Cinta de quilling de color blanca de 9mm de ancho (de los colores de tu preferencia).
• Aguja para quilling.
• Tijera.
• Pega blanca.
• Perlas del color de tu preferencia.
• Base para zarcillos fija pequeñas.
• Tapas para zarcillos antialérgicas.
• Resina artística.
• Solvente x.
• Frasco de vidrio.
• Pincel.
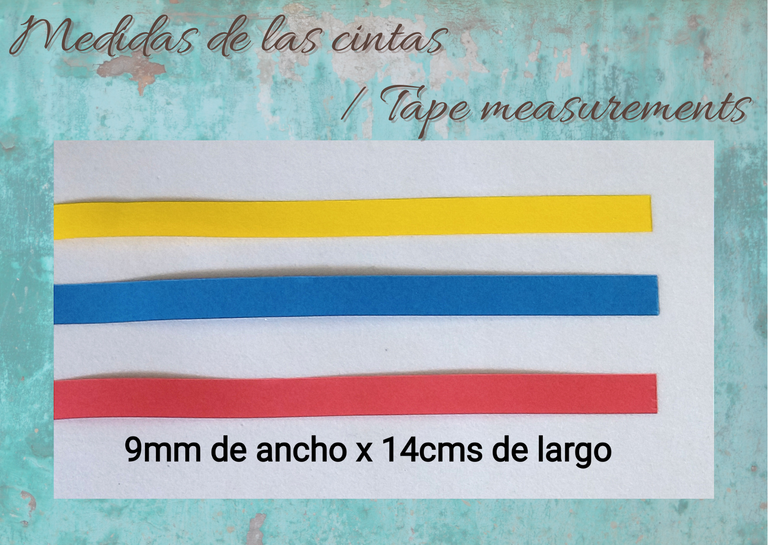
Tape measurements. 🌈
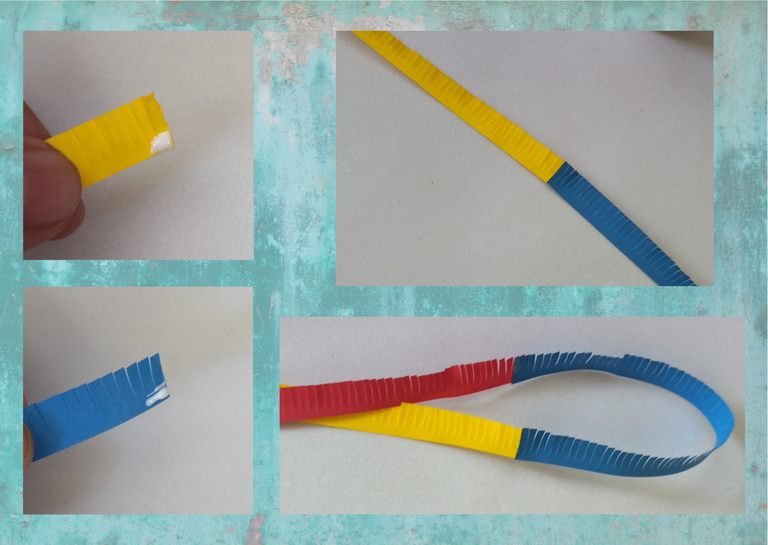
- We are going to make two pieces, that is to say a pair of tendrils, for this we will need 6 quilling ribbons of 9mm wide x 14cms long yellow, blue and red, (1 of each color, for each piece).
Medidas de las cintas. 🌈
- Vamos a elaborar dos piezas, es decir un par de zarcillos, para ello necesitaremos 6 cintas de quilling de 9mm de ancho x 14cms de largo amarilla, azul y rojo, (1 de cada color, para cada pieza).
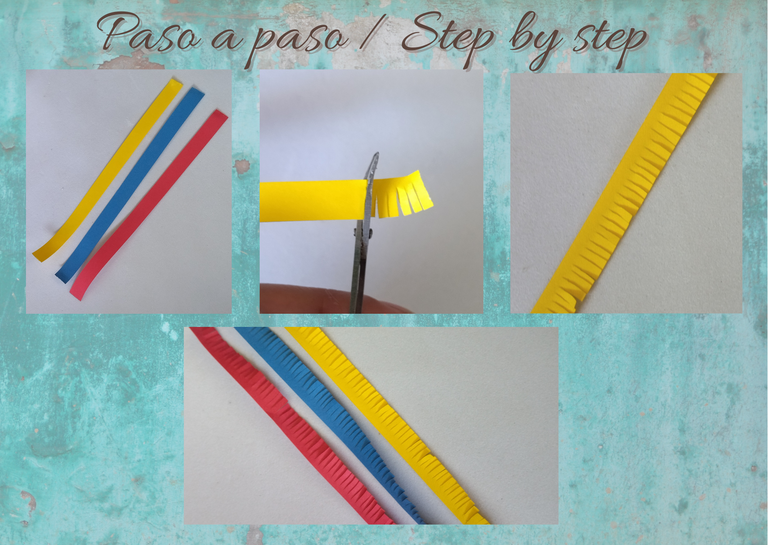
Step by step:💖
- Let's start by taking each of the ribbons, (yellow, blue and red), and separately to make the job easier, we will take the scissors and very careful not to break them, we will go cutting vertically strips species without reaching the end of the tape, with a separation of about 1mm wide, we will do this until we finish with all the tape, this process as I said at the beginning we will do with each of them, in the order that you most want it.
Paso a paso:💖
• Vamos a comenzar tomando cada una de las cintas, (amarilla, azul y roja), y por separado para hacer el trabajo más fácil, tomaremos la tijera y con mucho cuidado de no romperlas, iremos cortando en vertical especies de tiras sin llegar al final de la cinta, con una separación de aproximadamente 1mm de ancho, esto lo haremos hasta terminar con toda la cinta, este proceso como dije al principio lo haremos con cada una de ellas, en el orden que más lo deseen.
- Once we have made the cuts on the ribbons, we will proceed to join them by adding a little glue on their ends to form a single ribbon. We will join them in yellow, blue and red order.
• Una vez que le hayamos hecho los cortes a las cintas, vamos a proceder a unirlas añadiendo un poco de pega en sus puntas para formar una sola cinta. Uniremos en orden amarillo, azul y rojo.
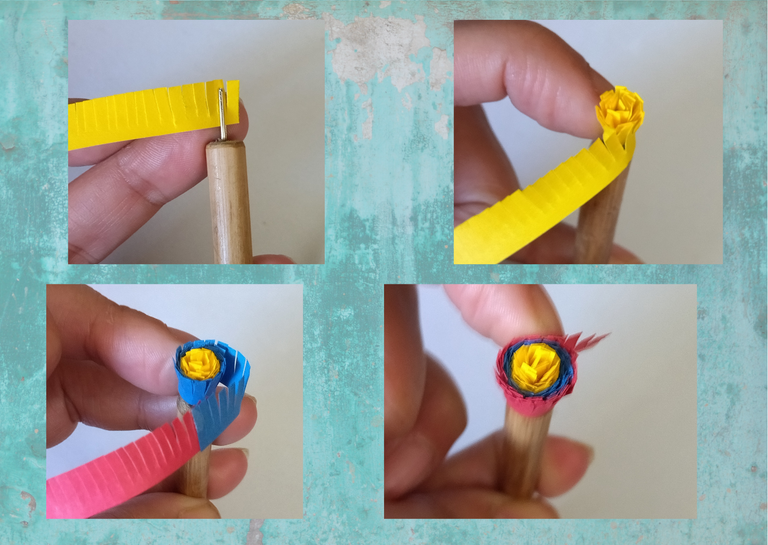
- Once the ribbons are glued, we are going to take our quilling needle and we are going to proceed to roll, we will start with the end of the yellow ribbon, we will roll very carefully until we reach the end of the red ribbon, this process must be done very carefully so as not to break the ribbons since they tend to be much more delicate, when we reach the end we seal with glue and take it out of the quilling needle. We repeat the above process with the other remaining ribbon to have the two pieces of our pair of tendrils.
• Pegadas las cintas, vamos a tomar nuestra aguja para quilling y vamos a proceder a enrollar, comenzaremos por el extremo de la cinta amarilla, enrollaremos con mucho cuidado hasta llegar al final de la cinta roja, este proceso hay que realizarlo con mucha cautela para no romper las cintas ya que al estar cortadas en tiras tienden a ser mucho más delicadas, al llegar al final sellamos con pega y sacamos de la aguja para quilling. El proceso anterior lo repetimos con la otra cinta restante para poder tener las dos piezas de nuestro par de zarcillos.
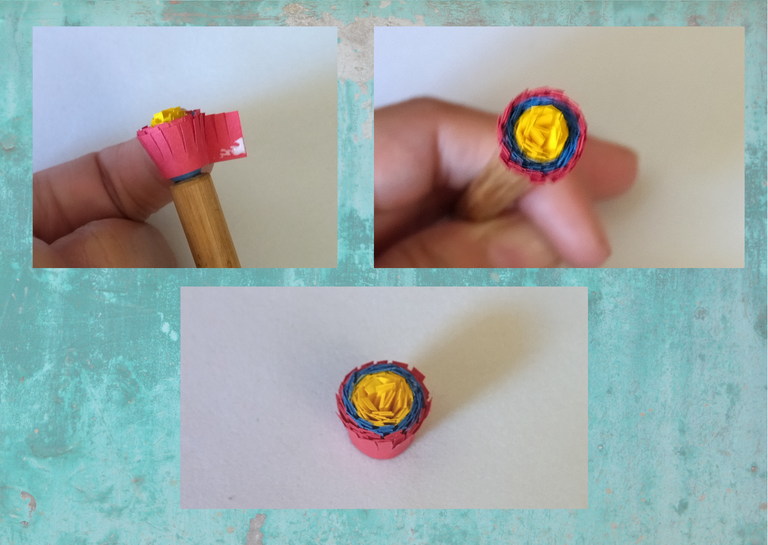
- We are going to shape our pompom, as you will see it looks like a kind of cocoon, with the help of our fingers we will proceed to open the strips to the sides and mold them, in this way we will give it the shape that we like, we can leave it more cocoon, intermediate or totally open, I will open it totally since I like to do it this way, so that the detail that I am going to put on it will shine. Repeat with the other piece.
• Vamos a darle forma a nuestro pompón, como verán se ve como especie de un capullo, con la ayuda de nuestros dedos procederemos a abrir a los lados las tiras y moldearlas, de esta manera le daremos la forma que más nos guste, podemos dejarlo más capullo, intermedio o totalmente abierta, yo lo abriré totalmente ya que es de mi agrado realizarlo así, para que luzca el detalle que le voy a colocar. Repetimos con la otra pieza.

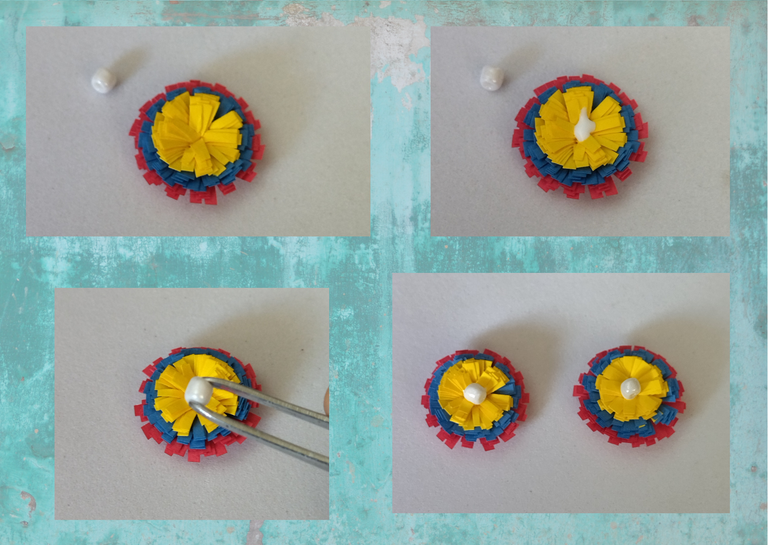
- Once the pompom is opened to our liking, we are going to place a pearl in the center to give it a striking detail, in my case I will place a white one, add a touch of glue in the center of the pompom, and place the pearl.
• Una vez abierto el pompón a nuestro gusto, vamos a colocarle una perlita en el centro para darle un detalle llamativo, yo en mi caso le colocare una de color blanco, añadimos un toque de pega en el centro del pompón, y colocaremos la perla.
- Now we have our pompoms ready, we are going to place their bases for fixed tendrils, we place a little glue and fix our bases on the back of the tendril, we will let them dry.
• Ya tenemos nuestros pompones listos, vamos a colocarle sus bases para zarcillos fijas, colocamos un poco de pega y fijamos nuestras bases por la parte de atrás del zarcillo, dejaremos secar.
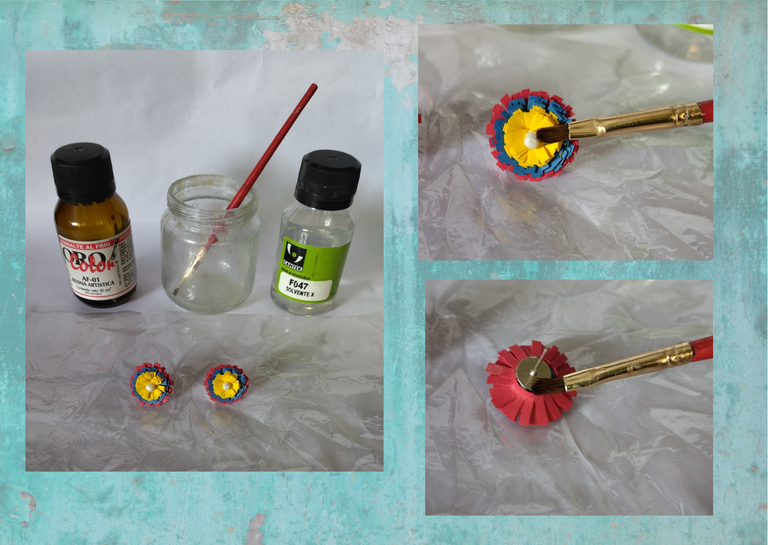
- Finally we are going to place its liquid protection, (plasticized), we take the glass bottle, we place a part of artistic resin, another part of solvent X, and with the brush we add to the pompoms by all its parts, we let it dry. In this way we already have our pompom tendrils ready for use.
• Por ultimo vamos a colocarle su protección liquida, (plastificado), tomamos el frasco de vidrio, colocamos una parte de resina artística, otra de solvente X, y con el pincel añadimos a los pompones por todas sus partes, dejamos secar. De esta manera ya tenemos nuestros zarcillos tipo pompón listos para su uso.
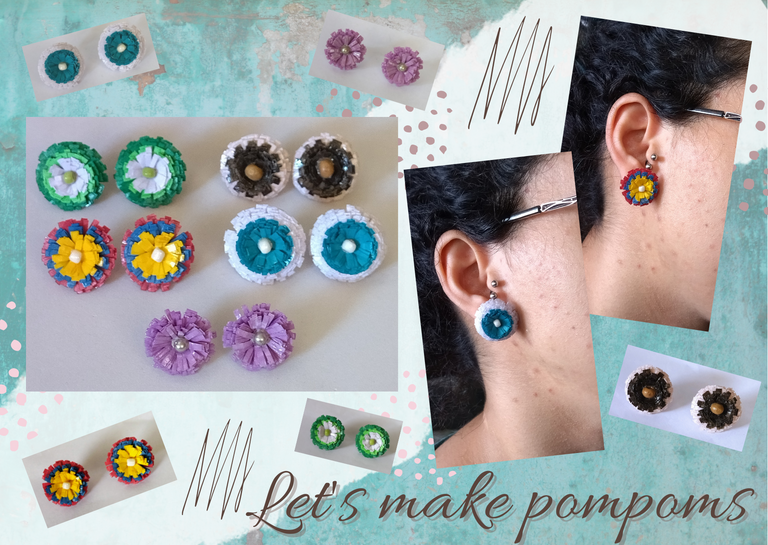
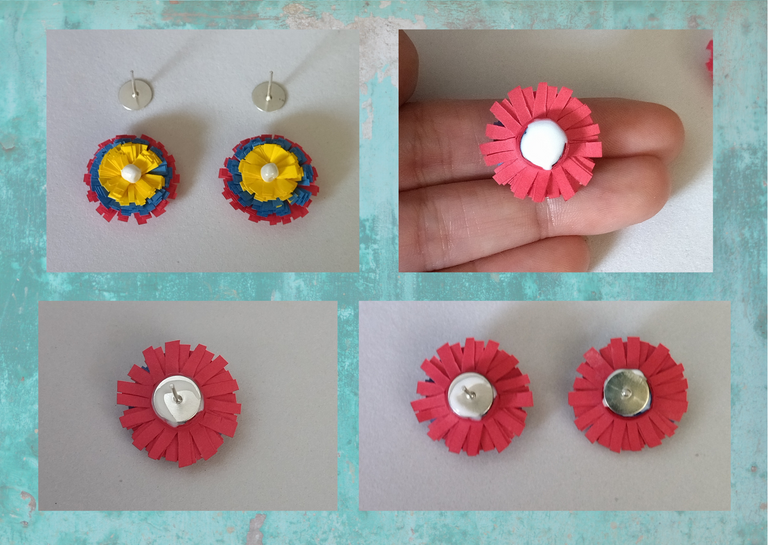
Final result:💕
As you observed I made the pair of tendrils with a tricolor combination (yellow, blue and red), but here I leave other combinations, some with more ribbons, others with less and even unicolor to get an idea and see how they look, and thus let your imagination fly when it comes to carry them out.
Resultado Final:💕
Como observaron les realice el par de zarcillos con una combinación tricolor, (amarillo, azul y rojo), pero por acá les dejo otras combinaciones, unos con más cintas, otros con menos y hasta unicolor para que se hagan una idea y vean como lucen, y de esa manera dejen volar su imaginación a la hora de llevarlos a cabo.

What did you think, did you like it?
I hope you did, I hope you liked my explanation, procedure and photos, I made them with love for you.
"Let out that muse that inspires you, and let your imagination fly".
Thank you all, see you next time. 🐾🐱💕
¿Que les pareció, les gustó?
Espero que sí, que les haya gustado mi explicación, procedimiento y fotos, los hice con mucho cariño por y para ustedes.
"Deja salir esa musa que te inspira, y deja volar tu imaginación".
Gracias a todos, nos vemos en la próxima. 🐾🐱💕
Todas las fotos usadas en este post son de mi autoría y han sido sacadas en mi celular personal un Redmi 9T y editadas Canva Banner hecho por mí en Paint Tool Sai Traducido con la ayuda de DeepL


