Saludos comunidad Creative Hive, Soy Edioretza, Venezolana y es un gusto para mi compartir con ustedes una vez mas y en esta oportunidad les estare mostrando como realizar un sencillo anillo con mostacillas:
Para iniciar realice un pequeño diseño utilizando la aplicacion Beadstool4 que nos permite crear diseños con mostacillas, esta aplicacion ademas trae una paleta extensa de colores y diferentes tipos de técnicas de tejido de cuentas, yo uso la version gratuita, que me es funcional, excepto que no guarda los diseños en la aplicacion sino fuera de ella pero aun asi es super útil para nuestro proposito.
Para este anillo realice como indique un diseño sencillo y como me gusta el juego tetris pues aqui pequeño honor como muestro:
Greetings Creative Hive community, I am Edioretza, Venezuelan and it is a pleasure for me to share with you once again and this time I will be showing you how to make a simple ring with beads:
To start I made a small design using the Beadstool4 application that allows us to create designs with beads, this application also brings an extensive palette of colors and different types of bead weaving techniques, I use the free version, which is functional, except that it does not save the designs in the application but outside it but still is super useful for our purpose.
For this ring I made as I indicated a simple design and as I like the game tetris so here little honor as I show:
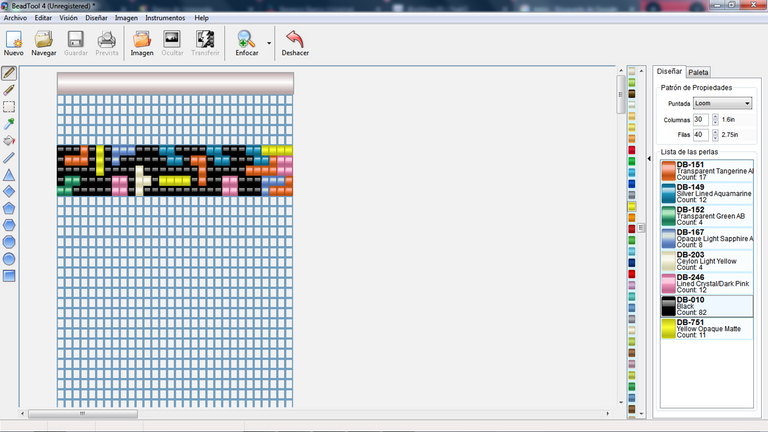
como pueden ver al lado derecho de la captura de pantalla aparece un menu donde eliges la puntada y los colores, para mi diseño del anillo la tecnica elejida es loom que es para telar, pero les explicare el tejido sin telar con el punto cuadrado.
Ahora una vez listo este patrón comenzamos con muestro tejido, la longitud del tejido sera proporcional a la medida del dedo donde colocara el anillo. Bien comencemos:
Yo utilizare mostacillas normales, aguja para mostacillas e hilo para mostacillas delicas de la marca nemo :
As you can see on the right side of the screenshot there is a menu where you choose the stitch and colors, for my ring design the chosen technique is loom which is for loom, but I will explain the weaving without loom with the square stitch.
Now once this pattern is ready we start with my knitting, the length of the knitting will be proportional to the measure of the finger where you will place the ring. Well let's start:
I will use normal beads, bead needle and thread for nemo beads:

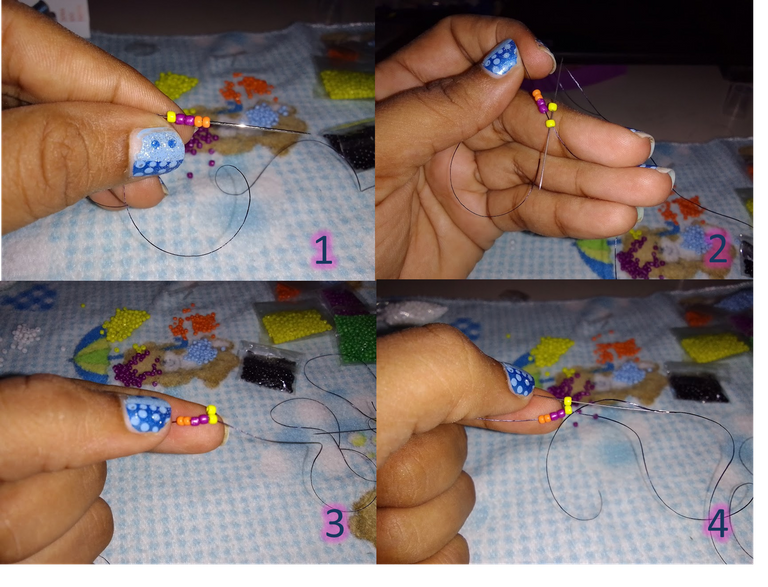
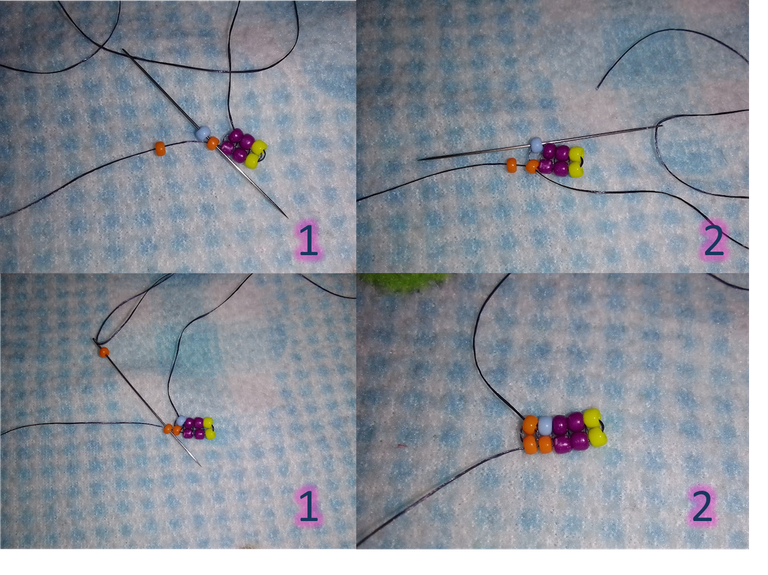
Comenzamos colocando en nuestra aguja 5 mostacillas con los colores en el siguiente orden, claro ud puede utilizar cualquier color o realizarlo todo de un solo color, y llevando casi al final del hilo dejando como 10 cm de hilo al final puede sostener con otra mostacillas mas grande si es de su gusto..
Luego de ubicar las mostacillas en nuestro hilo le damos el inicio al tejido punto cuadrado, (1) colocando una nueva mostacilla en este caso de color amarilla,(2) pasamos la aguja por la mostacilla amarilla de abajo de adentro hacia afuera y (3)(4)luego volvemos a pasar el hilo por la mostacilla que acabamos de colocar, para continuar con la siguiente;
We begin placing in our needle 5 beads with the colors in the following order, of course you can use any color or do it all in one color, and taking almost to the end of the thread leaving about 10 cm of thread at the end you can hold with another larger beads if you like it.
After placing the beads in our thread we start the square stitch, (1) placing a new bead in this case of yellow color, (2) we pass the needle through the yellow bead from the bottom inside out and (3) (4) then we pass the thread through the bead that we just placed, to continue with the next one;
Repetimos el proceso anterior con una cuenta morada, la enfilamos en nuestra aguja, pasamos por la mostacilla morada de abajo, de adentro hacia afuera, y una vez colocada esa mostacilla pasamos el hilo nuevamente por alli..
We repeat the previous process with a purple bead, thread it on our needle, pass it through the purple bead from the bottom, from the inside to the outside, and once the bead is in place, we pass the thread through it again.
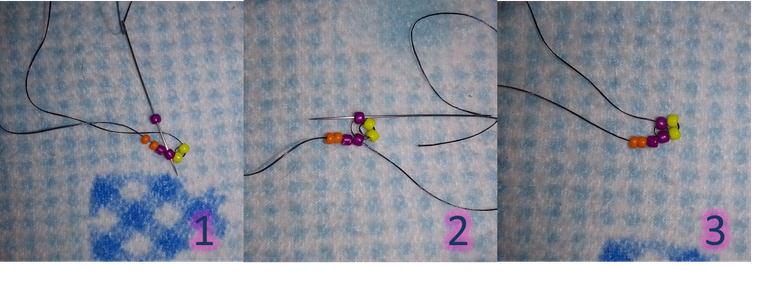
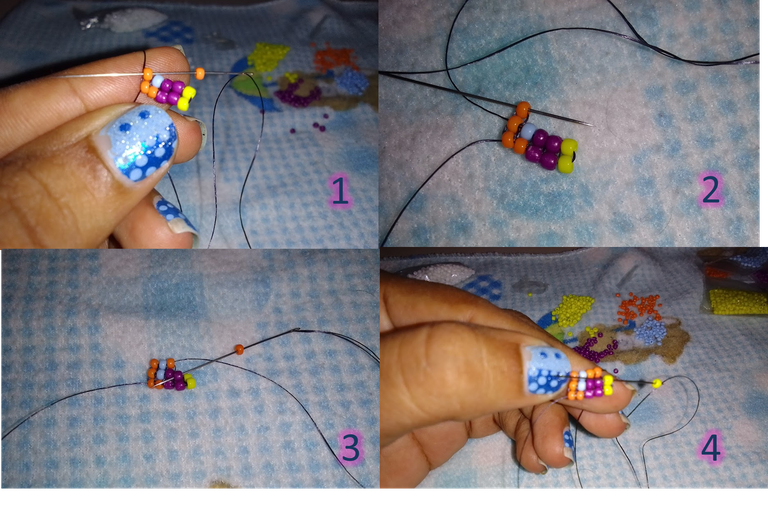
Bien este proceso lo continuamos con las mostacillas siguientes hasta llegar a la naranja, siguiendo nuestro esquema mostrado anteriormente, en la siguiente imagen puedes ver las siguientes uniones hasta llegar a la ultima y vemos la segunda fila formada
Well, we continue this process with the following beads until we get to the orange one, following our scheme shown above, in the following image you can see the following joints until we get to the last one and we see the second row formed.
Continuamos a formar la siguiente fila, en este punto colocamos la mostacilla siguiente en la aguja y pasamos la aguja nuevamente de adentro hacia afuera y luego se pasa la aguja por la mostacilla que acabamos de colocar para continuar con la siguiente y asi hasta terminar la fila,
We continue to form the next row, at this point we place the next bead on the needle and pass the needle again from the inside to the outside and then pass the needle through the bead we just placed to continue with the next one and so on until the end of the row,
La creación de este anillo consta de estos pasos hasta llegar a longitud que desee lograr, con este mismo tejido puedes hacer tanto el anillo que es mi propósito, también puede hacer una pulsera o choker..
The creation of this ring consists of these steps until you reach the length you want to achieve, with this same fabric you can make both the ring that is my purpose, you can also make a bracelet or choker.
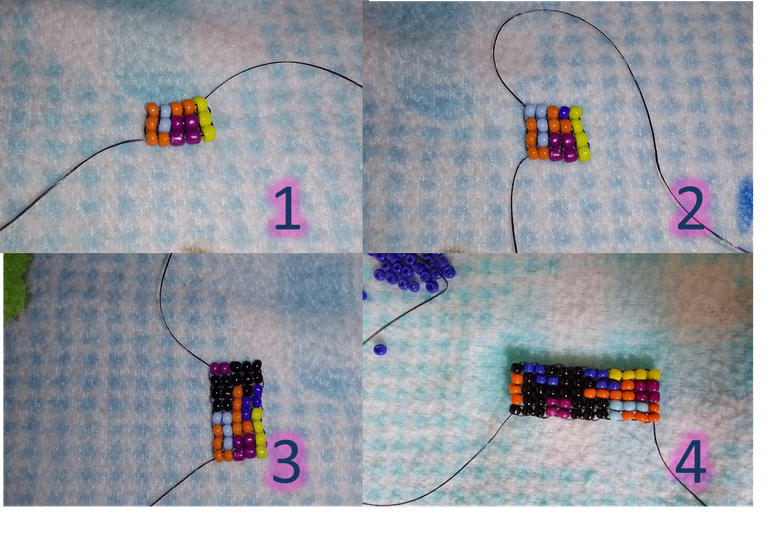
Bien, continuamos el tejido como se explico anteriormente, hasta lograr la medida deseada para nuestro anillo, y luego unimos los extremos para cerrar nuestro anillo, entro por la mostacilla amarilla doy la vuelta y salgo por la mostacilla verde como muestra en la (2), luego comienzo a unir pasando la aguja por la mostacilla amarilla (3) y luego paso por la negra (4) sigo ese proceso hasta llegar a las ultimas mostacillas:
Well, we continue weaving as explained above, until we reach the desired size for our ring, and then we join the ends to close our ring, I enter through the yellow bead and go around and out through the green bead as shown in (2), then I start to join passing the needle through the yellow bead (3) and then through the black bead (4) I follow this process until I reach the last beads:
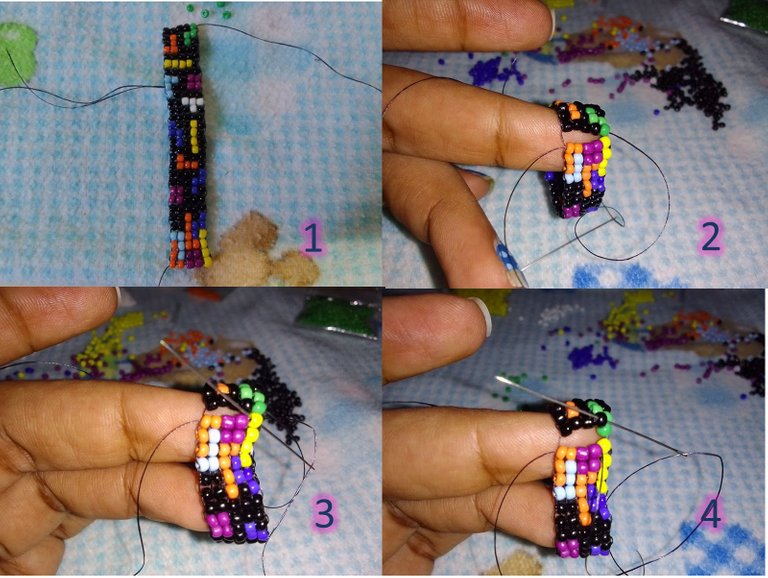
luego de terminar de unirlos y formar el anillo, elimino el exceso de hilo, y así quedo mi anillo:
After I finish joining them and forming the ring, I remove the excess thread, and this is what my ring looks like:
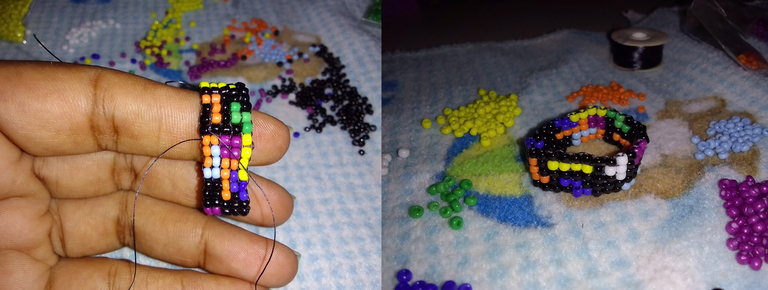
y así se ve en mi mano/and it looks like this in my hand:

Espero sea de su agrado mi explicación y puedan realizarlo..
Gracias a todos por leerme..
I hope you like my explanation and that you can do it. ....
Thank you all for reading me...
The images are my property, collages made in PowerPoint .