
Feliz noche a todos los amigos que hoy me visitan.
Les doy una cordial bienvenida.
Y ahora te invito a que lo hagas conmigo, verás que te será fácil.
Vas a necesitar:
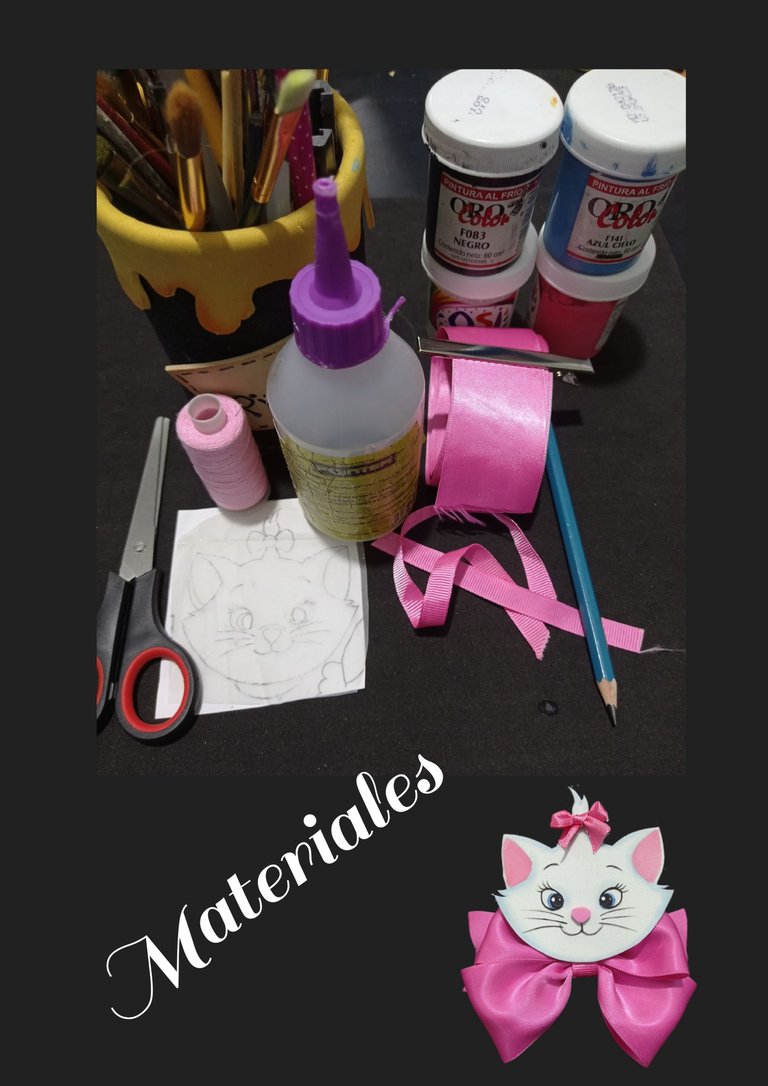
Cintas de raso, Foami blanco y rosa.
Hilo, Tijera.
Pinceles y pinturas.
Tijera y lápiz.
Silicón y Pinza de cabello.
Dibujo o impresión.
Tiza de colores.
Comencemos:
Paso 1:
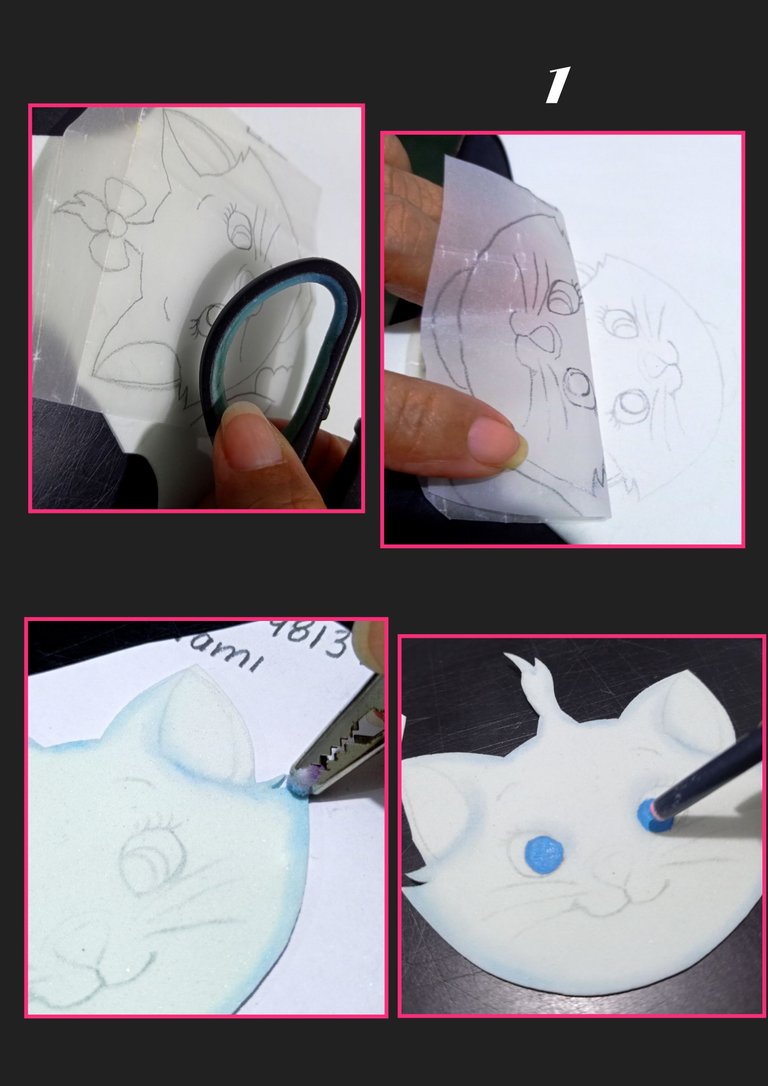
- Remarca el dibujo y coloca sobre el foami, luego frota con la tijera y asegúrate que todo el dibujo quede marcado o transferido y recorta por todo el borde.
- Luego toma un pedacito de algodón y frota la tiza y comienza a pintar todo el borde.
- Ahora con la punta trasera del pincel, pinta los ojos y deja secar.
Paso 2:
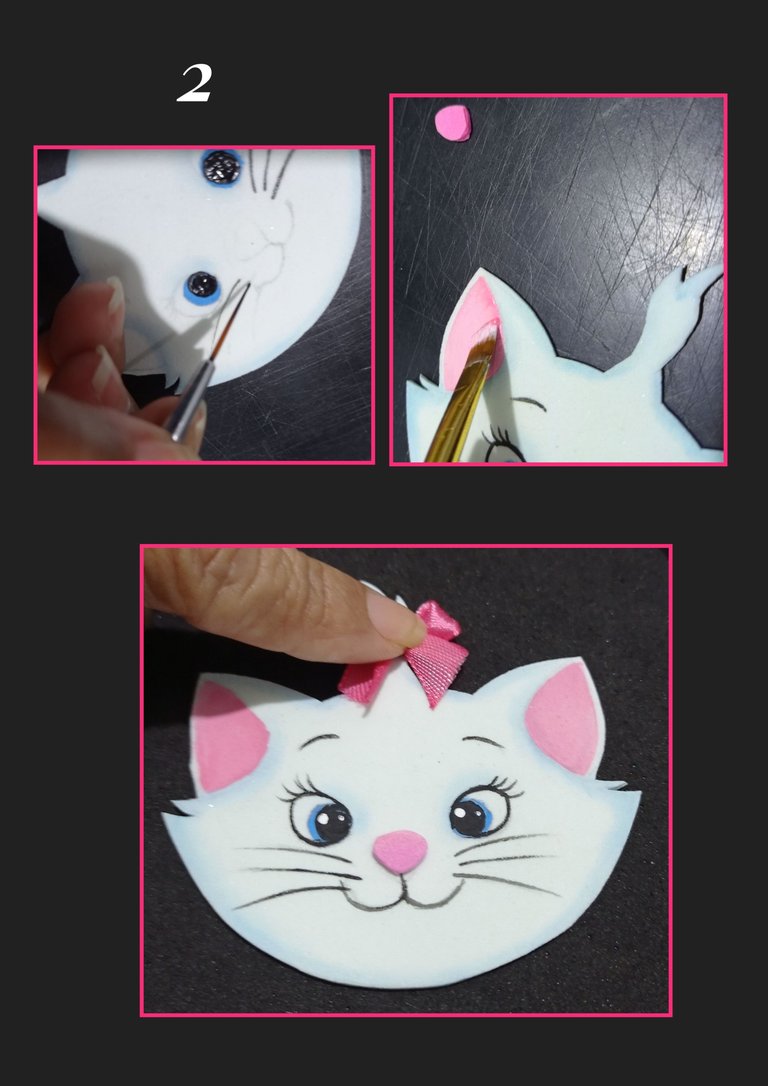
- Sigue pintando los ojos con pintura negra y con un pincel delineador pinta bigotes, cejas, boca y ojitos.
- Después pinta las orejas en el centro con color rosa y deja secar.
- Por último haz un lacito y pega.
Paso 3:
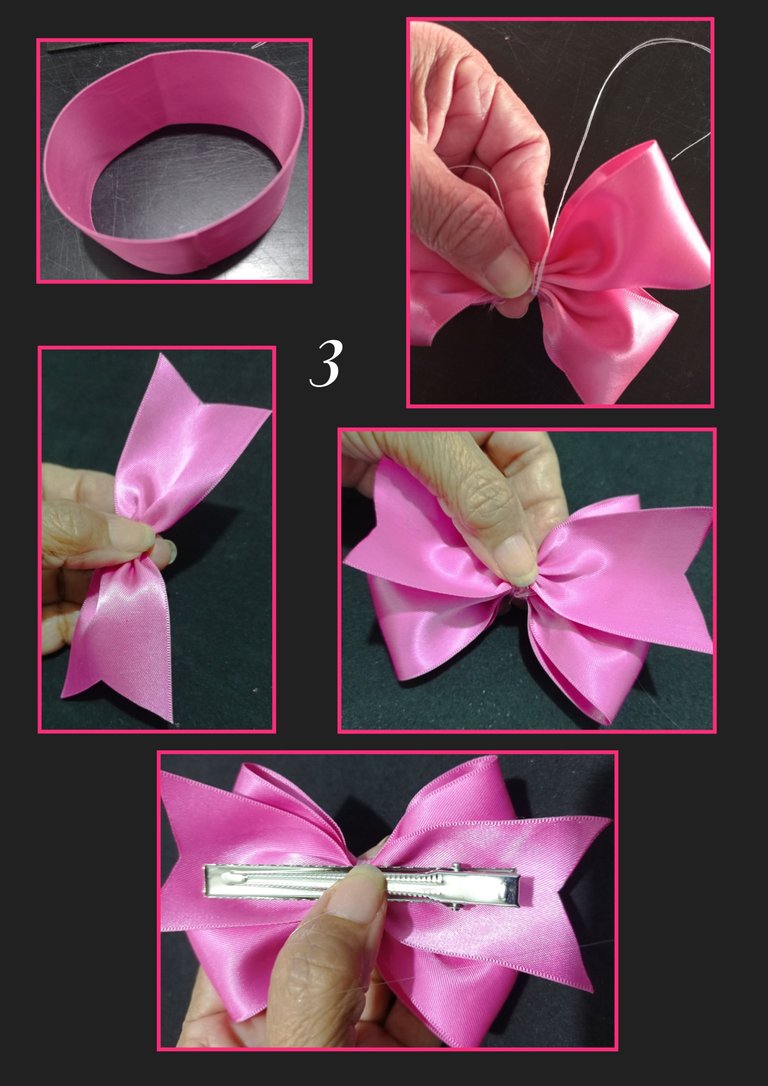
- Recorta dos piezas de cinta de 20cm cada una y cierra aplicando silicon en los extremos, luego divide a la mitad y amarra con hilo como te muestro en la foto.
- Aparte recorta una pieza de cinta de 13 cms y recorta en forma triangular en los extremos, haz pliegues en el centro y vuelve a amarrar y anuda.
- Ahora aplica silicón en el centro y pega la pinza.
Paso 4:
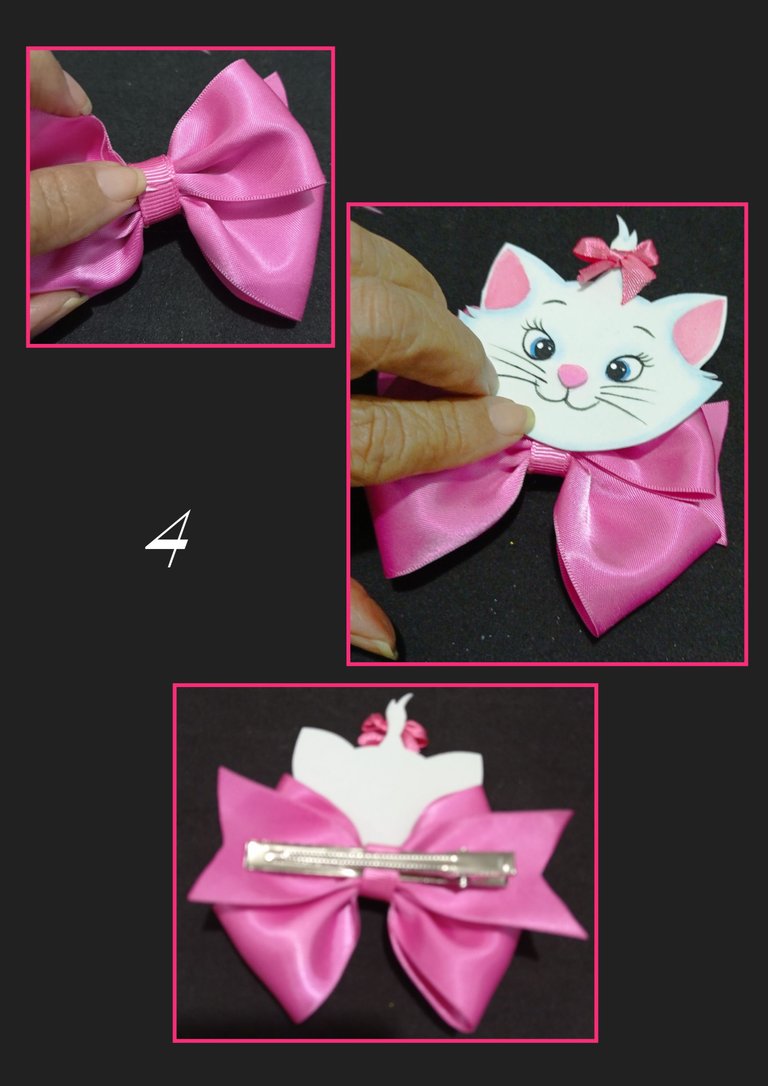
- Ahora con una cinta más delgada ajusta el lazo a la cinta en el centro y pega con silicón.
- Y para terminar, aplica silicón en la gatica y pega al lazo, así quedará terminado este hermoso Lazo.
Recuerda siempre tratar de dar un buen acabado a tus piezas.
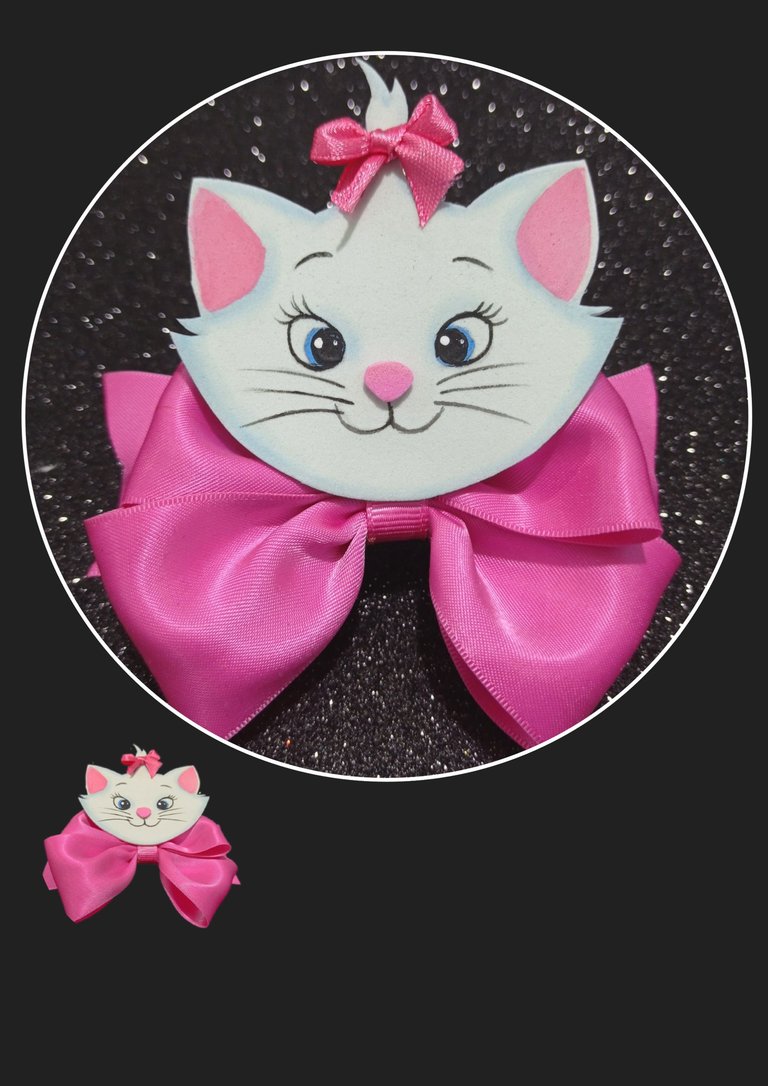
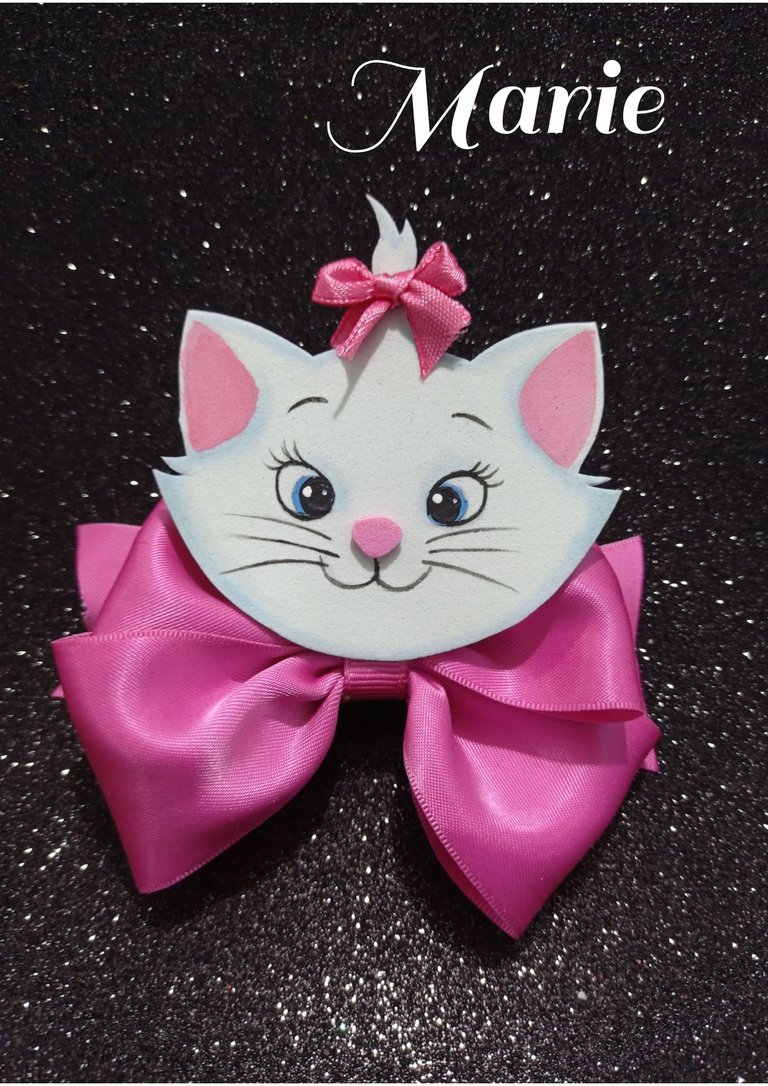
Ahora te muestro unas fotitos con el resultado final.
Puedes hacer el mismo modelo de lazo y cambiar la imagen por la que prefiera la niña.
Editor de fotos: GridArt
Teléfono: Redmi Note 9
Fuente:https://es.pinterest.com/pin/133700682682766771/
Espero te haya gustado mi publicación y te sirva de guía en cualquier ocasión.
Inventa, crea y diseña tu mismo.
Muchas gracias por tu apoyo y comentario.
English:
Happy evening to all the friends who visit me today.
I give you a warm welcome.
And now I invite you to do it with me, you will see that it will be easy for you.
You will need:
Satin ribbons, white and pink Foami.
Thread, scissors.
Brushes and paints.
Scissors and pencil.
Silicone and hair clip.
Drawing or printing.
Colored chalk.
Let's begin:
Step 1:
- Outline the drawing and place it on the foami, then rub with the scissors and make sure that the whole drawing is marked or transferred and cut all around the edge.
- Then take a piece of cotton and rub the chalk and start painting all around the edge.
- Now with the back tip of the brush, paint the eyes and let dry.
Step 2:
- Continue painting the eyes with black paint and with an eyeliner brush paint whiskers, eyebrows, mouth and eyes.
- Then paint the ears in the center with pink and let dry.
- Finally make a bow and glue.
Step 3:
- Cut two pieces of ribbon of 20cm each and close by applying silicone on the ends, then divide in half and tie with thread as shown in the photo.
- Separately cut a 13 cm piece of ribbon and cut in a triangular shape at the ends, make folds in the center and tie and knot again.
- Now apply silicone in the center and glue the clip.
Step 4:
- Now with a thinner ribbon adjust the loop to the ribbon in the center and glue with silicone.
- And to finish, apply silicone on the kitten and glue to the ribbon, so this beautiful ribbon will be finished.
Remember to always try to give a good finish to your pieces.
Now I show you some pictures with the final result.
You can make the same model of ribbon and change the image for the one the girl prefers.
Photo Editor: GridArt
Phone: Redmi Note 9
Fuente: https://es.pinterest.com/pin/133700682682766771/
I hope you liked my post and it will serve as a guide for you in any occasion.
Invent, create and design your own.
Thank you very much for your support and comment.