
✨🧚♀️Hello community! Welcome| ¡Hola comunidad, bienvenido/a🧚♀️!✨
Hoy les tengo un nuevo tutorial el cual me es muy lindo enseñarles, creativo y el cual siempre quise realizar aquí con ustedes. Este mismo es una idea para un disfraz en caso de que no tengas o para que le regales a tu Bestie <3 que te da aires de ser una hadita🧚♀️. A continuación, los materiales:
Today I have a new tutorial which is very nice to show you, creative and which I always wanted to do here with you. This same one is an idea for a costume in case you don't have one or for you to gift your Bestie <3 that gives you airs of being a little had🧚♀️. Below are the materials:
`✨🧚♀️Materials to be used🧚♀️✨`
| -Nail clippers | - Corta uñas | |
|---|---|---|
| - Fashion jewelry tweezers | - Pinzas de bisuteria | |
| - Fashion jewelry wire (I used 1mm) but you have to buy a thicker one so that it doesn't deform | - Alambre de bisutería (yo utilice de 1mm) pero tienen que comprar uno más grueso para que no se les deforme | |
| - 0.3mm bijouterie wire | - Alambre de bisutería de 0.3mm | |
| - Swarovski 2 large and 6 small to decorate in the color of your choice | - Swarovski 2 grandes y 6 pequeños para decorar del color de tu preferencia |
•STEP BY STEP•
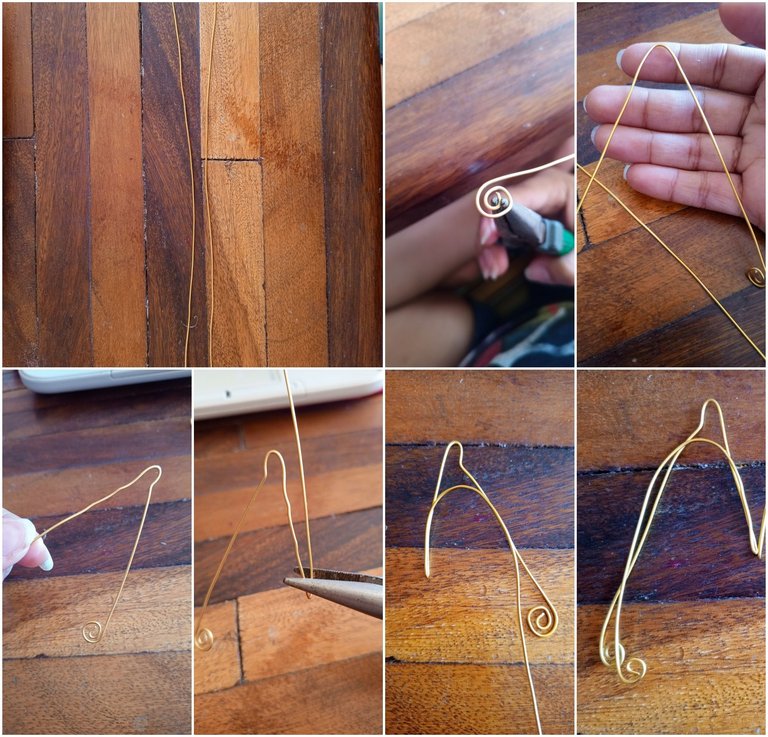
•STEP BY STEP• Como paso N°1 vamos a tomar 30 cm del alambre de 1mm (o el más grueso que eligieron) vamos a curvear en forma de un remolino๑ una de las puntas. Luego, realizamos una curvatura un poco menos de la mitad de nuestro alambre doblándolo como se puede observar en la imagen y en la parte donde se ve el 🌀. Es opcional, si quieren crearle un efecto de puntita apretando con la pinza entre el alambre doblado y curveándola un poco.
Ahora bien, la parte más larga la vamos a doblar hacia dentro y atrás del alambre donde está el remolino 🌀 y la vamos a curvear. Cosa de que esta parte nos ayude a sostener nuestras orejitas de hada. Le realizamos también a la punta de este tramo de alambre un remolino🌀. Mientras vayan doblando y eso, van a tener que ir acomodando para que les quede como una orejita.
As step N°1 we are going to take 30 cm of the 1mm wire (or the thickest you chose) we are going to bend in the shape of a swirl๑ one of the ends. Then, we make a bend a little less than half of our wire bending it as you can see in the image and in the part where you see the 🌀. It is optional, if you want to create a little point effect by squeezing with the tweezers between the bent wire and curving it a little.
Now, the longest part we are going to bend it inside and behind the wire where the 🌀 swirl is and we are going to curve it. This part will help us to hold our little fairy ears. We also make a swirl🌀 at the end of this wire. While you are bending and so on, you will have to adjust it so that it looks like a little ear.
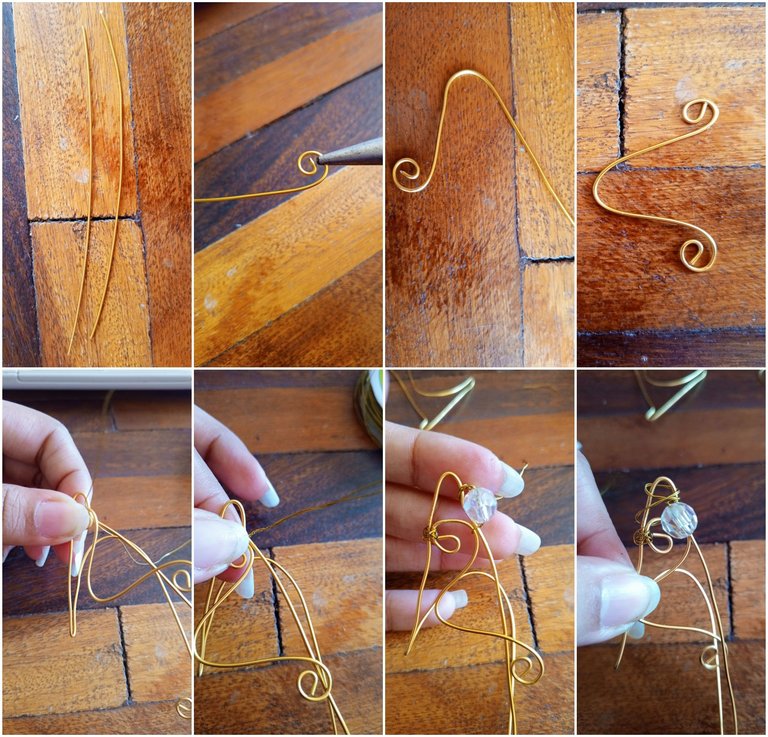
En este paso vamos a crear los alambres para decorar nuestra orejita de hada. Vamos a recortar como unos 10cm de alambre y doblaremos los extremos del alambre como un remolino también a la mitad de este alambre lo vamos a curvear como si fuera una colina. Aquí, tomaremos ahora el alambre de 0.3mm utilizándolo como amarre para sujetar nuestro alambre en forma de colina el cual colocaremos debajo de nuestra punta de la oreja mirando hacia la izquierda.
Enrollamos nuestro alambre dándole vueltas, pasándolo por delante y por detrás del accesorio y del alambre que conforma nuestra orejita. Ya que le dimos vueltas con ayuda de la pinza y miramos qué está bien fijado le introducimos una cuenta de cristal, en mi caso le metí esta blanca. El alambre que quedó lo enrolle alrededor de la punta de la oreja para que no se saliera nuestra la cuenta.
In this step we are going to create the wires to decorate our fairy ear. We are going to cut about 10cm of wire and bend the ends of the wire like a swirl also in the middle of this wire we are going to curve it like a hill. Here, we will now take the 0.3mm wire using it as a tie to hold our wire in the shape of a hill which we will place under our ear tip facing to the left.
We wind our wire around it, passing it in front and behind the accessory and the wire that forms our ear. Once we twisted it with the help of the tweezers and we check that it is well fixed, we introduce a glass bead, in my case I put this white one. I wrapped the remaining wire around the tip of the ear so that the bead would not come out of the ear.
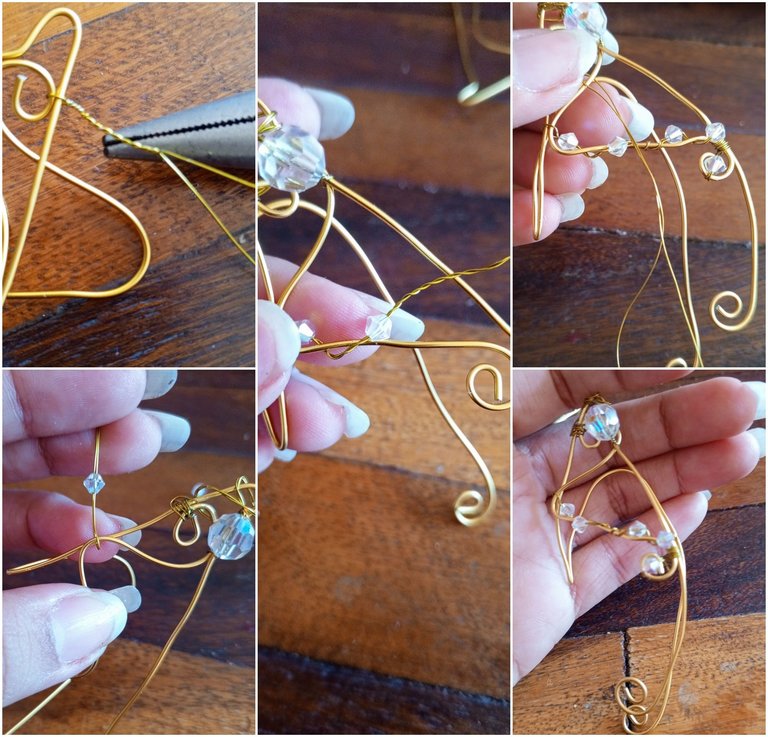
De nuevo volvemos a tomar otro alambre con el cual repetí el mismo paso anterior para que no se moviera el alambre con forma de colina y le vamos a ir introduciendo los swaroski pequeños, Enrollamos eso alrededor del mismo alambre en forma de colina y le introducimos otro swaroski, repetimos el paso dos veces más hasta tener cinco (5) cuentas enredadas en ése alambre. Le quise dar un toque colocando la cuenta número 5 en donde está el remolino🌀 y de ahí terminar enrollando lo que queda de alumbre para fijar, sujetar y que no se mueva ni se salga nada.
Repetí el mismo pasó en medio del alambre en forma de colina introduciéndole aquí un swaroski azul y otro blanco haciendo una intersección entre la enredadera qué hice y el mismo.
Para los toques finales repetimos todos los pasos anteriores con la otra oreja solo qué de modo de espejo. Tienen que irse midiendo también la orejita para que no les quede tan grande y hay que ir dándole forma de oreja de hada porque se nos puede ir deformando en la medida que vayamos amarrando y decorando.
Again we take another wire with which I repeated the same previous step so that the wire does not move and we are going to introduce the small swaroski, we wind that around the same wire in the shape of a hill and we introduce another swaroski, we repeat the step two more times until we have five (5) beads entangled in that wire. I wanted to give it a touch by placing the bead number 5 where the swirl is🌀 and from there finish winding what is left of alum to fix, hold and that nothing moves or comes off.
I repeated the same step in the middle of the wire in the shape of a hill introducing here a blue swaroski and another white one making an intersection between the vine I made and the same.
For the final touches we repeat all the previous steps with the other ear only as a mirror. You also have to measure the ear so that it is not too big and you have to give it the shape of a fairy ear because it can be deformed as we go tying and decorating.
•💖RESULT💖•
•💖RESULT💖•
💖Y este es el resultado💖
Deseo mucho que hagas esta manualidad de hadita para regalar o para un disfraz. ¡Disfrútalo bastante!
I so wish you would make this little fairy craft for a gift or for a costume. enjoy it very much!
💞Thank you so much for making it this far! I hope you liked my post, I'll see you next time!💞
💞¡Muchas gracias por llegar hasta aquí! Espero que te haya gustado mi post. ¡Nos vemos en una próxima oportunidad!💞

📲 Todas las fotografías fueron tomadas con un teléfono Tecno Spark 10 pro
📷 TODAS LAS FOTOS SON DE MI PROPIEDAD