D. I. Y
Hello everyone, today I am doing a craft / diy, I hardly do crafts or diy of this style and since I wanted an ornament for my makeup and I had all the materials at home, I said why not? It is a kind of headpiece with roses for my head.
Hola a todos, hoy estoy haciendo una manualidad, casi no hago manualidades de este estilo y como quería un adorno para mi maquillaje y todos los materiales los tenía a la mano dije ¿por qué no? Se trata de una especie de diadema con rosas para mi cabeza.
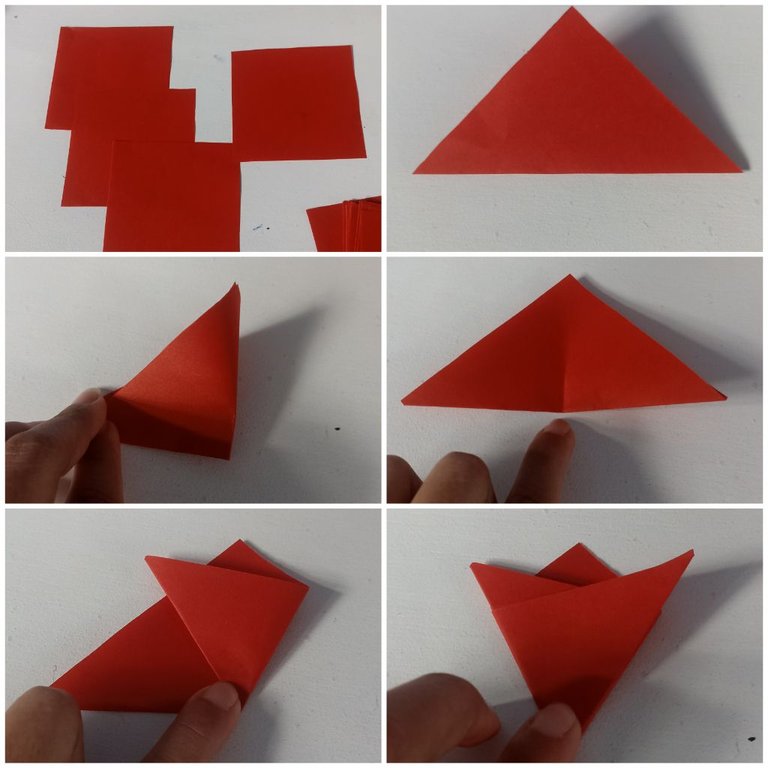
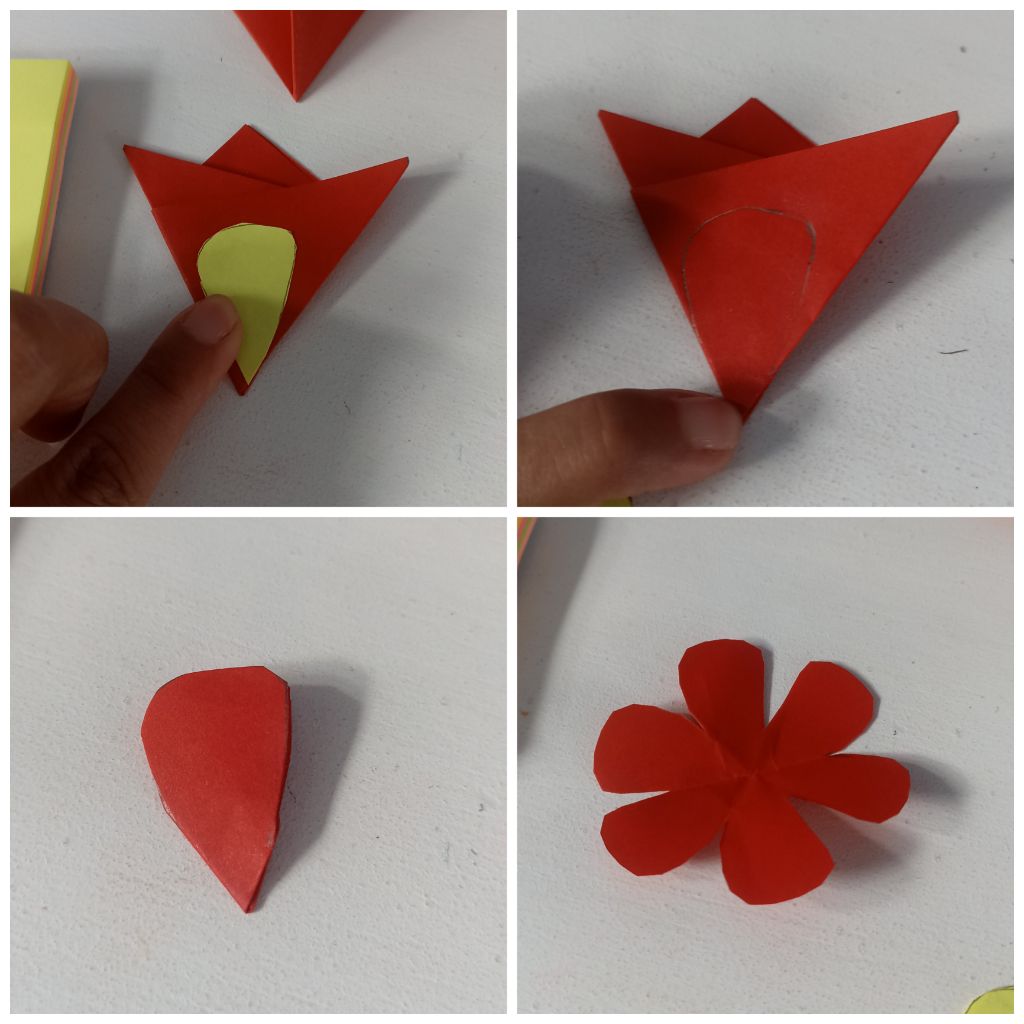
First we need to make the roses, these roses are made of paper, so we are going to need colored paper, in this case I wanted red because that is what I need for my headdress, the paper that we are going to use measures 8.5 cm x 8.5 cm , is a square.
So we start by folding our sheet into a triangle, then we are going to join point to point and we are going to press one side but only halfway. Then we open the sheet again to the same shape as the triangle and from there we take one of the ends and guided by the side that we marked with our finger, we are going to fold it making another smaller triangle and the same procedure with the other end.
Primero necesitamos hacer las rosas, estas rosas son hechas de papel, por lo que vamos a necesitar papel de colores, en este caso yo quería rojo porque es lo que preciso para mi tocado, el papel que vamos a utilizar mide 8.5 cm x 8.5 cm, es un cuadrado. Comenzamos por doblar nuestra hoja en un triángulo, luego vamos a juntar punta con punta y vamos a presionar un costado pero solo hasta la mitad. Luego volvemos a abrir la hoja a la misma forma del triángulo y de ahí tomamos una de las puntas y guiándonos del lado que marcamos con el dedo vamos a doblarla haciendo otro triángulo más pequeño y el mismo procedimiento con la otra punta.
Once we have the sheet already folded, we are going to make a pattern with the figure of the drop and we are going to place this pattern on top of our sheet, we will make the same mark of the drop but leaving a space at the end and proceed to cut it out, then what we have left we proceed to gently open it and it will look like the shape of a flower. We are going to need 4 pieces of these to make our rose.
Una vez que tenemos la hoja ya doblada, vamos a hacer un patrón con la figura de la gota y este patrón lo vamos a colocar encima de nuestra hoja, haremos la misma marca de la gota pero dejando un espacio al final y procedemos a recortarlo, luego eso que nos quedó procedemos a abrirlo gentilmente y parecerá la forma de una flor. Vamos a necesitar 4 piezas de estas para hacer nuestra rosa.
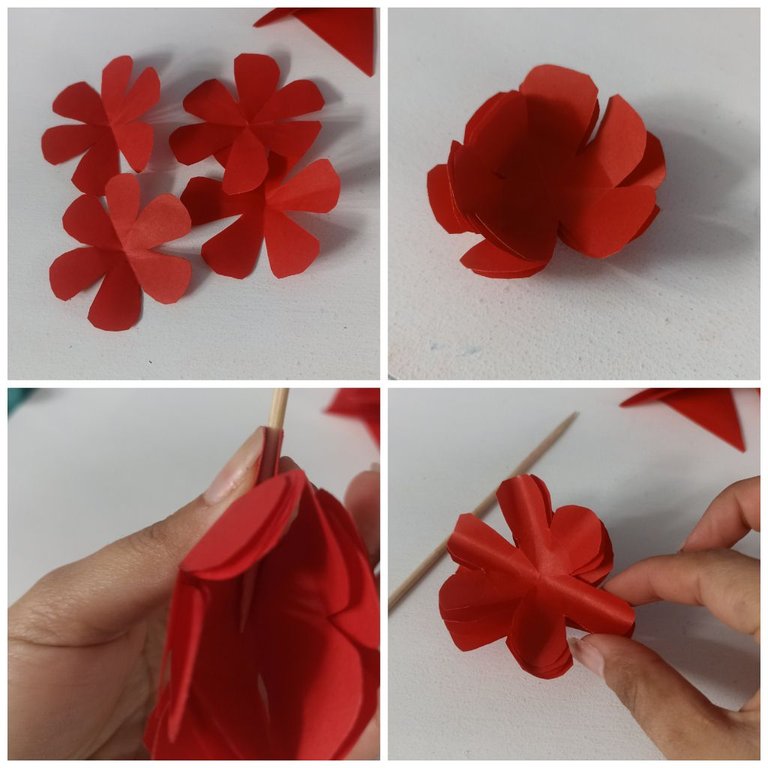
Once we have our four pieces, we are going to take them all together and we are going to proceed with a food pick to give it a rounded shape through the middle of the petals, here we can separate the pieces and with a toothpick to 2 pieces we are going to round the tips of the petals, we use that middle line as a guide to round each petal into two parts, first one corner, then the other, this will give it a better effect.
Una vez que tenemos nuestras cuatro piezas, vamos a tomarlas todas juntas y vamos a proceder con un palillo de comida a darle forma redondeada por el medio de los pétalos, aquí podemos separar las piezas y con un palillo de diente a 2 piezas vamos a redondear las puntas de los pétalos, usamos esa línea del medio como guía para redondear cada pétalo en dos partes, primero una esquina, después la otra, esto le dará un mejor efecto.
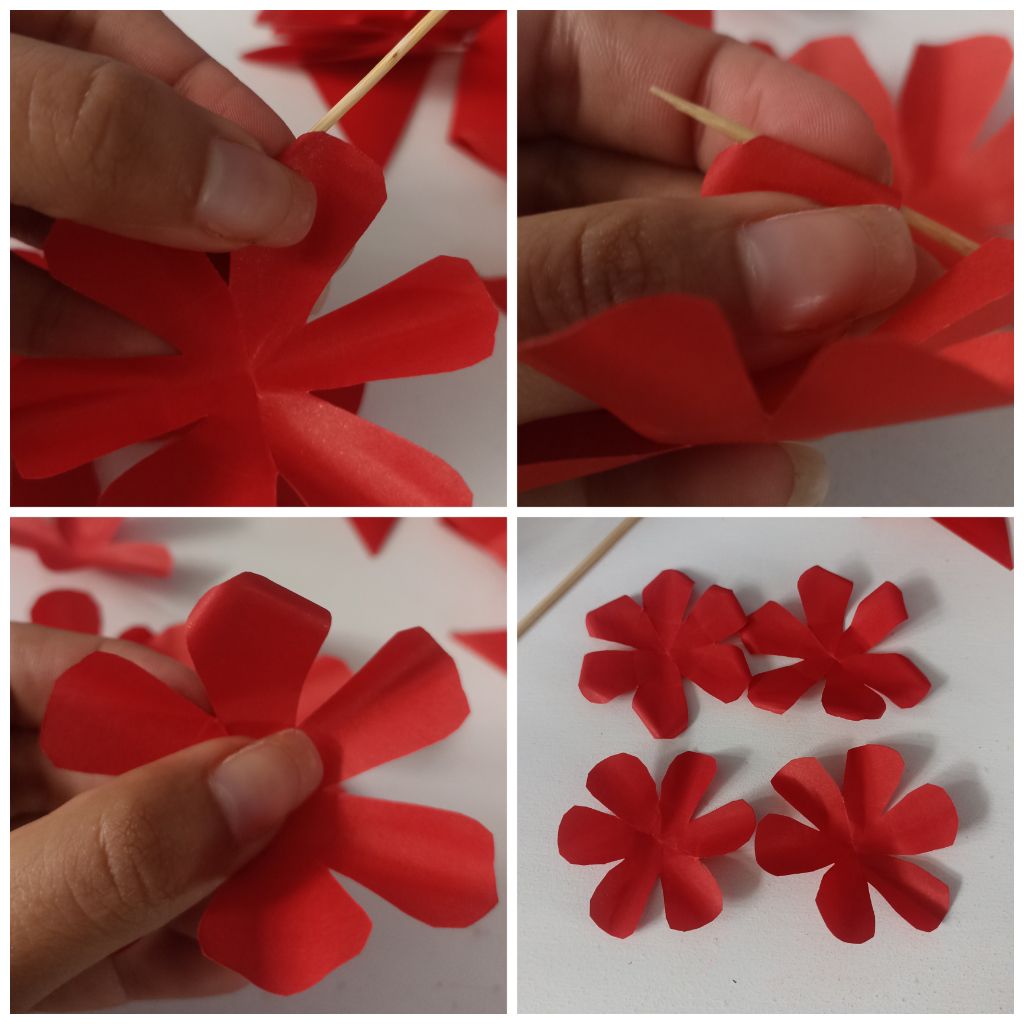
Now we are going to start assembling the roses, first we start with the 2 pieces that are flat in the corners, we are going to take a point from one end of a petal and put glue and we will do the same with the petal that is on the other end (poles opposite) but the glue of this petal will be on the other side, and what we are going to do is join them, we will do the same with all the petals until they look like a bud.
Ahora vamos a empezar a armar las rosas, primero empezamos con las 2 piezas que están planas en las esquinas, vamos a tomar una punta de un extremo de un pétalo y colocamos pegamento y haremos lo mismo con el pétalo que está del otro extremo (polos opuestos) pero la pega de este pétalo será del otro lado, y lo que vamos a hacer es unirlos, lo mismo haremos con todos los pétalos hasta que parezca un capullo.
Now we take the next piece that also has flat petals and we put glue right in the middle and there we are going to glue our bud in the whole center.
In this part we need to put glue on the petals but only on one edge, we will do the same with the rest of the petals, following the same direction and then we are going to join all the petals, trying to make the part that has glue coincide with the part that does not have glue from the other petal, we gently join it with our fingers until it takes shape.
Ahora tomamos la siguiente pieza que también tiene los pétalos planos y le colocamos pegamento justo en el medio y ahí vamos a pegar nuestro capullo en todo el centro.
En esta parte necesitamos colocar pegamento en los pétalos pero solamente en un borde, haremos lo mismo con el resto de los pétalos, siguiendo el mismo sentido y luego vamos a unir todo los pétalos, tratando de que la parte que tiene pegamento coincida con la parte que no tiene pegamento del otro pétalo, gentilmente vamos uniendo con los dedos hasta que toma forma.
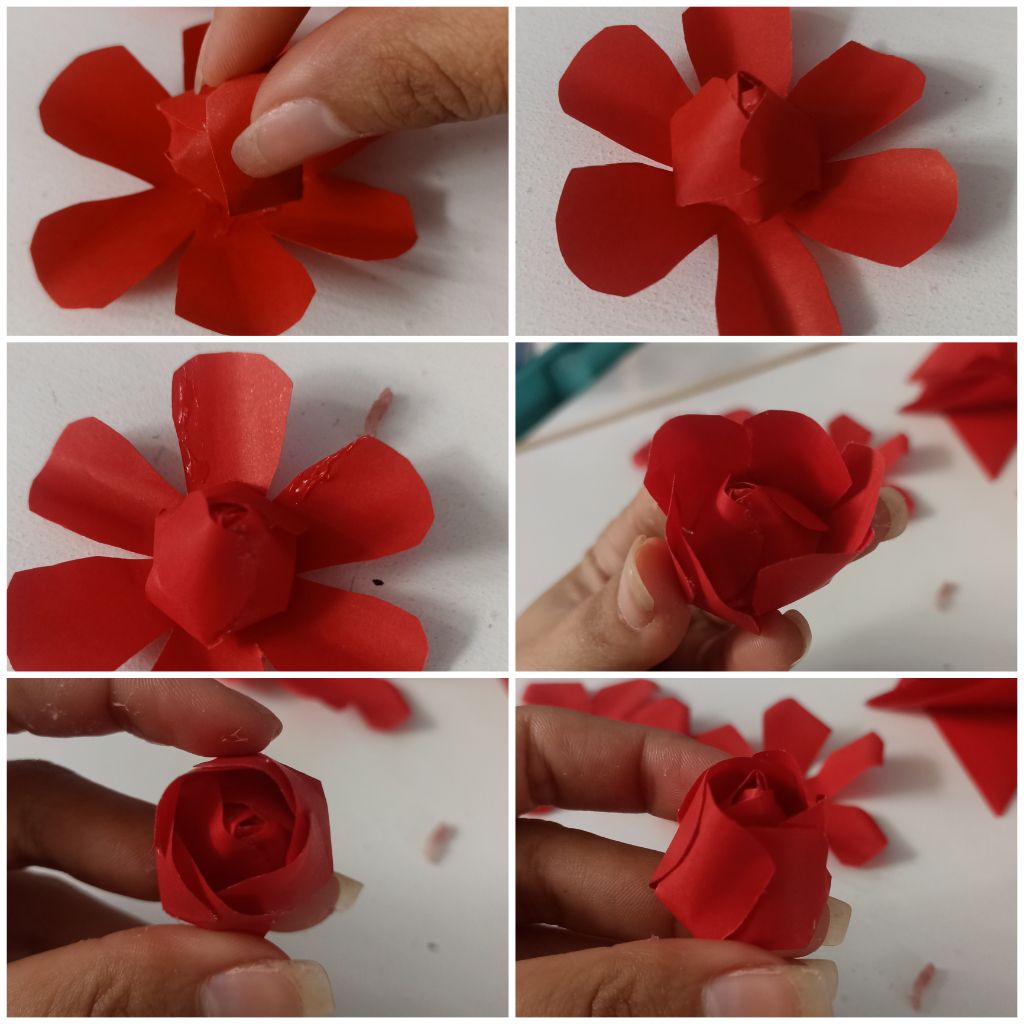
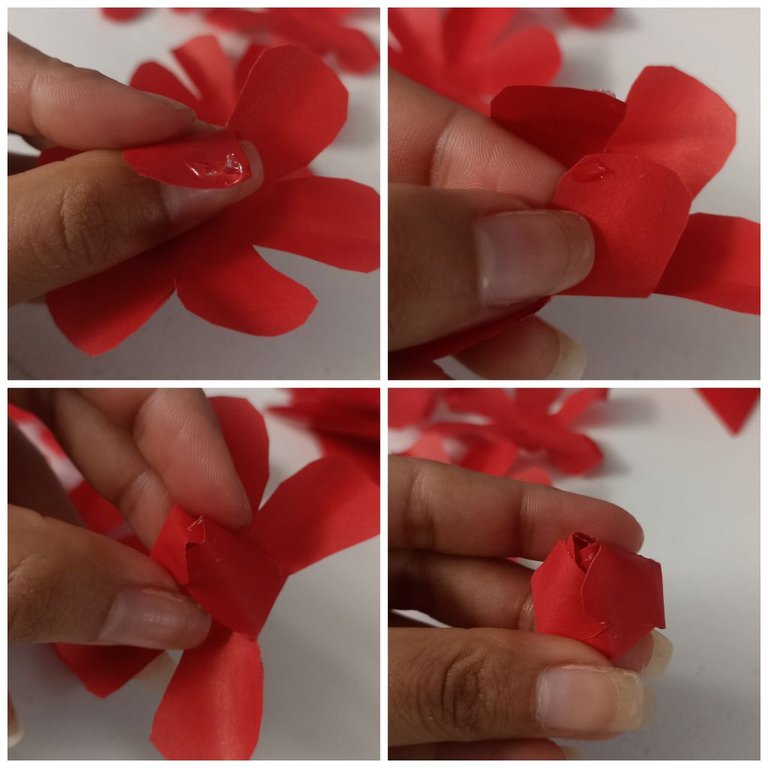
Now we have to take the 2 pieces that have rounded edges for this we are going to do exactly the same procedure as above, we are going to place our bud in the center, we are going to put glue on the petals in the same direction, and we will try to stick them exactly the same that as we did before and we will also do with the next piece, we must always press gently on the bottom, never on top because the top does not have glue so if we start pressing from top we will damage our rose.
Ahora nos toca tomar las 2 piezas que tienen los bordes redondeados para esto vamos a hacer exactamente el mismo procedimiento anterior, vamos a colocar nuestro capullo en el centro, vamos a colocar pegamento en los pétalos en el mismo sentido, y trataremos de pegarlos exactamente igual que como hicimos anteriormente y así también haremos con la siguiente pieza, siempre debemos presionar gentilmente en el fondo, nunca arriba porque arriba no tiene pegamento entonces si empezamos a presionar por arriba vamos a dañar nuestra rosa.
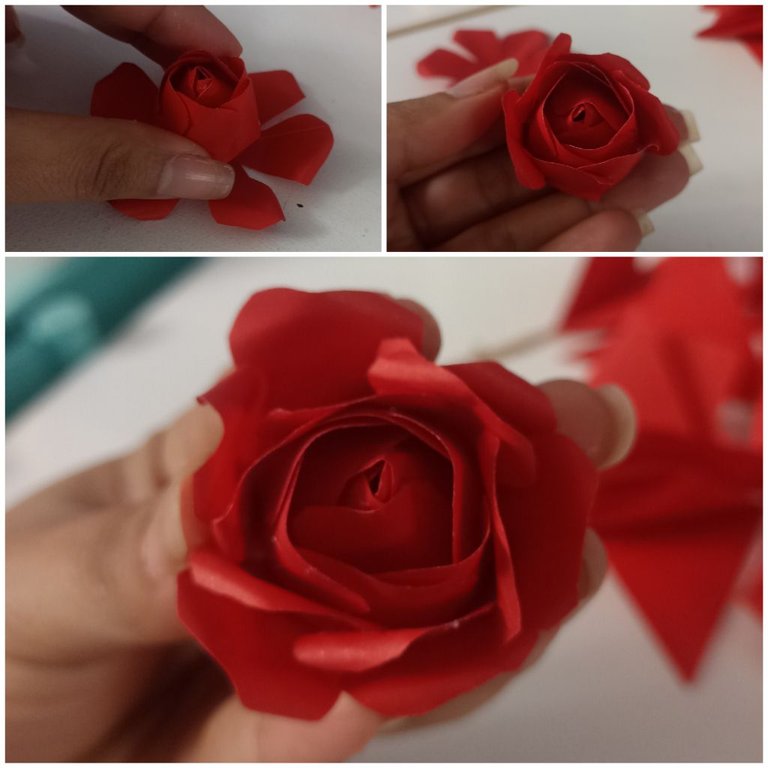
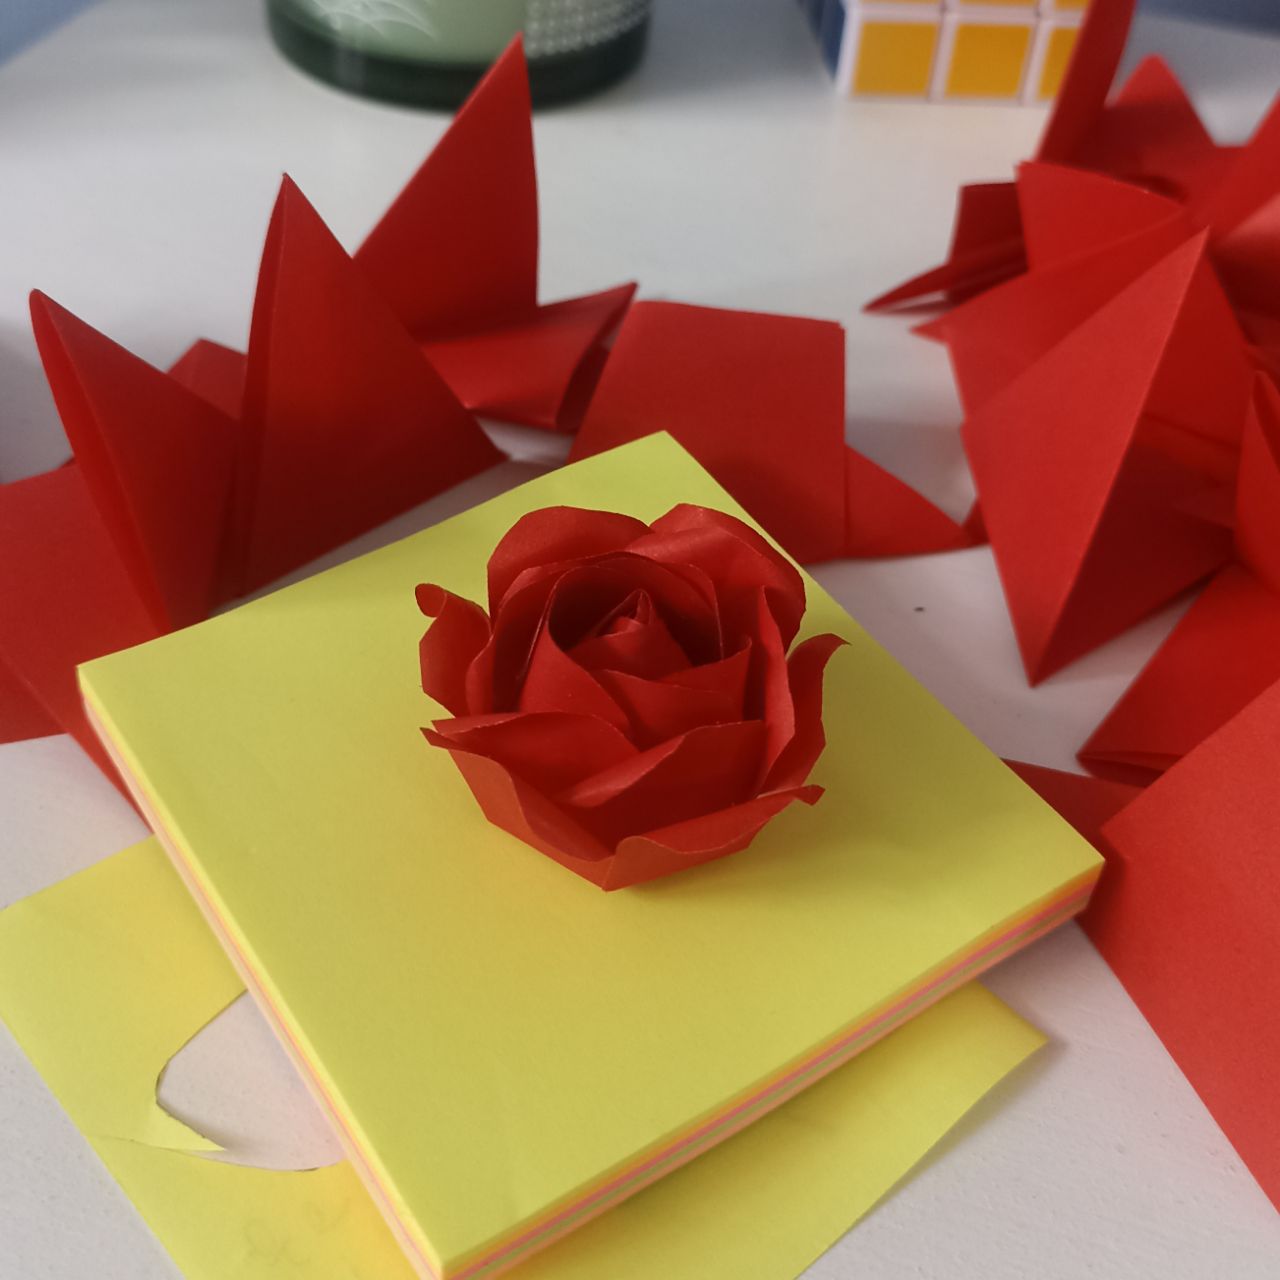
And this is what our finished rose looks like, it's very beautiful.
Y así es como se ve nuestra rosa ya terminada, es muy hermosa.
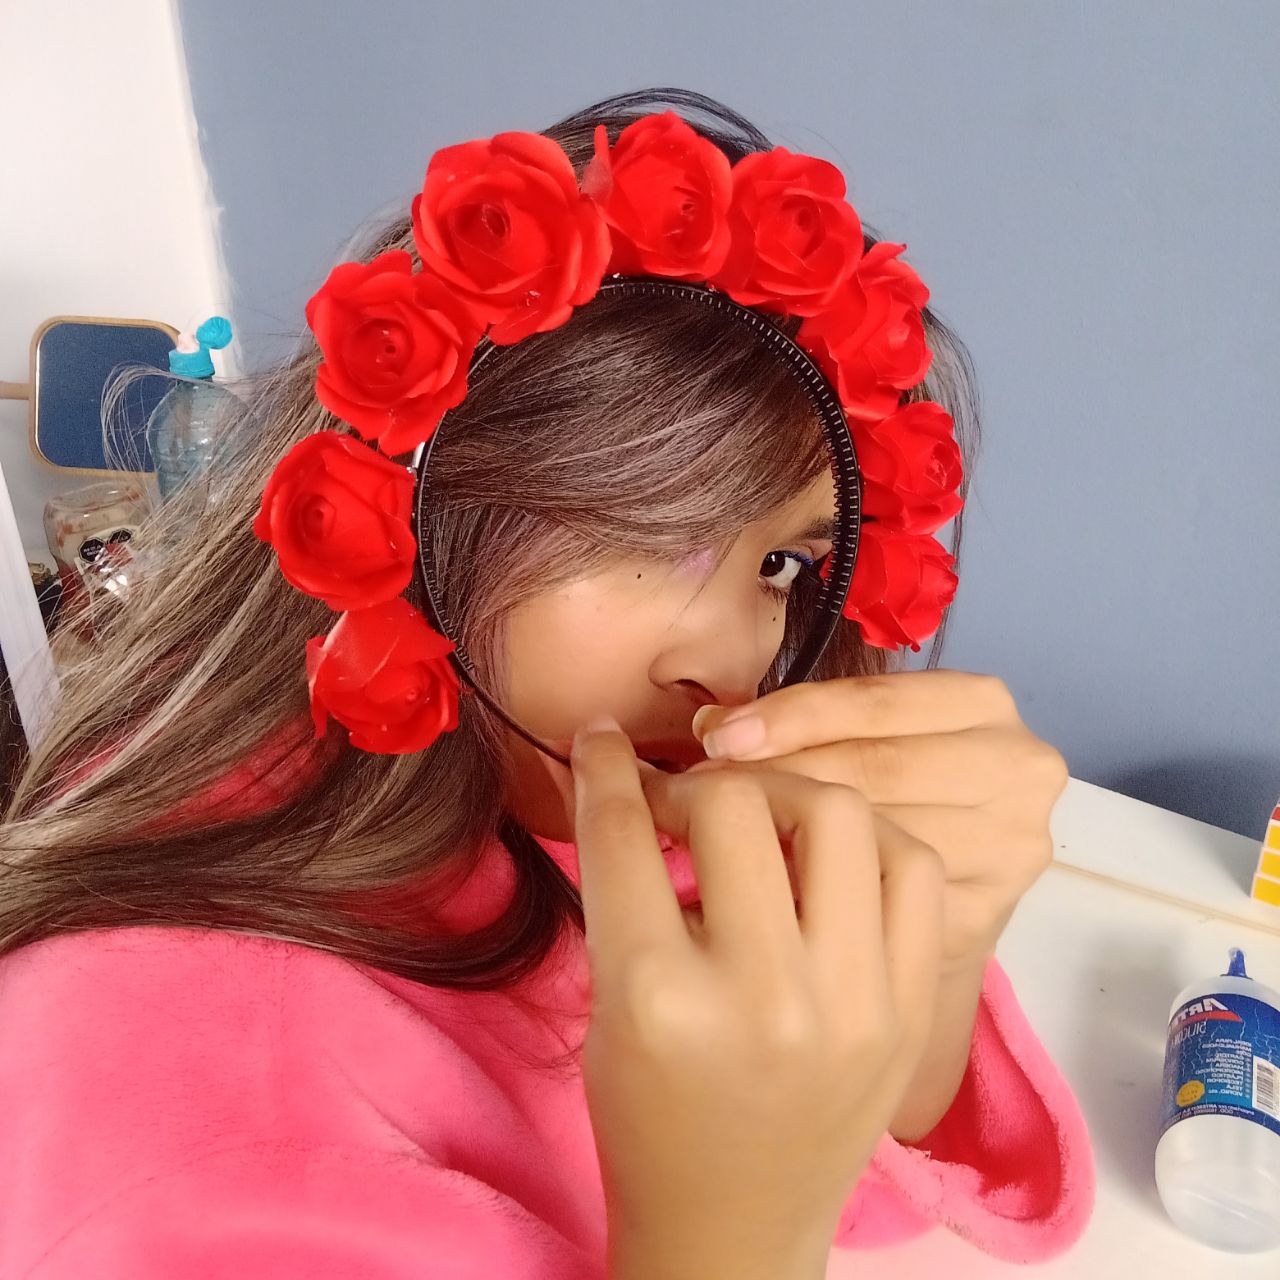
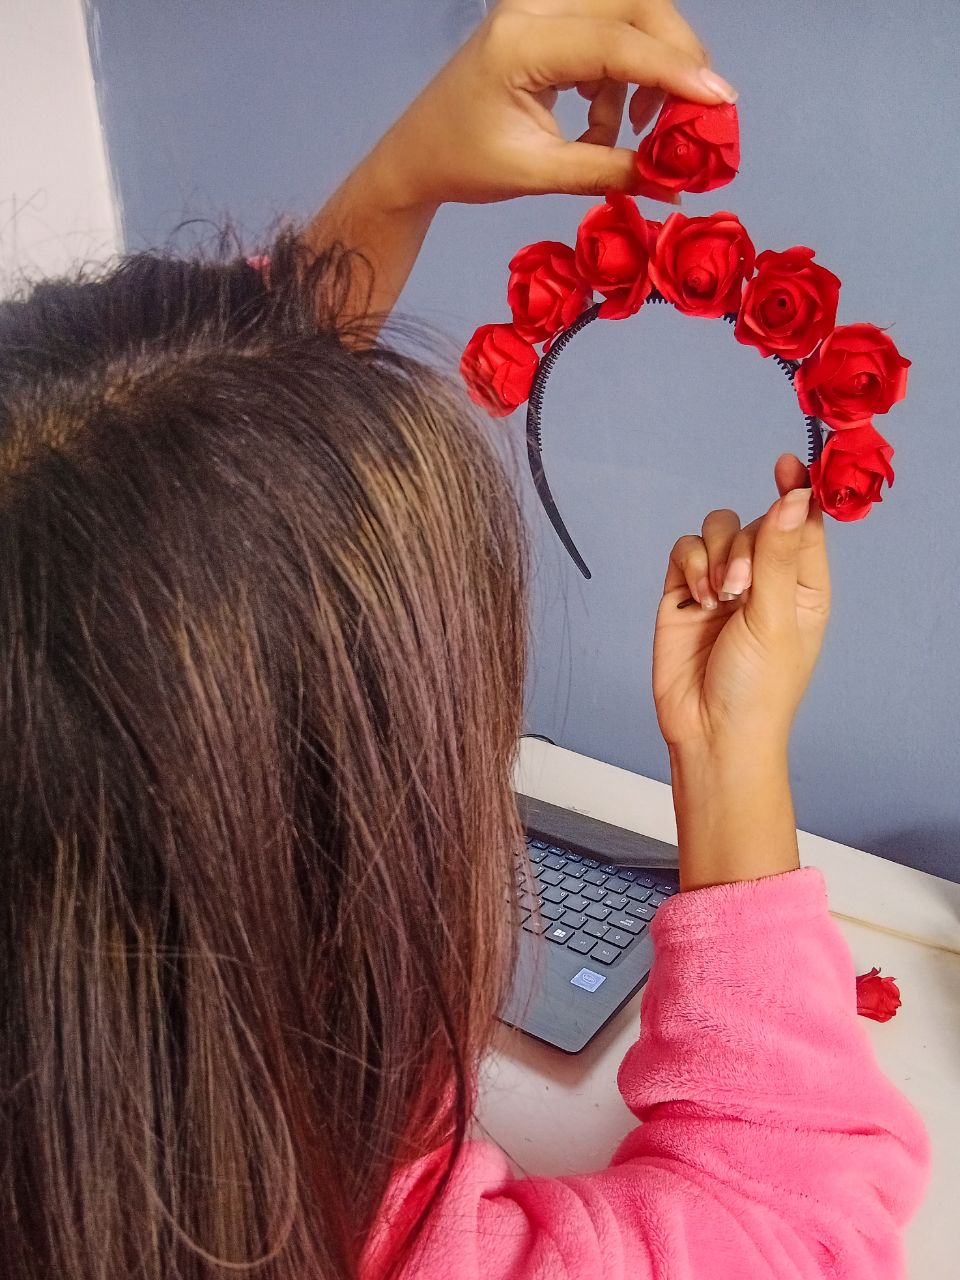
As I said before, I needed these roses to make a headpiece, so I had to do this procedure many more times until I got the amount I wanted, after that I already had a basic headband to which I only put glue and glued the roses my way.
Como dije anteriormente necesitaba estas rosas para hacerme una diadema, así que yo tuve que hacer este procedimiento muchas veces más hasta que obtuve la cantidad que quería, luego de eso ya tenía una diadema básica a la cual solamente le coloqué pegamento y fui pegando las rosas a mi manera.
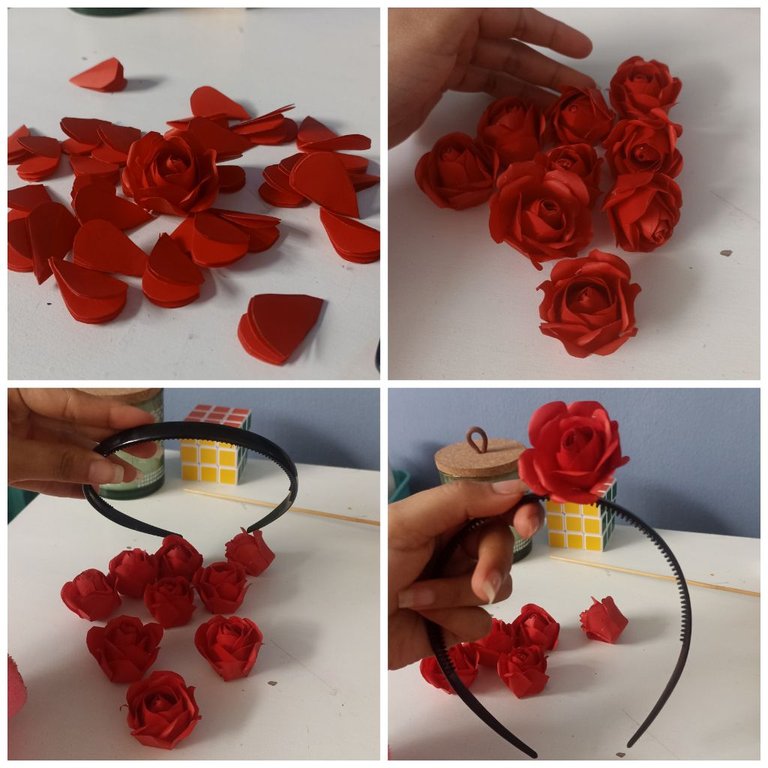
And I have my headpiece ready to use, I plan to use it tomorrow in a makeup that I will do.
Y tengo mi diadema lista para utilizarla, planeo utilizarla mañana en un maquillaje que haré.