La magia en la creatividad del ser humano no tiene límites, y lo mejor de ello es que podemos darle la chispa, la forma, los colores en su majestuosa armonía y por supuesto asignarle el uso que queramos; sea cual sea nuestra obra maestra; Dándole el disfrute que se merece.
The magic in the creativity of the human being has no limits, and the best thing about it is that we can give it the spark, the shape, the colors in their majestic harmony and of course assign it the use we want; whatever our masterpiece; Giving you the enjoyment you deserve.
Saludos mis queridos amigos, espero se encuentren de lo mejor; desde acá de la isla, mis mejores vibras para todos ustedes; en este maravillosa oportunidad quiero compartirles el paso a paso de un bolso particular. ¿Qué tendrá de diferente o raro este bolso Katherine?, pues ya hemos oído mucho sobre los famosos bolsos doble cara o doble faz, en este caso cierto que si vamos a elaborar uno, solo que nos saldremos un poco de lo convencional y haremos algo diferente, por tanto les invito a ver qué es eso diferente que les voy a mostrar.
Greetings my dear friends, I hope you find the best; From here on the island, my best vibes to all of you; In this wonderful opportunity I want to share with you the step by step of a particular bag. What is different or strange about this Katherine bag? Well, we have already heard a lot about the famous double-sided or double-sided bags, in this case it is true that if we are going to make one, only that we will go a little out of the conventional and do something different, therefore I invite you to see what is different that I am going to show you.

Recordándoles siempre que es importante darle el uso a los materiales reciclables que tengamos en casa; ya que, de esta forma no solo nos ayudamos a crear nuevos productos sino que también ayudamos a que nuestro planeta se mantenga lo más a salvo posible.
Always reminding them that it is important to use the recyclable materials that we have at home; since, in this way, we not only help each other create new products but also help keep our planet as safe as possible.

Materiales:
Retazos de tela
Cinta elástica
Un lacito
Piedritas de bisutería
Tijera, aguja, hilo, regla, alfileres.
Cartón
Encaje
Trozo de tela semidura
Cierre
Materials:
Pieces of cloth
Elastic tape
a little bow
jewelery stones
Scissors, needle, thread, ruler, pins.
Paperboard
Lace
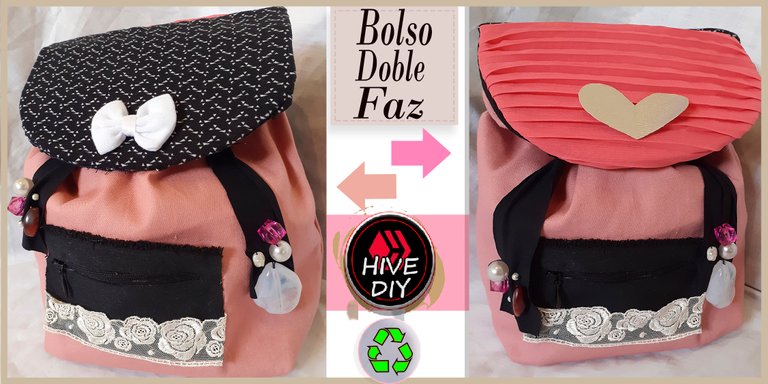
Piece of semi-hard cloth
closing


Pasos // Steps
Cuerpo principal del bolso. // Main body of the bag.
1: recortamos la medida en la tela con las siguientes medidas.
1: We cut the measurement on the fabric with the following measurements.

2: unimos los extremos laterales del rectángulo y sellamos con aguja e hilo.
2: We join the lateral ends of the rectangle and seal with a needle and thread.


3: con la costura al inverso, hacemos el siguiente doblaje, trazando una línea recta para luego cocer.
3: With the seam in reverse, we make the following fold, tracing a straight line to then sew.


4: chequeamos como ha quedado nuestra costura por la parte de afuera.
4: We check how our seam has turned out on the outside.

5: hacemos exactamente el mismo proceso con la tela negra.
5: we do exactly the same process with the black fabric.


6: listos ambas partes, vamos a acoplarlas con aguja e hilo desde sus partes inversas; dejando unos 5 centímetros de espacio para poder desdoblarlas.
6: Both parts are ready, we are going to attach them with a needle and thread from their reverse parts; leaving about 5 centimeters of space to be able to unfold them.


7: después de desdoblarlo vamos a elegir que parte será la que quedará por fuera, yo elegí el rosa; por lo que la parte de tela negra la meteré dentro de la tela rosa.
7: after unfolding it we are going to choose which part will be the one that will be left on the outside, I chose pink; so the black fabric part I will put inside the pink fabric.


8: le hacemos un pequeño doblaje hacia abajo por donde vamos a pasar la cinta que cierra el bolso. Sellando con aguja e hilo en todo su derredor.
8: We make a small fold down where we are going to pass the tape that closes the bag. Sealing with needle and thread all around.


Tapa superior del bolso. // Top cover of the bag.
9: usaremos un cartón de 30 cm de largo y aproximadamente unos 15 cm de ancho. Con ayuda del compás le daremos ese aspecto ovalado en cada extremo.
9: We will use a piece of cardboard 30 cm long and approximately 15 cm wide. With the help of the compass we will give it that oval appearance at each end.


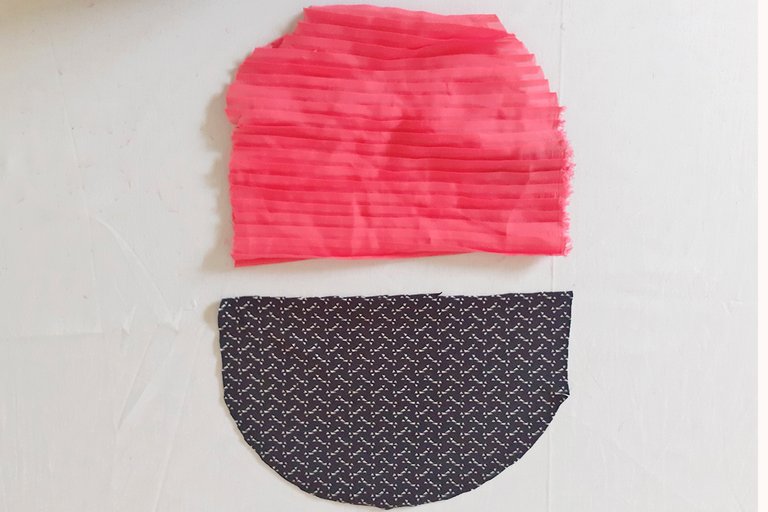
10: doblamos el cartón extremo con tremo para sacar el patrón abanicado en la tela negra estampada y de la misma manera con una tela rosa intensa.
10: we fold the cardboard end with end to take out the fanned pattern in the printed black fabric and in the same way with an intense pink fabric.


11: con el cartón extendido marcamos el patrón en una tela negra y recortamos.
11: With the cardboard extended, we mark the pattern on a black cloth and cut it out.


12: recortadas las tres partes vamos a acoplar primero los dos semicírculos con aguja e hilo.
12: Once the three parts have been cut out, we are going to attach the two semicircles first with a needle and thread.


13: ya selladas entre sí vamos a unirla por los bordes con la tercera parte de tela negra, igualmente con aguja e hilo. Dejando centímetros suficientes para luego desdoblar de adentro hacia afuera. Y luego poder introducir el cartón flexible que ya hemos cortado anteriormente.
13: already sealed together we are going to join it by the edges with the third part of black fabric, also with a needle and thread. Leaving enough centimeters to then unfold from the inside out. And then to be able to introduce the flexible cardboard that we have already cut previously.


14: finalmente sellamos cuidadosamente con aguja e hilo.
14: finally we carefully seal with a needle and thread.


Esta será nuestra parte diferente de un bolso doble faz, pues es la tapa la que cambia de aspecto dependiendo la dirección en la que la coloquemos. Para ello necesitaremos seguir con los siguientes procedimientos…
This will be our different part of a double-sided bag, since it is the lid that changes its appearance depending on the direction in which we place it. For this we will need to follow the following procedures


15: para adherir la tapa al bolso de manera que podamos despegarla y pegarla cuantas veces queramos, vamos a necesitar 6 botones de presión. Tres de cada lado. Los sellamos con aguja e hilo de la siguiente manera.
15: To adhere the lid to the bag so that we can take it off and stick it as many times as we want, we will need 6 press studs. Three on each side. We seal them with a needle and thread as follows.


16: con las mismas medidas que hemos colocado nuestros botones en la tapa por la parte interna, vamos a colocar tres conectores de los botones en la parte del espaldar del bolso, es decir en la parte trasera del bolso.
16: With the same measurements that we have placed our buttons on the lid on the inside, we are going to place three button connectors on the back of the bag, that is, on the back of the bag.


17: en la parte frontal del bolso solo vamos a colocar un conector del botón. Dejando al aire dos botones laterales de la tapa.
17: on the front of the bag we are only going to place a button connector. Leaving two side buttons of the lid in the air.


Bolsillo. // Pocket
18: recortamos un pequeño rectángulo de tela negra.
18: Cut out a small rectangle of black fabric.

19: hacemos una delgada fisura en la parte superior.
19: we make a thin crack at the top.

20: adherimos el cierre por la parte interna.
20: We adhere the closure on the inside.

21: para darle un toque más cute le colocamos un borde de encaje de tema floreado.
21: To give it a cuter touch, we put a flowery theme lace border.


22: luego sellar con aguja e hilo al bolso.
22: then seal with needle and thread to the bag.

Las mangas del bolso. // The bag sleeves.
23: para las mangas utilicé las tiras de un viejo bolso, recorté un poco para darle un estilo un poco más fresco y jovial, y luego los adherí al nuevo bolso.
23: for the sleeves I used the straps from an old bag, trimmed a bit to give it a fresher, more youthful look, and then attached them to the new bag.


Últimos detalles. // Last details.
24: las piedritas de bisutería siempre son una muy buena opción para darle ese toque Alegre a nuestras creaciones; así que no dudé en aplicarlas para mi nuevo bolso; en una cara del bolso coloqué un tierno lazo blanco unicolor.
24: jewelery stones are always a very good option to give that happy touch to our creations; so I didn't hesitate to apply them to my new bag; On one side of the bag I placed a cute solid white bow.

25: mientras que por la otra cara del bolso coloque un corazón al estilo metal, que recorte de una tela semidura, dándole un toque más chic y encantador.
25: while on the other side of the bag, place a metal-style heart, cut from a semi-hard fabric, giving it a more chic and charming touch.


Acá tenemos nuestro trabajo terminado, podemos apreciar ambas partes de la tapa superior, la cual puede cambiarse las veces que queramos; y por supuesto la parte principal del bolso que sería el saco donde metemos nuestras más preciadas pertenencias. Sin duda alguna hemos creado un súper coqueto y encantador bolso doble faz, que podremos llevar a donde sea y lucir siempre como unas reinas.
Here we have our work finished, we can see both parts of the top cover, which can be changed as many times as we want; and of course the main part of the bag that would be the bag where we put our most precious belongings. Without a doubt, we have created a super flirty and charming double-sided bag, which we can take anywhere and always look like a queen.


Mis queridos amigos, infinitamente agradecida de que me hayan acompañado hasta acá, súper emocionada de poder estrenar mi nuevo bolso, quede verdaderamente satisfecha con el resultado; lo importante es que cuando hagamos las cosas tengamos en cuenta que debe parecerse a nosotros, lo que hagamos que refleje nuestra esencia, no me cansaré de recalcarlo, lo que somos es lo que vale, la misión de nuestro producto es darnos esa sensación de satisfacción por lo que hacemos y para quienes lo hacemos. Es por eso que decidí compartir este paso a paso con las personas que realmente lo valen. Se les quiere un montón, hasta un próximo post! Bendiciones!
My dear friends, infinitely grateful that you have accompanied me here, super excited to be able to wear my new bag for the first time, I am truly satisfied with the result; the important thing is that when we do things we bear in mind that it should be like us, what we do should reflect our essence, I will not tire of emphasizing it, what we are is what counts, the mission of our product is to give us that feeling of satisfaction for what we do and for whom we do it. That is why I decided to share this step by step with the people who are really worth it. They are loved a lot, until a next post! Blessings!


Fotografía por | Photography by: @kathysteele, Android A10.Edición por | Edition by: @kathysteele, Photoshop.Separador y stikers| Separator and stikers: autoria propia.Translated with www.traductorgoogle