Hello to all my creative people at Hive Diy! I wish with all my heart that you are super well and have a blessed day. I find myself coming up with my first post of this new week, a very nice Diy loaded with lots of love and enthusiasm.♡
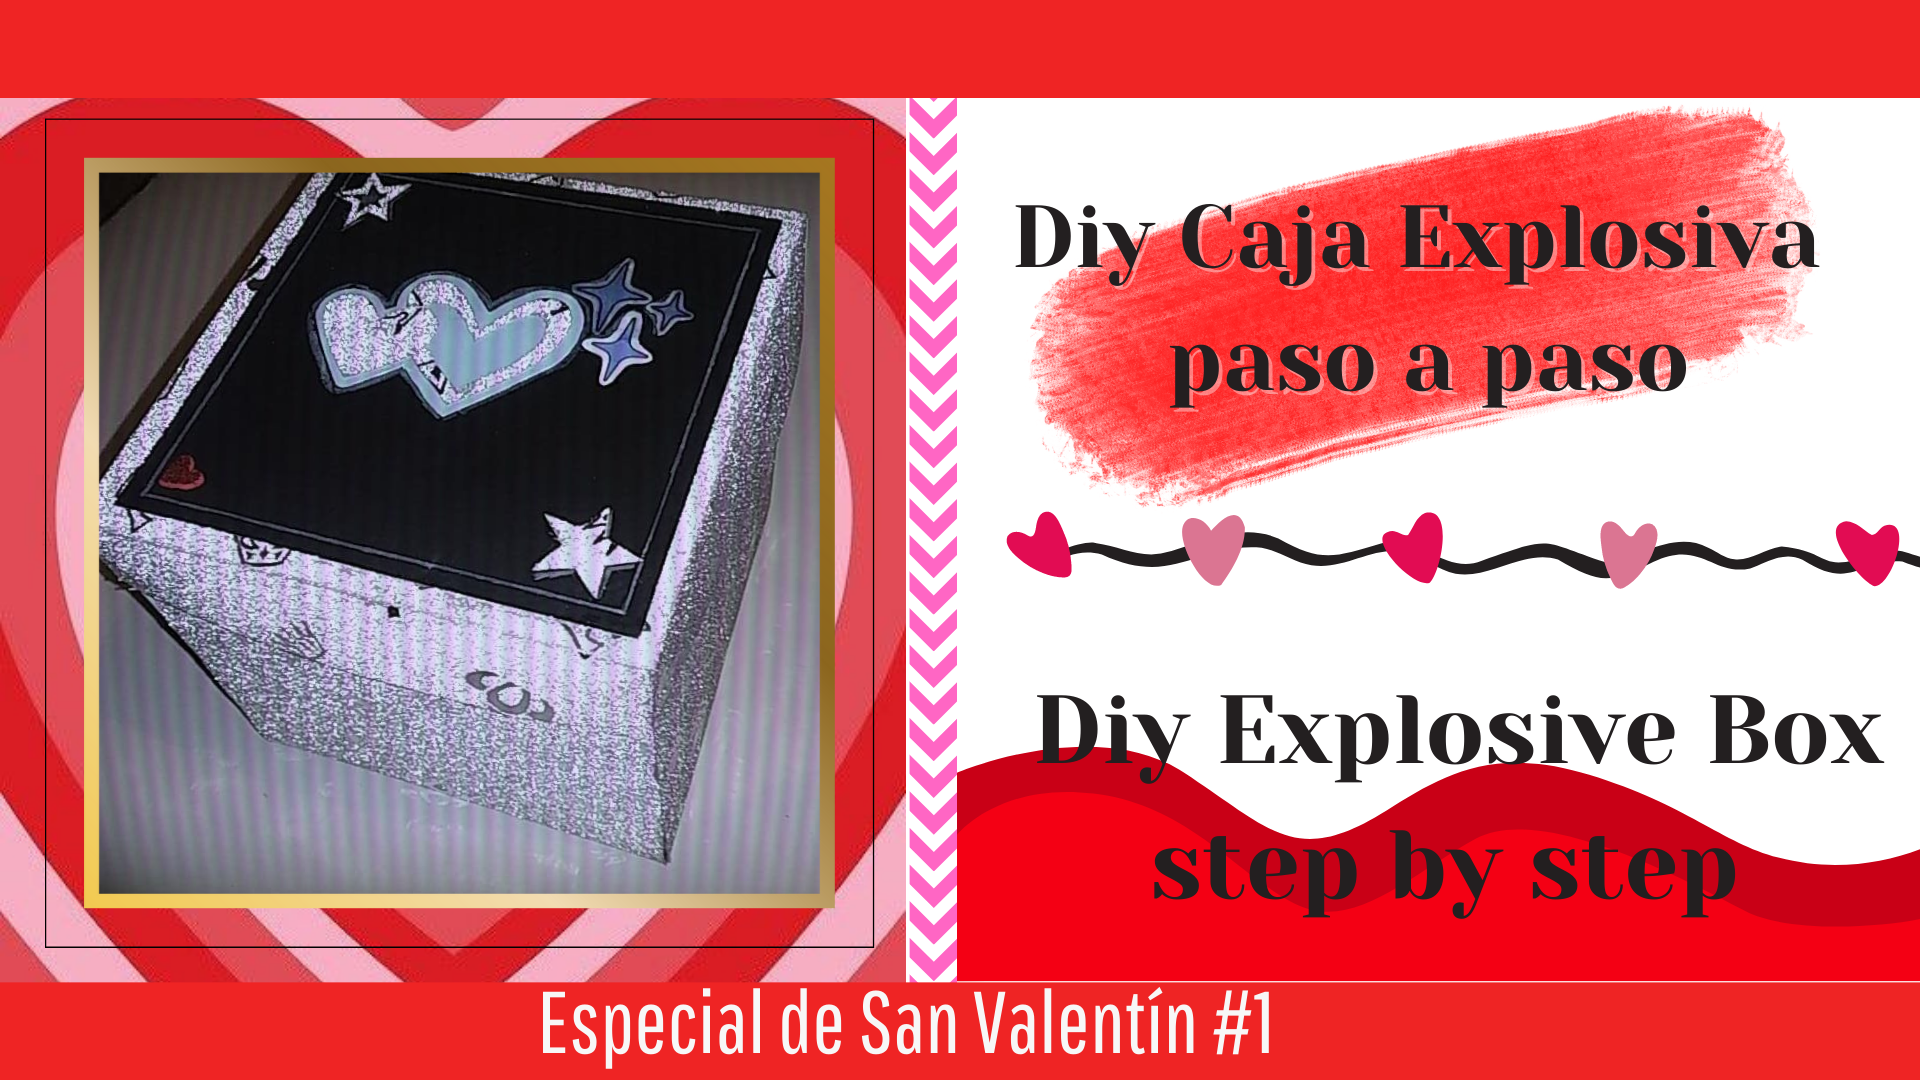
Les traigo mi primera idea para regalar en este San Valentín💘, dónde quise mostrarles la elaboración paso a paso de una cajita explosiva, perfecta para regalar a nuestra pareja o amistades más cercanas en esta fecha tan especial y hermosa como lo es el 14 de febrero, un día repleto de amor y cariño, que merece sin duda un detallazo lleno de mucho amor y dedicación, así que si te gusta ser detallista y estás buscando un regalo ideal, esto es perfecto para tí ¡quédate a ver cómo se hace!.♡
I bring you my first gift idea for this Valentine's Day💘, where I wanted to show you step by step the elaboration of an explosive box, perfect to give to our partner or close friends on this special and beautiful date as it is February 14, a day full of love and affection, which certainly deserves a detail full of love and dedication, so if you like to be detail-oriented and are looking for an ideal gift, this is perfect for you, stay here to see how it's done.♡
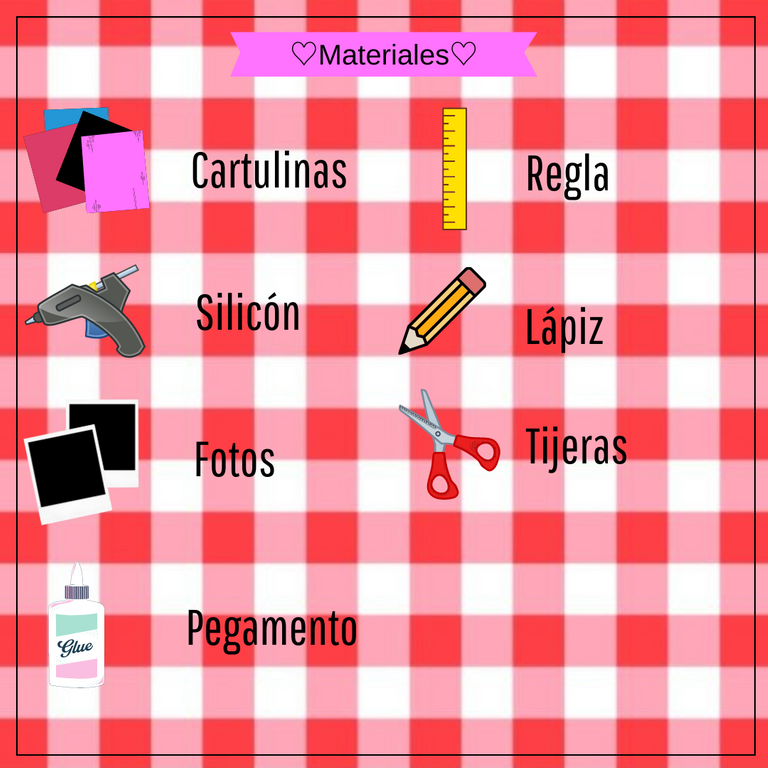
♡Materials:♡
- Cartulina dura (unicolor o con algún diseño)
- Cartulina de colores
- Silicón
- Fotos impresas
- Pega blanca
- Regla
- Lápiz
- Tijeras
- Hard cardboard (unicolor or with a design)
- Colored cardboard
- Silicone
- Printed photos
- White glue
- Ruler
- Pencil
- Scissors
♡Step by Step♡
Paso 1:
Step 1:
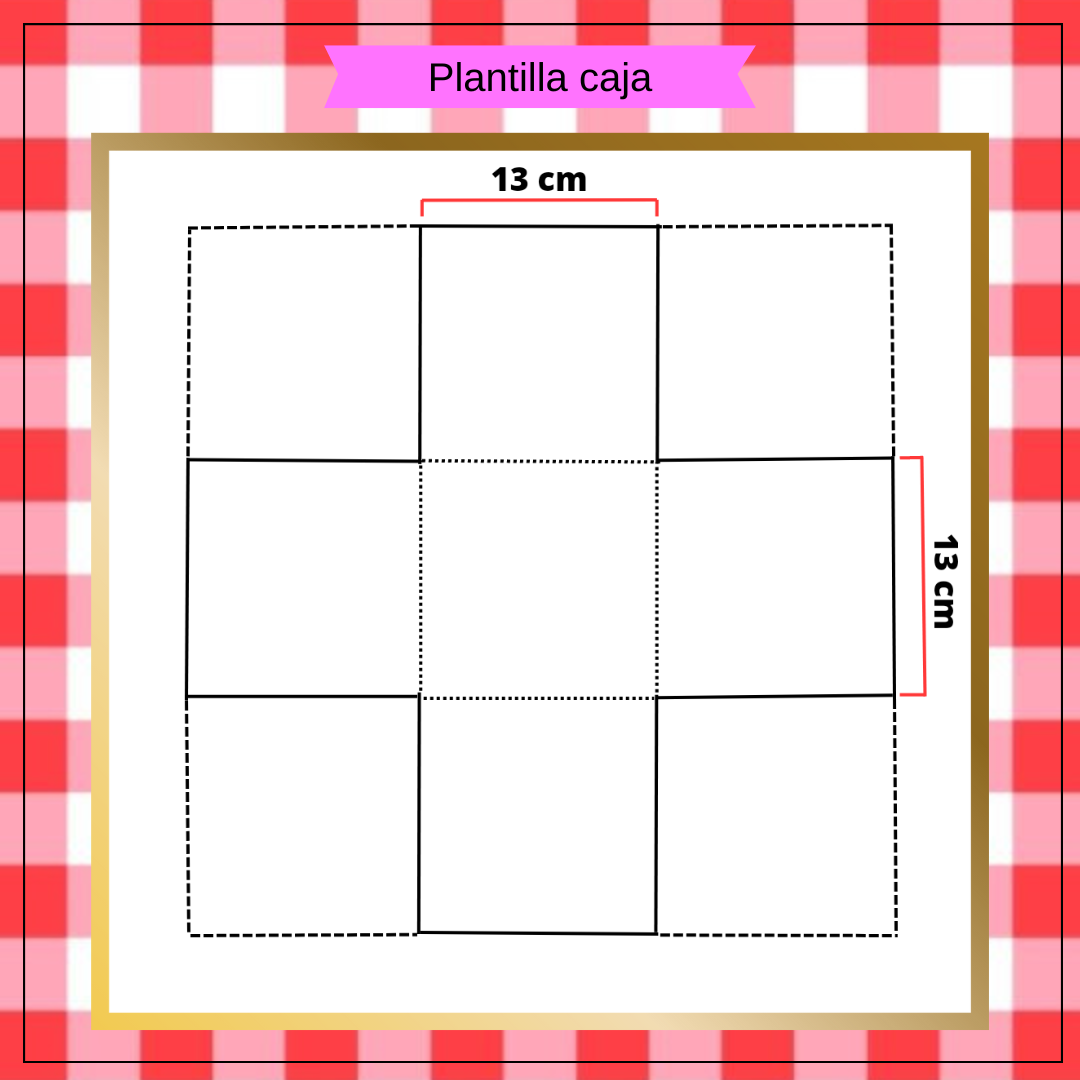
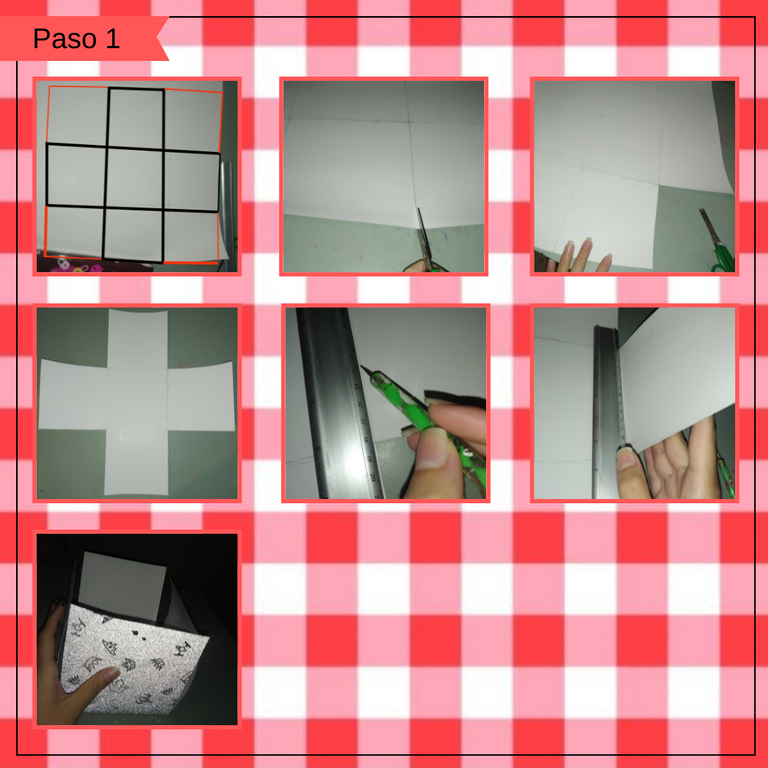
Primeramente vamos a extender nuestra cartulina principal para el armado de la caja, para proseguir a marcar la plantilla en está (se las dejo arriba), después con nuestra tijera recortaremos por completo los cuadrados que están en las cuatro esquinas, al culminar de recortar tomamos la regla y la acomodamos siguiendo la línea recta para pasar un puntero afincando solo un poco para lograr hacer estos dobleces, de esta manera ya tenemos la parte de abajo de la caja lista.
First we will extend our main cardboard for the assembly of the box, to proceed to mark the template on it (I leave them above), then with our scissors we will cut out completely the squares that are in the four corners, at the end of cutting we take the ruler and we accommodate it following the straight line to pass a pointer just a little to make these folds, thus we have the bottom of the box ready.
Paso 2:
Step 2:
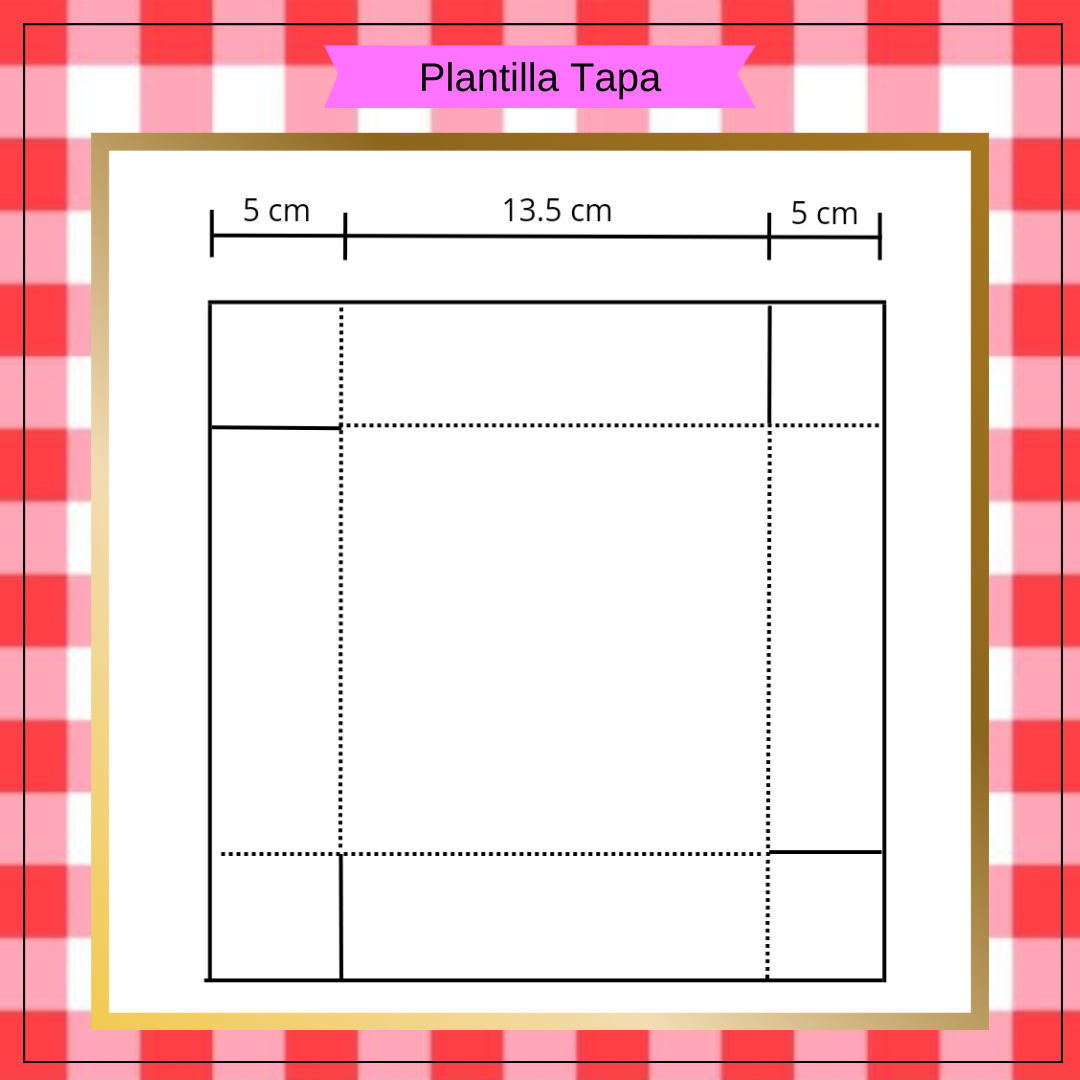
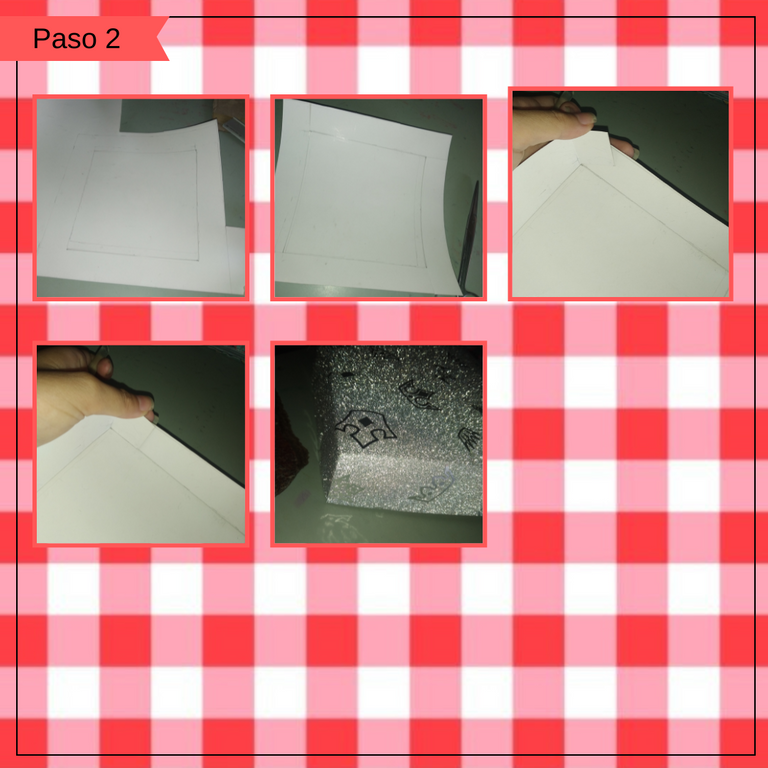
Ahora vamos con la tapa, tomamos nuestra cartulina y marcamos nuevamente nuestra plantilla, está vez de la tapa (se los dejo igual arriba), así recortamos este cuadrado que nos queda, luego procedemos a recortar una línea recta hasta el borde del cuadrado en las esquinas, solo debemos seguir la figura de la plantilla. Para terminar esta tapa solo nos quedaría pegar con silicón las solapas que justo acabamos de recortar, extendiendo a un lado estás y presionando para pegar, así igual con las tres restantes.
Now let's go with the lid, we take our cardboard and mark our template again, this time of the lid (I leave them the same above), so we cut this square that we have left, then proceed to cut a straight line to the edge of the square at the corners, we must only follow the figure of the template. To finish this cover we just need to glue with silicone the flaps that we just cut out, extending them to one side and pressing to glue, the same with the three remaining flaps.
Paso 3:
Step 3:
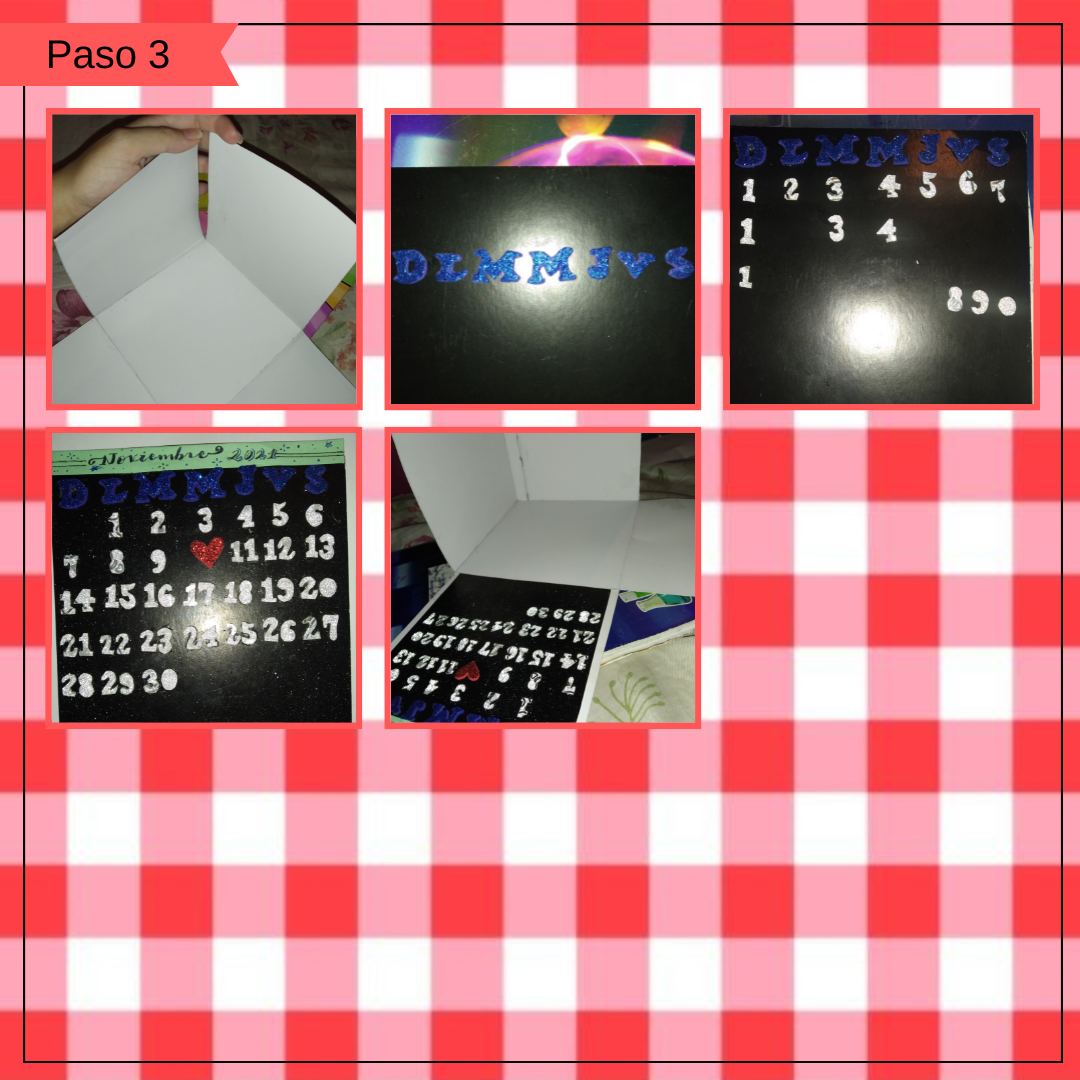
Al tener ya ambas piezas de nuestra caja, pegue dos cuadrados de estos para que quedarán pegados en la parte de atrás y dos quedaron sueltos para caer y así, solo quedaría decorar la parte de adentro, para esto primero recorte un cuadrado de cartulina en color negro de 12cm x 12cm (1cm menos a cada cuadrado de la caja) y hice un calendario señalando una fecha especial con un corazón rojo y pegue este calendario con silicón en uno de los cuadrados.
Once we had both pieces of our box, I glued two of these squares so that they would be glued on the back and two were left loose to fall and thus, it would only be left to decorate the inside, for this first cut a square of black cardboard 12cm x 12cm (1cm less than each square of the box) and made a calendar marking a special date with a red heart and glued this calendar with silicone on one of the squares.
Paso 4:
Step 4:
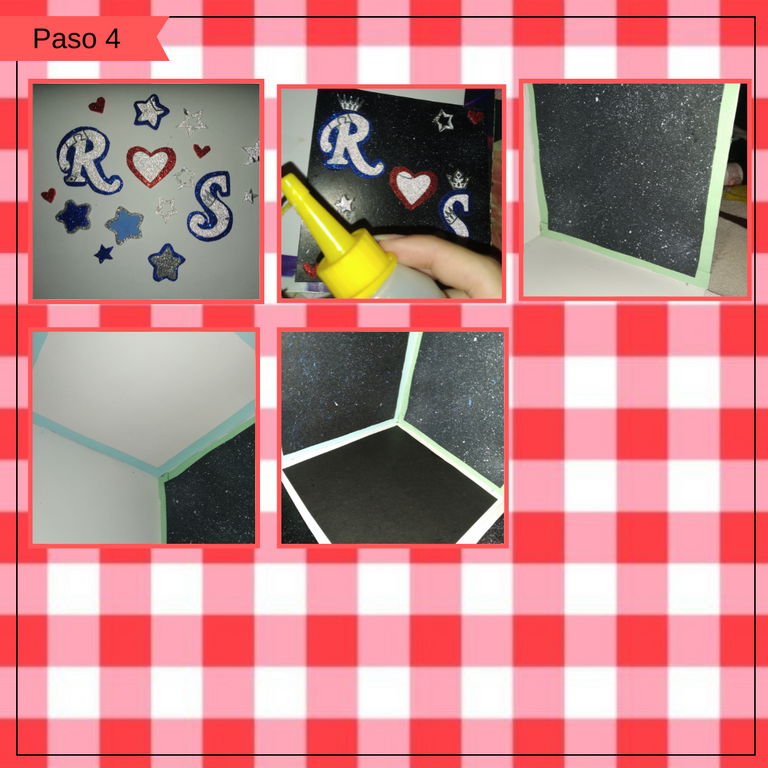
A continuación tome otro cuadrado en color negro de cartulina de la misma medida (12cm x 12cm) e hice otra decoración a mi gusto, coloque mi inicial y la de la persona a la que se la daré, las acomode y también pegue otros pequeños detalles, como estrellas y coronas que son piezas que tenía en foami y cartulina, cabe resaltar que antes había esparcido pintura blanca con un cepillo de dientes viejo, para así dar efecto del espacio. Después tome dos cuadrados iguales y nuevamente esparcí pintura blanca, al igual que agregué azul con el cepillo, pero antes de colocarlo puse unas tiras de cartulina verde y azul alrededor de los dos cuadrados y luego pegue estos encima, y en el centro agregué uno solamente negro.
Then I took another square in black cardboard of the same size (12cm x 12cm) and made another decoration to my liking, I placed my initial and that of the person to whom I will give it, I arranged them and also glued other small details, such as stars and crowns that are pieces that I had in foami and cardboard, it should be noted that before I had spread white paint with an old toothbrush, to give the effect of space. Then I took two equal squares and again spread white paint, as I added blue with the brush, but before placing it I put some strips of green and blue cardboard around the two squares and then glued them on top, and in the center I added a black one only.
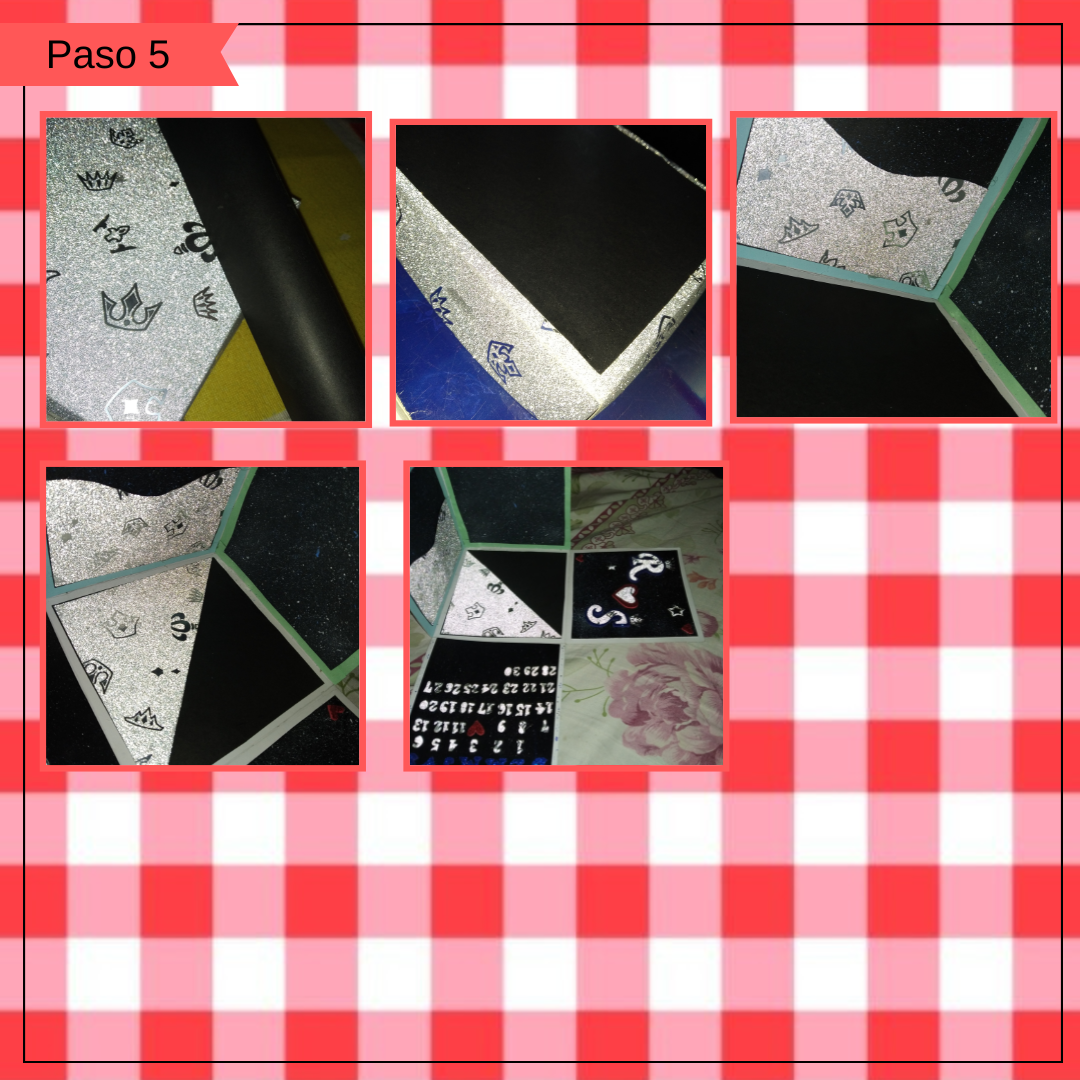
Paso 5:
Step 5:
Ahora tome la tapa, y recorte un cuadrado en color negro un centímetro más pequeño que está (12.5cm x 12.5cm) y la pegue con silicón, luego tome cartulina e hice una especie de bolsillo para meter cartitas o cualquier cosa y la pegue en uno de los cuadrados, para continuar recorte un cuadrado en diagonal y lo pegue en el centro con silicón.
Now take the lid, and cut out a square in black a centimeter smaller than this one (12.5cm x 12.5cm) and glue it with silicone, then take cardboard and made a kind of pocket to put cards or anything and glue it in one of the squares, to continue cut out a square diagonally and glue it in the center with silicone.
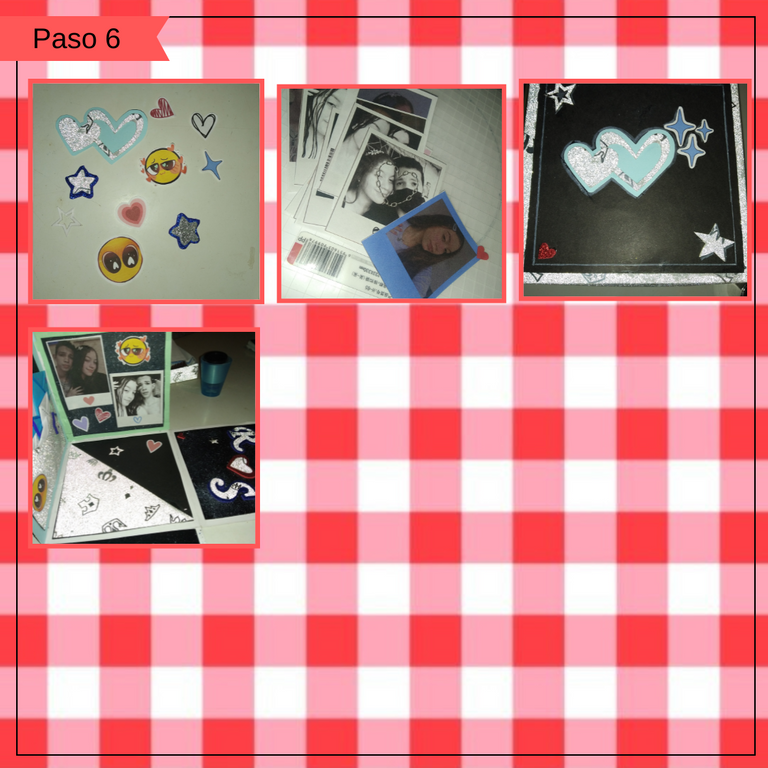
Paso 6:
Step 6:
Para terminar con los últimos toques, recorte unos dibujos y unas fotos que imprimí y tome unas estrellas y corazones que había hecho antes, así en la tapa de la caja comencé a pegar el corazón en el centro, luego agregué unas estrellas, unos destellos y un corazón pequeñito, después con un color blanco hice unos detalles de sombras y también un borde. Seguí en la parte de adentro de la caja y le pegue las fotos y algunos dibujos restantes.
To finish with the last touches, I cut out some drawings and photos that I printed and took some stars and hearts that I had made before, so on the lid of the box I started gluing the heart in the center, then I added some stars, some sparkles and a tiny heart, then with a white color I made some details of shadows and also a border. I continued on the inside of the box and glued the photos and some remaining drawings.
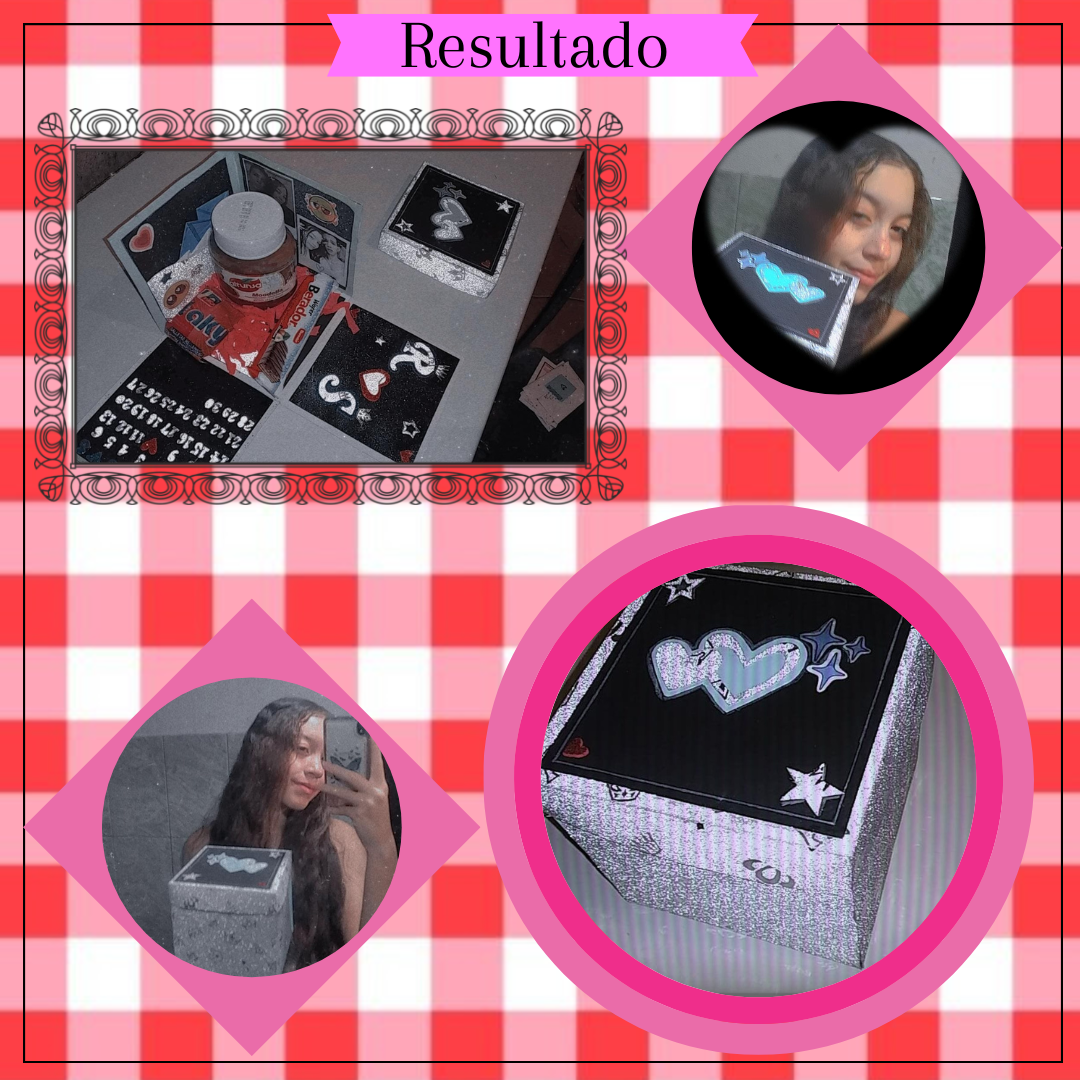
¡Y listo! Así solo nos quedaría agregar algún relleno (como papel crepé), dulces y sí gustan algunas cartitas y ya estaría, preparado para regalar a estas personas especiales en este día del amor y la amistad, un detalle único y elaborado a mano con todo el amor y dedicación, porsupuesto háganlo con tiempo para que no los agarre la fecha apurados, es un regalo muy bonito, apesar de que lleva cierta elaboración, vale totalmente la pena ¡A cualquiera le encantaría!.♡
And that's it! So we would only have to add some filling (such as crepe paper), candy and if they like some letters and it would be ready to give to these special people on this day of love and friendship, a unique and handmade detail with all the love and dedication, of course do it with time so that the date does not catch you in a hurry, it is a very nice gift, although it takes some elaboration, it is totally worth anyone would love it.♡
Así culmina la primera idea que les doy para que impacten a su persona especial el 14 de febrero, con un regalo hecho con amor y personalizado que es lo mejor, espero les haya gustado tanto como a mí, así me encargaré de publicar más ideas para este San Valentín en el resto de la semana, esperen eso por ahí.♡
Thus culminates the first idea that I give you to impact your special person on February 14, with a gift made with love and personalized that is the best, I hope you liked it as much as I did, so I will take care to publish more ideas for this Valentine's Day in the rest of the week, expect that out there.♡
¡Gracias por leer, un abrazo!.♡
Thanks for reading, a hug!!!♡
Photos of my authorship taken from my Xiaomi Redmi 7 phone, edited in the free version of Canva.