Hello my Hive Diy creative family! Good morning, happy, prosperous and blessed Tuesday, welcome this new week that brings us to the end of the month, let's hope that this week and this month that is approaching is greatly blessed and fully happy, I wish you no lack of health, happiness, love, creativity and productivity in your lives.♡

¡Sean bienvenidos a un nuevo tutorial mi gente creativa! En está oportunidad les vengo a mostrar el paso a paso de cómo realizar unas hermosas rosas eternas hechas en casa con cinta de seda. Si quieres dar un obsequio único y súper especial es el momento de que aprendas a hacer estás rosas que duran para siempre y son un detalle romántico que puedes hacer tu mismo, sin mayor dificultad y con mucho amor.
Welcome to a new tutorial my creative people! In this opportunity I come to show you the step by step of how to make beautiful homemade eternal roses with silk ribbon. If you want to give a unique and super special gift it's time to learn how to make these roses that last forever and are a romantic detail that you can do yourself, without much difficulty and with lots of love.
Estás rosas, nos sirven para una infinidad de proyectos, como cuadros, ramo de rosas, arreglos, rosas individuales y en general muchos regalos, todo es cuestión de nuestra creatividad. En está ocasión, elaboré estás rosas con cinta de satín de 2.5cm, por lo que son pequeñas y sus pétalos un poco puntiagudos, igualmente quedan muy lindas y se adaptan perfecto a todo tipo de arreglos.
These roses can be used for an infinite number of projects, such as paintings, bouquets of roses, arrangements, individual roses and in general many gifts, it is all a matter of our creativity. This time, I made these roses with 2.5cm satin ribbon, so they are small and their petals are a little pointy, but they are still very pretty and they adapt perfectly to all kinds of arrangements.
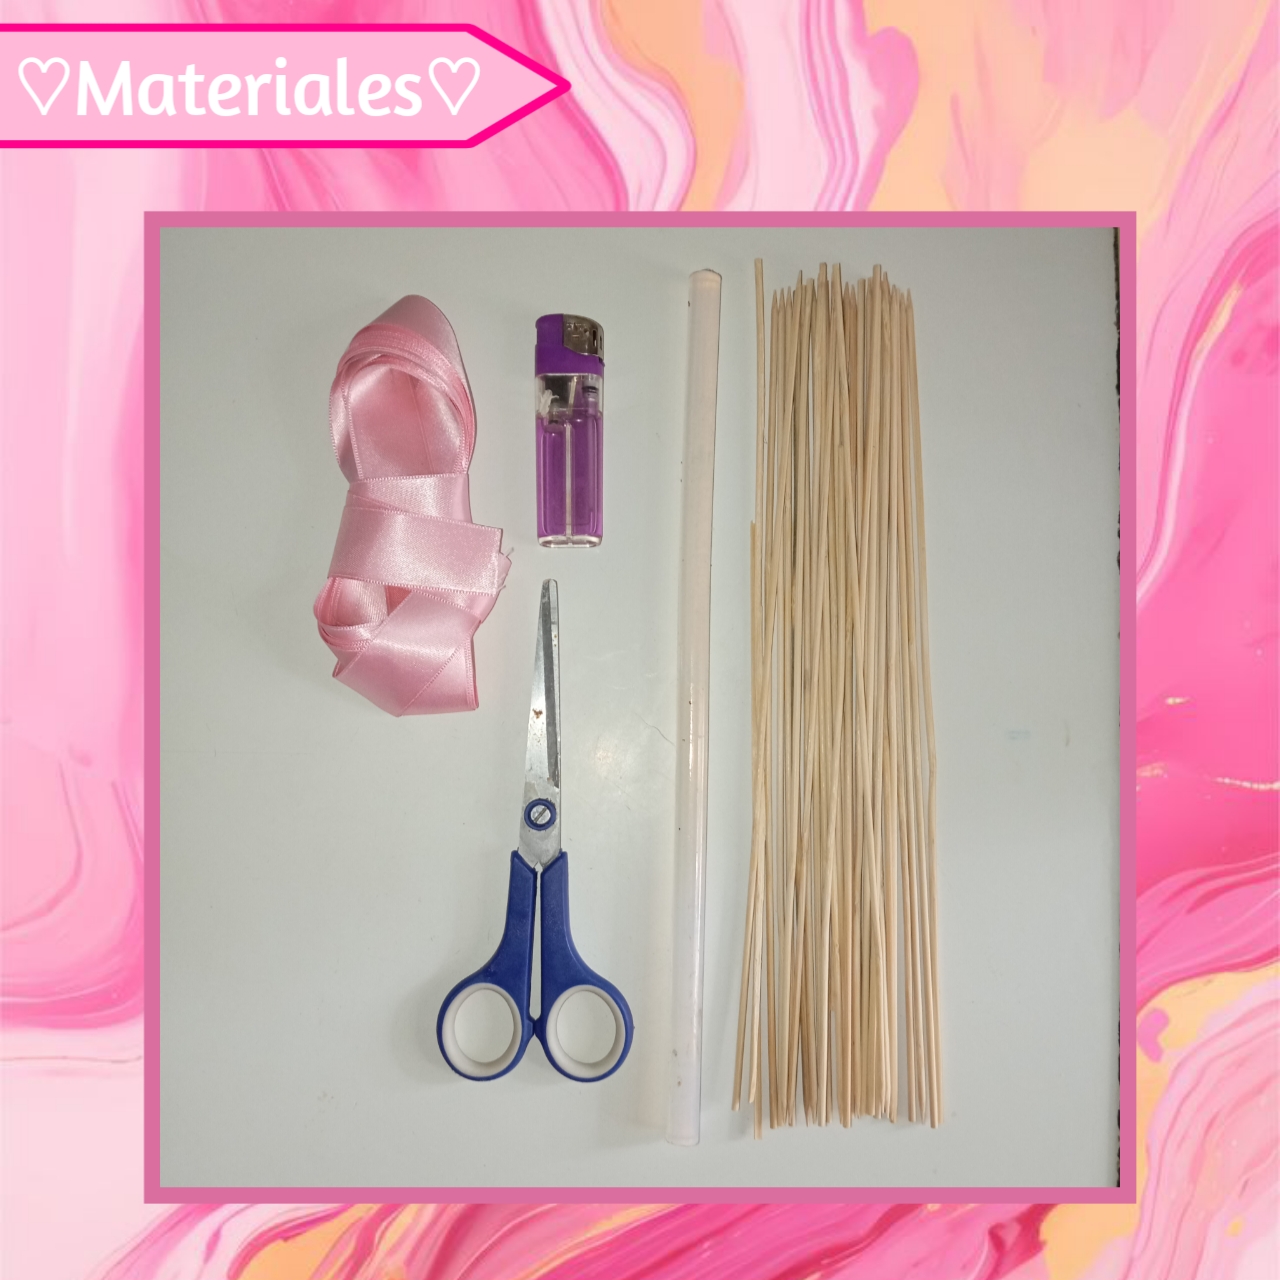
♡🩷🍬Materials🍬🩷♡
- Cinta de seda/Satín
- Palillos de altura
- Silicón
- Yesquero/encendedor
- Tijeras
- Silk ribbon/Satin
- Height chopsticks
- Silicone
- Tinder/lighter
- Scissors
♡🩷✨Step by Step✨🩷♡
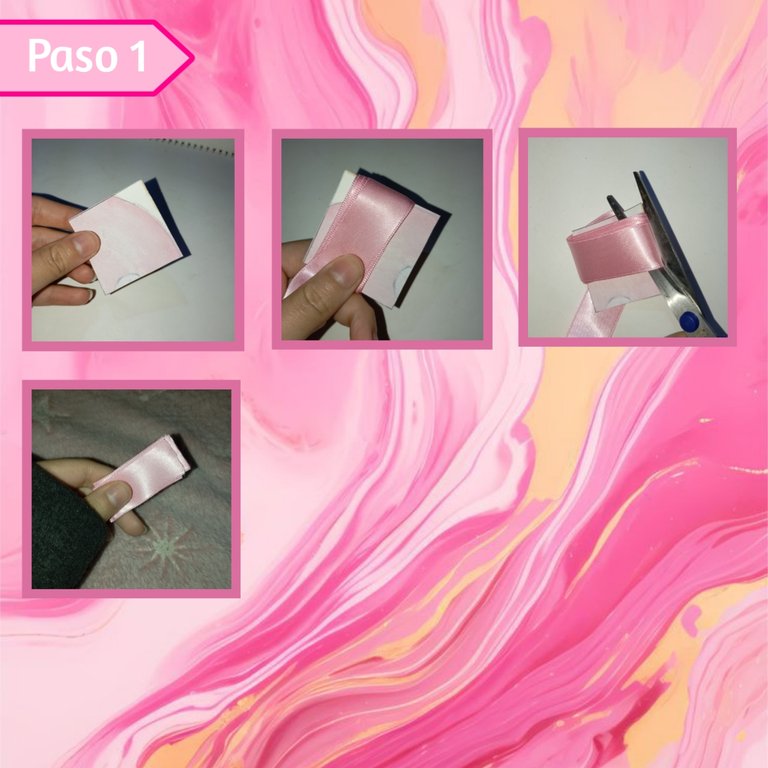
Paso 1:
Step 1:
Para empezar, haremos un pequeño cuadrado en cartulina o cartón de 5cm de ancho x 5cm de largo, luego tomaremos nuestra cinta de seda y alrededor de está plantilla daremos 6 vueltas, teniendo las vueltas listas, con una tijera cortaremos los dos extremos como se aprecia en la imágen, sacando así nuestros 12 rectángulos, que equivalen a un pétalo cada uno, lo que nos sirve para armar una rosa.
To begin, we will make a small square in cardboard or cardboard 5cm wide x 5cm long, then we will take our silk ribbon and around this template we will make 6 laps, having the laps ready, with a scissors we will cut the two ends as shown in the image, thus taking out our 12 rectangles, which are equivalent to a petal each, which serves to assemble a rose.
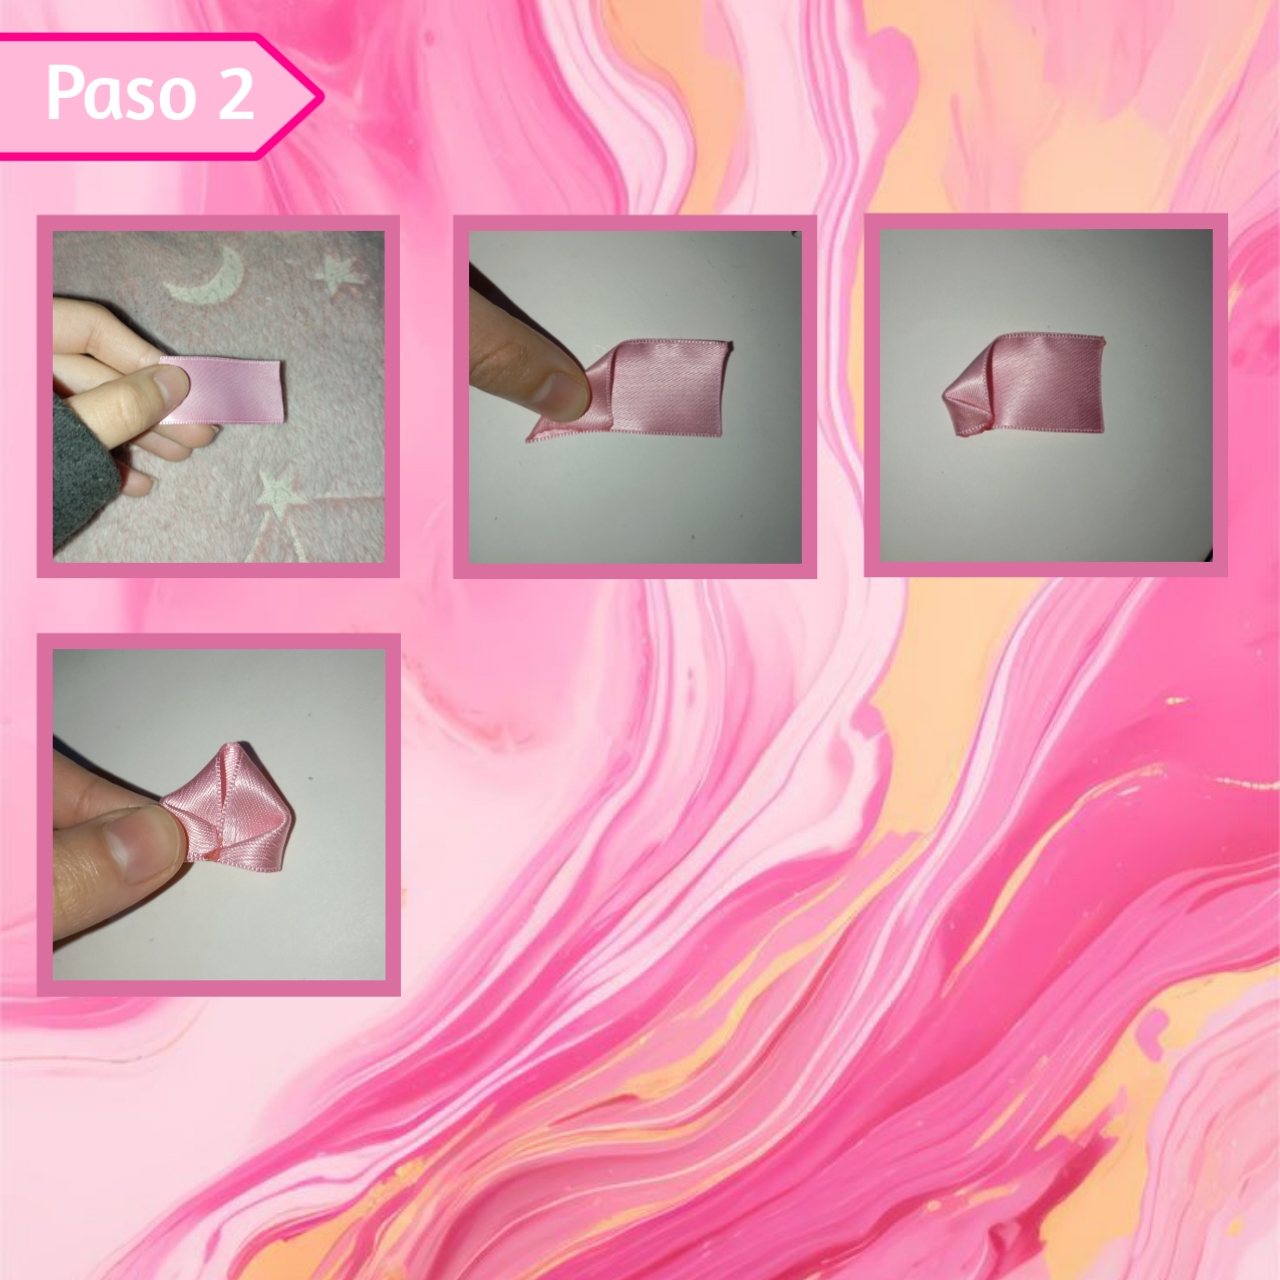
Paso 2:
Step 2:
Ahora bien, tomaremos rectángulo por rectángulo y vamos a quemar con un yesquero y encendedor los extremos para que no se suelten los hilos y quede parejo, así con cada uno. Después con un rectángulo, agarraremos una esquina y la llevaremos hacía la del frente, haciendo un pequeño triángulo, luego la esquina de ese pequeño triángulo lo llevaremos a su misma punta, y pegaremos con silicón o quemando un poco con el yesquero y presionando rápidamente, igualmente lo haremos con el otro lado formando el pétalo y así con todos.
Now, we will take a rectangle by rectangle and we will burn the ends with a tinder and a lighter so that the threads do not come loose and it will be even, like this with each one. Then with a rectangle, we will take a corner and we will take it to the front, making a small triangle, then the corner of that small triangle we will take it to its tip, and we will glue with silicone or burning a little with the tinder and pressing quickly, we will do the same with the other side forming the petal and so with all of them.
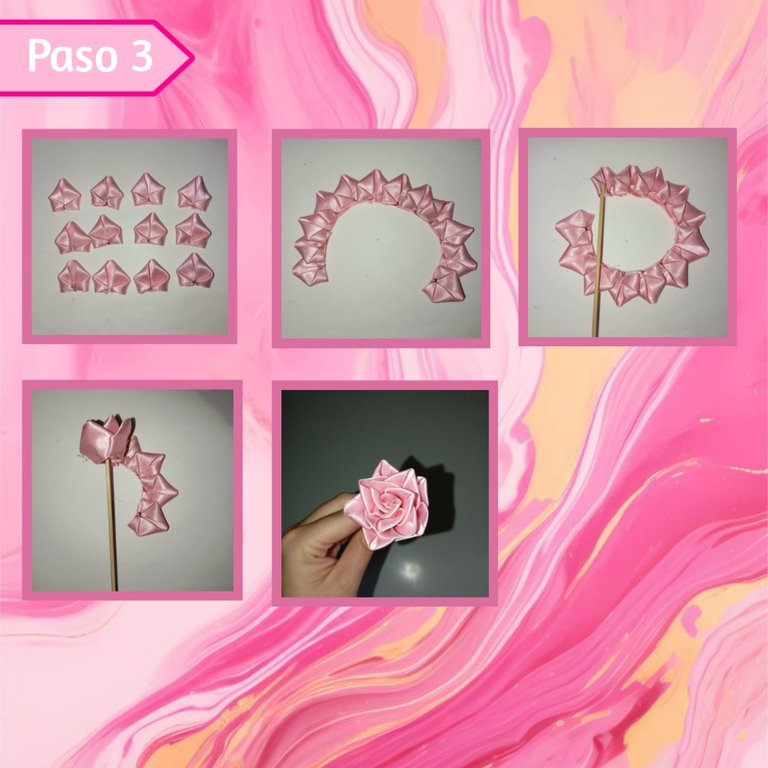
Paso 3:
Step 3:
Con los 12 pétalos, comenzamos a armar la flor, para esto pegaremos un pétalos encima del extremo del otro con una pequeña gota de silicón caliente, presionaremos hasta que pegue muy bien. A continuación, vamos a tomar el palillo de altura, pondremos un poco de silicón en la punta y vamos a enrollar mientras agregamos silicón, hasta llegar al final y terminar la rosa.
With the 12 petals, we begin to assemble the flower, for this we will glue a petal on top of the end of the other with a small drop of hot silicone, we will press until it sticks very well. Next, we will take the height stick, we will put a little silicone on the tip and we will roll up while adding silicone, until we reach the end and finish the rose.
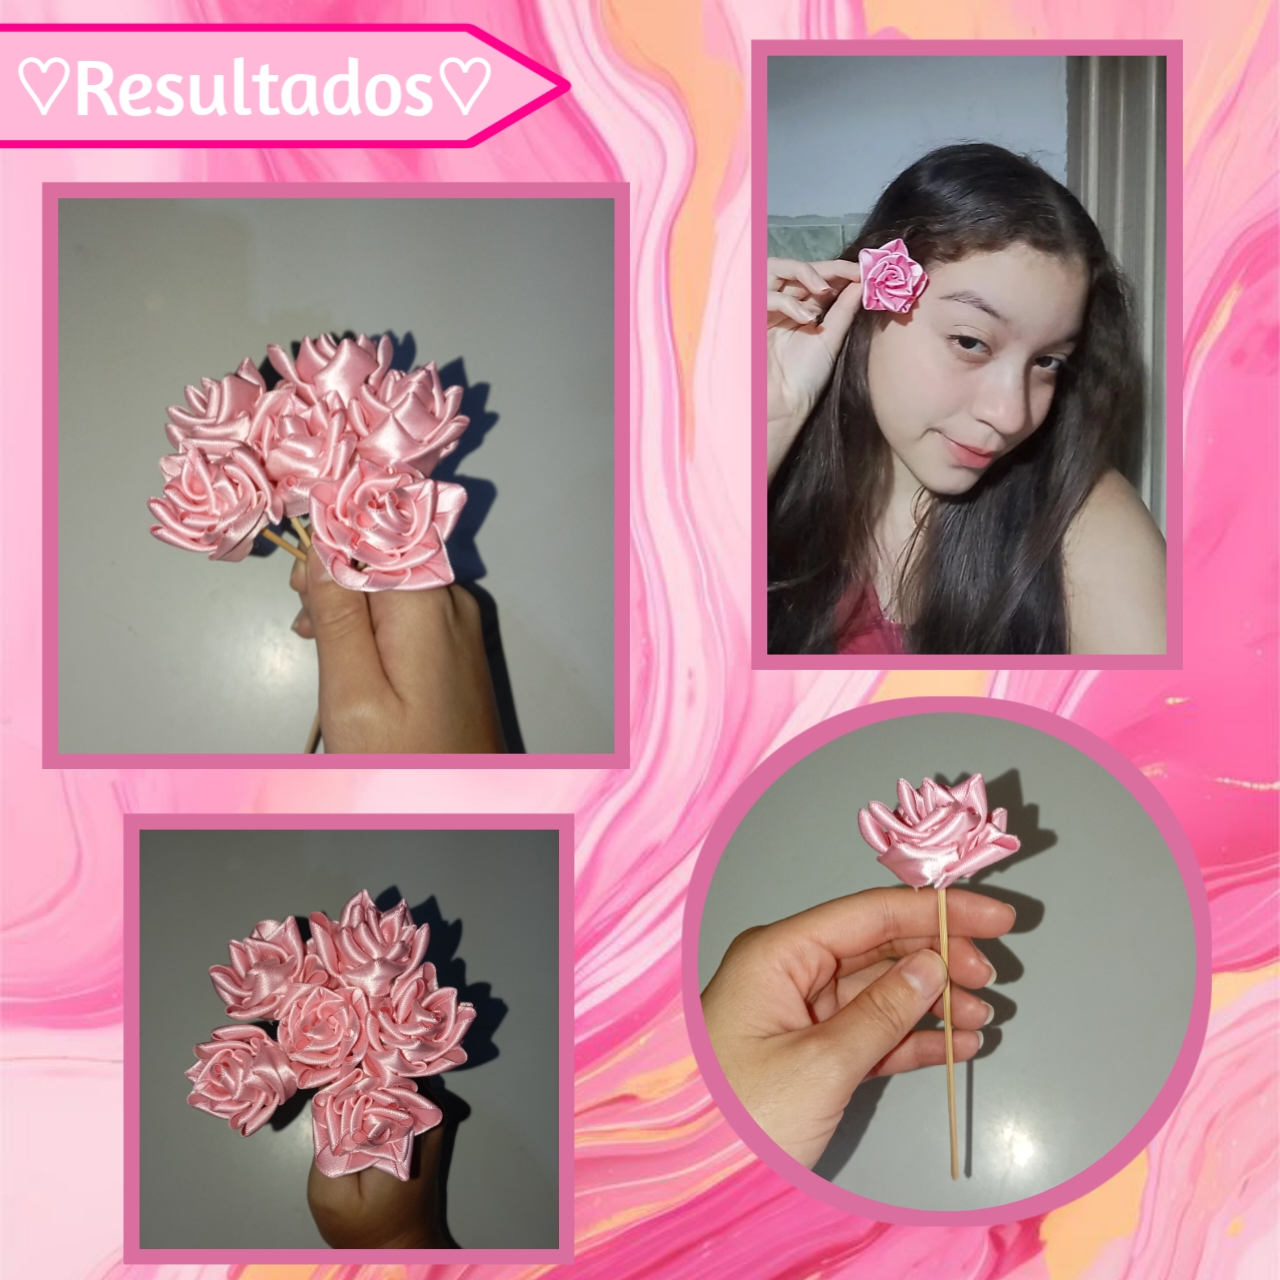
Así, es como a mano podemos hacer hermosas rosas para regalar o incluso vender en diferentes arreglos y regalos. Lo mejor de todo es que las podemos personalizar, del color y tamaño de nuestra elección, además de las distintas decoraciones que puede llevar, es cuestión de crear con creatividad y amor, nos resulta útil para muchas cosas, rosas eternas, para un amor eterno.❤️💗✨
This is how by hand we can make beautiful roses to give away or even sell in different arrangements and gifts. The best of all is that we can customize them, the color and size of our choice, in addition to the different decorations that can take, it is a matter of creating with creativity and love, it is useful for many things, eternal roses, for an eternal love.❤️💗✨
Espero y les haya gustado el resultado y les sea de gran utilidad este DIY que preparé con mucho amor para ustedes, está vez con estás rosas haré un pequeño arreglo para obsequiar, si Dios quiere pronto les mostraré su elaboración. Sin más que agregar, les deseo un bonito día familia, los leo debajo.❤️✨
I hope you liked the result and that this DIY that I prepared with much love for you will be very useful, this time with these roses I will make a small arrangement to give as a gift, God willing I will soon show you how to make it. Without more to add, I wish you a nice day family, I read you below.❤️✨
🩷🤍¡Gracias por leer! Hasta la próxima manualidad🤍🩷
🩷🤍Thanks for reading! Until the next craft🤍🩷
Photos of my authorship taken from my Xiaomi Redmi 13C phone, edited in the free version of PixeLab and Canva.