✦ This is an original and different tutorial proposal ! ! Let's see the construction of this backpack first, and in the second part that will be about the creation of stable patterns, I will include all the measurements with luxury of precision, so follow me and stay tuned for updates 😘 - Collage and Editing done in FotoJet, photos by @Tesmoforia ✦

🇪🇸 ~ Algunas veces necesitamos hacer diligencias rápidas con solo lo necesario acompañándonos, nuestro documentos de identidad, una pequeña lista de compras, y el teléfono celular. Pero necesitamos llevar esto de forma discreta, especialmente cuando utilizas transporte público o tomas tu camino a pie: La inspiración para este proyecto viene de esa necesidad y la pregunta, "¿cómo puedo fabricar una pequeña mochila que sea segura, que no llame la atencion, y sea bonita, combinable con cualquier outfit del día?" 🤔❔
🇺🇸 ~ Sometimes we need to run quick errands with only the necessities with us, our ID, a small shopping list, and cell phone. But we need to carry this in a discreet way, especially when using public transports or taking your way on foot: The inspiration for this project comes from that need and the question, “how can I make a small backpack that is safe, unobtrusive, and pretty, to match any outfit of the day?” 🤔❔


« 𝕋 𝕆 𝕆 𝕃 𝕊 • & • 𝕄 𝔸 𝕋 𝔼 ℝ 𝕀 𝔸 𝕃 𝕊 »
📝 ✨ Los materiales y herramientas que necesitas para realizar este proyecto son: Tela de jean reciclado, hilos de distintos colores, cinta de raso o bies, tela de forro tafeta, lápiz, marcador, regla escolar, alfileres pequeños, alfileres grandes, pinzas de costura, tijeras escolares, tijeras de costura, cinta métrica, cierre de 30 cm, plancha para ropa, aguja regular, y máquina de coser.
✅ ✨ The materials and tools you will need to make this project are: Recycled jean fabric, different color threads, satin ribbon or bias strip, taffeta lining fabric, pencil, marker, school ruler, small pins, large pins, sewing pliers, school scissors, sewing scissors, measuring tape, 30 cm zipper, clothes iron, regular needle, and sewing machine.
• 𝕊𝕋𝔼ℙ 𝔹𝕐 𝕊𝕋𝔼ℙ 𝕋𝕌𝕋𝕆ℝ𝕀𝔸𝕃 •
« Can you say with me: "Mini Mochila"? »

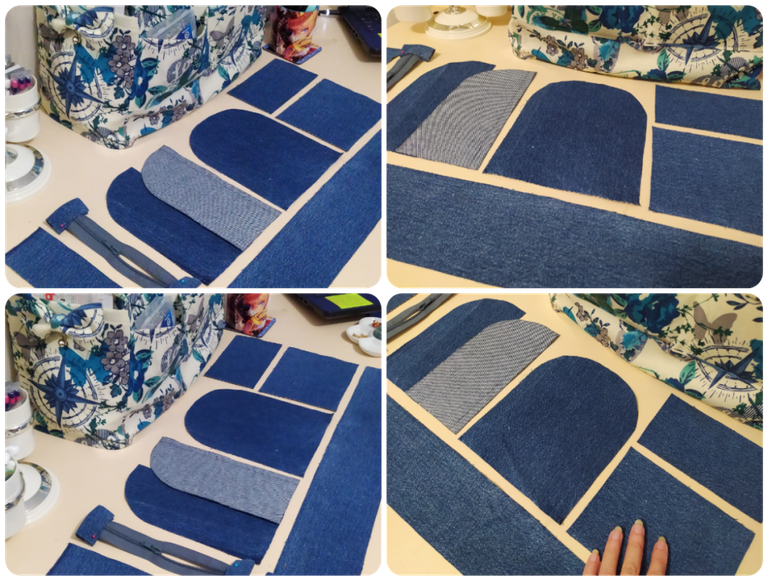

✦ PASO 1 ✦ Para este proyecto, replicarás en papel y después trasladarás a la tela denim las secciones más básicas de un modelo de mochila de uso cotidiano o regular. Parte delante, parte frontal, sus lados, el suelo, y guardando la abertura para el cierre (que será lo primero que prepararas, cortando el excedente del cierre en su parte superior y coseras en sus extremos 2 pestañas de tela de jean).
✦ STEP 1 ✦ For this project, you will replicate on paper and then transfer to denim fabric the most basic sections of an everyday or regular backpack model. Front part, front part, its sides, the floor, and saving the opening for the zipper (which will be the first thing you will prepare, by cutting the excess of the zipper on its top and sew on its ends 2 tabs of denim fabric).

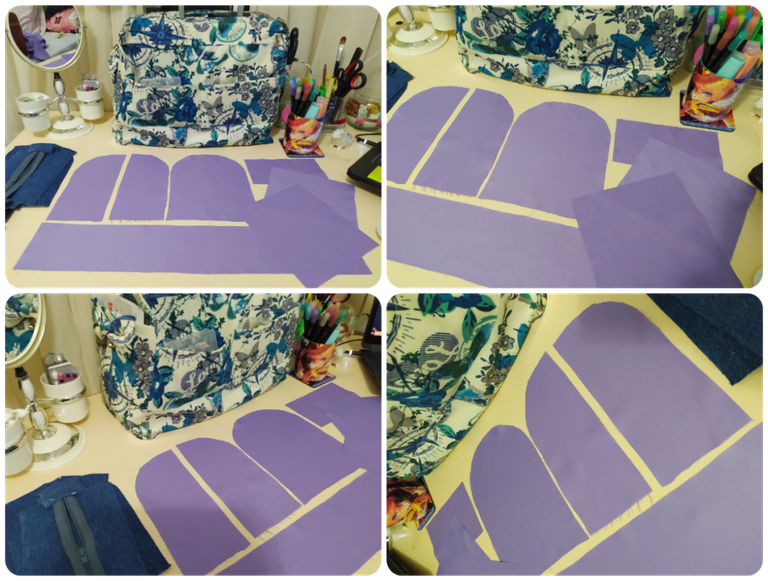

✦ PASO 2 ✦ Repetirás el paso numero 1 pero ahora en la tela tafeta que utilizaremos como forro. Tanto en el paso 1 como en el paso 2, las piezas cortadas deben incluir los centímetros de costura. Tambien incluirás un recorte extra para hacer un bolsillo interno.
✦ STEP 2 ✦ You will repeat step 1 but now on the taffeta fabric that we will use as lining. In both step 1 and step 2, the cut pieces should include the seam allowances. You will also include an extra cutout to make an inside pocket.

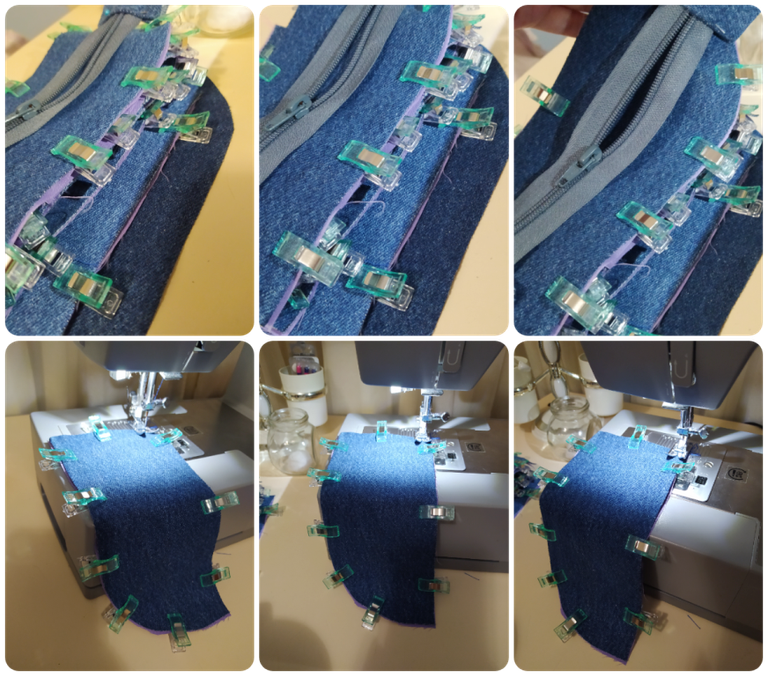

✦ PASO 3 ✦ Con ayuda de las pinzas de costura, vamos a sostener todas las piezas de tela denim con su respectiva pieza de forro tafeta, y llevaremos a la máquina de coser con una puntada ajustada, preferiblemente no superior al numero 3, para unirlas de forma segura.
✦ STEP 3 ✦ With the help of the sewing pliers, we will hold all the denim fabric pieces with their respective taffeta lining piece, and take to the sewing machine with a tight stitch, preferably not higher than number 3, to join them securely.

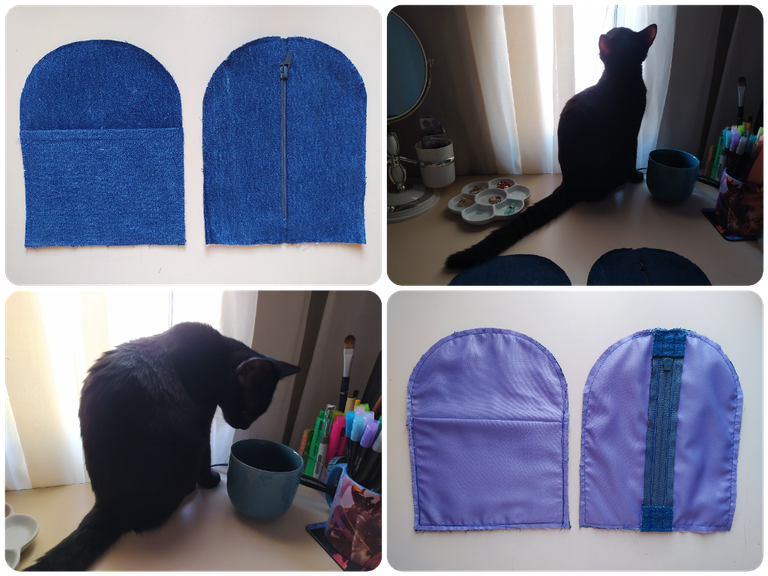

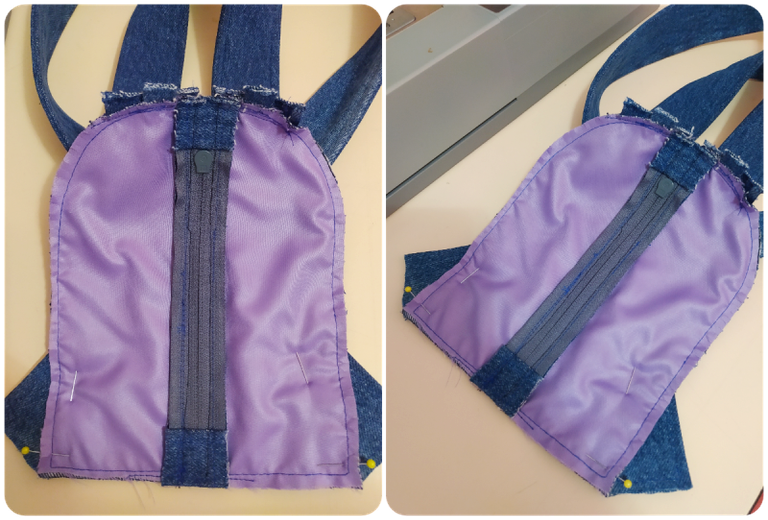
✦ PASO 4 ✦ Repetiremos el paso anterior con todas las piezas, instalando en esta etapa el bolsillo que corresponde al interior del forro de la parte delantera del bolso, e instalaremos el cierre entre las dos secciones que corresponden a la parte posterior del bolso; el resultado debe ser como el de las fotos guía.
✦ STEP 4 ✦ We will repeat the previous step with all the pieces, installing at this stage the pocket that corresponds to the inside of the lining of the front of the bag, and we will install the zipper between the two sections that correspond to the back of the bag; the result should look like the one in the guide photos.

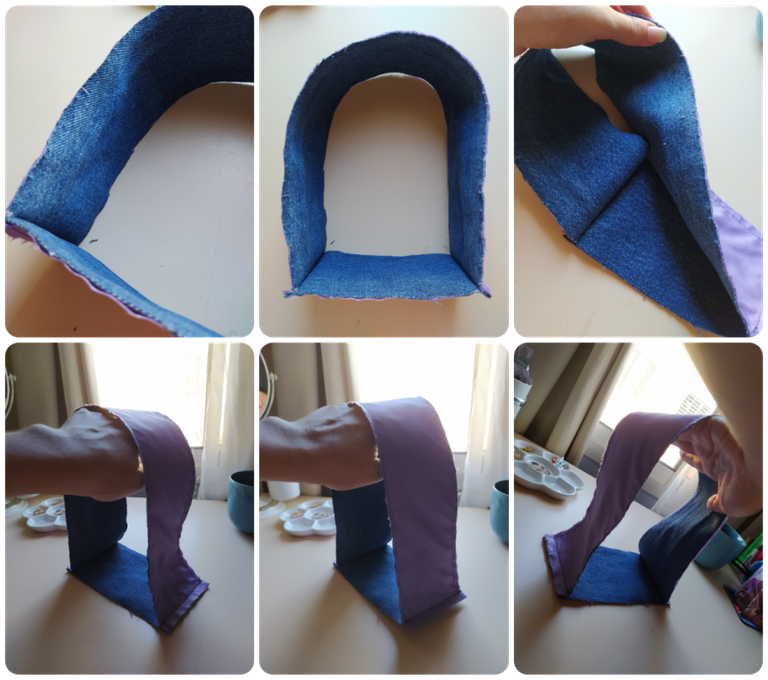

✦ PASO 5 ✦ Las primeras piezas que coseremos unas con otras serán el piso del bolso, y la larga tira de tela que corresponde a su contorno o ancho.
✦ STEP 5 ✦ The first pieces that we will sew together will be the floor of the bag, and the long strip of fabric that corresponds to its outline or width.

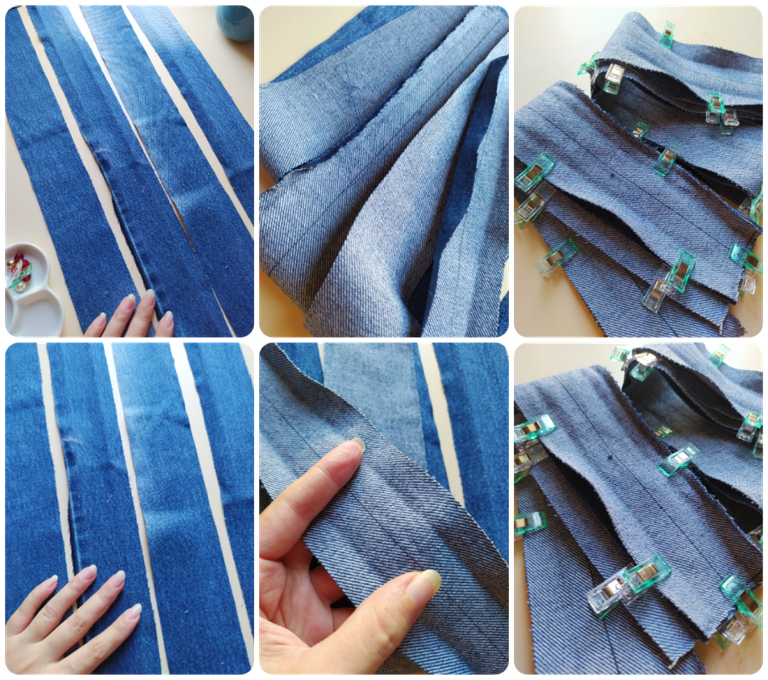

✦ PASO 6 ✦ Las siguientes partes que prepararemos seran las correas del bolso, recomiendo un ancho no menor de 6 cm por tira, y un largo promedio de 70 cm. Cortaremos y plancharemos a alta temperatura. Después, sostendremos una tira sobre otra del lado exterior de la tela hacia dentro una contra otra.
STEP 6 ✦ The next parts that we will prepare will be the straps of the bag, I recommend a width of no less than 6 cm per strip, and an average length of 70 cm. We will cut and iron at high temperature. Then, we will hold one strap over the other from the outer side of the fabric inwards against each other.

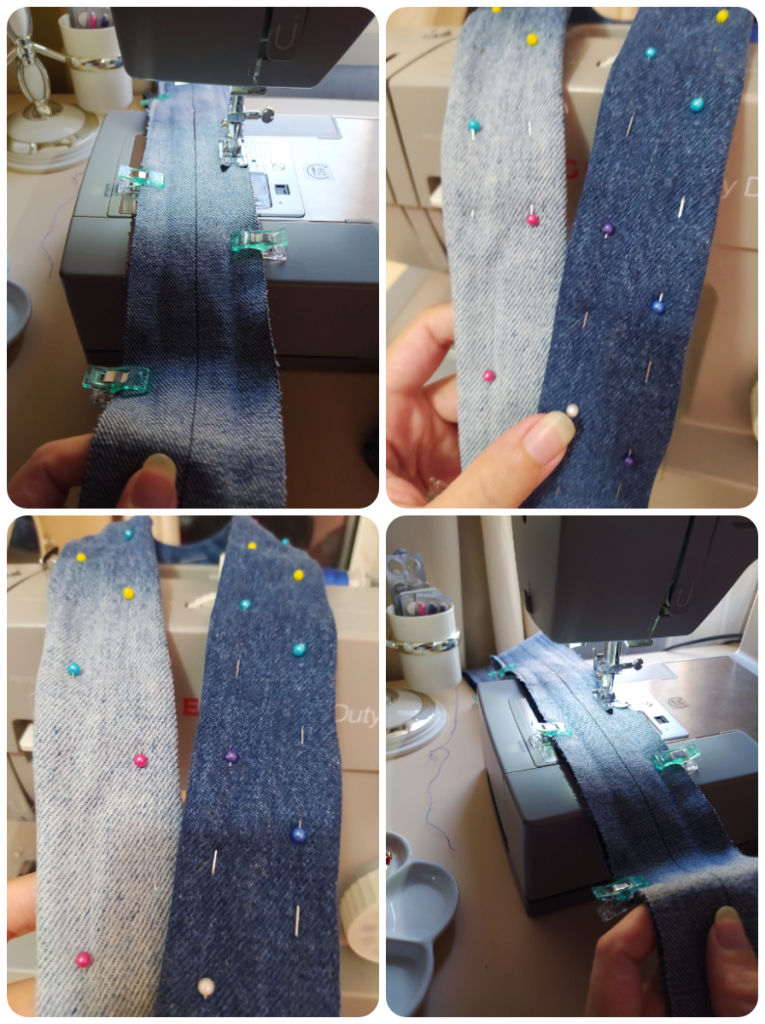

✦ PASO 7 ✦ Lleva las correas a la máquina de coser, y a 1 cm de su borde, cose en línea recta con puntada número 2. Después voltea cada correa, sostén sus bordes de nuevo con alfiler, y aplica la plancha a alta temperatura.
✦ STEP 7 ✦ Take the straps to the sewing machine, and 1 cm from their edge, sew in a straight line with stitch number 2. Then flip each strap over, pin their edges again, and apply the iron at high temperature.

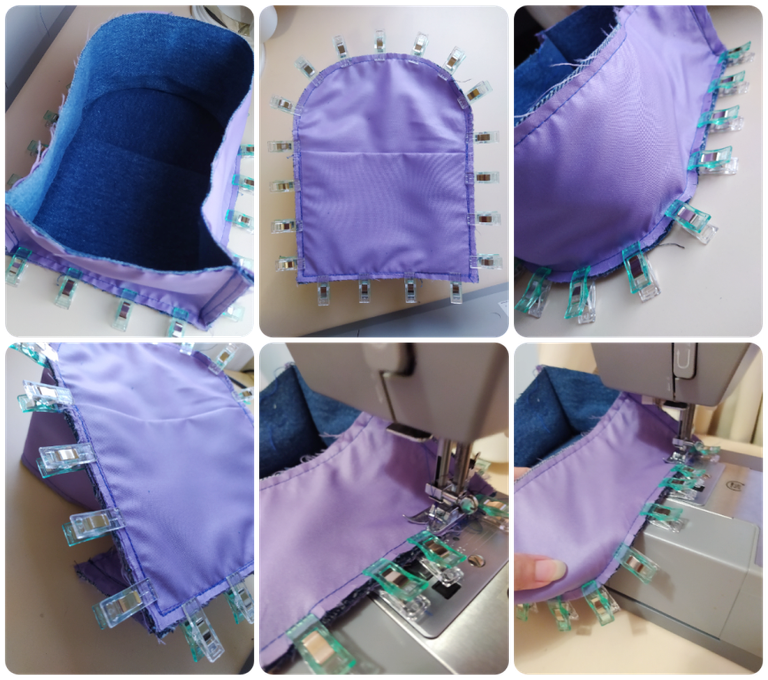

✦ PASO 8 ✦ Volviendo al cuerpo del mini morral, la primera sección que instalaras una contra otra es el que corresponde al frente del bolso, con el marco. Sostendrás con pinzas de costura como se aprecia en las fotos y llevaras a la máquina de coser con una puntada ajustada, número 2 o 2.5.
STEP 8 ✦ Going back to the body of the mini backpack, the first section that you will install against each other is the one that corresponds to the front of the bag, with the frame. You will hold with sewing clamps as seen in the photos and bring to the sewing machine with a tight stitch, number 2 or 2.5.

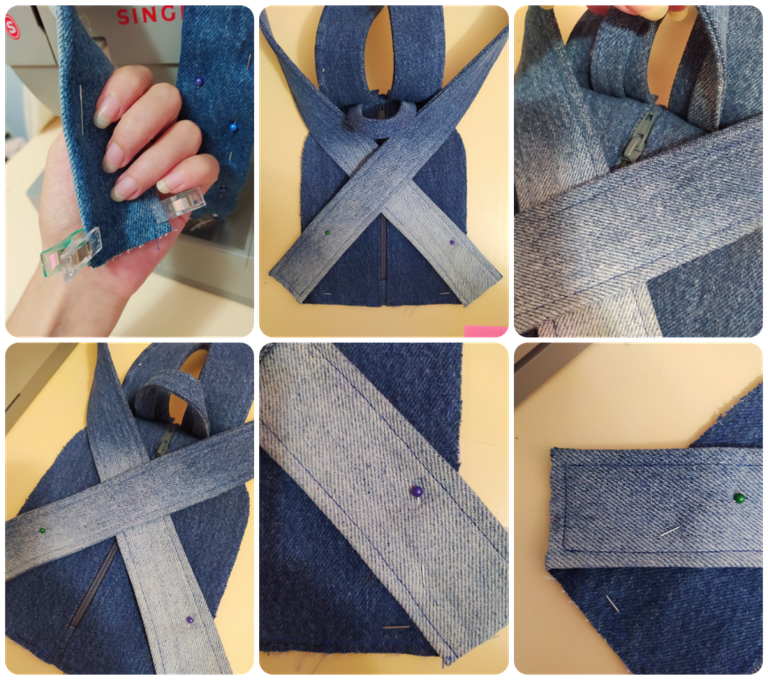

✦ PASO 9 ✦ Ya casi en la recta final, coloca las correas del morral en la posición que puede apreciarse en las fotografías guía. Puedes agregar a tu gusto un aza extra en la parte superior, cortando una tira de tela denim de 3 x 15 cm, doblándola dos veces por la mitad hacia dentro y cosiendo previamente en la máquina de coser. Asegura en su posición las correas con suficientes alfileres.
STEP 9 ✦ Almost in the final stretch, place the straps of the backpack in the position that can be seen in the guide pictures. You can add to your liking an extra loop at the top by cutting a 3 x 15 cm strip of denim fabric, folding it twice in half inward and pre-stitching on the sewing machine. Secure in position the straps with enough pins.


✦ PASO 10 ✦ Lleva la pieza a la máquina de coser y asegura muy bien con la misma puntada todas las bases de cada correa justo por encima de la línea de costura que hiciste para unir la tela forro tafeta con la tela denim.
✦ STEP 10 ✦ Take the piece to the sewing machine and secure very well with the same stitch all the bases of each strap just above the stitching line you made to join the taffeta lining fabric with the denim fabric.

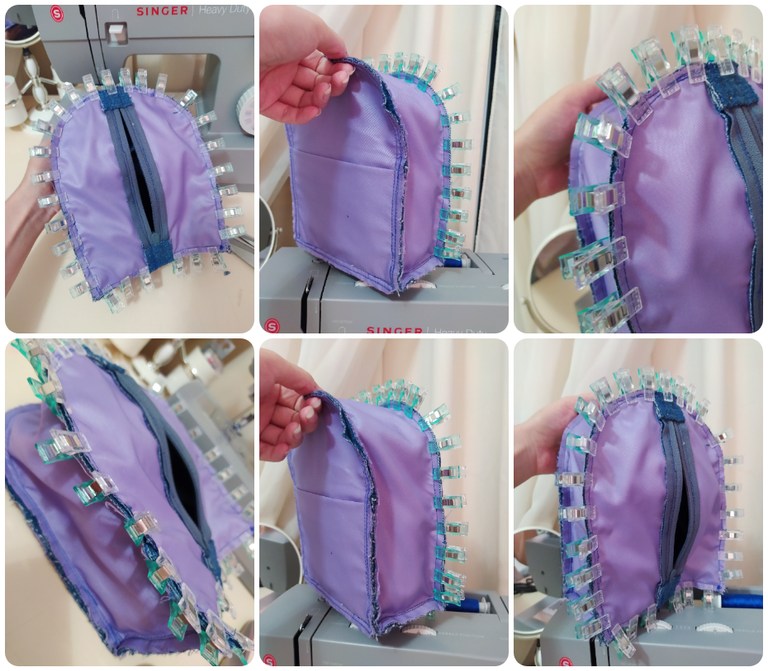

✦ PASO 11 ✦ Corta el excedente de tela que sobresalga de todos los bordes. Abre el cierre de la parte que corresponde a la espalda del bolso, guarda las correas en el interior de toda la pieza y cierra/fija en su sitio todo con más pinzas de costura.
✦ STEP 11 ✦ Cut off the excess fabric overhanging all the edges. Unzip the zipper on the back portion of the bag, tuck the straps inside the entire piece and close/fasten everything in place with more sewing clips.

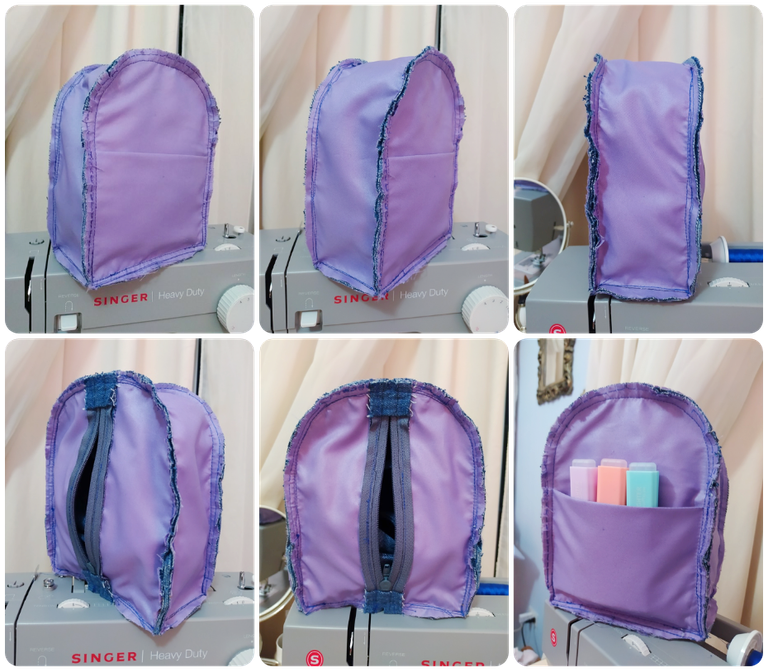

✦ PASO 12 ✦ Repasa con costura en línea recta número 3 todos los bordes del bolso. Después, has pequeños cortes en todo el rededor de cada margen sin tocar o dañar las costuras de unión.
STEP 12 ✦ Go over all the edges of the bag with straight line stitching number 3. Then, make small cuts all the way around each edge without touching or damaging the seam allowances.

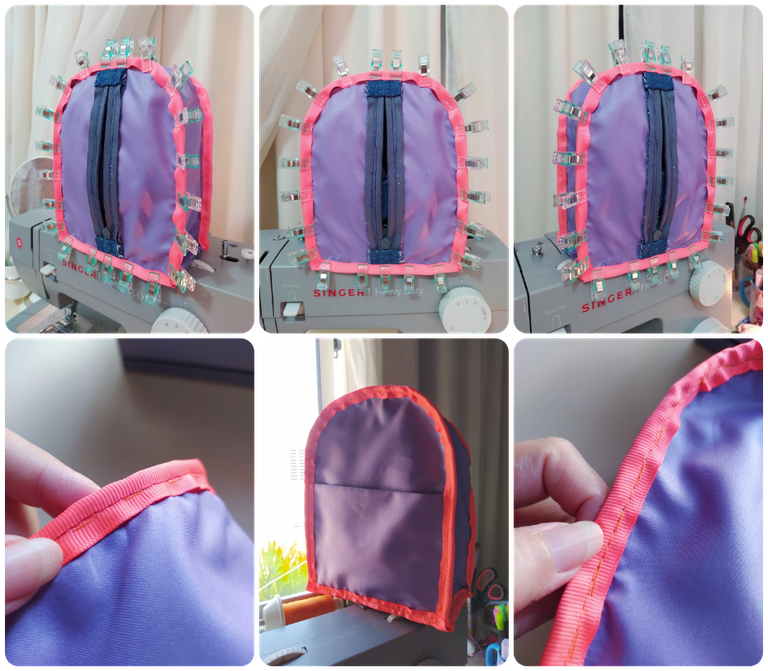

✦ PASO 13 ✦ Utilizando bies o cinta de seda, fíjala con más pinzas de costura en su lugar, bien tenso, cubre todos los bordes interiores del bolso y cóselo con la máquina de coser.
✦ STEP 13 ✦ Using bias or silk ribbon, secure it with more sewing clamps in place, tightly taut, cover all the inside edges of the bag and sew it with the sewing machine.

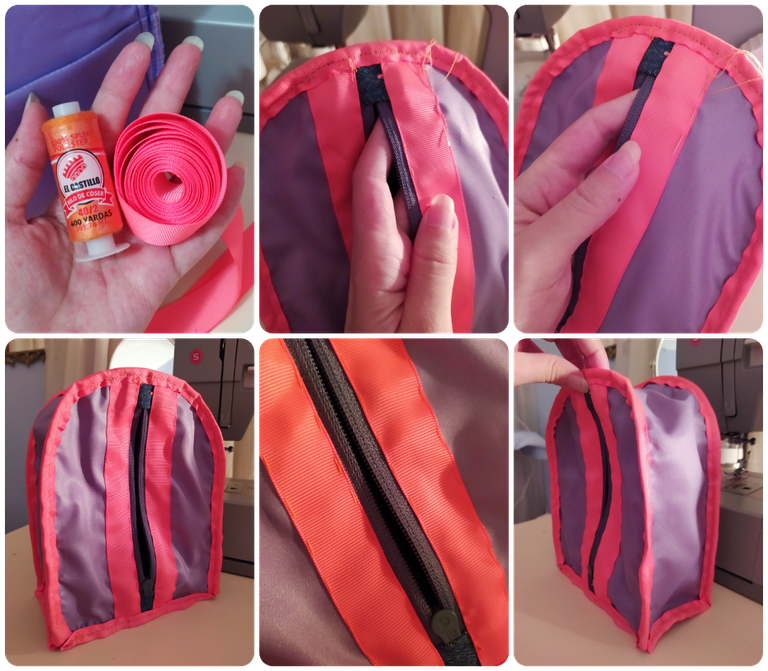

✦ PASO 14 ✦ Para la parte del cierre, cose a mano un poco de cinta para darle un aspecto mas bonito y limpio. Utiliza la técnica de la costura invisible a mano con una sola hebra de hilo del mismo color.
✦ STEP 14 ✦ For the zipper part, hand stitch some ribbon to give it a nicer, cleaner look. Use the invisible hand stitching technique with a single strand of thread of the same color.

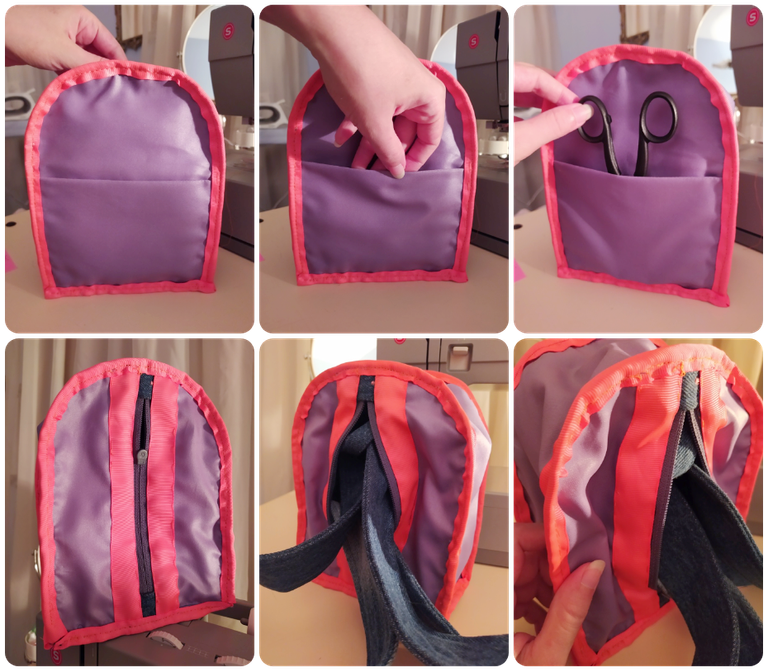

✦ PASO 15 ✦ Comprueba que todas las costuras estén bien hechas, termina de abrir el cierre y saca-jala las correas del bolso hacia afuera con mucha paciencia y cariño.
✦ STEP 15 ✦ Check that all the seams are well done, finish opening the zipper and pull the straps of the bag outwards with a lot of patience and love.

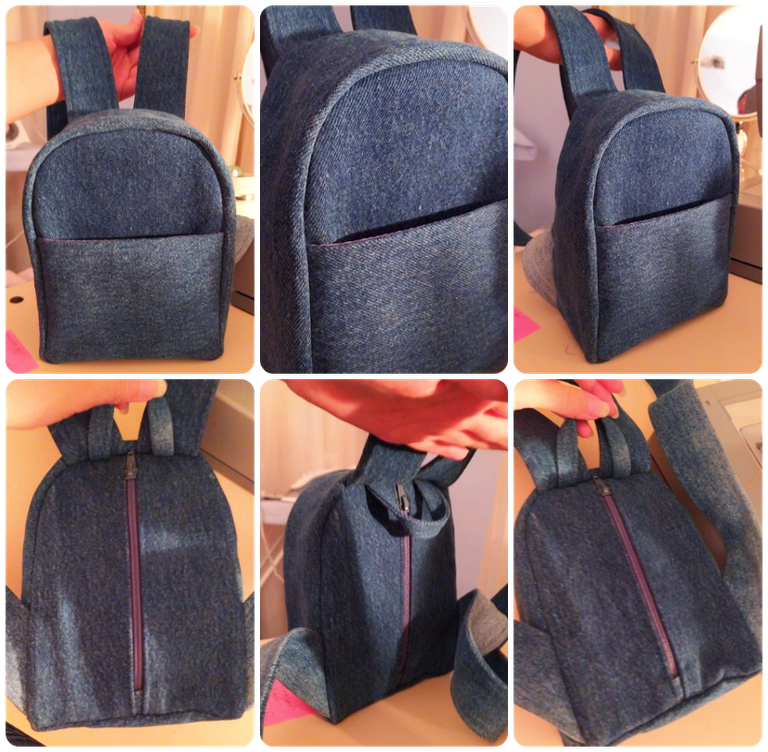

✦ PASO 16 [FINAL] ✦ Extienden muy bien de adentro hacia afuera con ayuda de un objeto puntiagudo redondeado, todas las esquinas del bolso. Estíralo y ayúdalo a tomar su respectiva forma metiendo la mano hacia adentro y empujando hacia afuera todo el marco donde instalaste el bies. Cierra el cierre y comprueba una vez mas las costuras.
STEP 16 [FINAL] ✦ Spread all the corners of the bag from the inside out very well with the help of a rounded pointed object. Stretch it and help it take its respective shape by reaching inside and pushing out the entire frame where you installed the bias binding. Close the zipper and check the seams once more.


🔴 EL CIERRE EN LA ESPALDA COMO MEDIDA ANTIROBO: La abertura del bolso queda contra tu espalda, y asi literalmente, ¡fuera de la vista de quienes te rodean!. Cambiar el diseño del morral clásico e instalar el cierre en la espalda es una gran idea porque no hay forma ni manera de alguien acceda a los objetos que has guardado en el sin que te des cuenta. También hacer la abertura mas pequeña hace que al abrirlo no corras el riesgo de que las cosas se desborden; además, el bolsillo interno es perfecto para colocar el celular y evitar que "baile" contra el resto de las pertenencias que lo acompañan.
🔵 🔴 THE ZIPPER ON THE BACK AS AN ANTI-THEFT METHOD: The opening of the bag is against your back, and so literally, out of sight of those around you! Changing the design of the classic backpack and installing the zipper on the back is a great idea because there is no way or means for someone to access the items you have stored in it without you noticing. Also making the opening smaller means that when you open it you don't run the risk of things overflowing; also, the internal pocket is perfect for your cell phone and prevents it from “dancing” against the rest of your belongings that go with it.
« ✨ Final Tips for Better Results ✨ »
| 📌 Plancha a media y alta temperatura todas las piezas de tela antes, durante, y después del ensamblado. | 📍 Medium and high temperature iron all fabric parts before, during, and after assembly. |
|---|---|
| 📌 Para un extra de resistencia, puedes utilizar un tercer tipo de tela entre la tela denim y la tela forro tafeta, como una entretela suave con adhesivo o algo de guata que no supere los 2 cm de ancho, para un aspecto acolchado y agradable. | 📍 For extra strength, you can use a third type of fabric between the denim and taffeta lining fabric, such as a soft interlining with adhesive or some wadding no wider than 2 cm, for a nice quilted look. |
| 📌 Puedes hacer dibujos en las distintas partes de denim pre cortadas antes de comenzar la etapa de ensamblado, con pintura para telas o bordado en hilos de colores. | 📍 You can make drawings on the different pre-cut denim parts before starting the assembly stage, with fabric paint or embroidery on colored threads. |
| 📌 Una tela con estampado es estupenda opcion para darle vida al interior del bolso. | 📍 A patterned fabric is a great option to liven up the inside of the bag. |
| 📌 Si quieres algo mas atrevido, puedes utilizar tela de tapicería estampada y texturizada en lugar de tela denim. | 📍 If you want something bolder, you can use printed and textured upholstery fabric instead of denim. |
🧵 Sinopsis🧵 Los proyectos divertidos o temáticos siempre son super bienvenidos, pero las habilidades crafteriles también nos ofrecen la oportunidad de presentar propuestas que nos ayuden a resolver situaciones de la vida diaria o a mejorar nuestra experiencia de vida facilitando ciertos aspectos de nuestra rutina a través de la creación de objetos con características especialmente específicas que no se consiguen fácilmente en el mercado. Un morral de tamaño compacto con un cierre que no se ve cuando lo utilizamos, es una gran solución y medida de seguridad para resguardar nuestra seguridad y nuestras pertenencias de manera simple y efectiva.
🧶 Summary 🧶 Fun or thematic projects are always super welcome, but crafterile skills also offer us the opportunity to present proposals that help us solve situations of daily life or improve our life experience by facilitating certain aspects of our routine through the creation of objects with especially specific features that are not easily available in the market. A compact size backpack with a zipper that cannot be seen when we use it, is a great solution and security measure to protect our safety and our belongings in a simple and effective way.
~ You must login to the site first, then click on the text above ~


✨ 🍓 All texts and images by @Tesmoforia 🍓 ✨
📸 Tools: Xiaomi Redmi Note 8 📲 Snow 🎬 Remini 🌓 FotoJet 📐
🚨 ¡Please do not take, edit or republish my material without my permission! 🚨
💌 ¿Do you wish to contact me? Mino.Cosplay@Gmail.com 💌
🌙 Banner, signature and separators by Keili Lares

