
✦ Let's get back to tutorials in turbo panic mode! - Collage and editing done with FotoJet and iloveimg.com - Photos by @Tesmoforia ✦

🇪🇸 ~ ¿En el colegio te pidieron espadas de material reciclado?, ¿son para carnaval, halloween, fotos temáticas en grupo, o una obra de teatro infantil?: ¡Aqui tienes un tutorial para hacer espadas pirata en menos de 2 horas! 🔥 ✨
🇺🇸 ~ Did your school ask you to make swords out of recycled material?, are they for carnival, themed group photos, or a children's play? Here's a tutorial to make pirate swords in less than 2 hours! 🚀 ✨


| 🇪🇸 ~ Cartón corrugado de cajas o cartón de reciclaje, tirro grueso, barra de silicón, pistola de silicón, una tablita de madera pequeña, pintura acrílica color gris, fieltro marrón, pintura acrílica dorada, perlas de plástico, apliques brillantes, y cualquier tipo de cinta dorada. |
|---|
| 🇺🇸 ~ Corrugated cardboard from boxes or recycled cardboard, thick string, silicone stick, silicone gun, a small wooden board, gray acrylic paint, brown felt, gold acrylic paint, plastic beads, shiny appliqués, and any type of gold ribbon. |
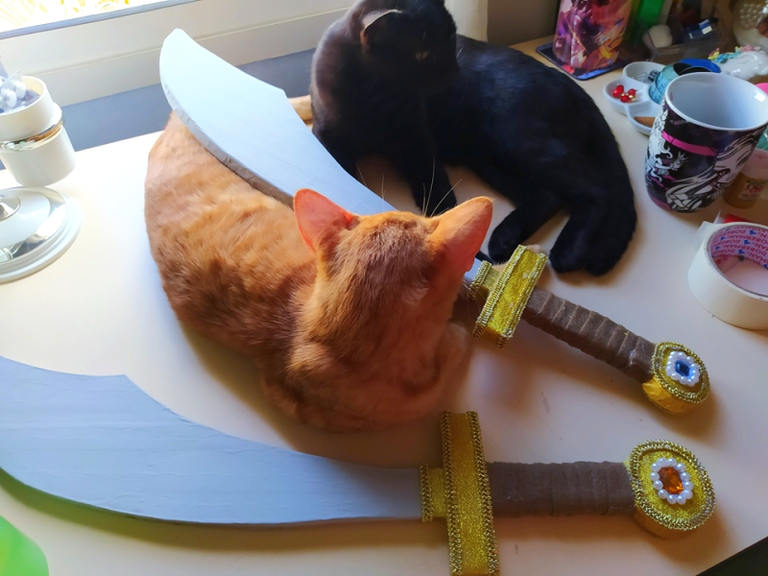 | 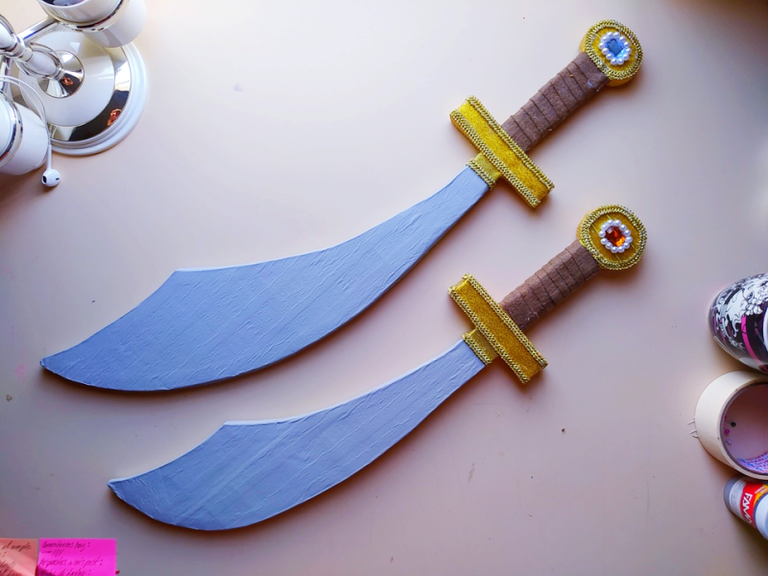 |
|---|
✦ At the end of this post I'll give you a little background on the origin of this craft! ✦

¡REGRESO CON TUTORIALES FLASH!, y como es costumbre en este blog, te garantizo que tiene las 3 "b", bueno, bonito, y barato: Estas espadas estan hechas con cartón reciclado y un extra de amor que las hace mucho más resistentes que las que encuentras de plástico en las jugueterías; pensadas como juguete y para niños, estan principalmente hechas de cartón de caja acanalado para evitar accidentes en performance piratas que pueden pasar rápidamente de 0 a 100 en segundos 😂 👍
I'M BACK WITH FLASH TUTORIALS, and as usual in this blog, I guarantee you a good result no matter your level of skill as a crafter: These swords are made with recycled cardboard and an extra love that makes them much more resistant than the ones you find in plastic in the toy stores; thought as a toy and for children, they are mainly made of corrugated box cardboard to avoid accidents in pirate performance that can quickly go from 0 to 100 in seconds 😂 👍
• STEP BY STEP TUTORIAL •
« PIRATE SWORDS MADE FROM RECYCLED MATERIAL »

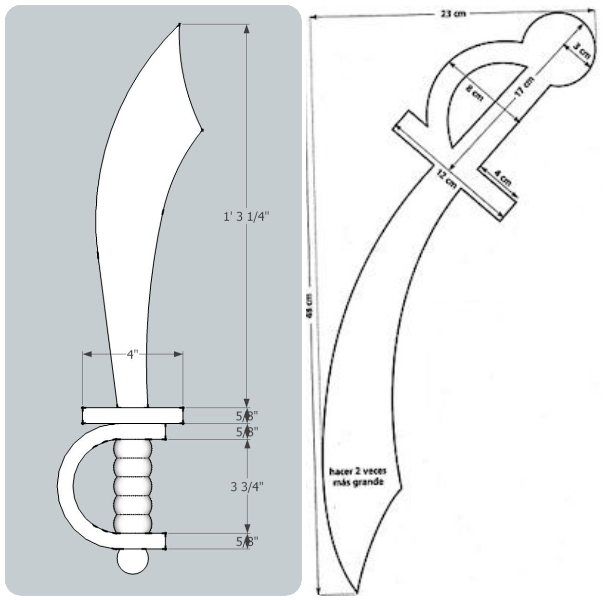
✦ These are the most nice references I found, there are several, but these ensure a nice result without excessive effort. - 1 - 2 ✦

🔹 Comienza reuniendo referencias o dibujando a mano alzada la silueta de la espada. Recomiendo obviar el detalle curvo de la empuñadura para acelerar la construcción de la pieza, además que borrar esa parte del diseño no afecta negativamente el aspecto del resultado.
🔷 Start by gathering references or freehand drawing the silhouette of the sword. I recommend omitting the curved detail of the hilt to speed up the construction of the piece, besides delete that part of the design does not affect negatively the appearance of the result.

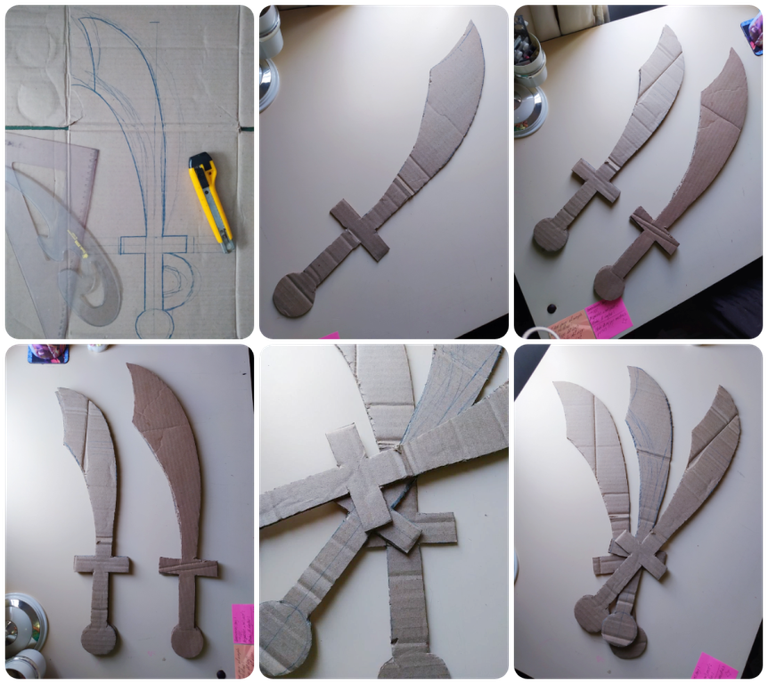
✦ You can cut out the silhouettes with the help of scissors, but in these cases I always recommend using a sharp cutter and do the work on the floor, with patience to avoid accidents ✦

🔹 Traslada la silueta de tu diseño al cartón de reciclaje. Necesitas 3 siluetas de cartón por cada espada que quieras hacer. Deben quedarte como en las fotografías de ejemplo.
🔷 Transfer the silhouette of your design to recycled cardboard. You need 3 cardboard silhouettes for each sword you want to make. They should look like the example pictures.

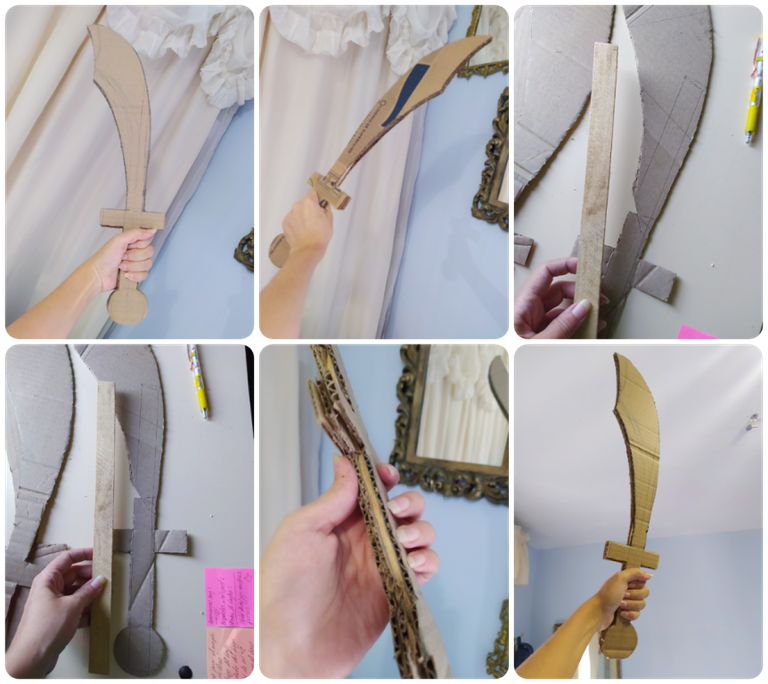
✦ In this step you have more than half of the process ready ! ! ✦

🔹 En esta parte vas a pegar con silicón caliente la tablita de madera en el centro de una de las caras de la espada, la tablilla debe ocupar desde el inicio de la empuñadura de la espalda y terminar antes de llegar a la curva de la espada -en este caso una cimitarra- Cuando esté hecho, con una segunda capa págala en las zonas que no alcanza la tablilla para completar el vacío de la pieza, y finalmente pega la tercera cara de la espalda con más silicón caliente. ¡Es como armar un emparedado!.
🔷 In this part you are going to glue with hot silicone the little wooden board in the center of one of the faces of the sword, the board must occupy from the beginning of the hilt of the back and finish before reaching the curve of the sword -in this case a scimitar- When it is done, with a second layer glue it in the areas that the board does not reach to complete the emptiness of the piece, and finally glue the third face of the back with more hot silicone. It's like making a sandwich!

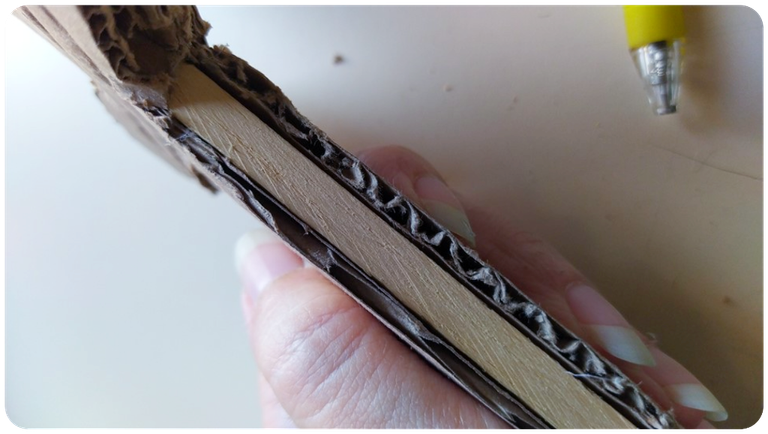
✦ This is how it should look ✦

🔹 La tablilla del centro asegura que la espada no se va a doblar ni romper. Queda sellada entre el cartón para no representar un peligro. Su única función es darle estabilidad a la pieza, pero no llega a la parte del "filo" de la espada para que esa sección sí quede suave y seda a los golpes.
🔷 The center splint ensures that the sword will not bend or break. It is sealed between the cardboard so as not to represent a danger. Its only function is to give stability to the piece, but it does not reach the “edge” of the sword so that this section is smooth and yields to blows.

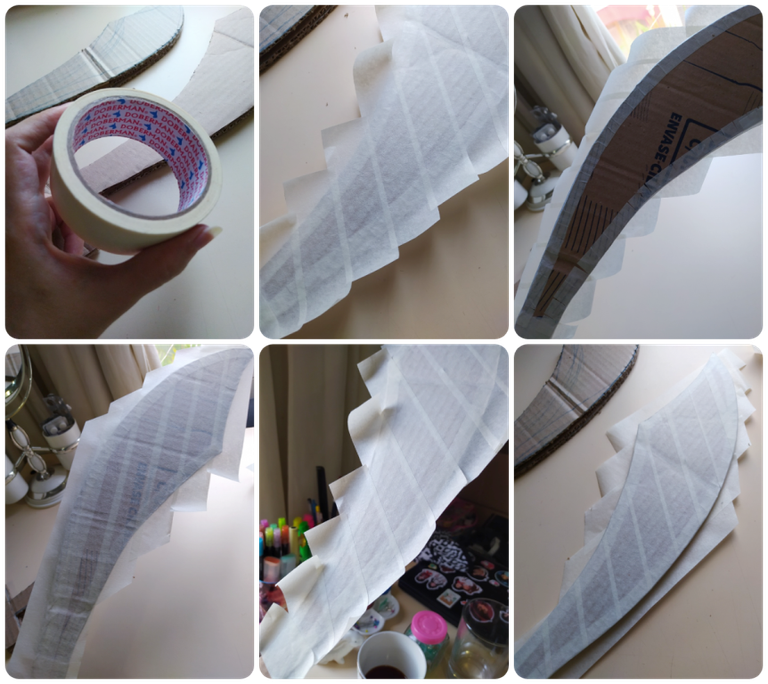
✦ You're almost to the fun part, it won't be long now ! ! ✦

🔹 Para una superficie más bonita y limpia, forra toda la espada siguiendo el ejemplo de las fotografías. Primero en todo el borde una larga tira de tirro liso, y luego varias tiras en diagonal. Corta el exceso en los bordes con la tijera.
🔷 For a nicer and cleaner surface, line the entire sword following the example in the pictures. First along the entire edge, a long strip of smooth cloth, and then several strips diagonally. Cut off the excess at the edges with the scissors.

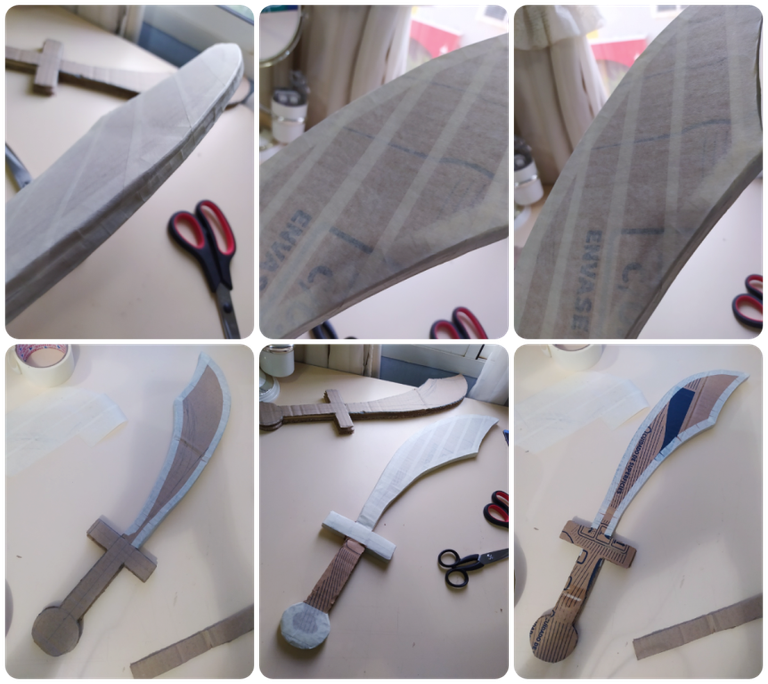
✦ The ideal length of each sword is 40 to 50 cm from the length of the child's hand ✦

🔹 Aqui puedes apreciar el proceso mejor, en mi caso hice 2 espadas de tallas diferentes, una más corta que la otra, pero el proceso de forrado es el mismo.
🔷 Here you can see the process better, in my case I made 2 swords of different sizes, one shorter than the other, but the lining process is the same.

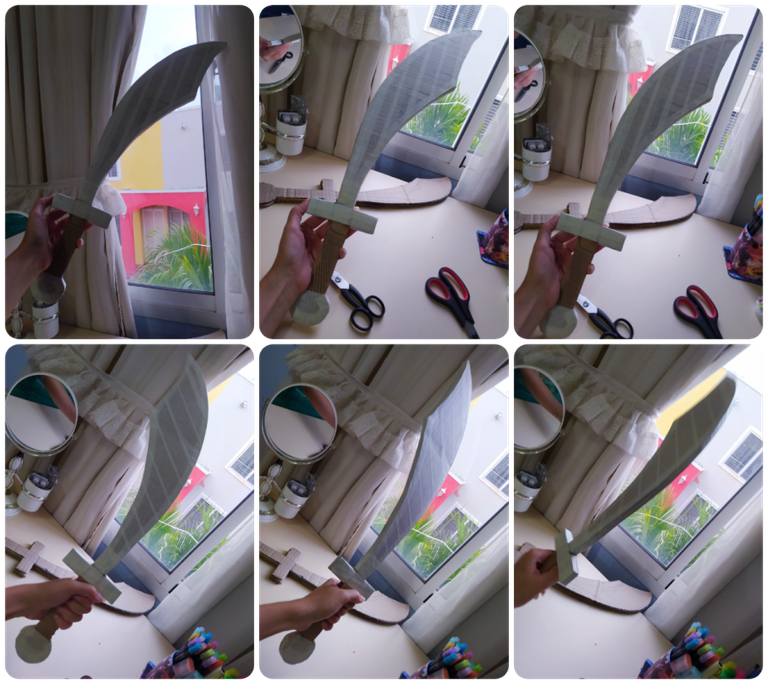
✦ There are no tricks or secrets, it's that quick and easy 💕 ✦

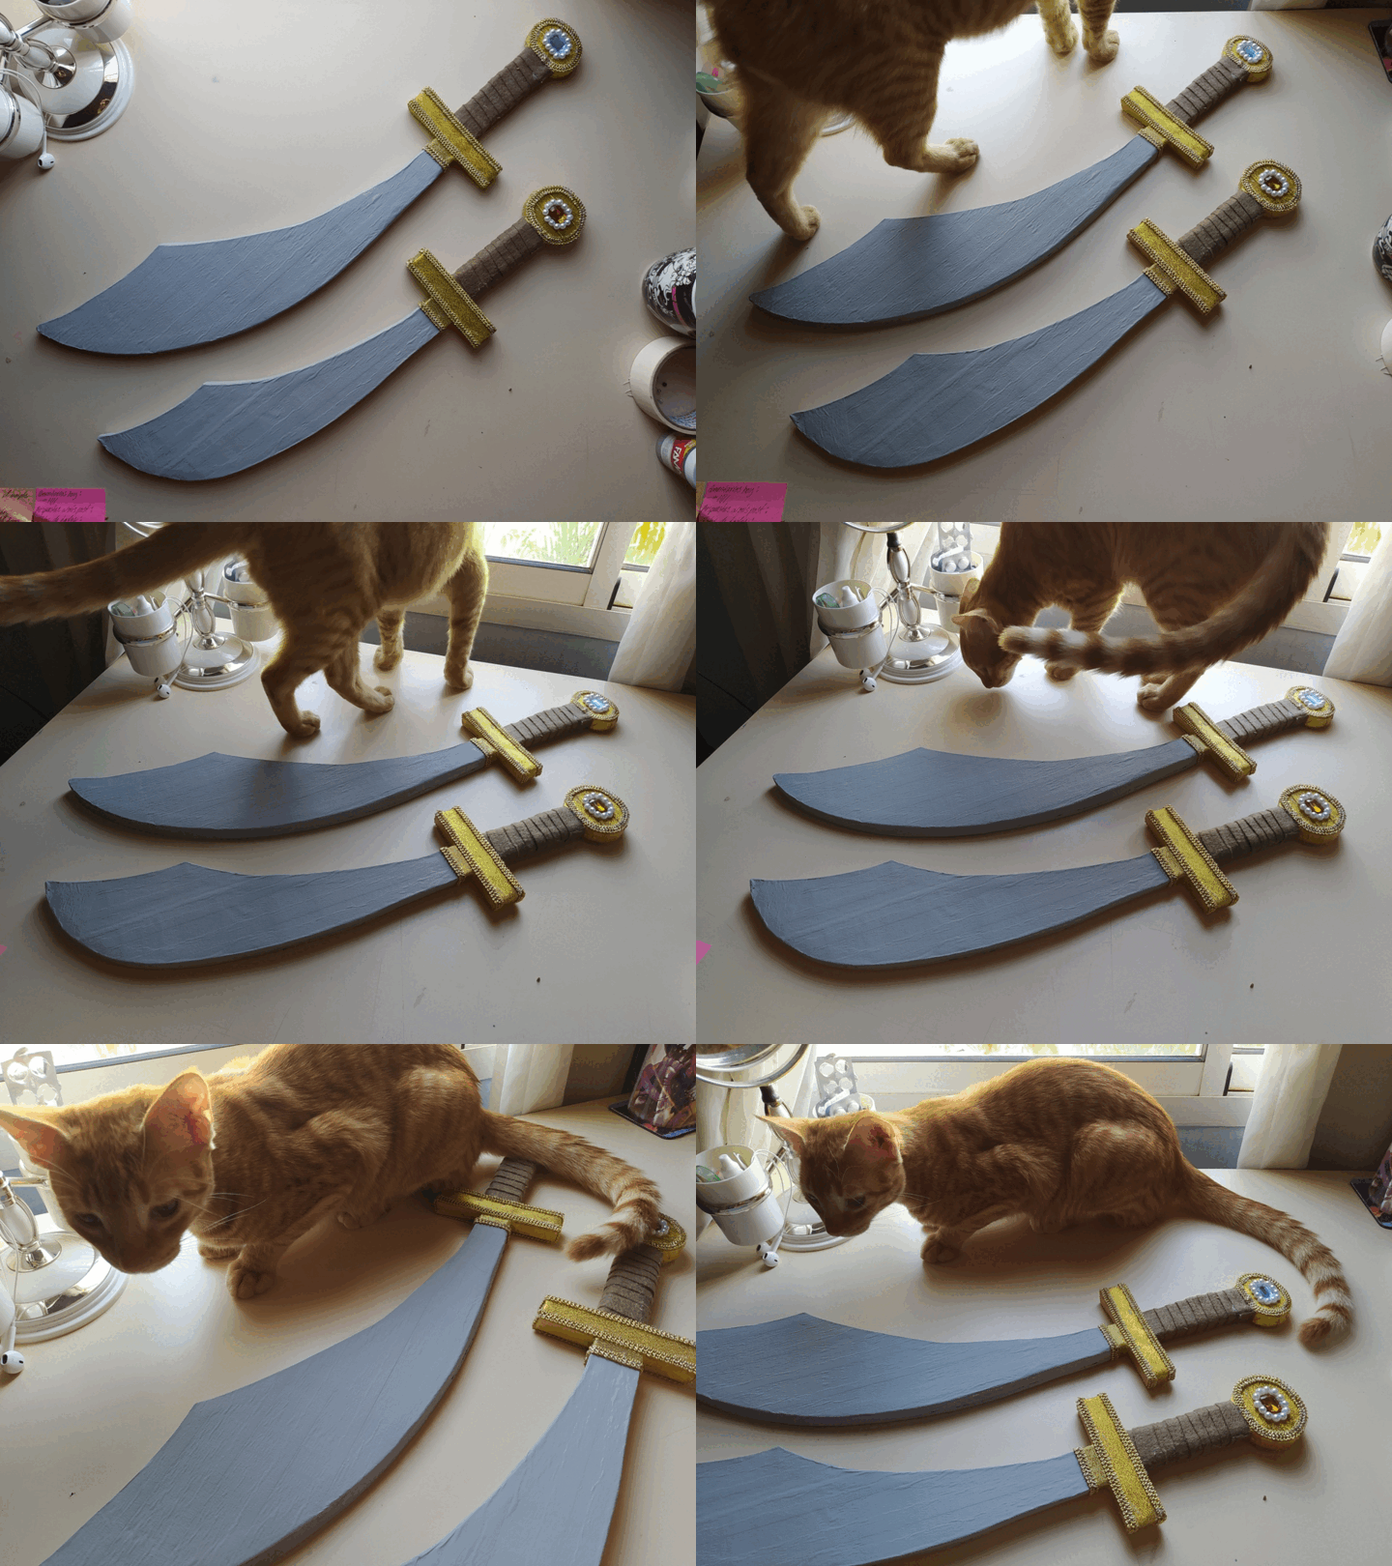
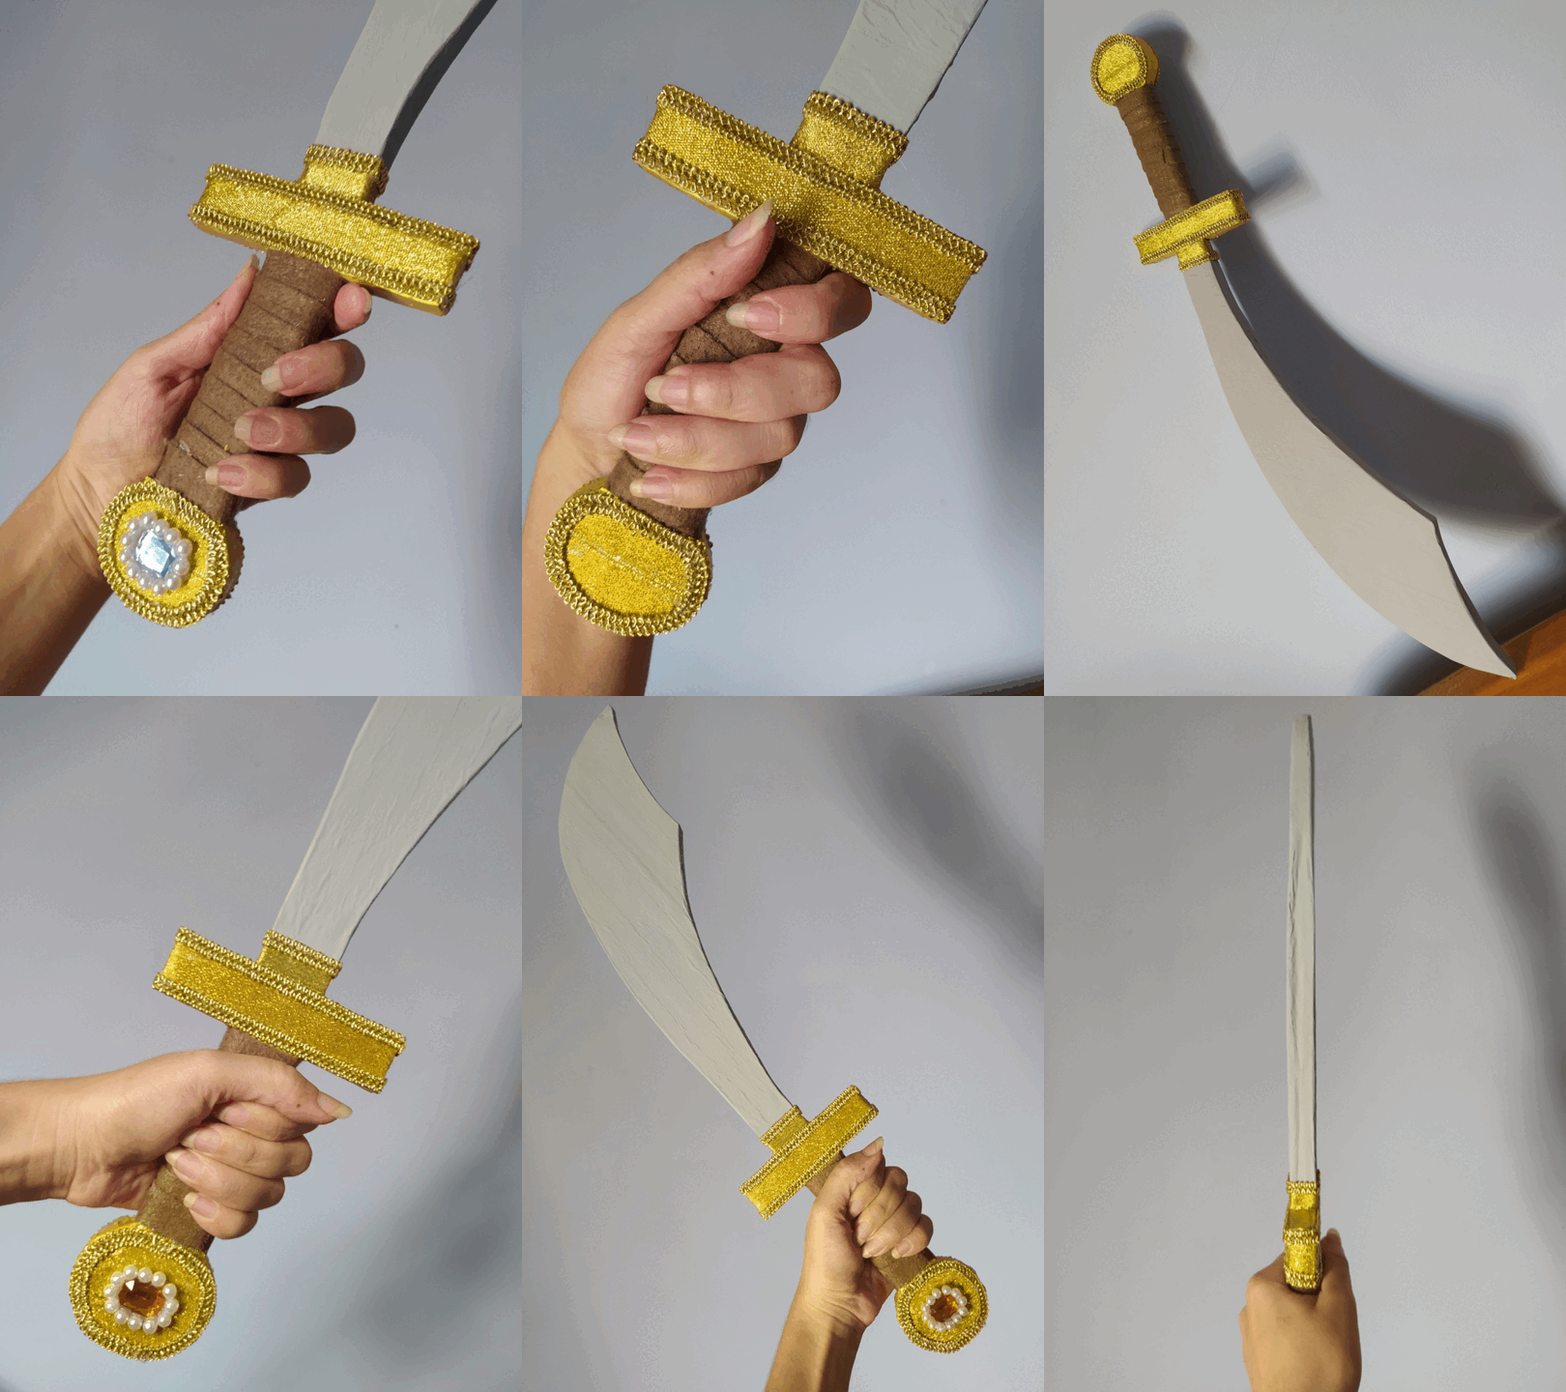
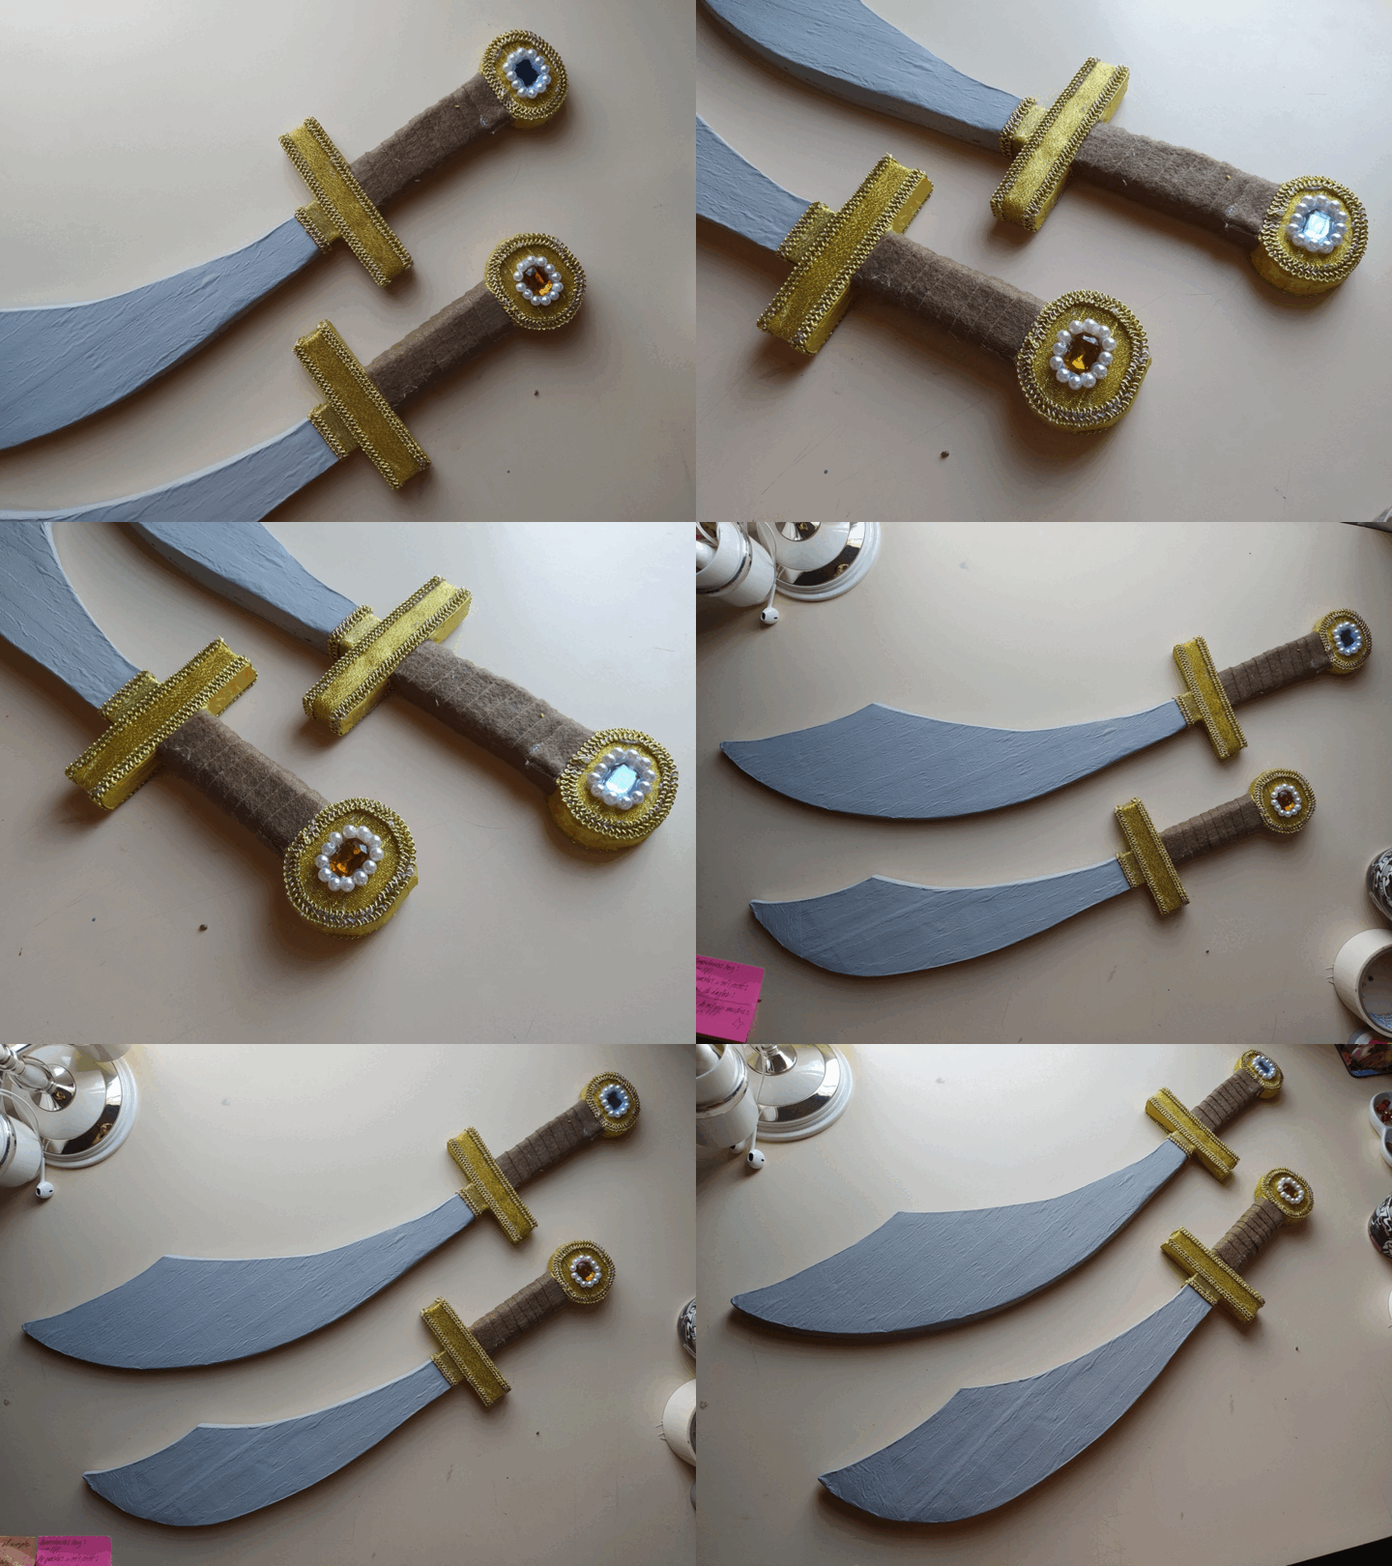
🔹 No es necesario dejar reposar la pieza ni esperar tiempos de secado. A partir de aqui, decora completamente a tu gusto, tienes libertad creativa al 100%, aunque los pasos que yo seguí fueron: Pinta primero toda la hoja de la espada de color gris, con dos capas de pintura estará bien. Forra con una tira de fieltro color marrón la agarradera de la espada, y despues, pinta la cuña y la parte inferior de color dorado, cuando seque la pintura, pega con silicón caliente los apliques decorativos que tú quieras. Agrega unas cuentas piedras de plástico brillante, y un borde de perlas, todo pegado con silicón caliente. ¡Y listo! ✨
🔷 It is not necessary to let the piece rest or wait for drying time. From here, decorate completely to your liking, you have 100% creative freedom, although the steps I followed were: First paint the entire blade of the sword gray, two coats of paint will be fine. Cover with a strip of brown felt the handle of the sword, and then, paint the wedge and the bottom of the sword in gold color, when the paint dries, glue with hot silicone the decorative appliqués that you want. Add a few beads, shiny plastic stones, and a border of pearls, all glued with hot silicone, and that's it! ✨
« Pirate Swords in less than 2 hours! »

 |  |  |
|---|

✨ "¿Alguna sugerencia extra para mejorar el resultado?, ¡CLARO QUE SI!" ~ Para un mejor acabado, y con ayuda de un pincel punta redonda o tus dedos, coloca una capa de pegamento escolar en todas las partes que tienen pintura. Dos capas estarán bien, deja reposar en un lugar fresco por 3 horas.
✨ "Any extra suggestions to improve the result, of course!" ~ For a better finish, and with the help of a round tip brush or your fingers, put a layer of school glue on all the parts that have paint on them. Two coats will be fine, let stand in a cool place for 3 hours.

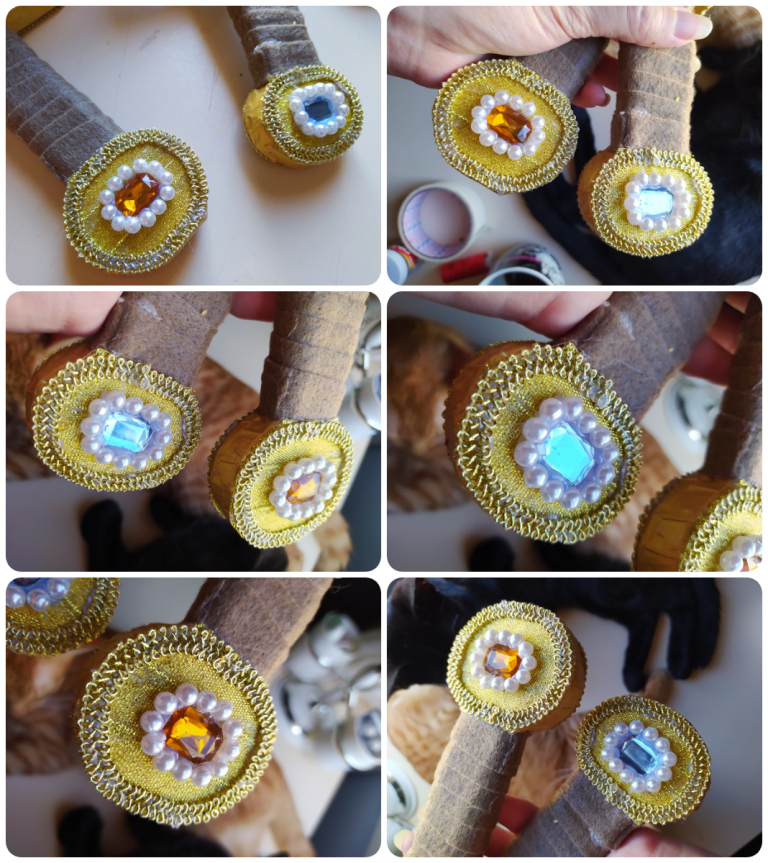
✦ These pearls and those little fake jewels were at the bottom of a msicelaneos drawer hahaha ! ! ✦

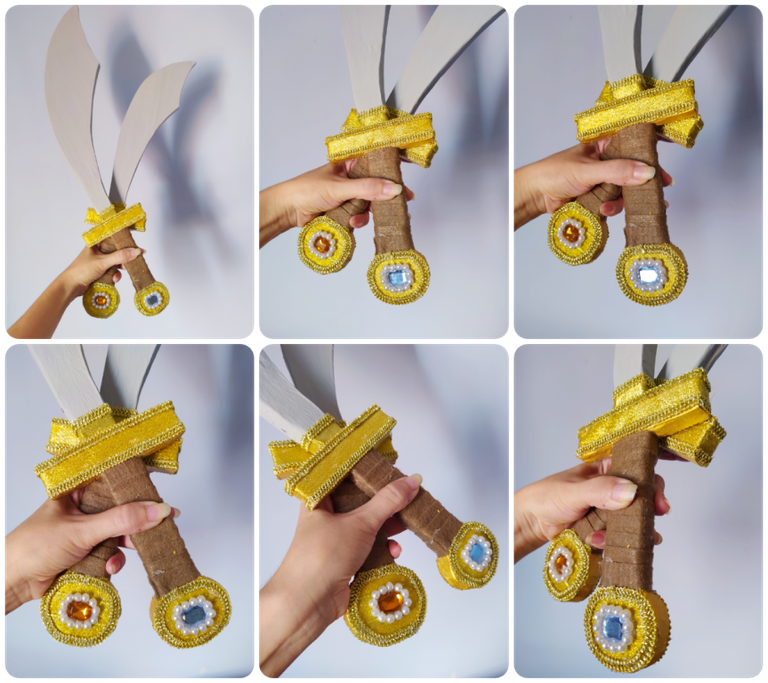
✦ You can decorate them as you like, I kept them simple at the request of the friend who commissioned them as an emergency uwu)/ 💖 ✦

💛 CONTEXTO DE ESTA AVENTURA CRAFTERIL 💛 Esta es una de las muchas comisiones en modo emergencia que recibo de mis amistades que tienen hijos pequeños en el kínder o el colegio ✌ Sé que papá y mamá tienen mucho que hacer en su día a día, así que condensé este proceso para que conozcas una alternativa rápida, económica y con materiales simples, para hacer bonitas espadas de juguete para tus hijos 😊 💝
💙 CONTEXT OF THIS CRAFTERIL ADVENTURE 💙 This is one of the many emergency mode commissions I receive from my friends who have young children in kindergarten or school ✌ I know mom and dad have a lot to do in their day to day lives, so I condensed this process to let you know a quick, inexpensive and simple materials alternative to make cute toy swords for your kids 😊 💝
Coméntame qué tipo de tutoriales te gustaria ver próximamente en mi blog o qué te gustaría que intentara hacer; tengo algunas carpetas con registros de proyectos de inicio de año, aunque la mayoría de costura. ¡Un abrazo a todos! (´。• ᵕ •。`) ♡
Let me know what kind of tutorials you'd like to see next on my blog or what you'd like me to try; I have a few folders with project logs from the beginning of the year, though mostly sewing. Hugs to all! (´。• ᵕ •。`) ♡
~ You must login to the site first, then click on the text above ~


✨ 🍓 All texts and images by @Tesmoforia 🍓 ✨
📸 Tools: Xiaomi Redmi Note 8 📲 Snow 🎬 Remini 🌓 FotoJet 📐
🚨 ¡Please do not take, edit or republish my material without my permission! 🚨
💌 ¿Do you wish to contact me? Mino.Cosplay@Gmail.com 💌
🌙 Banner, signature and separators by Keili Lares


