
Introduction
Hello guys, how are you? Today, I'm here once again to show you my game progress.
Before talking about the quest systems and lighting in the caves that is the main focus of this post, I wanted to mention that more maps were created, most were caves, they are easy maps to create and don't require a lot of time. On average a single cave can contain between six and twelve maps, and they are divided into small, medium and large caves. The time to finish each one can vary, so the monsters will only respawn after completing the cave or when you leave, so the game doesn't get too boring and repetitive.
A little gameplay completing a mission is available in the video, the mission is just a test for demonstration, the battles are also a test, they haven't been optimized and balanced yet, the maps and lighting system are included in the project, but can be changed to a better experience.
Note: The recording program interfered a little with the gameplay performance.
All the content shown here can be modified, there is still a lot to be improved and optimized.
Quests
The Plugin I'm using to add quests to my project is QuestLog (created by Galv), after studying its operation I realized that it's very easy and without complexities. To create a mission, it is necessary to create a file (.TXT) in the folder (Data) of the project.
As you can see it's quite easy, in the first line we have the mission name, difficulty (can be any number) and category (main = 0, side = 1, crafting = 2). In the second line we have the objectives, in addition, it is possible to place icons (\i [icon id]) that are in the project, making it easier to see, and the last line is the details of the mission, where you can include tips or the location to find the necessary items.

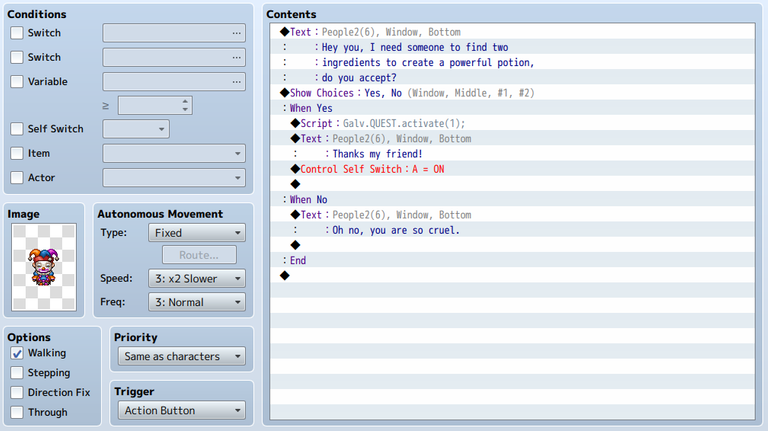
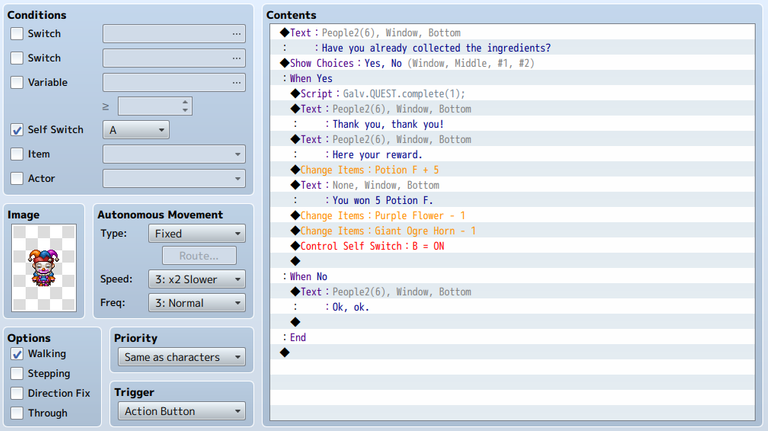
The next step is to create the events where the missions will be activated, to do this just use the Script (Galv.QUEST.active(mission id)). In the first image I created a simple dialog with two choices where the player can or cannot accept the mission, if he accepts a local Switch it takes him to the second page of the event that will contain the Script to complete the mission with two options (Complete and Fail), reward for completing the mission and removing the items, the ideal is to put a condition on the first choice to check if the player has the items, in this image I didn't put it because it's a test, but it would be like this (if party has Purple Flower && Giant Ogre Horn), with all the code of the choice (Yes) inside the condition.
Lighting System
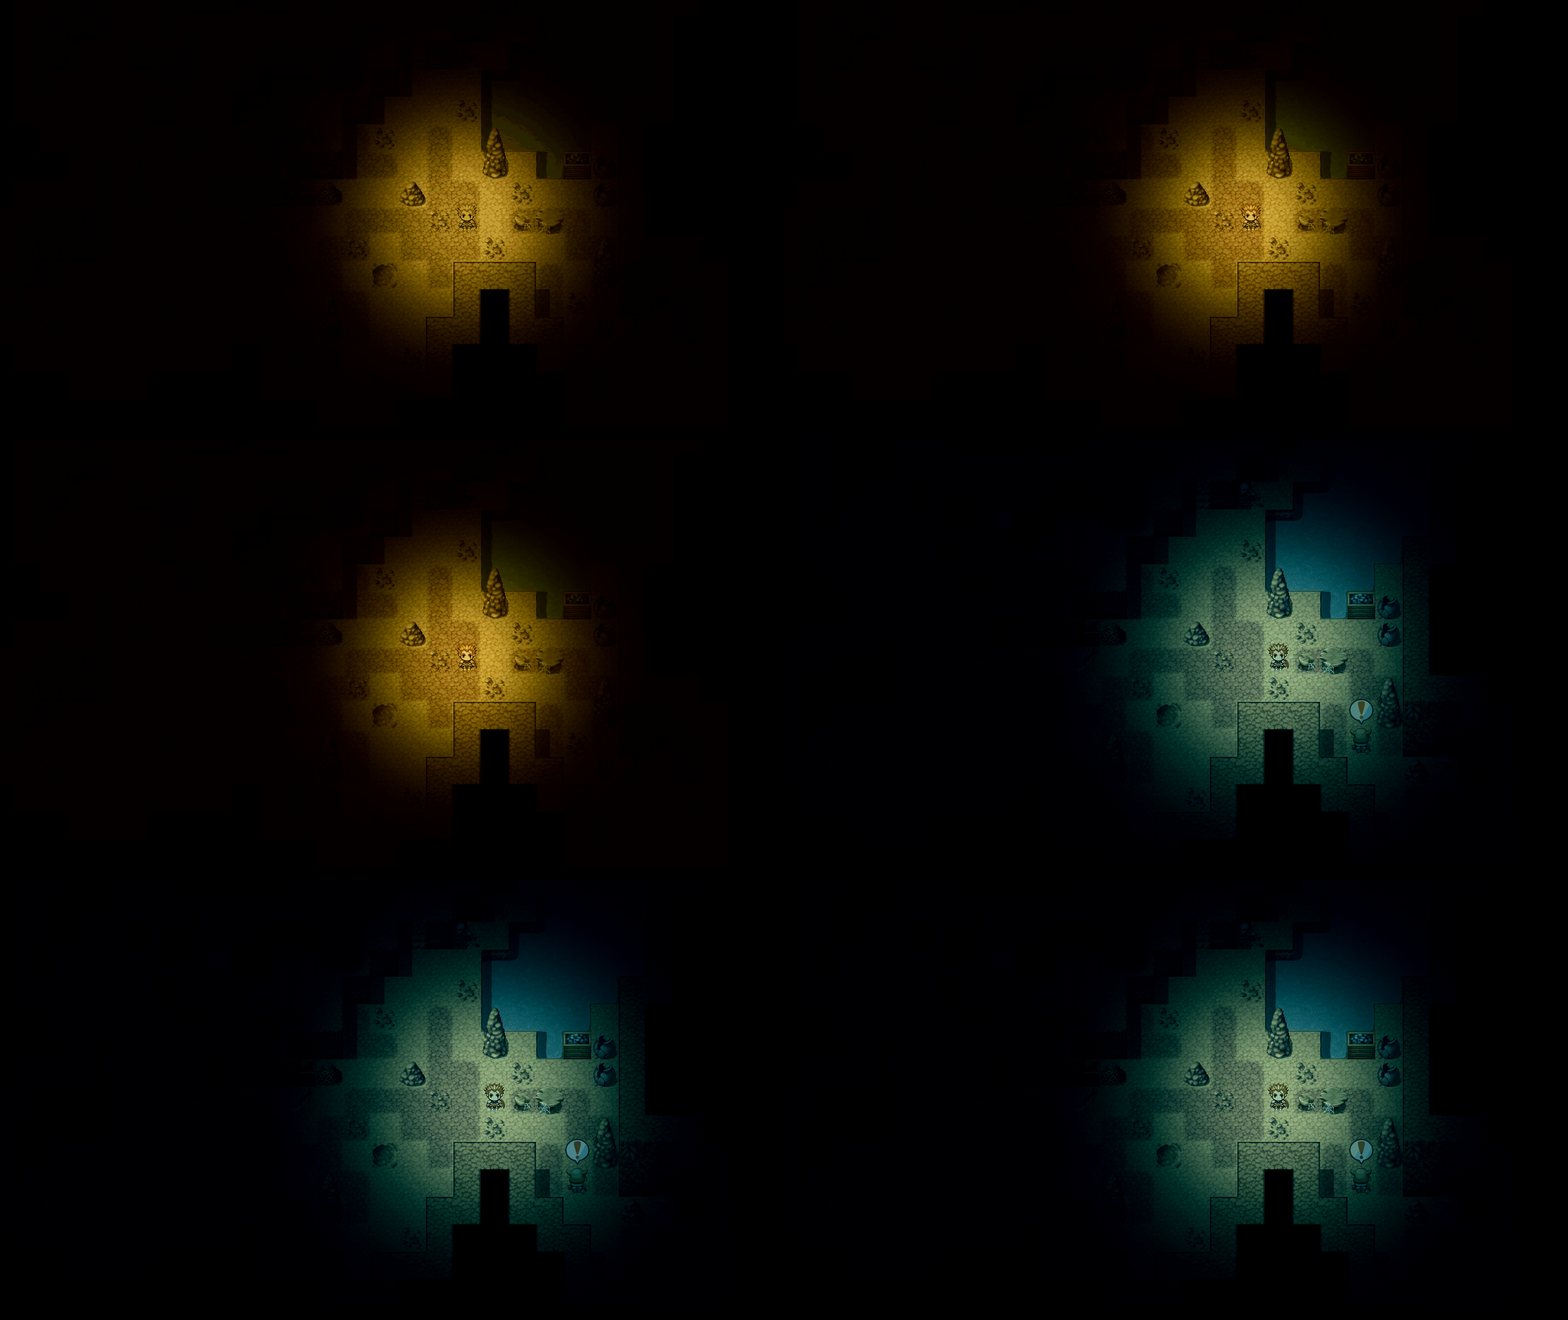
To bring a better experience when exploring a cave, I created a very simple lighting system that will work in two ways, Torch and Light Magic. The first step was to create the image with a transparent circle on a black background at the resolution (1366x768), the program I used to do this was FireAlpaca, using the Circle Snap tool aligning the center of the image.
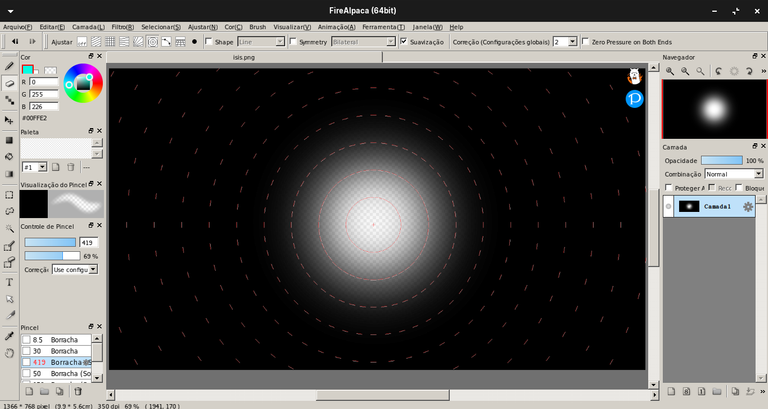
With the image finished, it's time to build the system, to do this I'm going to use a Plugin called VisibilityRange (created by Galv), although it's possible to create this system without using Plugins, the resolution is not set to a single size .
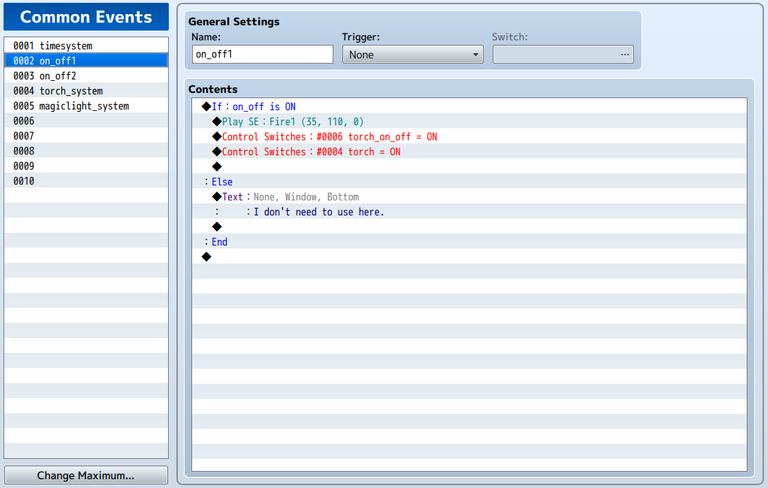
First I created a common event that will work together with the torch item and the lighting skill, in the image below the event has only one condition that can only be true if the Switch (on_off) is on. When (If) is true, two Switches are turned on, the first one will start the lighting system in parallel process, the other Switch a condition where the image is created, and to prevent the player from using the lighting in a place that is not is necessary, the Switch (on_off) will be turned on only in the teleport of a cave, if he leaves the cave, the Switch is turned off by activating the (Else).
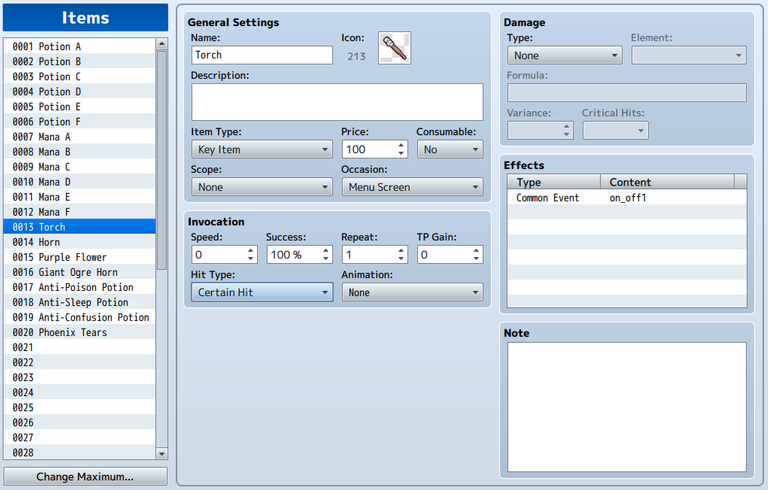
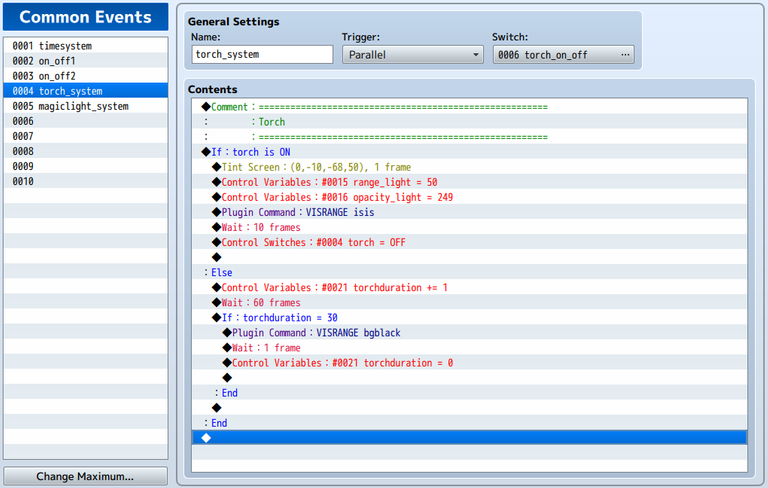
The second step was to create another common event, this one is responsible for creating the image and determining the duration that the lighting will be active. After the first one is called, the second event will be working in parallel process while the Swicth (Torch_on_off) is on, then the condition that checks if the Switch (Torch) is on will create the image. Within the condition the canvas will be painted according to the lighting type, the torch has an orange effect, the light magic a blue effect, the two variables determine the size (50%) and the opacity of the image (249), they are created in VisibilityRange. The next code is the Plugin call to create the image using (VISRANGE (image name in the project's System folder)), and finally it is necessary to turn off the Switch to enable the (Else) where the duration is defined that will be working In real time.
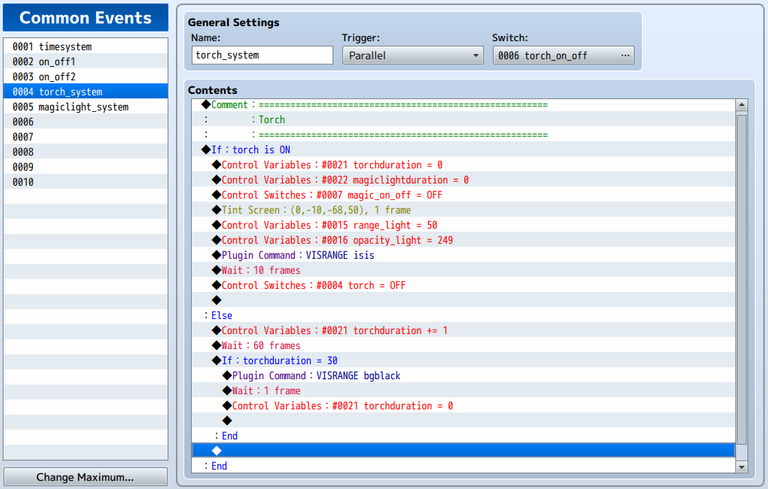
The variable (torchduration) will gain (+1) every (1) second (60 frames), when this value reaches (30) seconds, the image with a completely black background will be created, after that it is necessary to reset the value of the variable to not keep adding (+1) infinitely, then I created the same events with the lighting of the light magic. The second image shows the duration variables and the Switch of the other event, this is necessary to prevent the player from using one system in parallel with the other, in addition, the duration variable of each event needs to be reset, preventing the count continues if the event is used before ending. But there is a simpler way that I just remembered while writing the content of the post, at the end of (Else) I would only need to reset the duration variable and turn off the Switch (Torch_on_off or Magic_on_off).
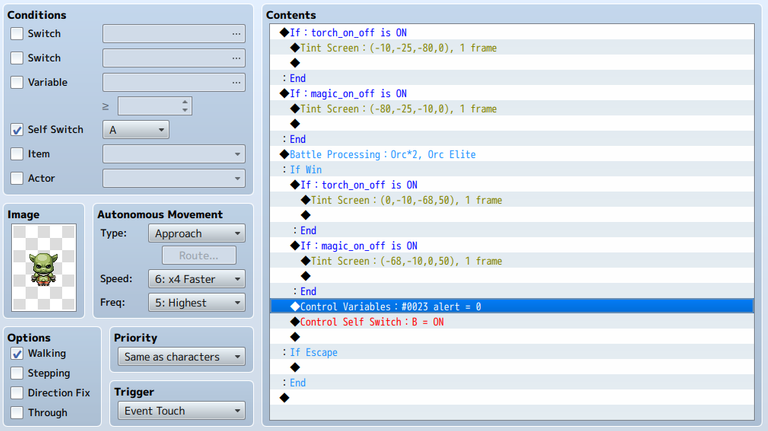
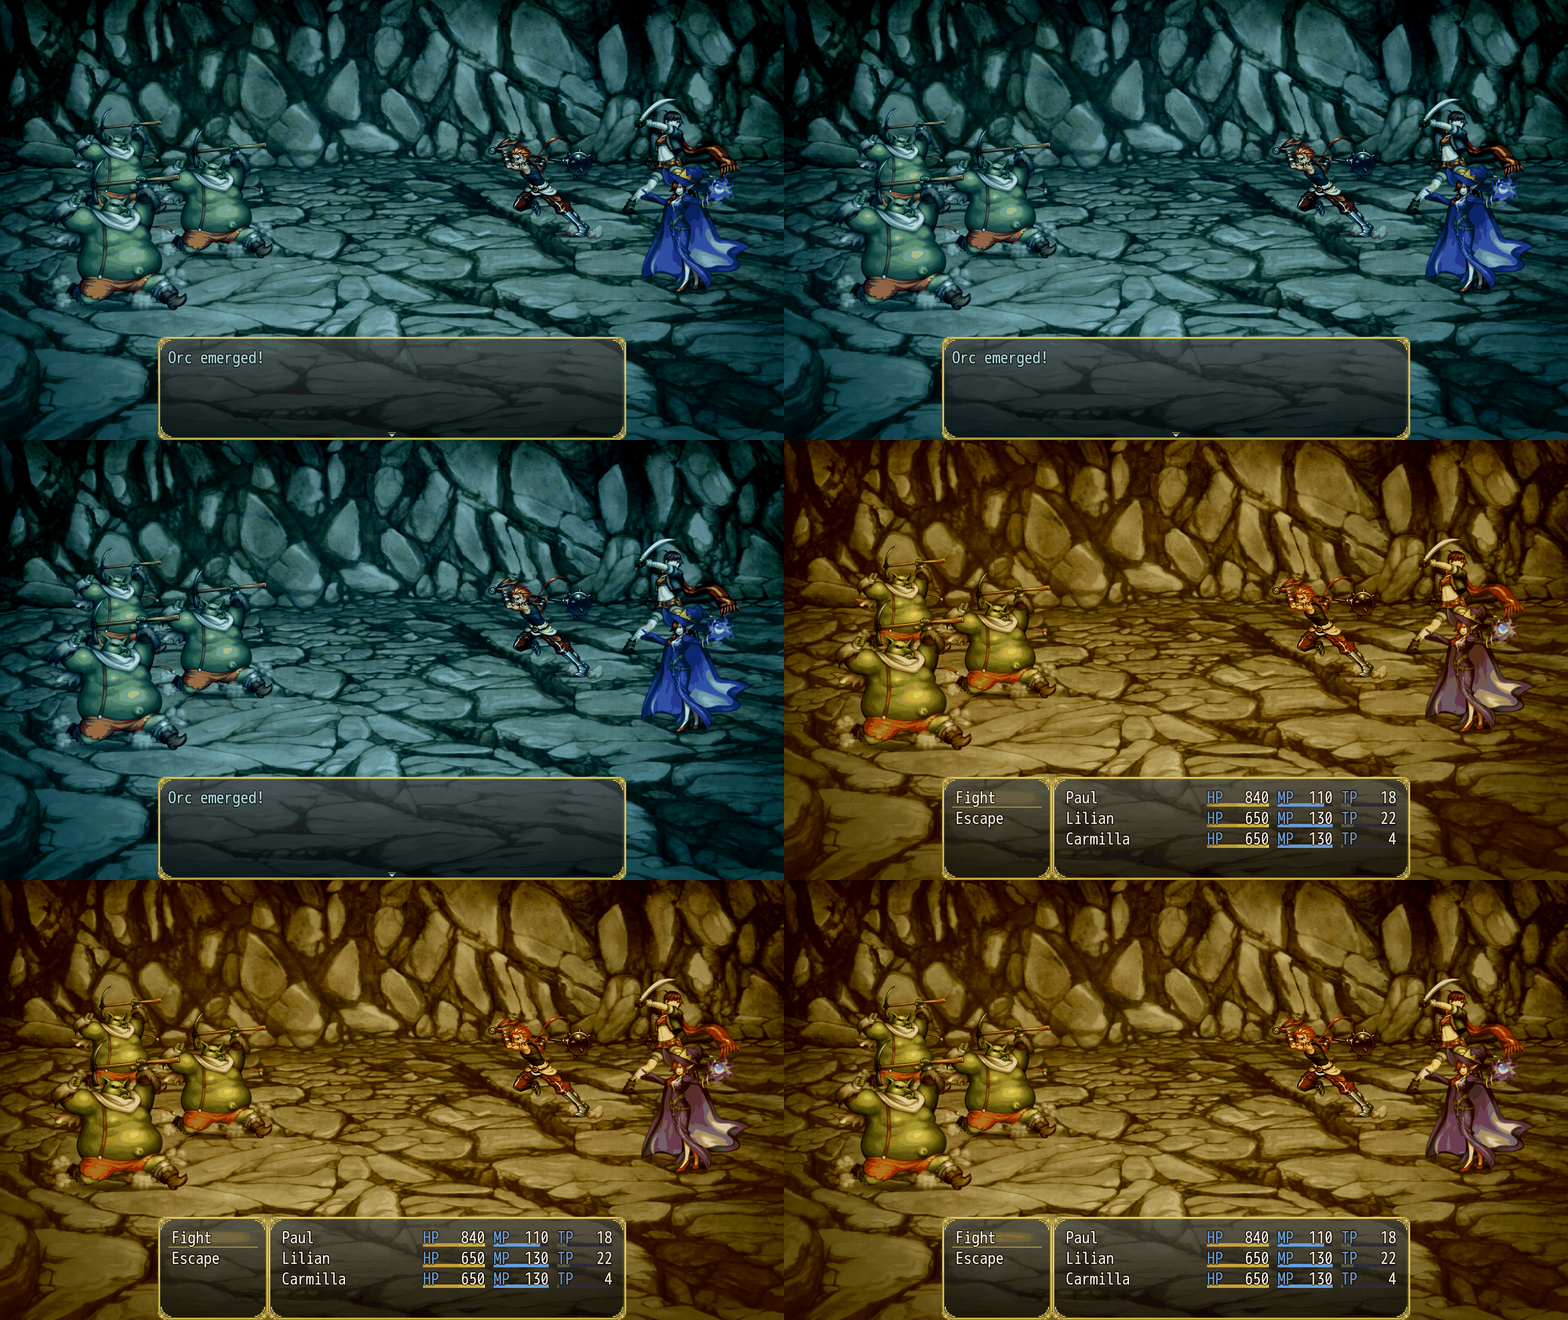
Before the battle starts, I put two conditions on the enemy event to check which lighting system is on to paint the screen according to the system, and when the battle is won the default lighting of each event is called, with that, the battles become more realistic.
Final Result
Final considerations
With most systems finished, my main focus is now on prioritizing story, maps, characters, enemies, items, and abilities. This will be the longest process in creation, many of these elements need to be tested individually, for example, characters need to be balanced with enemy attributes up to a certain level so as not to harm the experience, to do this it is necessary to create a base of progression fair, each map needs to have a proportionate amount for the character's progression, avoiding a very large imbalance. Skills also need to have a balanced progression base, in RPG Maker damage formulas can be created in several ways, in the next post I will show this part in more detail.
Hope you enjoyed it, see you next time!!!

Introdução
Olá pessoal como você estão? Hoje estou aqui mais uma vez para mostrar o progresso do meu jogo.
Antes de falar sobre os sistemas de missões e iluminações nas cavernas que é o foco principal desse post, queria mencionar que foram criados mais mapas, a maioria foram cavernas, são mapas fáceis de criar e não requer muito tempo. Em média uma única caverna pode conter entre seis a doze mapas, e estão divididas em cavernas pequenas, médias e grandes. O tempo para finalizar cada uma delas pode variar, por esse motivo os monstros só vão resnascer depois de completar a caverna ou quando você sair, com isso, o jogo não fica chato e repetitivo demais.
Uma pequena gameplay concluindo uma missão está disponível no vídeo, a missão é apenas um teste para demonstração, as batalhas também são um teste, ainda não foram otimizadas e equilibradas, os mapas e sistema de iluminação estão inclusos no projeto, mas podem ser alterados para uma melhor experiência.
Nota: O programa de gravação interferiu um pouco na performance da gameplay.
Todo o conteúdo mostrado aqui pode ser modificado, ainda tem muita coisa para ser melhorada e otimizada.
Missões
O Plugin que estou usando para adicionar missões no meu projeto é o QuestLog (criado por Galv), depois de estudar o seu funcionameno percebi que é muito fácil e sem complexidades. Para criar uma missão é necessário criar um arquivo (.TXT) na pasta (Data) do projeto.
Como vocês podem notar é bem fácil, na primeira linha temos o nome da missão, a dificuldade (pode ser qualquer número) e a categoria (principal = 0, secundária = 1, construção = 2). Na segunda linha temos os objetivos, além disso, é possível colocar ícones (\i [id do ícone]) que estão no projeto, facilitando a visualização, e a última linha são os detalhes da missão, onde você pode incluir dicas ou a localização para encontrar os itens necessários.

O próximo passo é criar os eventos onde as missões vão ser ativadas, para fazer isso basta usar o Script (Galv.QUEST.active(id da missão)). Na primeira imagem criei um simples diálogo com duas escolhas onde o jogador pode ou não aceitar a missão, se ele aceitar uma Switch local leva para a segunda página do evento que vai conter o Script para completar a missão com duas opções (Complete e Fail), recompensa por completar a missão e a remoção dos itens, o ideal é colocar uma condição na primeira escolha para verificar se o jogador tem os itens, nessa imagem não coloquei por se tratar de um teste, mas ficaria dessa forma (if party has Purple Flower && Giant Ogre Horn), com todo o código da escolha (Yes) dentro da condição.


Sistema de Iluminação
Para trazer uma experiência melhor ao explorar uma caverna, criei um sistema de iluminação bem simples que vai funcionar de duas formas, Torcha e Magia de Luz. O primeiro passo foi criar a imagem com um circúlo transparente em um fundo preto na resolução (1366x768), o programa que usei para fazer isso foi o FireAlpaca, usando a ferramente Circle Snap alinhando o centro da imagem.

Com o imagem finalizada, chegou o momento de construir o sistema, para fazer isso vou utilizar um Plugin chamado VisibilityRange (criado por Galv), apesar de ser possível criar esse sistema sem o uso de Plugins, a resolução não está configurada em um único tamanho.
Primeiro criei um evento comum que vai funcionar em conjunto com o item da torcha e a habilidade de iluminação, na imagem abaixo o evento tem apenas uma condição que só pode ser verdadeira se a Switch (on_off) estiver ligada. Quando o (If) for verdadeiro, duas Switchs são ligadas, a primeira vai iniciar o sistema de iluminação em processo paralelo, a outra Switch uma condição onde a imagem é criada, e para evitar que o jogador use a ilumação em um local que não é necessário, a Switch (on_off) vai ser ligada apenas no teleporte de uma caverna, se ele sair da caverna, a Switch é desligada ativando o (Else).


O segundo passo foi criar outro evento comum, esse está responsável por criar a imagem e determinar a duração que a iluminação vai estar ativa. Depois que o primeiro for chamado, o segundo evento vai estar funcionando em processo paralelo enquanto a Swicth (Torch_on_off) estiver ligada, em seguida a condição que verifica se a Switch (Torch) está ligada vai criar a imagem. Dentro da condição a tela vai ser pintada de acordo com o tipo de iluminação, a torcha tem um efeito laranja, a magia de luz um efeito azul, as duas variáveis determinam o tamanho (50%) e a opacidade da imagem (249), elas são criadas no VisibilityRange. O próximo código é a chamada do Plugin para criar a imagem usando (VISRANGE (nome da imagem na pasta System do projeto)), e por último é necessário desligar a Switch para habiltar o (Else) onde a duração é definida que vai estar funcionando em tempo real.
A variável (torchduration) vai ganhar (+1) a cada (1) segundo (60 frames), quando esse valor chegar a (30) segundos, a imagem com um fundo totalmente preto vai ser criada, depois disso é necessário resetar o valor da variável para não continuar adicionando (+1) infinitamente, em seguida criei os mesmos eventos com a iluminação da magia de luz. Na segunda imagem é mostrado as variáveis de duração e a Switch do outro evento, isso é necessário para evitar que o jogador use um sistema em paralelo com o outro, além disso, a variável de duração de cada evento precisa ser resetada, evitando que a contagem continue se o evento for usado antes de finalizar. Mas existe um jeito mais simples que só lembrei enquanto escrevia o conteúdo do post, no final do (Else) só precisaria resetar a variável de duração e desligar a Switch (Torch_on_off ou Magic_on_off).


Antes da batalha iniciar, coloquei duas condições no evento do inimigo para verificar qual sistema de iluminação está ligado para pintar a tela de acordo com o sistema, e quando a batalha for vencida a iluminação padrão de cada evento é chamada, com isso, as batalhas ficam mais realistas.

Resultado Final


Considerações finais
Com a maioria dos sistemas finalizados, o meu foco principal agora é dar prioridade a história, mapas, personagens, inimigos, itens e habilidades. Esse vai ser o processo mais longo na criação, muitos desses elementos precisam ser testados individualmente, por exemplo, os personagens precisam estar equilibrados com os atributos dos inimigos até determinado nível para não prejudicar a experiência, para fazer isso é necessário criar uma base de progressão justa, cada mapa precisa ter uma quantidade proporcional para a progressão do personagem, evitando um desquilibrio muito grande. As habilidades também precisam ter uma base de progressão equilibrada, no RPG Maker as fórmulas de dano podem ser criadas de várias maneiras, no próximo post vou mostrar essa parte de forma mais detalhada.
Espero que vocês tenham gostado, nos vemos na próxima!!!


