Every day, we keep learning and it's also a way to measure your achievement on daily basis. When one get to learn of a particular thing, even when it's something amazing, it's still nice to explain to other people because someone might learn from you too. Hive is a vast place where you can never be friends with everyone all at once, likewise one cannot learn all at once. For each day in the week, we come across something, that when applied would help us along the way.
Being on Hive for almost two years (I will be celebrating my second year by the end of this month) doesn't guarantee that I'd know everything because a new thing keeps showing up and when I learn of it, it feels so exciting as it means I am not on the Blockchain for nothing sake.

I got to know about scheduling posts from @burlarj sometime back when we were chatting in the Neoxian city channel on Discord where he talked about scheduling his post, he might not remember but I held that information in my brain. For the adding of favorites, I learnt about that early this year and I love the feature. The truth is, I never knew both features exist on Hive before and I never bothered to ask. Both came coincidentally when I was online and I immediately jumped on them.
My reason for writing this post is to explain to some of us who might not know how these works on Hive because I had two people who asked me and had to explain to them. That wasn't enough and I thought of writing a post for those who care to learn about them.

Let's talk about the first one which is adding favorites. Now, let's see it this way; you have many people in your organization and you find 2-3 out of them whose attitudes and personalities attract you. You wouldn't want to just keep saying Hi from a distance and most times, you might not see them for a while. But when you take a step to ask for their contacts, add them to your social media, you can easily keep up with them by chatting, calling, sharing things that happened etc.
This is how favorites works on Hive. There are many times I miss people's posts and it could take weeks for me to remember and visit them. This has always happened to many people too. I noticed it has been long I visited a user and vice versa. But adding them to your favorites won't make you miss their posts when they publish. You can easily go to the notification space, click on the favorite option and you can easily see those you added have posted a post.

How to add favorites through Peakd frontend.
| Image 1 | Image 2 |
|---|---|
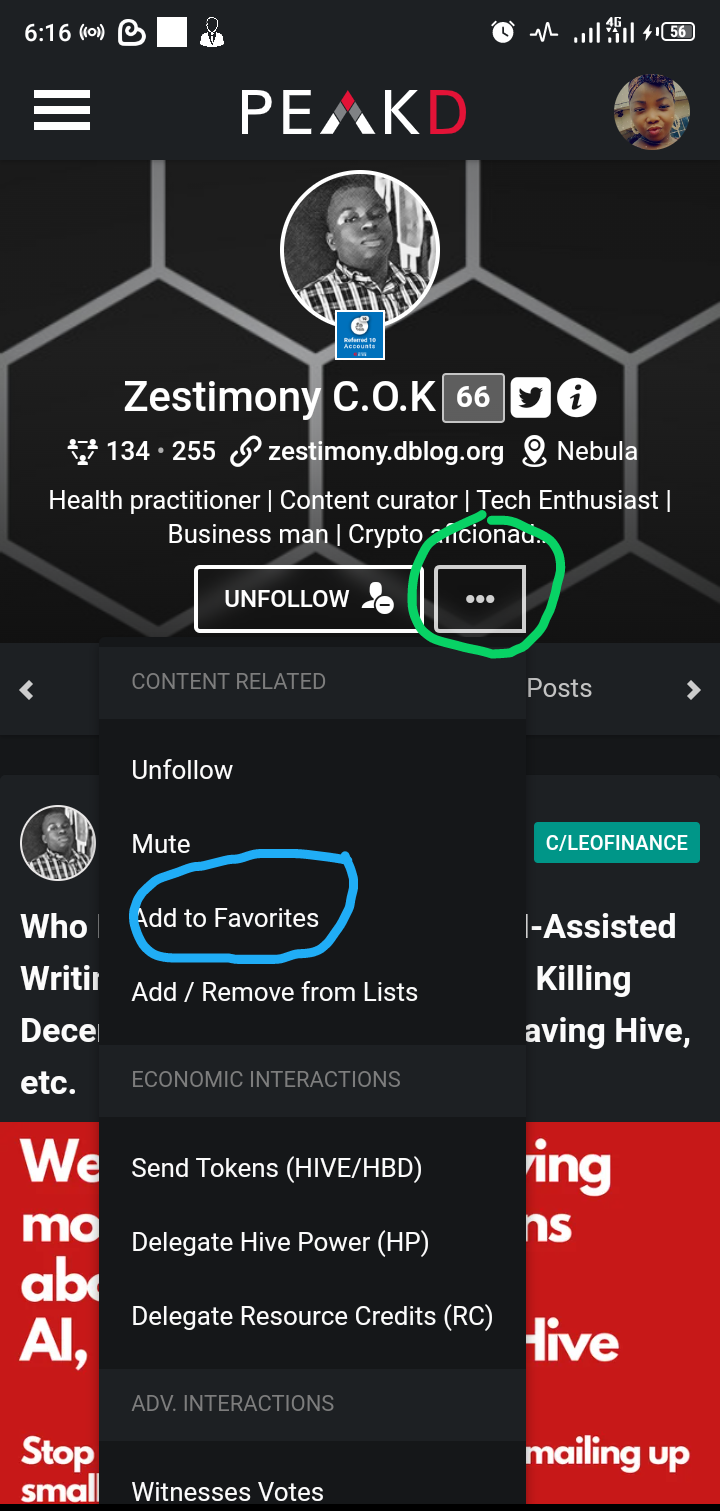 |  |
In Image 1, to add someone you wouldn't want to be missing his or her post to your favorite, just click on the person's profile, followed by the three dots beside 'unfollow' then the options will pop up. Click on "Add to favorites". Automatically when such a user publishes a post, you will be notified.
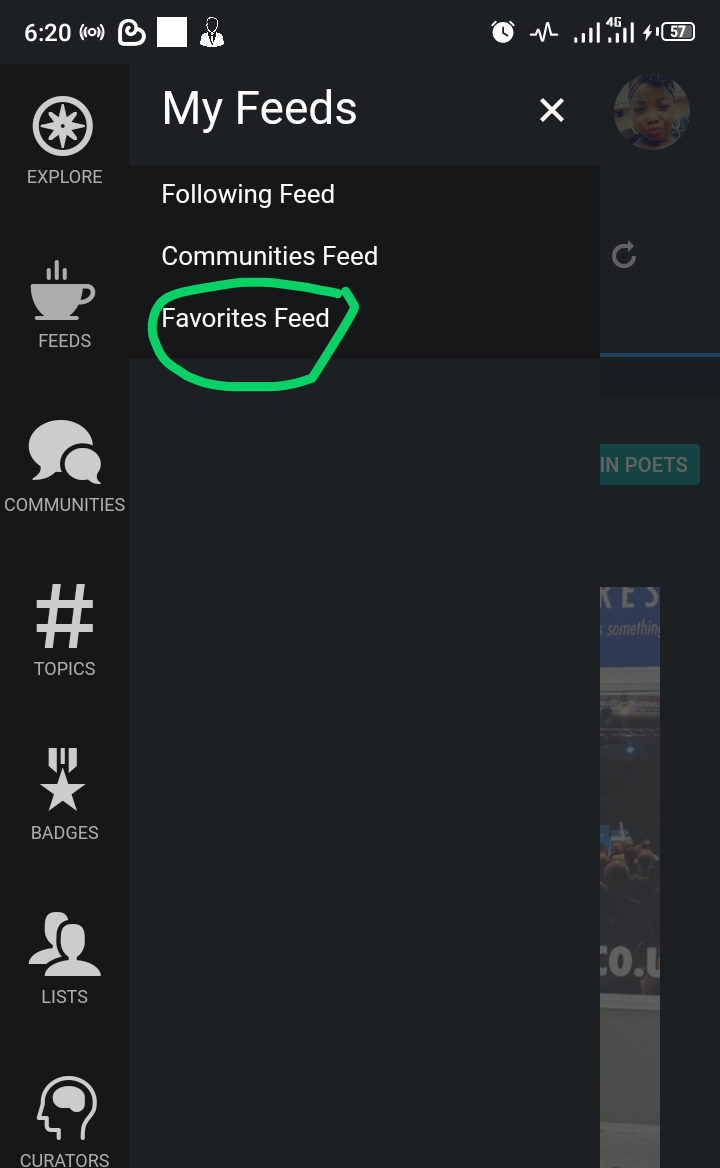
In Image 2, you can always view your 'Favorites feed' by clicking the menu icon on the left-hand side and the options pop up, click on "Feeds", then you see "favorite feed". Click on it and you see their posts.
It feels good being the first person to read and drop a comment. When you do this often, such a user would feel honoured to have you around and he or she may want to reciprocate. This can work well for newbies who are just starting and want to engage.
I have a lot of friends I have added to my favorites feed and it's easier to visit their posts when I get notified. Even if I do not show up immediately after they post, I wouldn't miss when I come online once I go through my notification.

How to add favorites through the Ecency frontend.
If you are always using Ecency for your activities, then it's also easier to add them to your favorites.
| Image 1 | Image 2 | Image 3 |
|---|---|---|
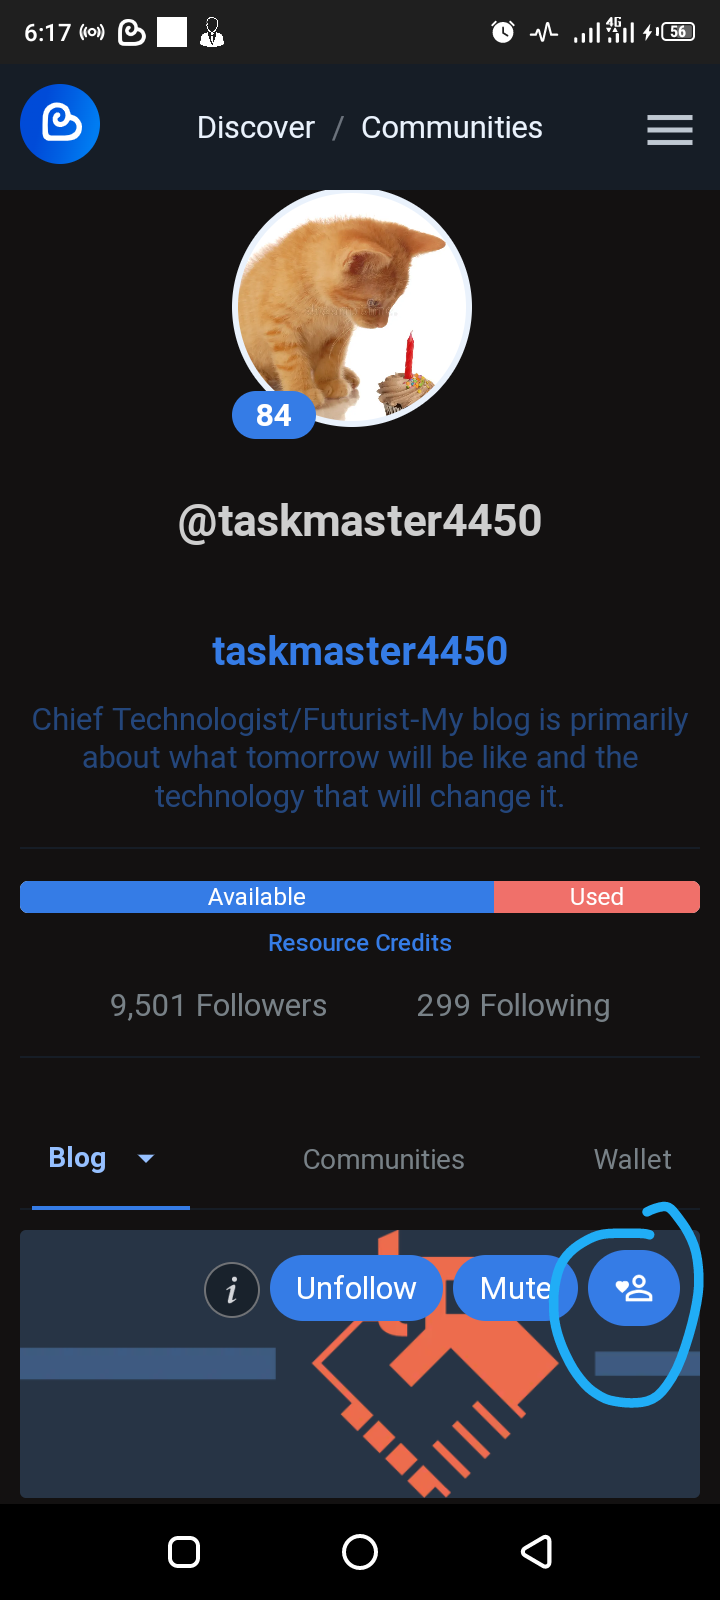 |  |  |
For Image 1, you can always add your favorite by clicking the circled option and a message will pop up that says "Added to favorites".
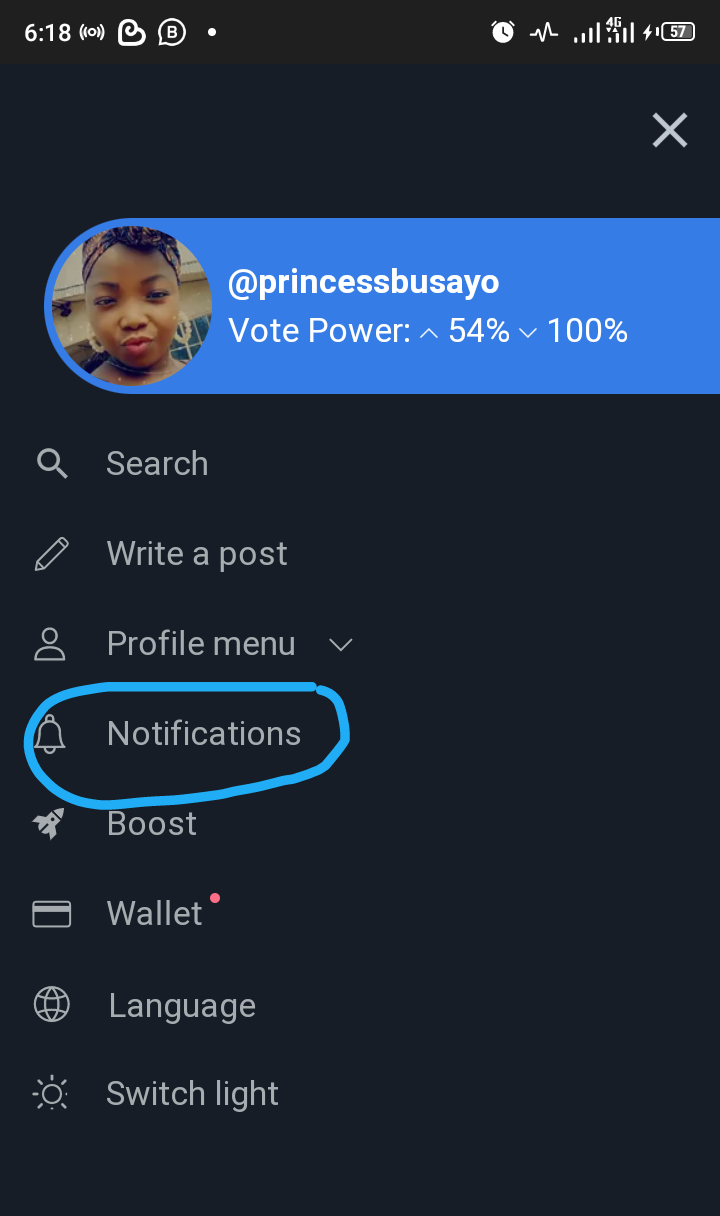
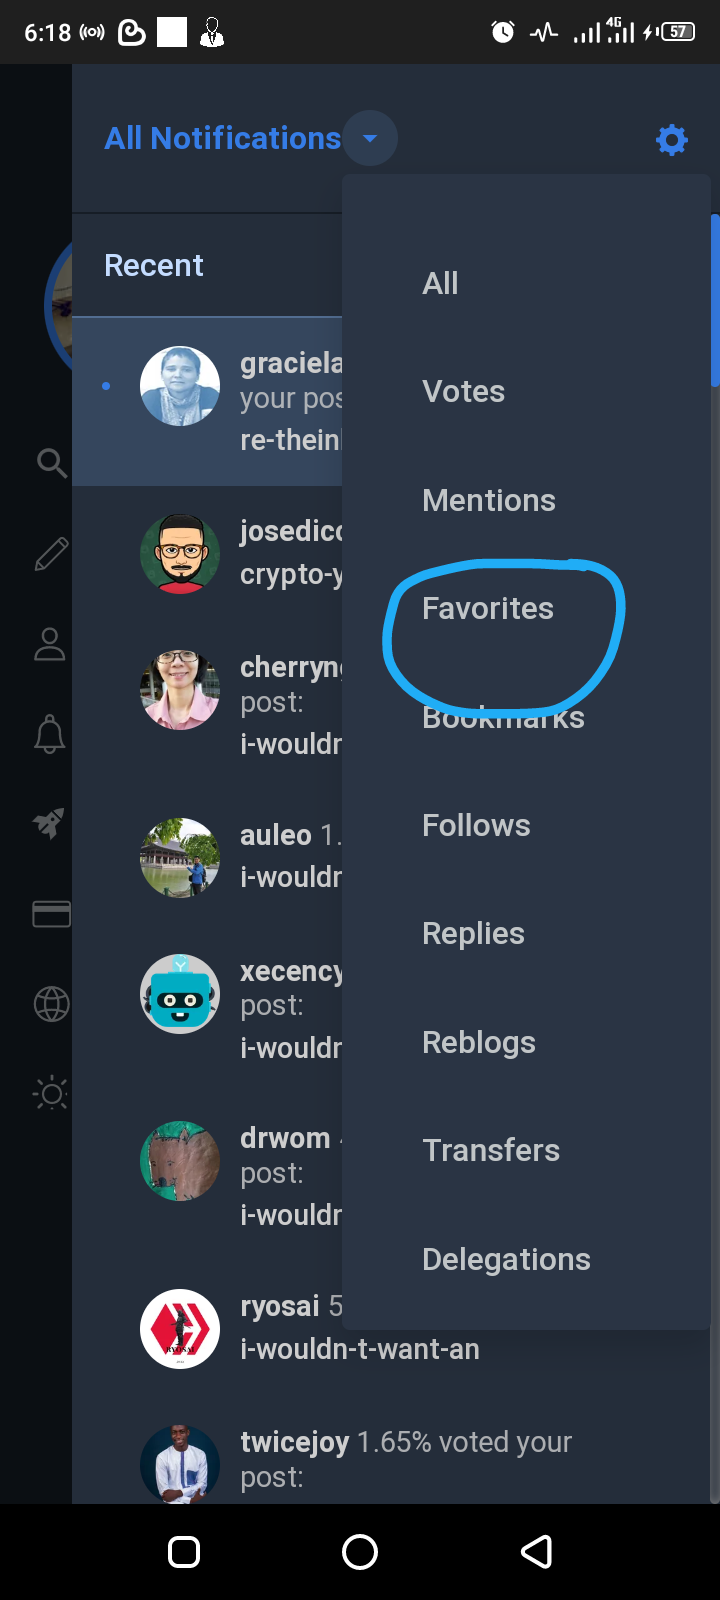
For Images 2 and 3, you can also access their posts by going to the notification, and then click the favorite option and you will see their posts.
I hope we are cleared on this, especially the newbies and even the oldbies who are just getting to know about this.

This feature is a process of setting a time to publish your post. Sometimes, some users would want to post at a particular time and do not want to forget. They simply write and edit their content and add all images they want, including formatting your post and are sure of hitting the publish button, once you have scheduled, it automatically gets published at that time.
I remembered sometime last week, I intended to post at a particular time and already forgot I have scheduled. I remembered an hour late when I should have posted but scheduling it saved me.
This is also helpful for those who would love to publish at a late hour and they might be fast asleep then, scheduling your post would be great for you. Even if you forget, the scheduling won't.
So, how is it done?

To schedule a post on Peakd...
| Image 1 | Image 2 |
|---|---|
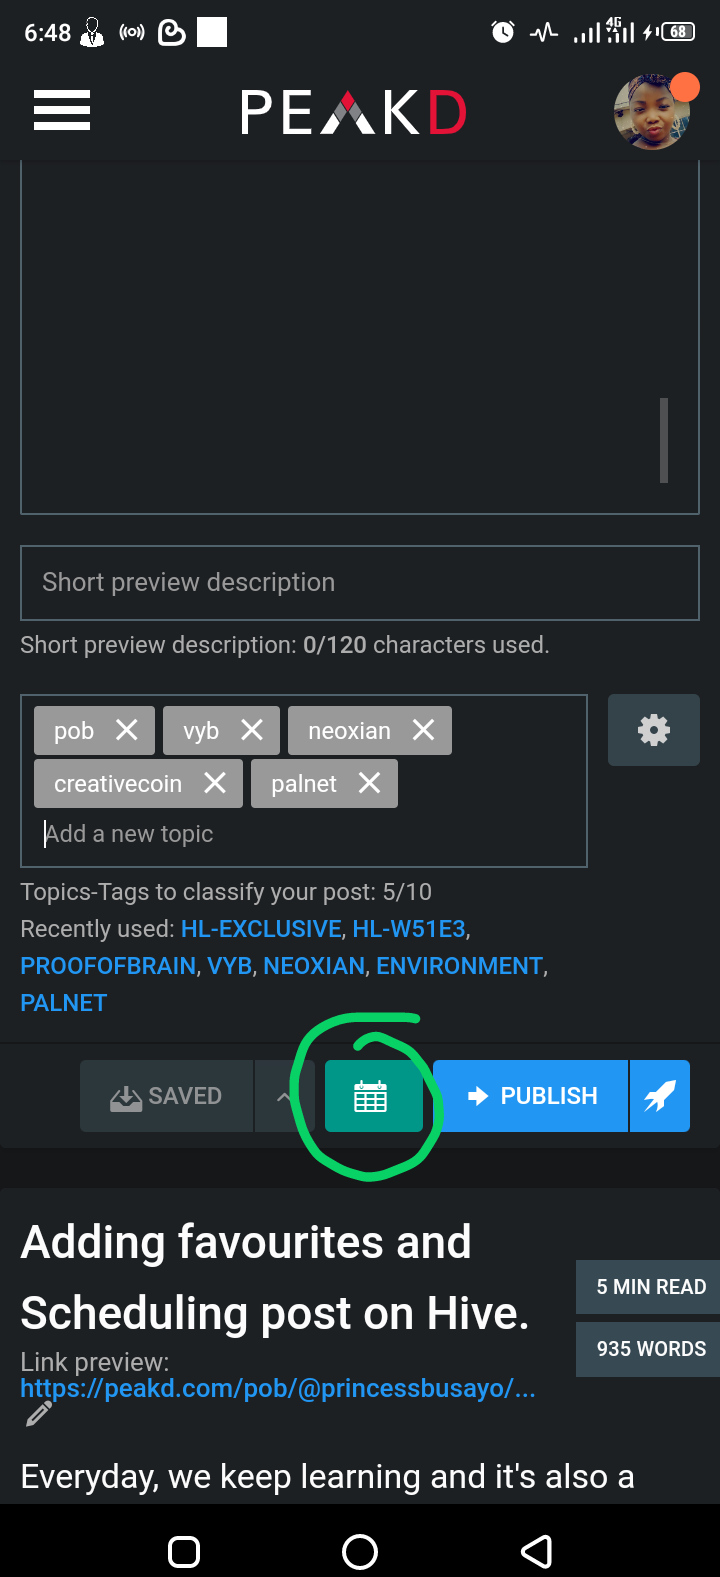 | 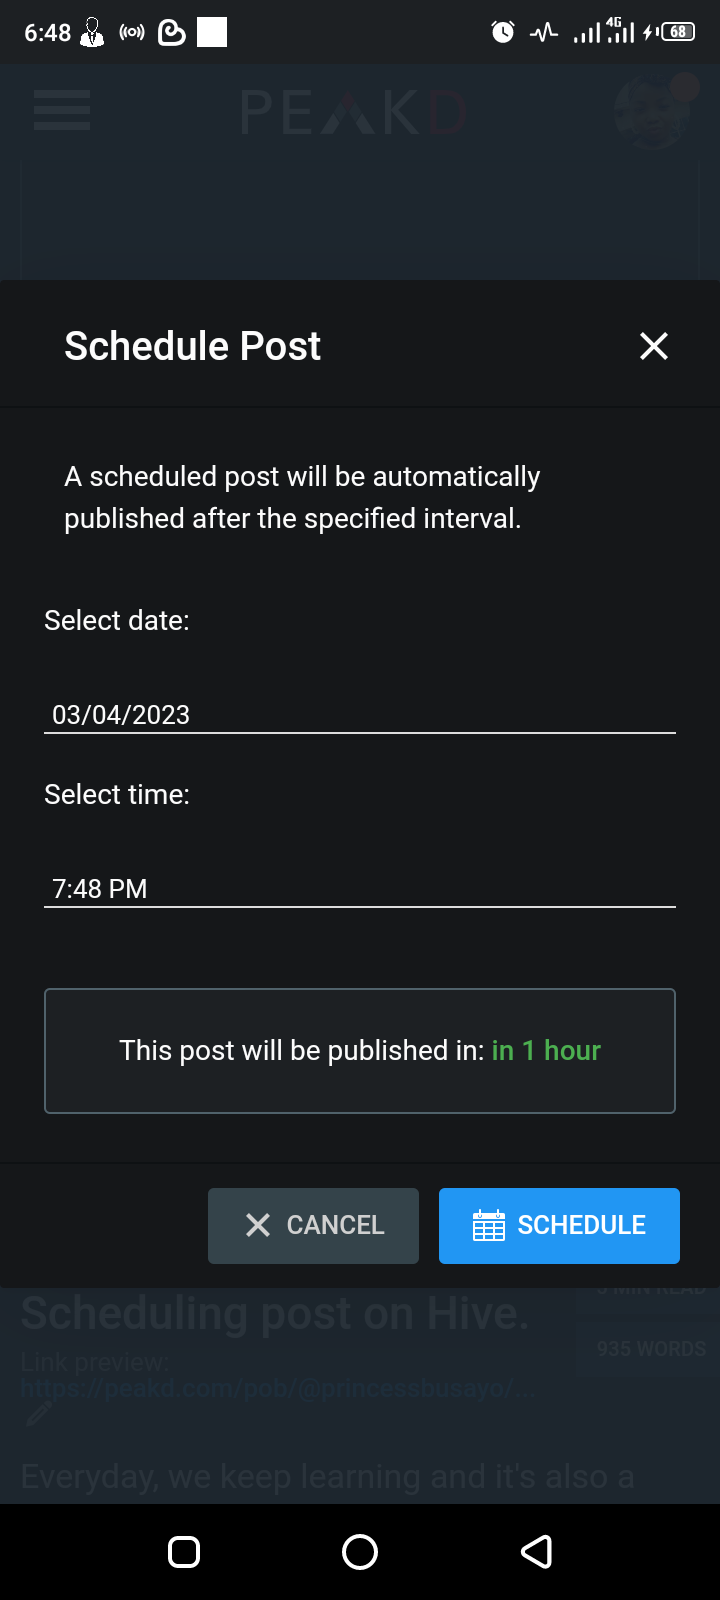 |
In the Image 1 and 2, after you are done creating your post and adding the necessary tags, scroll down and you will see the circled icon like a calendar, click on it and you are directed to the next page where you input the date and time to publish your post. Click on the schedule button and it automatically gets posted.

To schedule a post on Ecency...
| Image 1 | Image 2 | Image 3 |
|---|---|---|
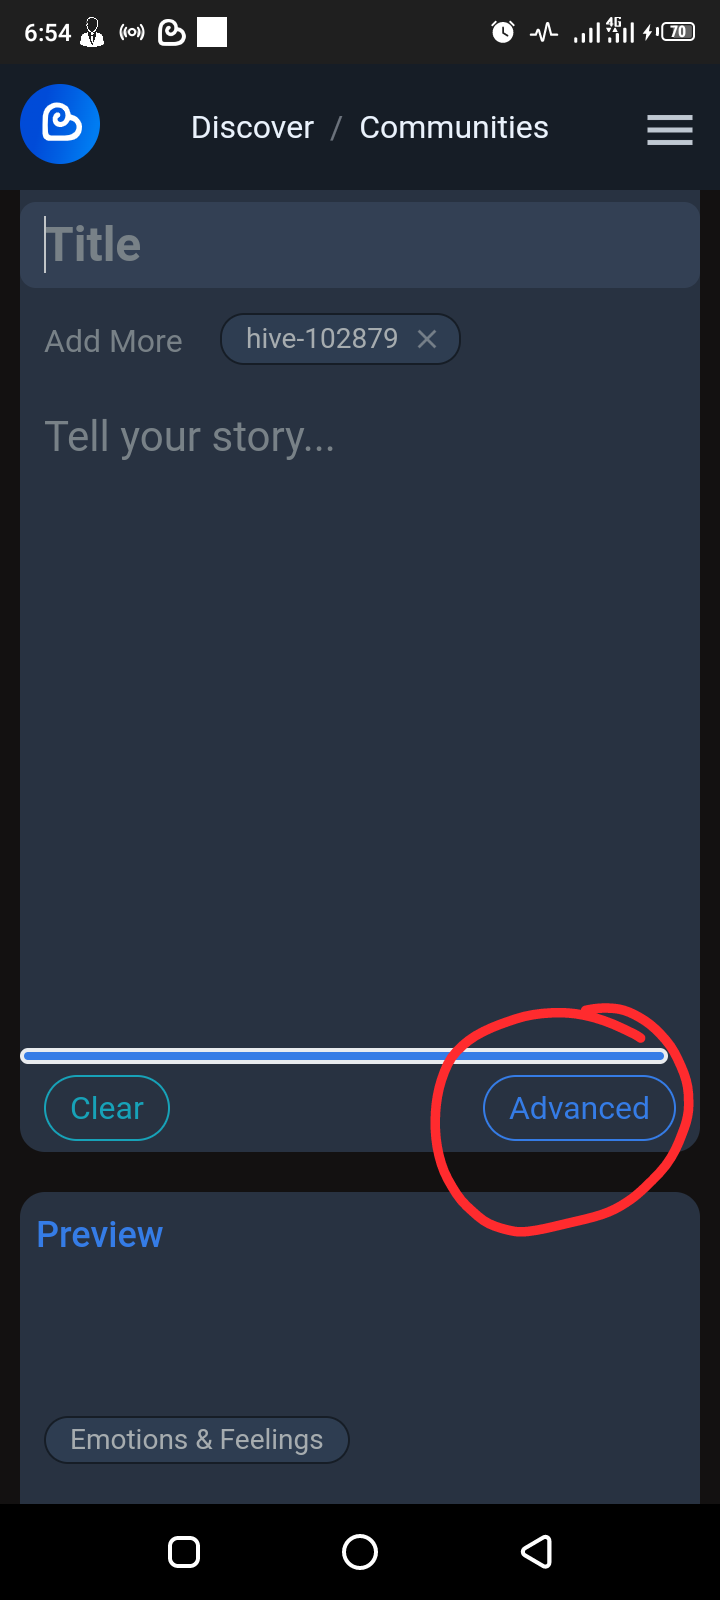 | 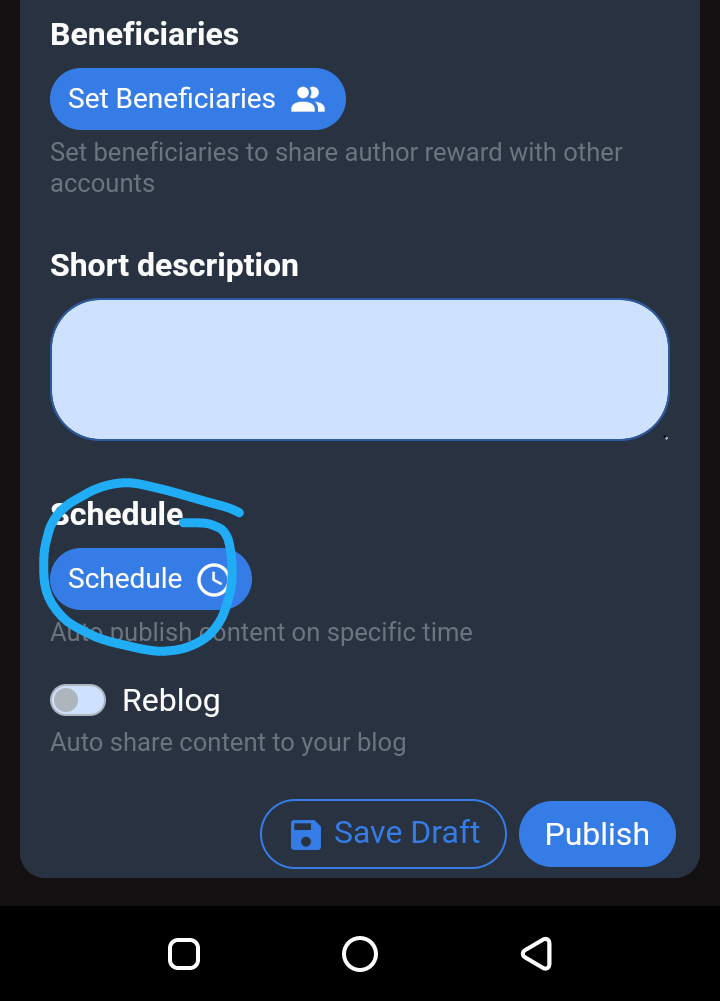 | 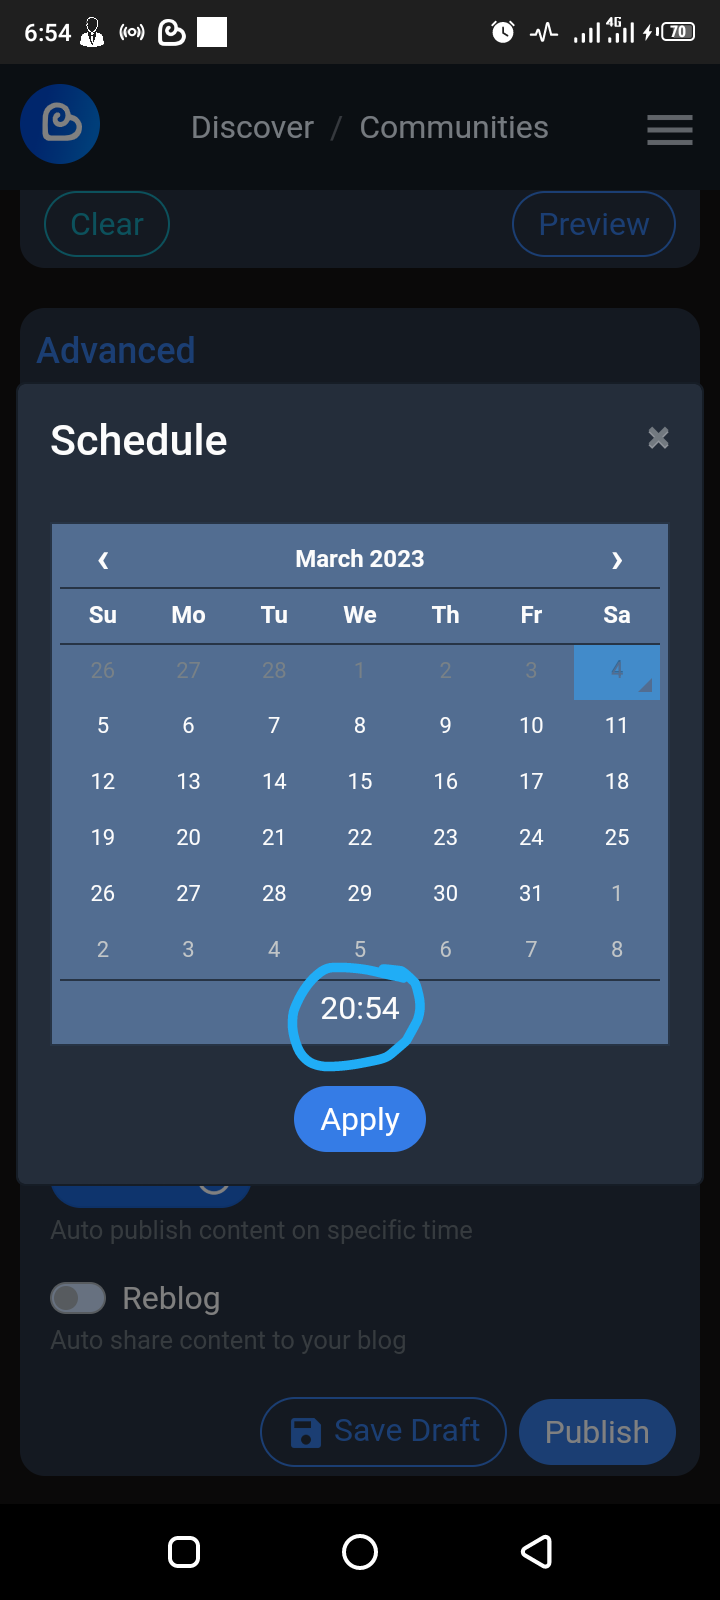 |
After creating, editing, formatting, adding images and necessary tags, click on the "Advanced" icon, and then it takes you to the next image where you click on "Schedule". Click on it and it brings you to the third image where you set the date, click on the time and set it too. Once done, press the "Apply" and you will see the last action to "Schedule" and that's it. Your post gets published automatically at the time you have activated it.

To schedule a post on the Leofinance frontend...
| Image 1 | Image 2 | Image 3 |
|---|---|---|
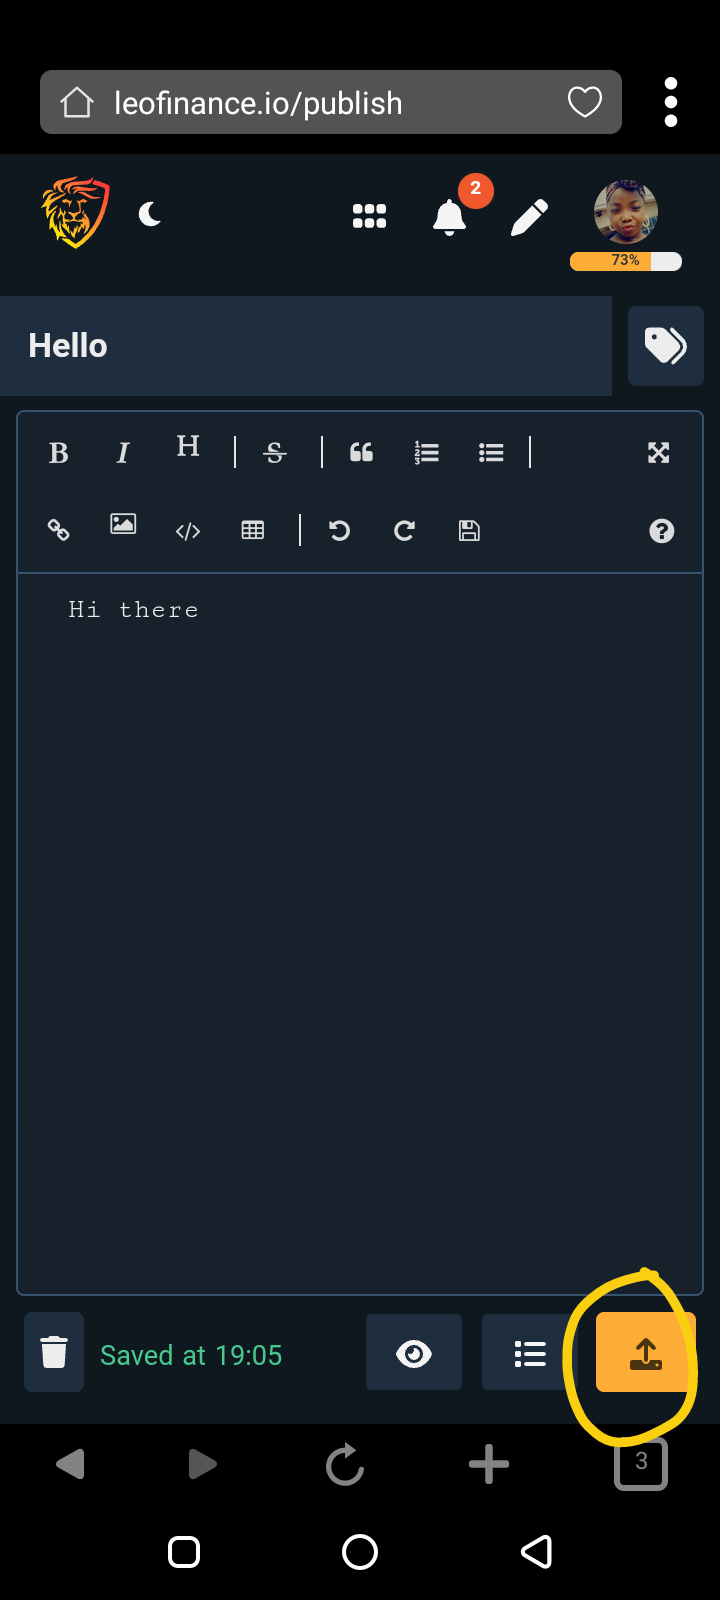 | 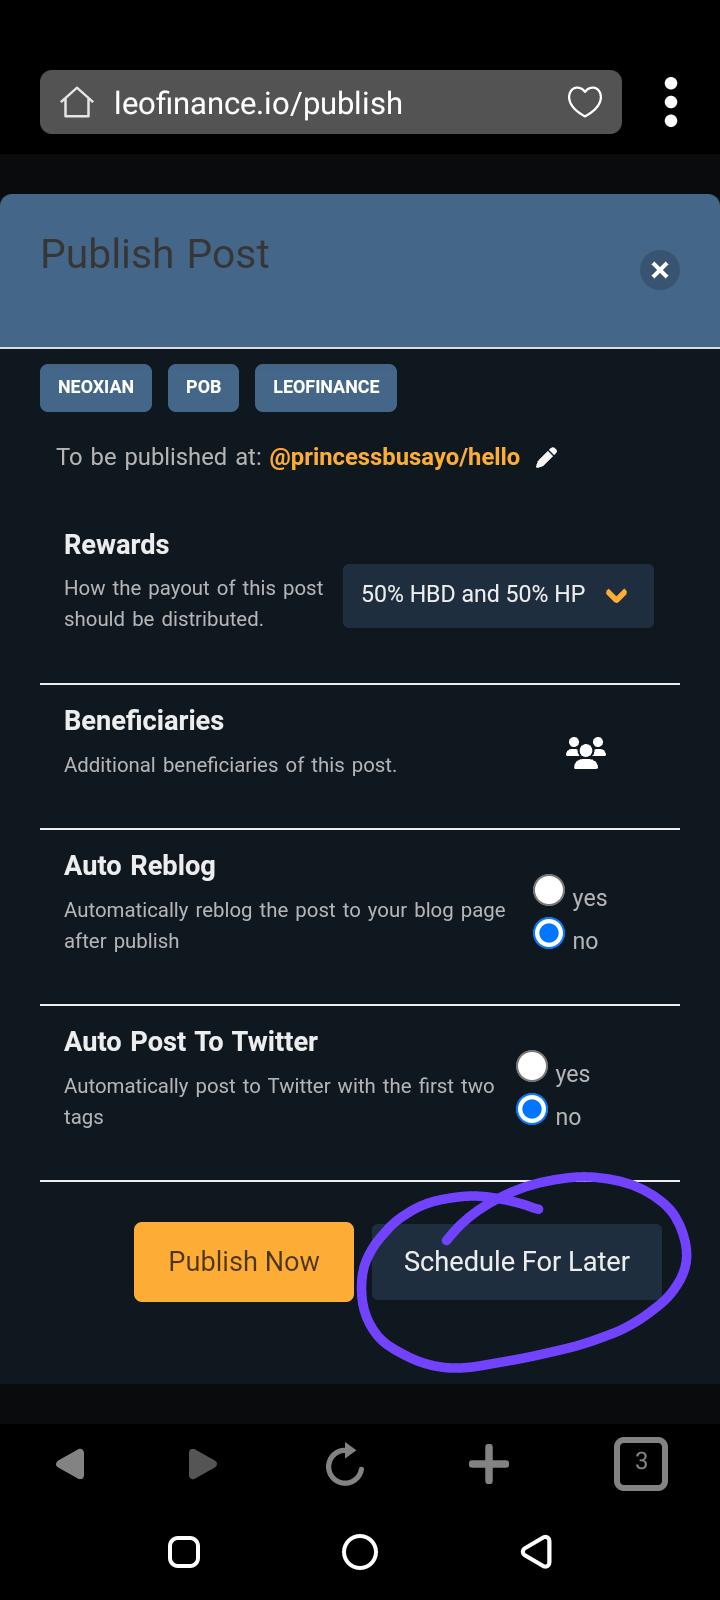 | 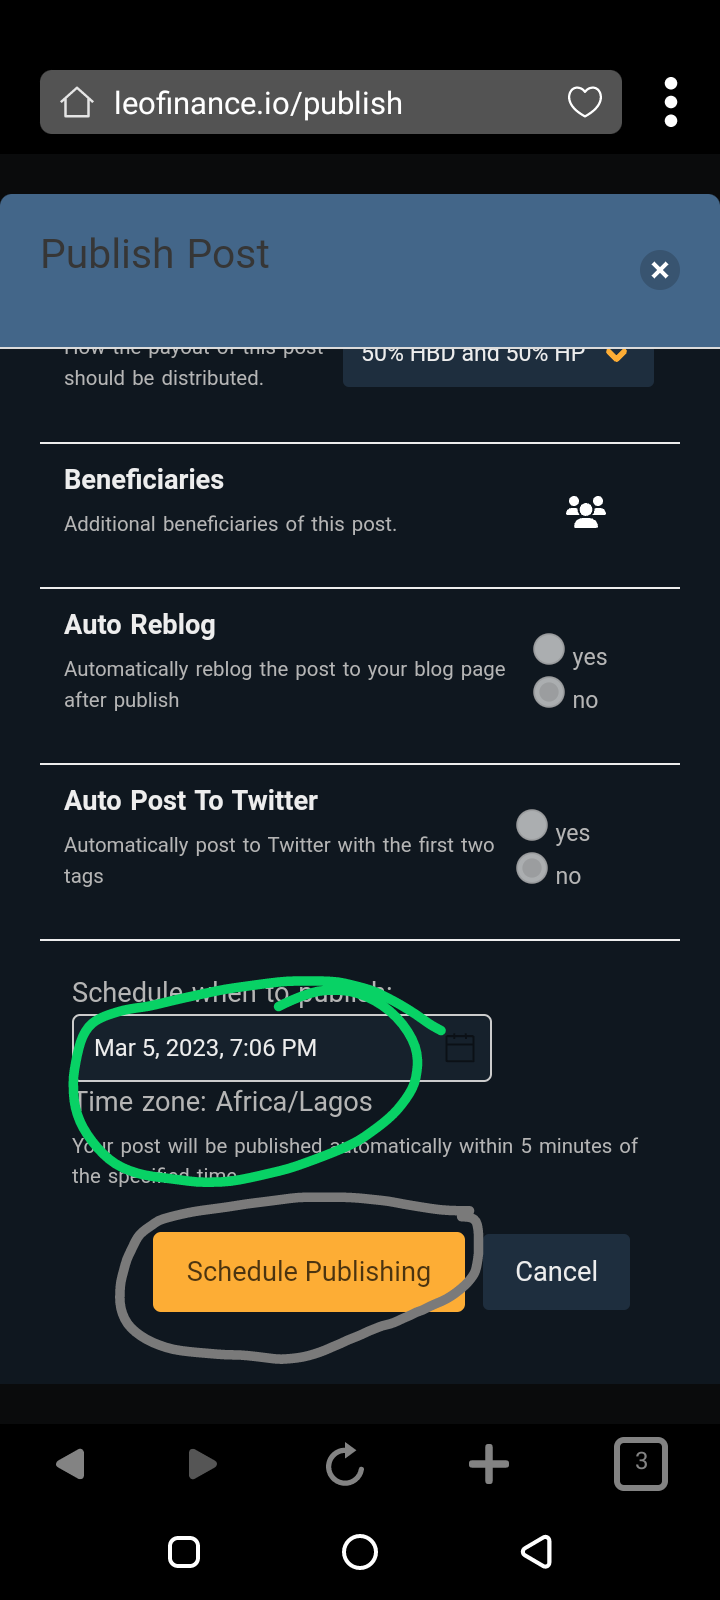 |
Doing this isn't hard too. Just follow through the images and voila, your post has been scheduled.
With this, you do not need to be worried about forgetting to post at the usual time.
I hope this helps.
Thanks for your time on my blog.
All screenshots are taken with my phone as a guide on the tutorial.
