✅✅✅ TIMESTAMPS ✅✅✅
00:00 Intro
00:50 LeoFinance & Cub Finance
02:00 Cub Finance Explained
07:58 Polycub Explained
10:19 Polycub Block Rewards
12:05 Polycub.com
13:30 What Is xPOLYCUB?
17:18 Protocol Owned Liquidity (POL)
22:23 How To Use Polycub And Cub Finance
22:48 Installing Metamask
25:12 Polycub Airdrop (How To Qualify And How To Claim)
27:25 My Airdrop Isn't Showing Up?!?!!
31:13 How To Buy CUB Tokens On PancakeSwap
33:17 How To Buy Polycub Tokens On Paraswap
35:56 How To Buy PLEO On Paraswap
38:56 How To Stake CUB On Cub Finance
41:31 How To Stake Polycub On Polycub.com
43:16 How To Provide Liquidity On PancakeSwap
45:31 How To Use Kingdoms And Farms On Cub Finance
46:30 How To Provide Liquidity On Sushiswap
47:39 How To Farm Polycub On Polycub.com
49:36 How To Remove Liquidity From Sushi Swap
50:35 How To Remove Liquidity From Pancake Swap
51:29 Cub Finance Roadmap / Polycub Roadmap (AvalancheCub, FantomCub, TerraCub Airdrop)
55:58 Conclusion
FYI: I've posted this on my website and will likely be plastering it across the web so everyone can find out about Polycub and LeoFinance.
Introduction
So you heard about Polycub, but you’re confused as f*c#.
What are all these different farms, what is xPolycub? How do I actually use this thing and earn interest on my holdings?
I am going to cover all of those things in this article. We’ll go over everything from what Polycub is, how it started, and most importantly, how to use it.
LeoFinance
Before we discuss Polycub, let’s give a bit of background on where this project came from.
There’s a project called LeoFinance, built on top of the Hive blockchain. LeoFinance is a blogging platform where you can earn crypto for posting content.
They have a native cryptocurrency called LEO, that powers their blogging platform.

Cub Finance
In March of 2021, LeoFinance launched a yield farming platform on Binance Smart Chain.
That platform is called Cub Finance. Cub Finance also has its own native crypto token, called CUB. Unlike many platforms that use new tokens as an opportunity to raise money and fill the pockets of the team members, LeoFinance decided to airdrop this new CUB token to people who were holding LEO.
The remainder of the supply is given out to people who farm on Cub Finance, at a predictable rate of 1 CUB per block, in perpetuity.
To clarify, this means that for every single block that is produced on Binance Smart Chain, 1 CUB is minted, and added to the rewards pool on Cub Finance.
What Are Farms, Dens, And Kingdoms?
So let’s take a deeper look into how Cub Finance works. I know you came here looking for Polycub information, but this is relevant.
Right now, I’m laying the groundwork that will help you fully understand Polycub.
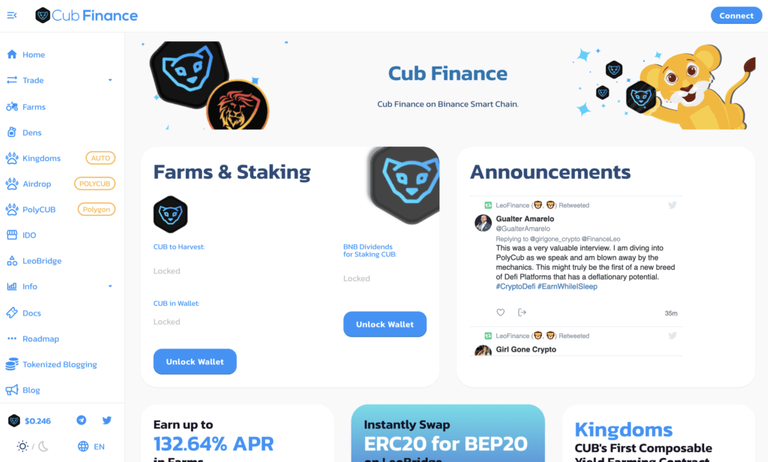
If you take a look at the menu on the left side of CubDeFi.com, you’ll see 3 main categories that we’re going to focus on. Those would be Farms, Dens and Kingdoms.
I’ll explain what each of those are right now, and then later in the article, I will show you how to use them.
Dens
Let’s start off with the Dens since they are the most simple.
A Den is basically a traditional staking model. Right now, there is only 1 Den on the platform.
That would be the CUB Den. It works in a very simple manner- you stake your CUB tokens, and you earn CUB rewards. You can withdraw these rewards any time you like, or you can leave them there and let them accumulate.
At the time of this writing, the return on the CUB Den is about 49% APR.
Farms
Next, we’ve got farms.
Farms offer CUB rewards to people who stake LP (liquidity provider) tokens for certain token pairs.
These pairs are typically tokens that the team sees value in you holding- for example, CUB-BUSD of CUB-BNB.
By providing liquidity for these pairs, you are helping the overall LeoFinance/Cub Finance ecosystem. In return for doing that, the platform is willing to pay you high CUB rewards.
As of right now, you can earn 86% APR on the CUB-BUSD pair.
Kingdoms
Lastly, we have the kingdoms. These are similar to farms, but with a couple of key differences.
With kingdoms, you typically stake tokens that earn rewards on other yield farming platforms (like PancakeSwap, for example).
You don’t actually need to interact with PancakeSwap directly- the Cub Finance smart contracts do this automatically for you behind the scenes.
These tokens are typically unrelated to the LeoFinance/Cub Finance ecosystem. Since holding these tokens doesn’t provide much value to Cub Finance, the CUB rewards are typically lower.
However, you can still earn similar APY on these because of the rewards that the other platforms are providing.
For example, you can stake CAKE in the CAKE kingdom, and earn 72% APY even though the CUB rewards are much lower.
This is mostly due to the CAKE rewards that you are earning through PancakeSwap.
“So why would I bother using Cub Finance when I could just use PancakeSwap, Mike?”
There are a couple of different answers to this.
For starters, you are also earning the extra CUB rewards on top of the rewards that PancakeSwap is giving.
On top of that, these kingdoms are auto-compounding. That means that every day, as PancakeSwap pays out your CAKE rewards, the Cub Finance smart contracts take those rewards, and re-invest them back into the token that you’re staking in the kingdom.
This is far more efficient than doing the compounding on our own. Essentially, even if you weren’t getting any CUB rewards, you’d still be earning more by using the Cub Kingdoms vs. using PancakeSwap.
The only kingdom that this doesn’t apply to is the CUB kingdom. With the CUB kingdom, you stake your CUB tokens, earn high CUB rewards, and they get auto-compounded back into more CUB tokens.
The current APY on the CUB kingdom is 63%.
Management Fees
On the auto-compounding Kingdoms, the platform takes a 10% management fee. Not 10% of your capital, just 10% of the yield that is earned from auto-compounding.
These fees are used to buy CUB off the open market, and burn it. This delivers value to CUB holders through a reduction of the CUB supply.
Polycub Explained
Ok, so now that you understand what Cub is, we can move on to Polycub.
Polycub is basically Cub Finance 2.0, on the Polygon blockchain- with a few changes, but 2 very key differences.
xPolycub and Protocol Owned Liquidity. We’ll get into those in a minute. First, let’s talk about the tokenomics.
Polycub Token
Just like Cub Finance, Polycub also has its own token on the Polygon network. The name of that token is Polycub. Wonder where they got the name from…
Airdrop
And just like the CUB token, Polycub was airdropped to holders as well. Except this time, instead of airdropping it to LEO holders, the token was airdropped to CUB holders.
1 million Polycub are being airdropped to CUB holders over the course of 60 days, with a snapshot of CUB balances being taken on a daily basis. Each day, CUB holders can claim their Polycub rewards from the latest snapshot.
The airdrop is currently about 15 days in, which means there are about 45 days left, at the time of making this video.
I’ll talk more about how to qualify for (and claim) the airdrop in a bit. But first, let’s go over the rest of the token supply.
Development Fund
200,000 tokens were put into a development fund, where they are locked in a smart contract. The tokens will be released slowly over a 6 month period.
Initial Liquidity
Aside from the airdrop and development fund, the only Polycub tokens that were initially created, are 100k tokens that were used to provide liquidity on Sushi Swap.
50k Polycub were put into the POLYCUB-USDC pool, and 50k were put into the POLYCUB-WETH pool.
The initial price was set at $1, which means that Khal (the founder of LeoFinance, Cub Finance and Polycub) was kind enough to put $100k of his own money into buying USDC and WETH to fund these liquidity pools.
There is also a 3rd pool that was funded with $100k of liquidity as well, and that is the PLEO-MATIC pool (more on this shortly).
Block Rewards
After the initial liquidity, development fund and airdrops, there is only 1 more factor that adds to the Polycub supply.
Token emissions.
Remember how I said that the CUB token has an emissions rate of 1 CUB per block, forever?
With Polycub, it’s a bit different (and much scarcer) than that.
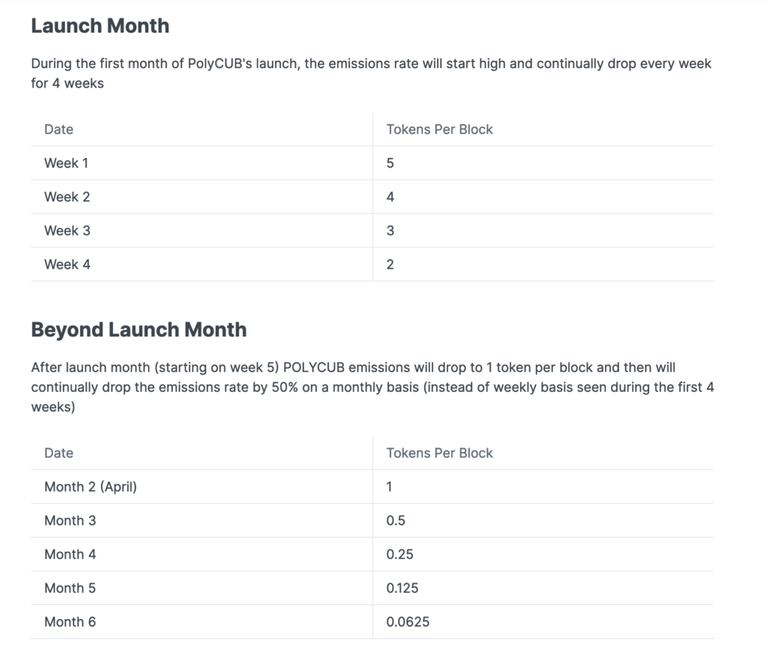
As you can see here, during the first week, the Polycub emissions rate is 5 tokens per block.
That means extremely high rewards for people who are using the platform in week 1.
Week 1 has already passed, and now we are in week 2. The block reward has dropped by 20%, and is now 4 tokens per block.
Week 2 is almost over. The block reward will keep decreasing by 1 token per block, until we reach an emissions rate of 1 token per block.
At that point, the block reward will start dropping by 50% each month, in perpetuity.
This essentially means that in a few months, the Polycub supply will permanently stop increasing.
Of course, that’s not literally correct. Block rewards will still exist, but the amount will be so small that it won’t even be worth discussing.
“So where will the rewards come from after all these halvings, Mike? Won’t the platform die after that?”
The team has already thought about that, and they’ve planned ahead. But we’ll get into that shortly.
Polycub Platform
Alright, let’s take a look at polycub.com
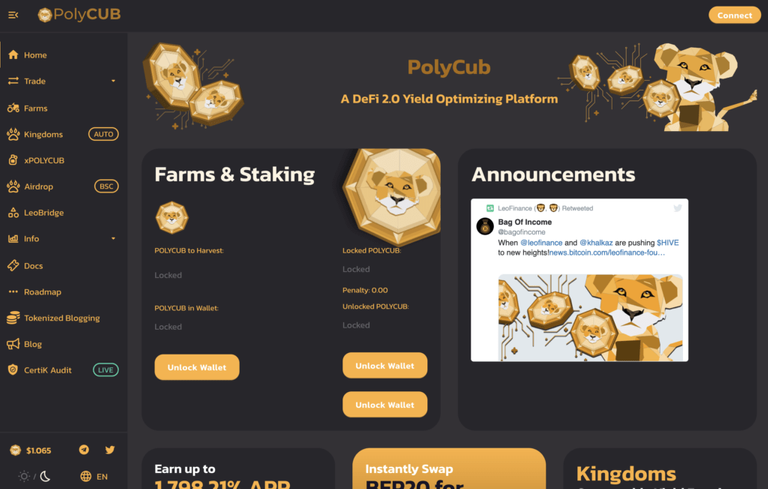
Looks awfully familiar, doesn’t it? Except there’s something a bit different about the menu.
We don’t see the “Dens” tab this time around. What we do see, is the xPOLYCUB tab.
We’ll talk about xPolycub in just a second.
First, let’s discuss the “Locked Polycub” and “Unlocked Polycub” options that are shown on the homepage.
One of the key differences between Cub Finance and Polycub, is that when you harvest your rewards on Polycub, there is a 90 day waiting period to unlock your rewards (not your initial capital, just the harvested rewards).
You can unlock the rewards early if you want to, but you will forfeit 50% of your rewards as a penalty if you do that.
This brings me to my next topic, xPOLYCUB.
xPOLYCUB
xPOLYCUB is the new and improved version of a den. With the old version on Cub Finance, you staked your CUB, and you earned some more CUB.
With xPOLYCUB, you stake your Polycub, and you earn…
more Polycub.
But wait, there’s more!
Remember those 50% penalties that get charged to people when they unlock their harvest before 90 days has passed?
That 50% goes directly to xPolycub holders.
This means that on top of the block rewards that you get for staking your Polycub, you also get all of the penalties from people who forfeit their tokens.
Let’s take a closer look at this.
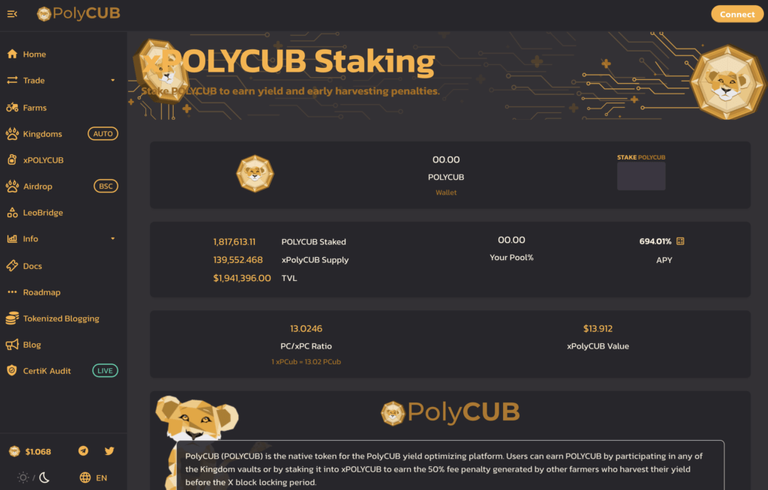
Here we are on the xPOLYCUB page.
There is only 1 thing on this page that should matter to you- PC/xPC Ratio.
When you stake your Polycub, you convert it into xPolycub. As you can see here in the picture, that ratio is 13.02 at the moment.
That means 1 xPOLYCUB is worth 13.02 Polycub. Meaning that you need to stake 13.02 Polycub in order to receive 1 xPOLYCUB.
On day 1 of the Polycub launch, this number was 1. ONE.
That means that anyone who staked 1 Polycub on day 1, now has 13.02 Polycub less than 2 weeks later.
Part of this is due to the block rewards, but the vast majority is due to earning those 50% penalties from people who unlocked their tokens before 90 days.
There’s one thing I’d like to clarify in case you don’t understand yet. This number can never go down, it can only go up.
That means that putting your Polycub into the xPOLYCUB pool will always result in you having more Polycub later.
Of course, since the block rewards will keep going down over time, you will probably never see this number do a 13x again. At least not any time soon.
But you will see it continually increase, because the only place it can go is up. So if you have liquid Polycub and you aren’t staking it, I’m not quite sure what you’re doing?
Protocol Owned Liquidity (POL)
Aside from xPOLYCUB, the other major improvement on Polycub is the introduction of Protocol Owned Liquidity. We will refer to this as POL from this point forward.
Remember the 10% management fee that Cub Finance uses to buy and burn CUB tokens?
Well, Polycub takes that 10% management fee as well- but it does something completely different with it.
When you stake in the auto-compounding Kingdoms on Polycub, those tokens that you staked are generating yield on other platforms like Sushi Swap.
90% of that yield goes to you (just like on Cub Finance), and 10% goes to a treasury address that belongs to the Polycub protocol.
All of the funds in that treasury address are used to buy “blue chip” tokens, like BTC, ETH, stablecoins, etc.
These tokens are then deposited into pools/farms etc where they generate yield. That yield is then used to purchase Polycub off the market, and given out as rewards on the Polycub platform.
Actually, since the Polycub emissions rate is going to rapidly decrease to almost nothing… eventually the yield from POL will be the only rewards that are given out on Polycub at all.
Think about this for a second if you aren’t comprehending why this is valuable.
Let’s say the Polycub platform generates $100M in yield over the course of however long.
Polycub earns 10% of that yield, which means there is now $10M in POL. $10M that is generating yield to distribute to Polycub users.
Now imagine somehow Polycub dies, and only 1 person is using the platform. That person only has $1 invested.
This person will be earning the rewards from $10M, even though he only put in $1.
That would never happen, because the free market would not allow that.
The reality is, if POL has $10M in capital, then there will theoretically never be less than $10M invested into the farms on Polycub. This would keep the POL growing (as more fees are generated from new users), and keep the value of Polycub growing as well.
Ultimately, this creates a floor price on Polycub. If $10M is generating yield every week, and that yield is being used to buy Polycub… then how much is Polycub worth?
$10M is an arbitrary number. You can use any number you want. The point is, POL has tremendous value when it comes to long term sustainability.
Tutorial Time- How To Use Cub Finance And Polycub
Alright, so you understand the concept of the platforms now. But how do you use them?
Let’s go over everything from start to finish.
Installing Metamask
If you don’t have Metamask installed on your browser, you’ll need to go over to metamask.io and download it.
Once you have it set up, go ahead and create your account. Just follow the directions, it’s a pretty straight forward process.
Adding Polygon And Binance Smart Chain To Metamask
Cub Finance runs on the Binance Smart Chain, and Polycub runs on the Polygon network.
In order to use the Cub websites, you will have to add these 2 networks to your Metamask. I’ll explain how.
To add a new network to Metamask, simply click the drop down menu at the top of Metamask. Mine says “Matic”, but yours will probably say Ethereum.
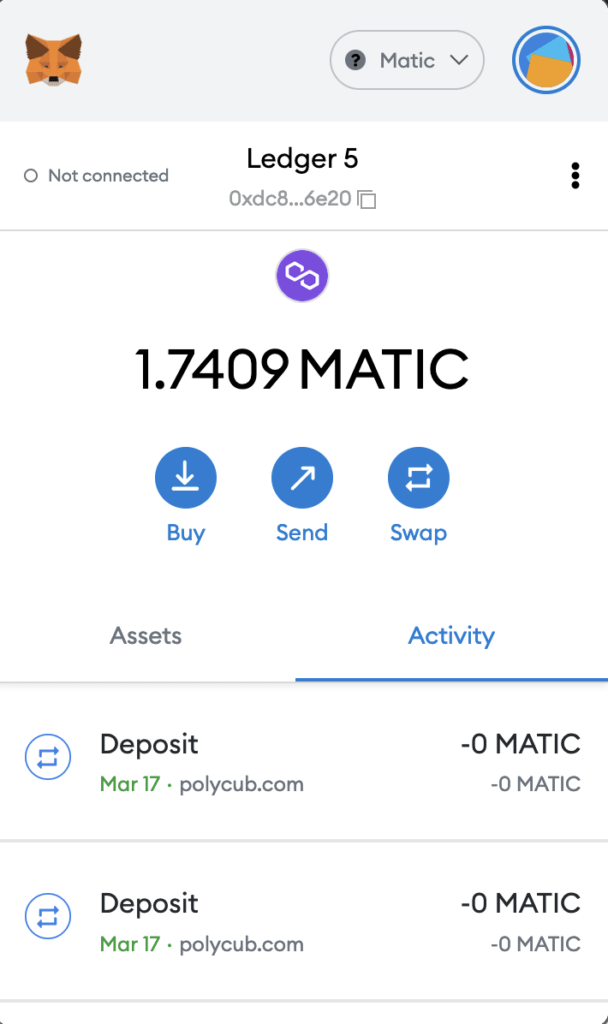
Once you click the drop down menu, you’ll see an option to “Add Network”. It might also say something like “Custom RPC”.
Click on that button.
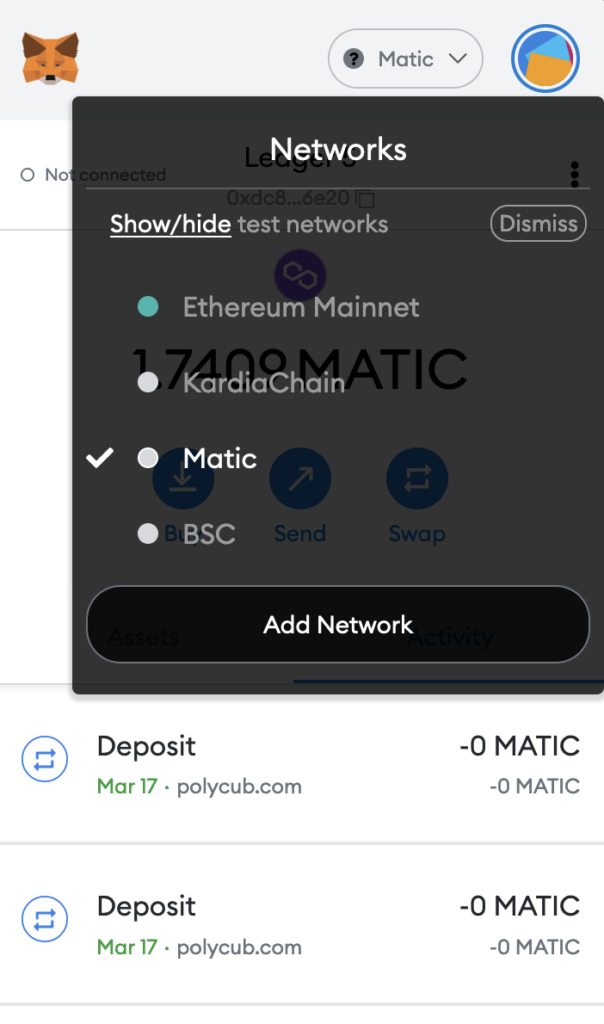
This should take you to a page where you have to fill out some information.
Here’s the info you need:
Polygon Network (For Polycub)
Network Name: Polygon Mainnet
New RPC URL: https://polygon-rpc.com/
ChainID: 137
Symbol: MATIC
Block Explorer URL: https://polygonscan.com
Binance Smart Chain (For Cub Finance)
Network Name: Smart Chain
New RPC URL: https://bsc-dataseed.binance.org/
ChainID: 56
Symbol: BNB
Block Explorer URL: https://bscscan.com
Save both of these networks into your Metamask. You can switch between networks when you need to, by clicking the drop down menu and selecting the network you want.
FYI, your address will be the same on Ethereum, Binance Smart Chain, and Polygon. So don’t be alarmed if you see the same address when you switch networks.
It’s the same address, just a different blockchain. Makes things nice and simple.
Gas Fees
In order to use Binance Smart Chain and Polygon, you’ll need tokens in your wallet to cover transaction costs.
Binance Smart Chain uses their native BNB token to pay for transactions. Make sure when sending BNB to your wallet, you use the BEP-20 Network (Binance Smart Chain) and NOT the BEP-2 Network (Binance Chain).
Polygon uses its native MATIC token.
You won’t need much of either, but you’ll need a bit. I’d suggest getting at least 1 BNB in your Binance Smart Chain wallet, and/or at least 1 MATIC in your Polygon wallet.
Polycub Airdrops- What Makes You Eligible?
There are 3 ways that you can qualify for the Polycub airdrop.
- Staking CUB in the CUB Kingdom
- Farming LP tokens in CUB-BUSD farm
- Farming LP tokens in the CUB-BNB farm
Snapshots of these balances are taken on a daily basis, and then airdrops are sent out based out snapshot balances.
*Note: airdrops aren’t actually “sent out”… you need to claim your airdrop. I will show you how in a second.
How To Claim Your Polycub Airdrop
In order to claim your Polycub airdrop, you’ll need to head over to polycub.com/airdrop.
Make sure your Metamask is connected to the Polygon network, and make sure you have at least 0.1 MATIC in your Polygon wallet.
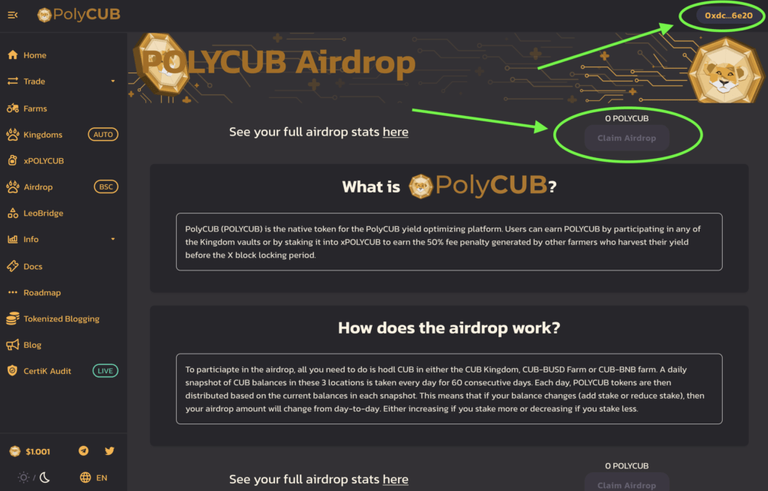
If your Metamask is connected to Polygon network, and connected to the Polycub website, then you should see your address at the top right hand of the screen.
The “Claim Airdrop” button should be orange if you are eligible, and it should show the amount you can claim.
Click on the Claim Airdrop button, and a pop-up will appear, asking you to confirm the transaction.
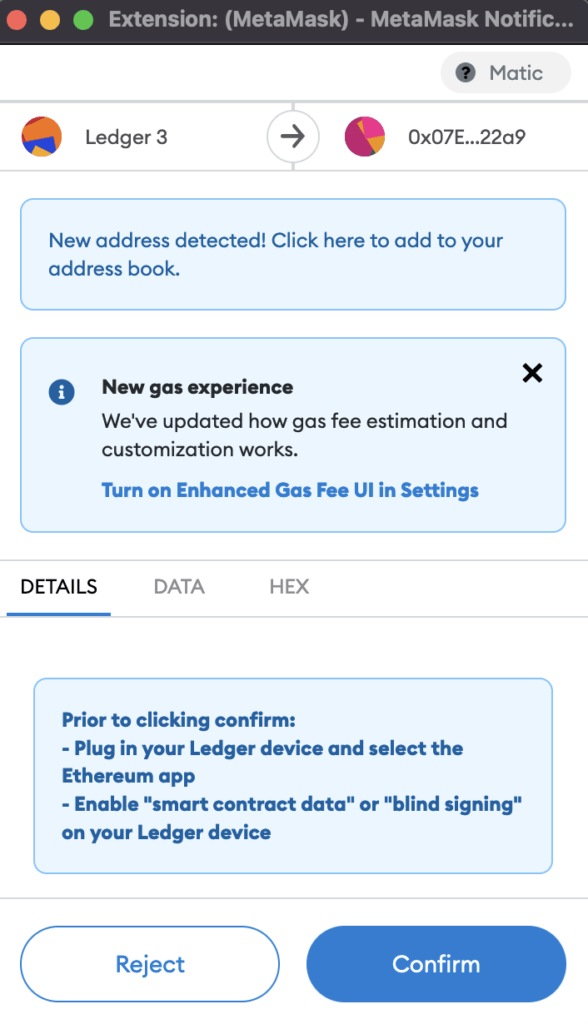
Confirm the transaction and wait a few seconds, and then head over to the xPOLYCUB page.
If you claimed your airdrop properly, then you should now see a Polycub balance on this page.
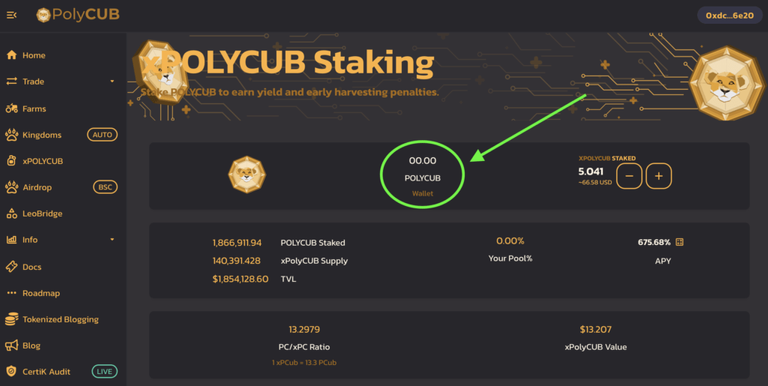
What To Do If My Airdrop Isn't Showing Up
Have you been staking/farming in one of the qualifying pools for at least 24 hours?
If so, check your address on the following page: https://polycub-api-1.fbslo.net/?address=YOUR_POLYGON_ADDRESS
Make sure to replace the “YOUR_POLYGON_ADDRESS” part with… YOUR POLYGON ADDRESS.
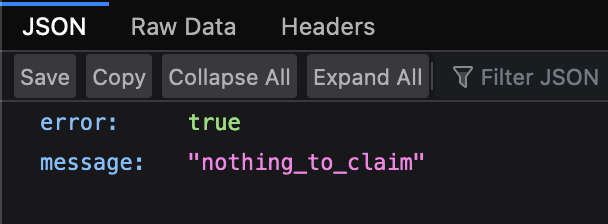
Is this the message that you get? Nothing to claim?
If so, that means that the system has not recognized your address as being eligible for the airdrop.
If you’re 100% sure that you’re staking/farming in a qualifying pool, and have had your funds there for at least 24 hours, then here’s how you can fix the problem.
Go to this page: https://add-address.fbslo.net/
Make sure your Metamask is connected to Binance Smart Chain and make sure you have around $1 worth of BNB in your Binance Smart Chain wallet to cover transaction costs.
Paste your Binance Smart Chain address (it’s the exact same address as your Polygon address) into the text box.
Click the “Add” button, and it will ask you to confirm a transaction.
Confirm the transaction.
This will update the system and let it know to look for your address when doing snapshots for airdrops.
Note: this will not update instantly, but it will include you in the next airdrop. So wait another 24 hours before you start freaking out.
Why Does CubDeFi.com Say My Airdrop Is 600 Tokens, But I Can Only Claim 10?
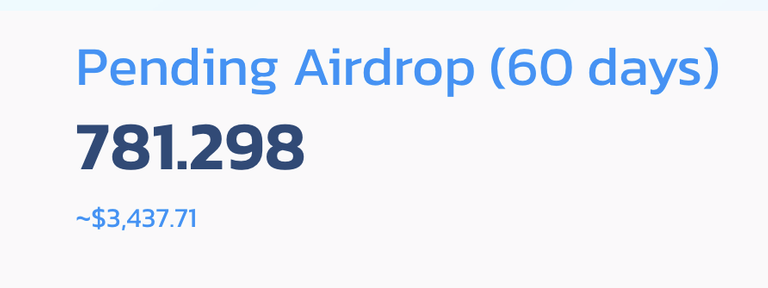
Keep in mind that the airdrop takes place over a 60 day period. The number that you see under “Pending Airdrop” is based on 60 days.
Each day, you can claim about 1/60th of this number. It’s not all given out in 1 shot.
Also, this number can fluctuate based on how much TVL (Total Value Locked) is in the qualifying farms.
Remember that there were 1 million CUB allocated to the airdrop. That means if only 1 person qualified, then they would get the full 1 million tokens. If a million people qualified, then each person would get an average of 1 token.
So don’t be surprised if you don’t receive the exact amount you were expecting. It changes all the time.
How To Buy CUB Tokens
Now you know how to claim your airdrop. But how do you actually get CUB tokens in the first place, so you can become eligible for the airdrop?
First, you’ll need a bit of BNB in your Binance Smart Chain wallet for transaction costs.
You’ll also need more BNB (or any other asset like USDT/USDC etc) in your wallet, so you can use it to buy some CUB.
If you’ve got funds in your Binance Smart Chain wallet, then head on over to PancakeSwap.
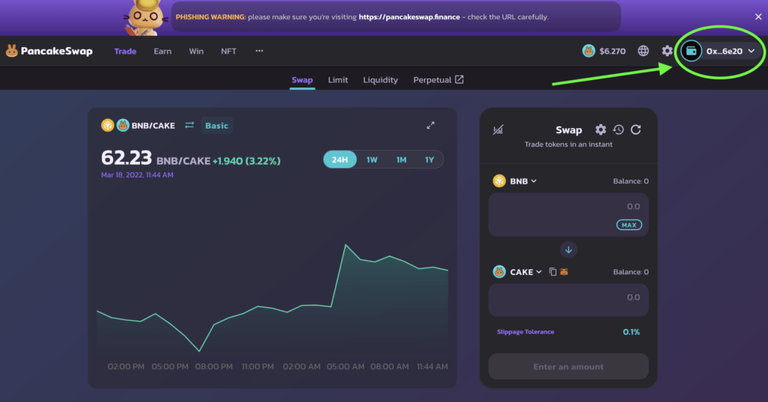
Make sure your Metamask is connected to Binance Smart Chain, and that your wallet is connected to PancakeSwap.
If you’ve done this properly, then you will see your wallet address at the top right.
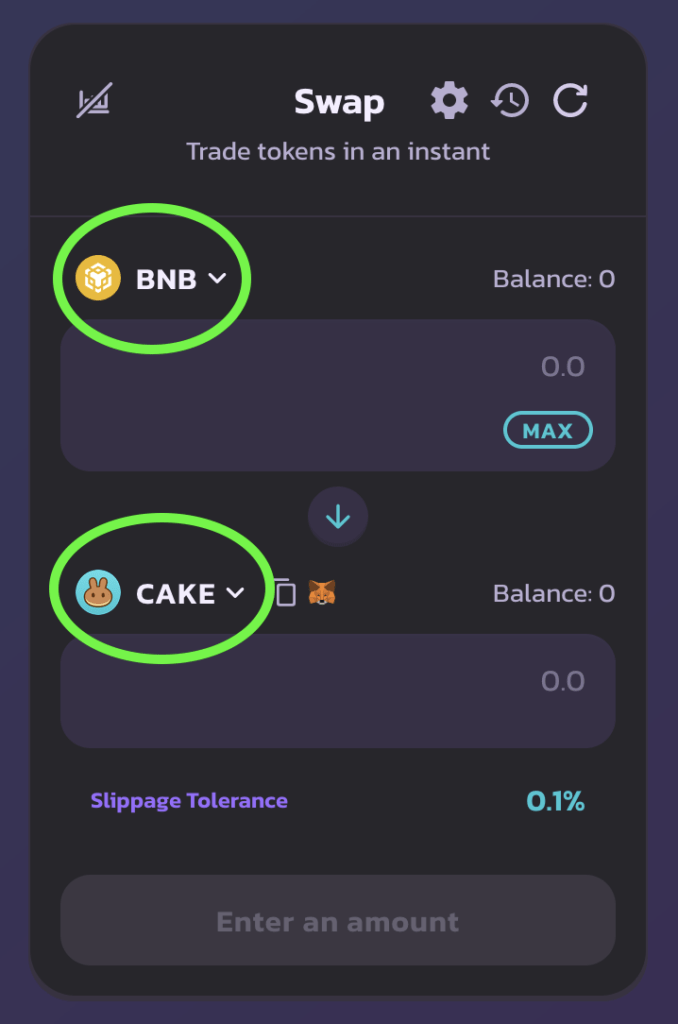
Click on the BNB button at the top of the swap form, and select the coin you would like to use for purchasing CUB.
If that coin is BNB, then just leave it as is.
Enter the amount you want to spend into the box.
Now click on the bottom token (CAKE in this example), so you can select CUB as the token you want to buy.
But wait, why isn’t CUB on the list? I can’t find it?
No worries. All you need to do is enter the CUB contract address into this box:

CUB contract address: 0x50D809c74e0B8e49e7B4c65BB3109AbE3Ff4C1C1
Once you paste the contract address into the box, you should see the option to “Import Token”.
Import CUB, and confirm that you’re aware that someone can give you a fake contract address and make it look like CUB (this is why I included the source, so you can verify this address yourself. Don’t trust me, don’t trust anyone. ALWAYS go to the source.)
Once you have everything filled out properly, click the “Swap” button.
Depending on the coin that you’re paying with, you may need to do 2 transactions here. You might have to enable the token before you can spend it on CUB.
If that’s the case, then confirm the “enable/approval” transaction when Metamask asks you to.
Then, submit and confirm the swap transaction.
Give it a few seconds to go through, and your CUB should now be in your wallet.
How To Buy Polycub Tokens
Buying Polycub is a very similar process to buying CUB. The main differences will be the network you are using, and the tokens involved in transaction fees etc.
You’ll need a bit of MATIC in your Polygon wallet.
You’ll also need more MATIC (or your coin of choice) to spend on Polycub.
Once you’ve got that covered, head on over to ParaSwap.
Make sure your Metamask is connected to Polygon network, and make sure your Metamask is connected to Paraswap.
Select the coin you want to pay with, and then enter the Polycub contract address into the “Receive” field.
Polycub contract Address: 0x7cc15fef543f205bf21018f038f591c6bada941c
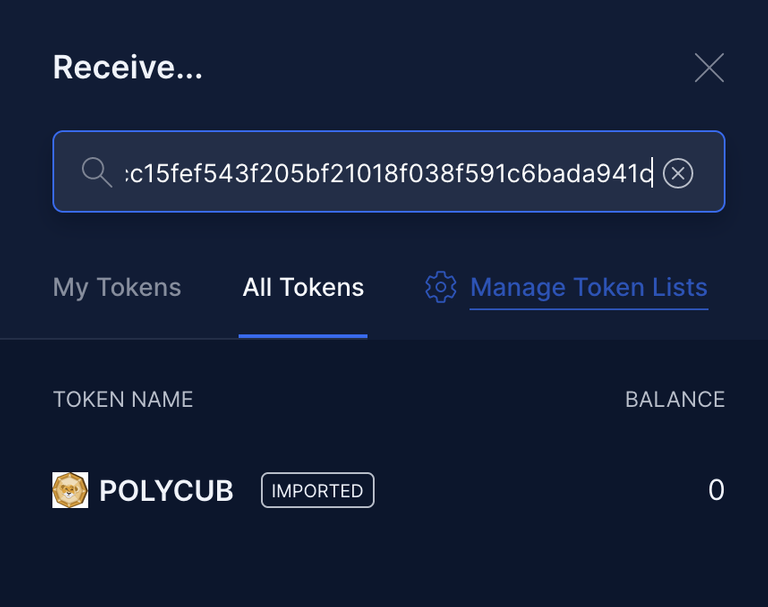
Just like with Pancakeswap, you may need to do 2 transactions here (depending on what token you are paying with).
If you need to submit an approval transaction, then go ahead and do that. Confirm it with Metamask, then submit the actual swap transaction and confirm that one too.
Once that’s done, give it a few seconds to update. Your Polycub should now be in your Polygon wallet.
How To Get PLEO
If you need to get some PLEO so you can provide liquidity and farm the PLEO-MATIC pool, there are 3 ways you can go about this.
Buying Directly On Paraswap
If you want to buy PLEO on Paraswap, the follow the exact same instructions as you would to buy Polycub.
The only difference is the contract address.
PLEO contract address: 0xF826A91e8De52bC1Baf40d88203E572DC2551aa3
Bridging LEO From Hive
If you have LEO tokens on the Hive blockchain, you can convert them to PLEO using Leofinance’s bridge.
Head on over to https://wleo.io/polygon and you will see the following form.

Enter the Polygon address that you want the PLEO to be sent to.
It will ask you how many LEO you want to send across the bridge to Polygon. Enter the amount.
Then it will ask you for your Hive username. Enter your username.
Then it will give you an account to send the LEO tokens to. Send your LEO tokens to that account, and you will receive PLEO in the Polygon wallet that you put into the form.
The conversion rate between LEO and PLEO is always 1:1 but there is a small fee of about 1 LEO for using the bridge.
Bridging From Binance Smart Chain, To Hive, Then To Polygon
There is also a version of the LEO/PLEO token called BLEO. This token is on Binance Smart Chain, which means you can but it on PancakeSwap.
Then you can use the LEO Bridge to send your BLEO over to Hive blockchain, where it becomes LEO.
After that, you can follow the steps above for bridging from Hive to Polygon.
To buy BLEO on PancakeSwap, follow the steps I wrote in the “How To Buy CUB Tokens” section.
The only difference is, you want to buy BLEO instead of CUB. This means that you need to import BLEO as a custom token in PancakeSwap.
BLEO contract address: 0x6421531AF54C7B14Ea805719035EBf1e3661c44A
Once you have your BLEO, you can bridge it to Hive using the LEO bridge.
Head over to wleo.io and you will see the following form.

Make sure your Metamask is connected to Binance Smart Chain.
Then enter your Hive username that you want to send the LEO tokens to.
Click the Submit button, and you will see this box pop up.
Click on the Conversion Details box, and a pop up will ask you how many BLEO you want to send.
Type in the amount, and click OK.
Metamask will open up and ask you to confirm the transaction, which will send your BLEO out of your wallet.
You will then receive LEO tokens in your Hive wallet.
At this point, you can follow the steps in the “Bridging LEO From Hive” section to move the LEO to your Polygon wallet.
P.S. If you have no idea what Hive is or how to use it, you can check out my Hive For Beginners Tutorial to learn everything you need to know.
How To Stake CUB And Polycub
If you want to earn yield from your CUB and/or Polycub holdings, you’ll need to stake them.
Unless you are using them to provide liquidity so you can farm LP tokens, which I will get into in a bit. For now, let’s discuss staking.
Staking Your CUB Tokens
If you want to stake your CUB, head on over to cubdefi.com.
Once again, make sure your Metamask is connected to Binance Smart Chain and connected to Cub Finance.
Whether you choose to stake your CUB in the CUB Den, or the CUB Kingdom (auto-compounding) is up to you.
Either way, the process is basically the same.
All you need to do is click on the “Details” button for the Den or Kingdom that you want to enter.
You will see the box expand, showing something that looks like this:

Once again, you will need to do 2 transactions if this is your first time entering this particular Den/Kingdom.
One transaction to enable the contract, and one transaction to make the actual deposit.
Confirm both of these transactions with Metamask, and you should see your “Deposited” balance go up.

Note: there is a 0.1% fee for depositing into the Kingdom and Den. This is to prevent users from gaming the system by trying to use the same tokens to get rewards from 2 different pools at once.
How To Unstake CUB
If you want to unstake your CUB tokens, just go to the pool where you have them staked.
You will see a “withdraw” button.
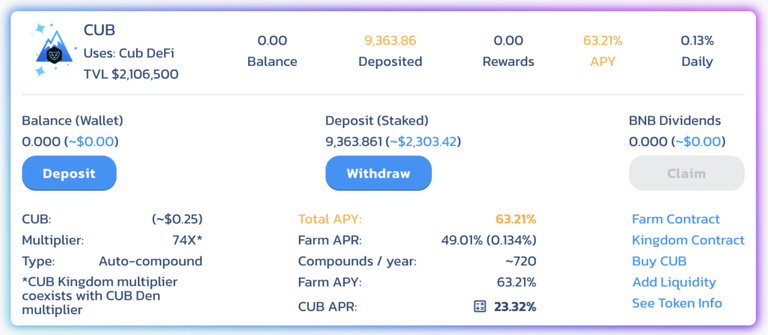
Just click the withdraw button, enter the amount you want to unstake, and click Confirm.
Confirm the transaction in Metamask, and you are good to go.
Note: the picture above is from the CUB Kingdom. Since this is auto-compounding, there is no “harvest” button (your rewards are harvested automatically and compounded back into more CUB every day). If you are staking in the CUB Den, then you will need to harvest your rewards separately from your withdrawal (in other words, 2 transactions).
How To Stake Polycub In The xPOLYCUB Pool
To stake your Polycub, head over to polycub.com/staking.
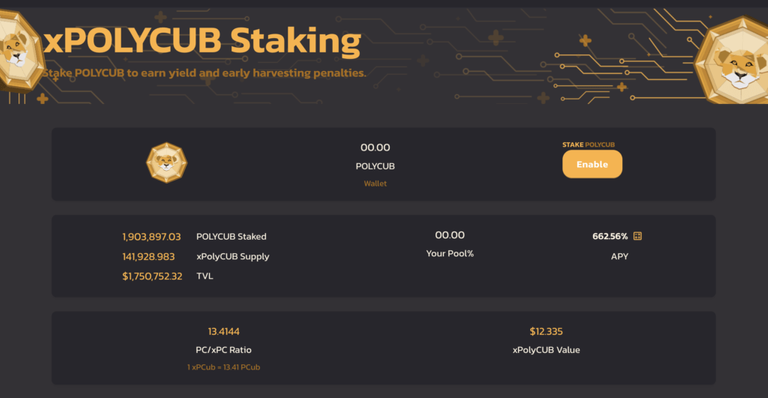
Make sure you are connected to the Polygon network, and logged into the site with Metamask.
If this is your first time staking, you will need to submit 2 transactions. One to enable the contract, and then a 2nd transaction to actually stake the Polycub.
The amount of xPOLYCUB you receive will depend on the current PC/xPC ratio. Don’t worry, that number can never go down- it can only go up. So you will always receive more Polycub when you leave the pool, than the amount you put into it.
How To Unstake xPOLYCUB
Unstaking your xPOLYCUB is very simple. On the xPOLYCUB page, you will see a “minus” symbol.
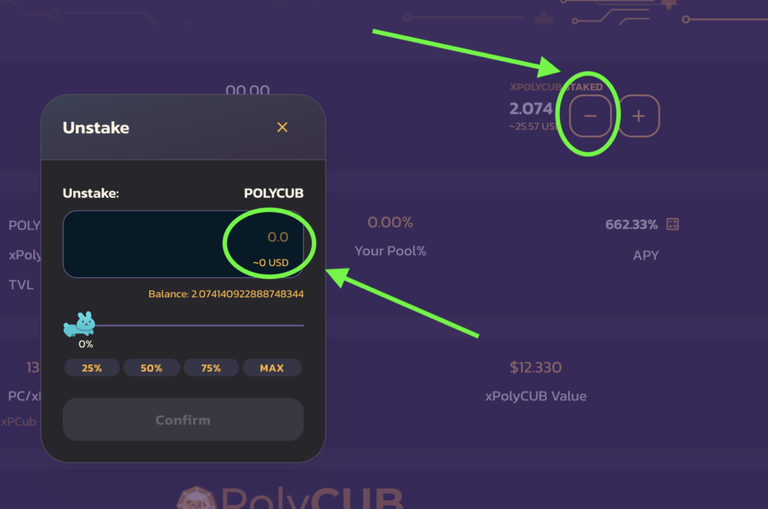
Click the – symbol, then enter the amount of xPOLYCUB you want to unstake.
Click “Confirm” and confirm the transaction in Metamask.
Give it a few seconds to update, and you will see your Polycub in your wallet.
There is no penalty for leaving the xPOLYCUB pool, and there is also no penalty for taking your xPOLYCUB rewards.
How To Provide Liquidity On PancakeSwap
Before you go providing any liquidity, make sure you understand the concept of impermanent loss, and the risk that comes along with providing liquidity.
I’m not going to go into detail about that right now, but if you don’t know what impermanent loss is, I highly suggest watching this video by BoxMining. He breaks it down very well.
With that out of the way…
If you want to farm LP tokens on Cub Finance, you will need… LP tokens.
To get those, you’ll need equal dollar amounts of the tokens that you want to provide liquidity for.
Let’s use the CUB-BUSD pool as an example.
As I write this, the price of CUB is about $0.24.
If I wanted to put 1000 CUB into the farm, then that would be about $240 worth of CUB. This means that I also need $240 worth of BUSD in order to provide liquidity (you can buy BUSD on PancakeSwap).
Once I have my CUB and BUSD tokens, now I can go provide liquidity. I can do this by going to pancakeswap.finance/liquidity.
This is what we will see when we go to the liquidity page.
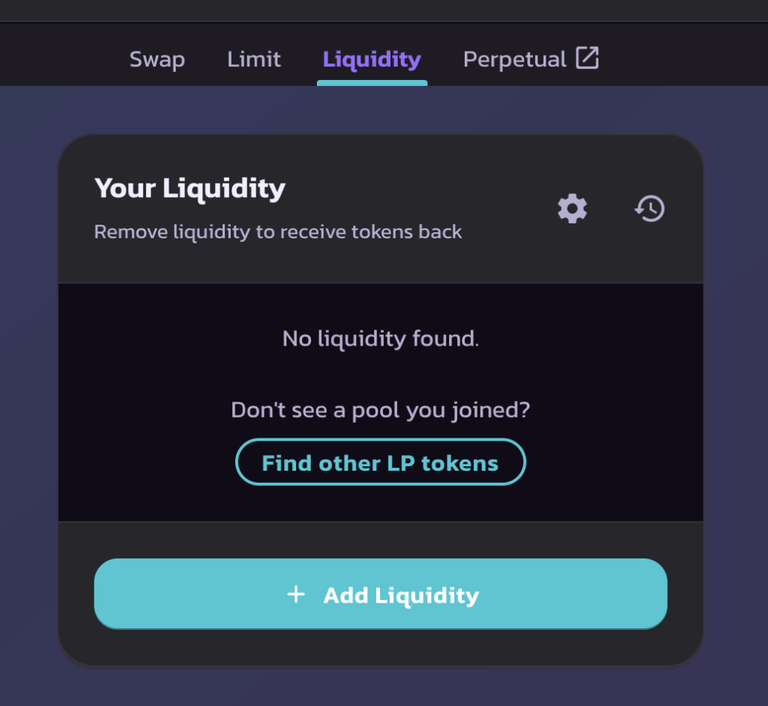
Click on the “Add Liquidity” button.
We will need to select the tokens that we want to provide liquidity for, and enter the amount.
As you can see below, in order for me to add 1000 CUB into the pool, I also need to provide 248 BUSD.
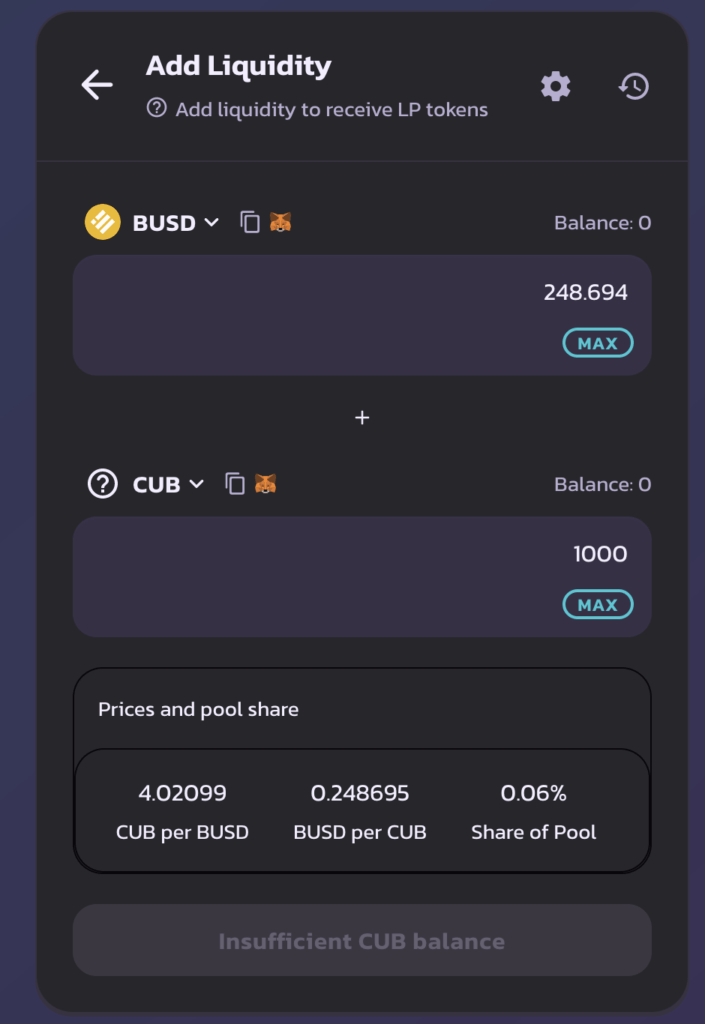
I don’t actually have CUB or BUSD in my wallet, so the button shows “insufficient balance”.
But if you have the proper tokens in your wallet, then the button will show something like this:
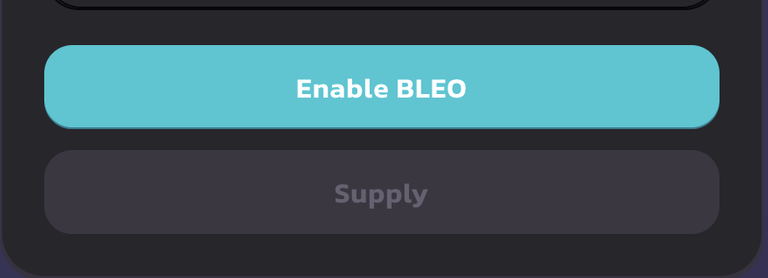
You will likely need to do 3 total transactions here- 1 to enable CUB, 1 to enable BUSD, and 1 to actually “Supply” the liquidity.
Once you get all of those things done, then you can head back over to the farms page on Cub Finance.
How To Add LP Tokens To Cub Finance Farms
Click on the CUB-BUSD farm (or whichever farm you are putting LP tokens into). Then click on the “enable” button to enable the contract.

Once again, there are 2 separate transactions here. Enabling the farm, and the depositing to the farm. So make sure you do both transactions if you want your tokens to actually be deposited.
Now that your tokens are in the pool, you can remove them and/or harvest your rewards any time you want. All you need to do is click the harvest button to get your rewards, and approve the transaction.
For withdrawing, just click on the “-” icon and enter the amount you want to withdraw. Confirm the transaction, and you’re all set.
How To Provide Liquidity On Sushi Swap
If you want to put LP tokens in the Polycub farms, then the process is pretty much the same, but with different tokens on a different network.
Let’s say we want to put LP tokens into the Polycub-USDC farm. We can get both of those tokens using ParaSwap, as I showed you before.
Once we have our Polycub and USDC, we can head over to Sushiswap to provide our liquidity.
Make sure you are connected to the Polygon network in Metamask and on Sushi Swap.
Select the tokens that you want to provide liquidity for.
You may need to add Polycub as a custom token before you can select it from the list. I showed you how to do that already so I won’t bother going over it again.
In case you missed it before, here’s the Polycub contract address again: 0x7cc15fef543f205bf21018f038f591c6bada941c
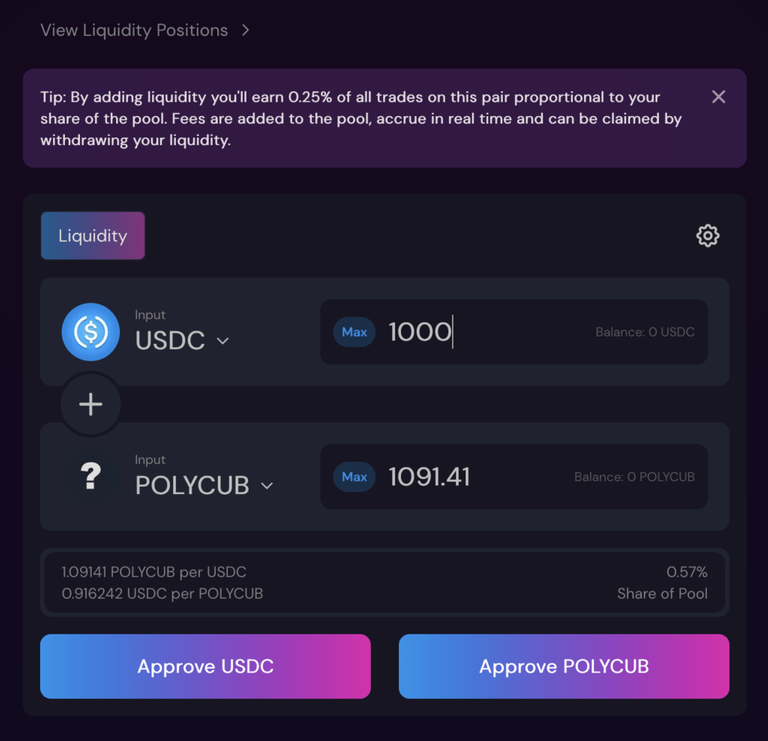
Once again, you will need to do 3 transactions here. 1 transaction to approve USDC, 1 to approve Polycub, then a final one to actually add the liquidity.
When you have that done, you can head over to polycub.com/farms.
How To Farm LP Tokens On Polycub
Click on the farm that you want to put your LP tokens into.

As usual- 2 separate transactions here. 1 to enable the farm, 1 to deposit the LP tokens.
To withdraw your LP tokens, all you need to do is click the “-” icon, enter the amount you want to withdraw, and confirm the transaction.

How To Harvest Polycub Rewards
If you enjoy wasting time, you can harvest rewards individually from each farm/staking pool etc.
Or, you can just do things the easy way and go to the homepage on Polycub.
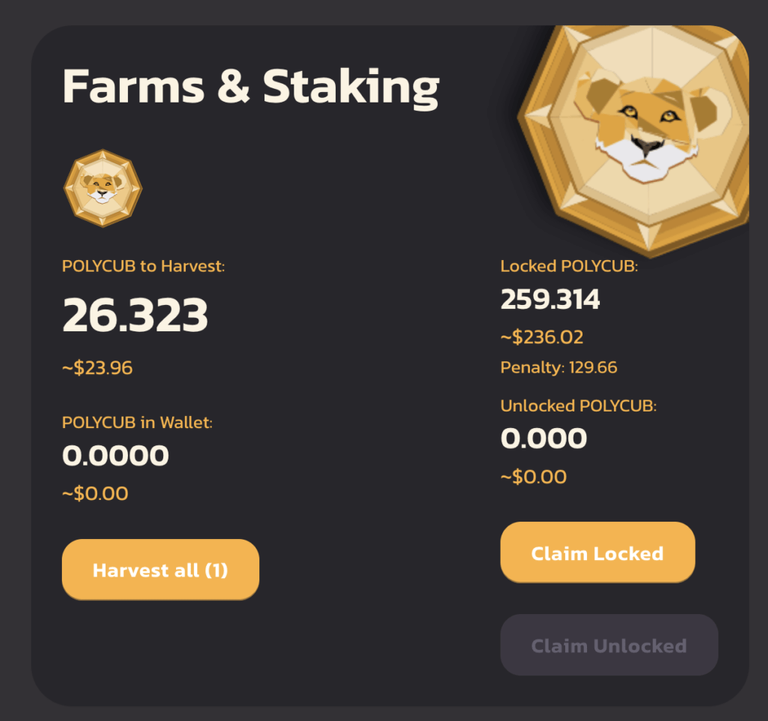
By clicking the “Harvest all” button, you can… harvest all… of your rewards.
If you have multiple pools that you’re earning from, then you will need to do multiple transactions here- 1 for each pool.
Metamask will ask you to approve these transactions, so go ahead and do that.
Claiming Your Harvested Rewards
You’ll notice that there are 2 claim buttons here- “Claim Locked” and “Claim Unlocked”.
Locked tokens are still in that “90 day penalty” phase. If you claim these, you will lose 50% of the Polycub that you claim. If you have 100 locked Polycub, then you will only get 50 by claiming.
The unlocked tokens are free to be transferrred, sold, or whatever you want to do with them. There is no penalty for claiming unlocked tokens.
These claims require a transaction of course, so you’ll need to approve them with Metamask after you click the claim button.
How To Sell Polycub
How to make the LeoFinance community hate you:
Just kidding. If you want to sell your Polycub, you can do that using Paraswap.
There’s really no need to go over this again, I already showed you how to buy Polycub. Just go read the “How To Buy Polycub” section, and instead of buying it.. sell it. It’s pretty self explanatory, you got this. I believe in you.
How To Remove Liquidity From Sushi Swap
You can view your current Sushi Swap liquidity positions by going to app.sushi.com/pool.
Note: if your LP tokens are currently locked in a farm on Polycub, then you will not see them on this page. That’s because they are not in your wallet- they are locked in a smart contract. You need to withdraw them from the farm before they will appear on this page.
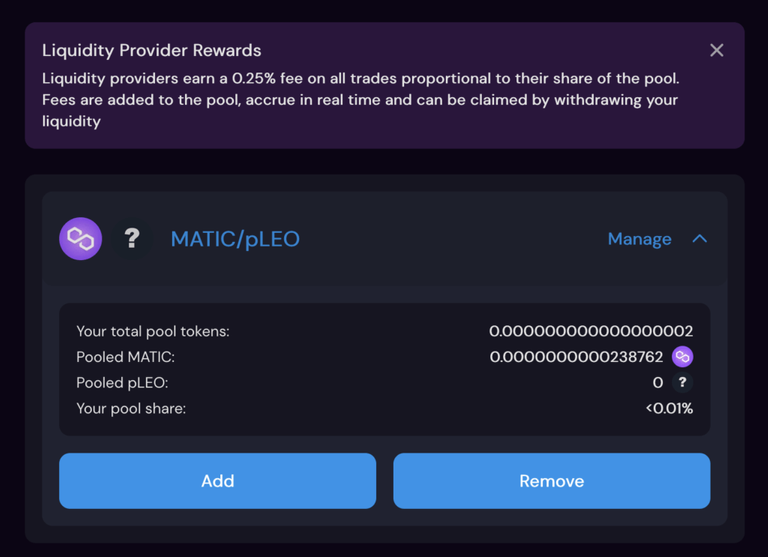
Click on the “Manage” tab for the pair that you want to remove liquidity from.
Then click the “Remove” button.
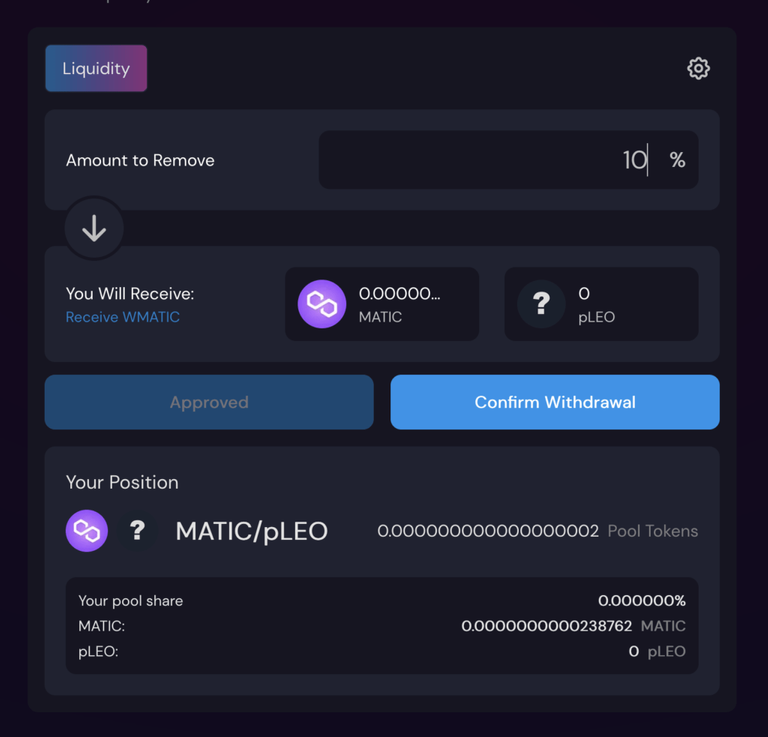
Enter the amount you want to remove. This is a percentage, so 100% means removing your entire position.
It will tell you how many of each token you will receive when you leave the liquidity pool.
Submit the “approval” transaction if necessary, and confirm it.
Then click the “Confirm Withdrawal” button and confirm that transaction is well.
Your 2 tokens will appear back in your wallet, and you can do with them as you please. Sell them, hodl them, whatever you like.
How To Remove Liquidity From PancakeSwap
You can view your current liquidity positions on PancakeSwap at pancakeswap.finance/liquidity.
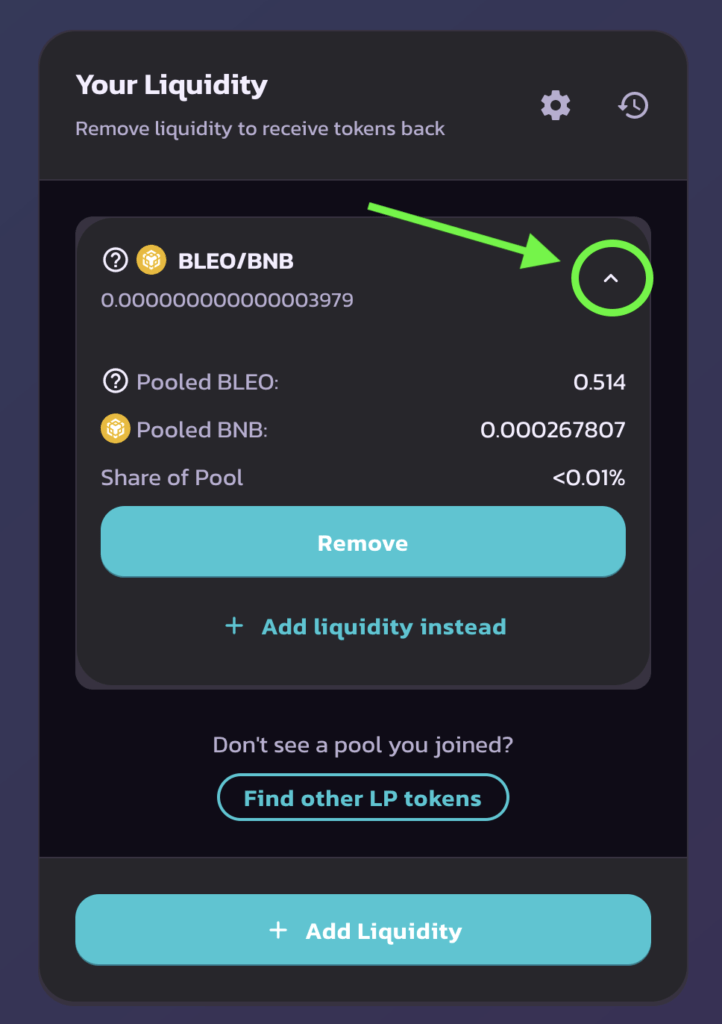
Click the little arrow to expand the menu, then click “Remove”.
Select the amount you would like to remove from your position, then click “enable” and confirm the transaction.
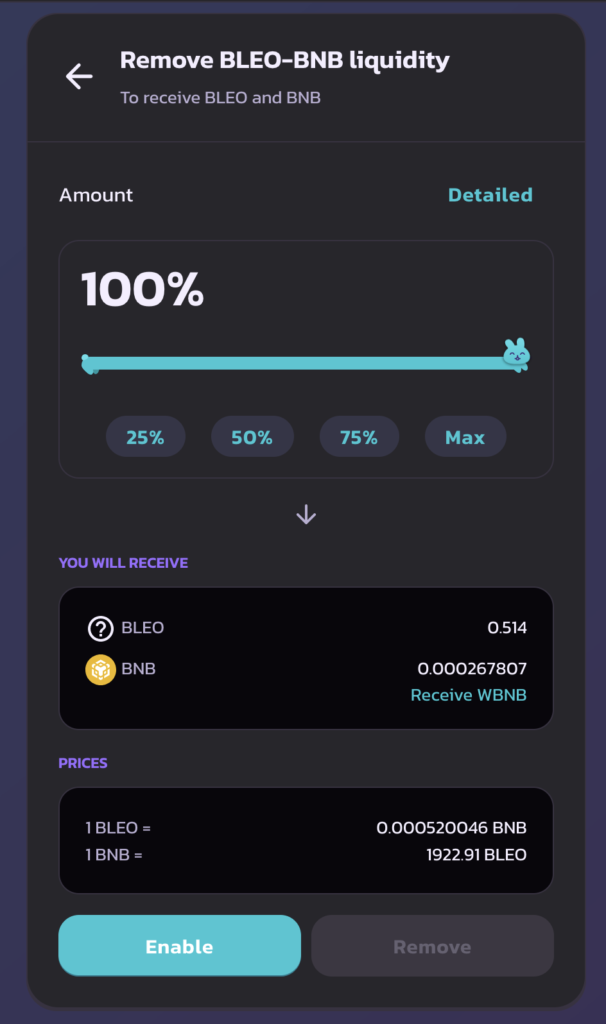
After you enable the token(s), click the Remove button and confirm that transaction as well.
Your tokens will appear back in your wallet, and you can go ahead and do what you like with them.
Future Plans For Cub Finance
Polycub was just the first test-run for this LeoFinance version of “DeFi 2.0”.
Assuming that all goes well, and the platform actually proves to be sustainable, then there are more plans for the future.
I’m just gonna drop this here… do with it as you please.

I know what I’m doing right now. Hopefully it plays out well, I guess we will see.
There’s also some other interesting stuff on the roadmap.
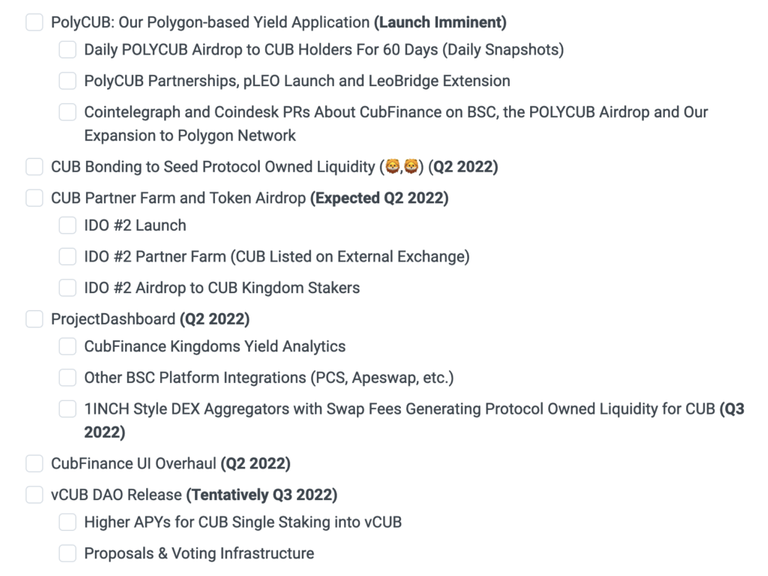
As you can see, there are some other mechanics being added to the POL feature this year.
There is also a DAO being released, a new UI on Cub Finance… so overall there’s a lot to look forward to this year.
Conclusion
That’s my review/tutorial on Polycub and Cub Finance. If you have any other questions, feel free to drop a comment on my video.
If you found this tutorial helpful, please like/subscribe/share/comment etc.
Thanks you for reading. See you guys next time, peace out.
Posted Using LeoFinance Beta


