PICTURE

Hi Hivian 🖖
Recently I took a look at the latest version of the Godot engine again and somehow asked myself how one could implement Hive API requests in GDScript (Godot's internal python like programming language). A few scripting experiments later, I was a little bit wiser about it.
I would love to share my findings from this little excursion with you.

Hallo Hivianer 🖖
Vor kurzem hab ich mir mal die aktuelle Version der Godot-Engine angeschaut und fragte mich bei der Gelegenheit, wie man Hive-API Abfragen in GDScript (der internen, Python ähnlichen Programmiersprache Godots) lösen könnte. Ein paar Scripting-Experimente später, war ich dahingehend etwas schlauer.
Meine Erkenntnisse über diese kleine Exkursion, möchte ich sehr gern mit euch teilen.


Preparations
In Godot, an application is structured almost completely using node objects.
A node represents exactly one functional aspect and this can be extended programmatically. Further functional sub-aspects can be added to a node using sub-nodes.
In this tutorial we will write a script for a node, which in turn adds another sub-node with HTTP request features to this node during runtime.
Creating a new project
In order to start the experiment, we first need a virgin Godot project, if possible. See illustration #1.
Then we need a simple user interface as the main scene. See illustration #2.
Now, let's save this scene as "ui.tscn" and set it as the main scene. The content of the editor should now be similar to that in Illustration #3.
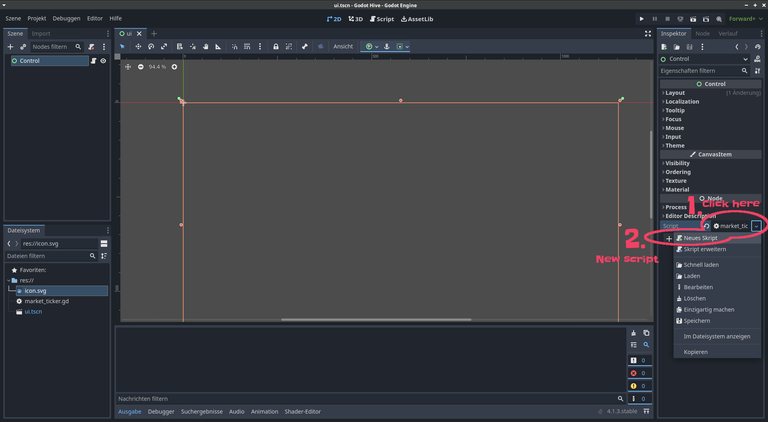
Then we need to add a new script called "market_ticker.gd" to the "Control" node. See illustration #4.
Now double-click on the script file in the file system panel to open it in the code editor.
Usually, the Godot editor creates a new script from a template, so that a few lines of code can already be found in it.
The lines below should now show up in the code editor:
extends Control


# Called when the node enters the scene tree for the first time.
func _ready():
    pass # Replace with function body.


# Called every frame. 'delta' is the elapsed time since the previous frame.
func _process(delta):
    pass
All we need is the first line ("extends Control"). Just delete the other lines.

Vorbereitungen
Eine Anwendung wird in Godot nahezu komplett mittels Knoten-Objekten strukturiert.
Ein Knoten stellt dabei genau einen funktionellen Aspekt dar und dieser kann programmatisch erweitert werden. Weitere funktionelle Unteraspekte können durch Unterknoten zu einem Knoten hinzugefügt werden.
Wir werden in diesem Tutorial ein Script für solch einen Knoten schreiben, welches wiederrum einen weiteren Unterknoten mit HTTP-Request Funktionen zu diesem Knoten, während der Laufzeit hinzufügt.
Projekt erstellen
Damit das Experiment starten kann, benötigen wir zu allererst, möglichst ein jungfräuliches Godot-Projekt. Siehe Abbildung #1.
Anschließend benötigen wir als Hauptszene eine einfache Benutzerschnittstelle. Siehe Abbildung #2.
Nun, speichere diese Szene als "ui.tscn" und setzte sie als Hauptszene. Der Inhalt des Editors sollte nun jenem in Abbildung #3 ähneln.
Alsdann fügen wir ein neues Script mit den Namen "market_ticker.gd" zum Knoten "Control" hinzu. Siehe Abbildung #4.
Doppelklicke nun auf die Script-Datei im Dateisystem-Panel, um sie im Code-Editor zu öffnen.
In der Regel erstellt der Godot-Editor ein neues Script aus einer Vorlage, so dass darin bereits ein paar Zeilen Code zu finden sind.
Diese Zeilen sollte nun im Code-Editor zu sehen sein:
extends Control


# Called when the node enters the scene tree for the first time.
func _ready():
    pass # Replace with function body.


# Called every frame. 'delta' is the elapsed time since the previous frame.
func _process(delta):
    pass
Wir benötigen darin nichts weiter als die erste Zeile ("extends Control"). Lösche die anderen Zeilen einfach.
Illustration #1 | Abbildung #1
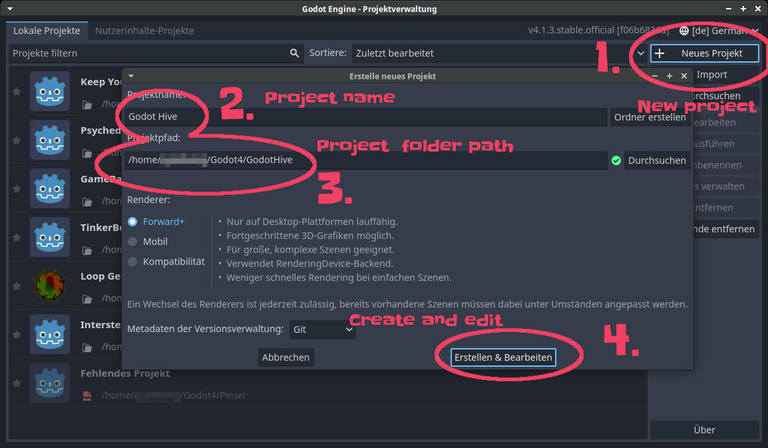
Illustration #2 | Abbildung #2
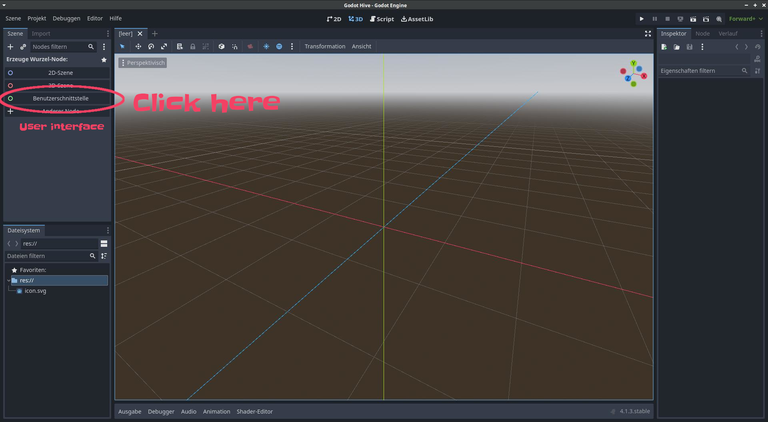
Illustration #3 | Abbildung #3
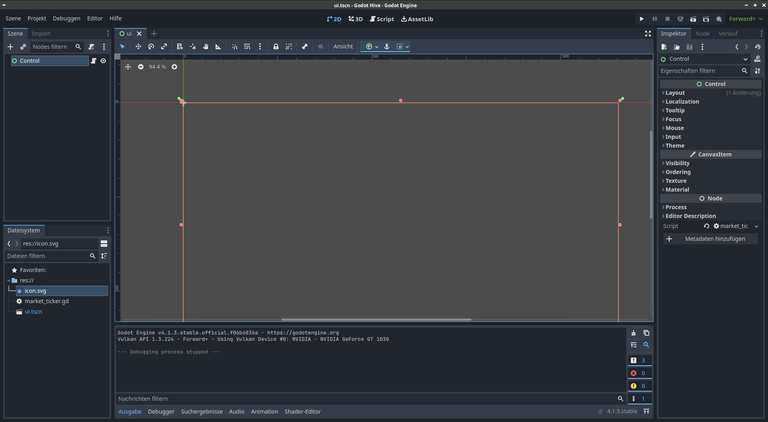
Illustration #4 | Abbildung #4

Coding
At runtime, using our new script ("market_ticker.gd"), we now let add a node of the HTTPRequest class as a child node and connect its event "request_completed" with a callback function within this script.
We do this by overwriting the _ready method of the "Control" class it inherits and creating the node object in it, then adding it to itself as a child node using the "add_child" method.
extends Control

# Creating a member variable for the
# HTTPRequest child node.
var _request: HTTPRequest

func _ready():
    # Creating a new HTTPRequest node object.
    _request = HTTPRequest.new()

    # Disable accepting gzip compressed replies.
    _request.accept_gzip = false

    # Connecting the event "request_completed" with an event handler method.
    _request.request_completed.connect(_on_http_request_request_completed)

    # Add as child node.
    add_child(_request)


func _on_http_request_request_completed(result, response_code, headers, body):
    # The event handler method for the event "request_completed".
    pass
We now can use the variable "_request" to perform HTTP requests to Hive API nodes using the HTTPRequest node. The event callback function "_on_http_request_request_completed" is called whenever the request has received a response.
An HTTP request does not always receive a usable response. For example, in the case of a server error or simply because the respective resource is no longer available on the server.
We are only interested in the usable responses that come with the HTTP status code 200. The status code of the response is available in the parameter variable "response_code".
func _on_http_request_request_completed(_result, response_code, _headers, body):

    if response_code != 200:
        print("Error %s." % response_code)
        return
In the next step, the response, which is available in the "body" parameter variable, must be translated from JSON format into a GDScript dictionary.
func _on_http_request_request_completed(_result, response_code, _headers, body):

    if response_code != 200:
        print("Error %s." % response_code)
        return

    var json = JSON.new()
    json.parse(body.get_string_from_utf8())
    var response = json.get_data()

    # Check if an error has occurred. In that case the "result" element is empty.
    if response["result"].is_empty():
        print("Response was empty.")
        return

    print(response["result"]) # Print response.
Still the script cannot send any requests. This happens in the next step.
To do this, let's create a new method called "_perform_request". This is where we will configure and send the request.
For our request, we will use the API RPC function "condenser.get_ticker" as described in https://developers.hive.io/apidefinitions/#condenser_api.get_ticker to request the ticker of the blockchain internal HBD/HIVE market.
The request must be sent as HTTP post and the details of the request need to be stored as JSON string in the data part. The "stringify" method of the JSON class can be used for this purpose.
func _perform_request():

    # See: https://developers.hive.io/apidefinitions/#condenser_api.get_ticker
    # Setting up the request body.
    var body = JSON.stringify(
        {
            "jsonrpc":"2.0",
            "method":"condenser_api.get_ticker",
            "params":[],
            "id":1
        }
    )

    # Submitting the request.
    var error = _request.request(
        "https://api.hive.blog",
        [
            "Content type: application/json"
        ],
        HTTPClient.METHOD_POST,
        body
    )

    # If an error occurs, the return value of the request method is not "OK".
    if error != OK:
        push_error("An error occurred in the HTTP request.")
As a final step, we let the "_perform_request" method be called at the end of the "_ready" method.
If we now start the application from the editor by pressing the F5 key, after a few seconds you will see something like the output below in the "Output" tab of the editor.
{
  "latest": "0.00000000000000000",
  "lowest_ask": "0.00000000000000000",
  "highest_bid": "0.00000000000000000",
  "percent_change": "0.00000000000000000",
  "hive_volume": "0.000 HIVE",
  "hbd_volume": "0.000 HIVE"
}

Programmieren
Mithilfe unseres neuen Scripts ("market_ticker.gd"), fügen wir nun zur Laufzeit einen Knoten der Klasse HTTPRequest als Kindknoten hinzu und verknüpfen dessen Ereigniss "request_completed" mit einer Rückruf-Funktion innerhalb dieses Scripts.
Das tun wir, in dem wir die _ready Methode der geerbten "Control" Klasse überschreiben und darin das Knoten-Objekt erstellen, um es dann mit der "add_child" Methode als Unterknoten sich selbst hinzuzufügen.
extends Control

# Creating a member variable for the
# HTTPRequest child node.
var _request: HTTPRequest

func _ready():
    # Creating a new HTTPRequest node object.
    _request = HTTPRequest.new()

    # Disable accepting gzip compressed replies.
    _request.accept_gzip = false

    # Connecting the event "request_completed" with an event handler method.
    _request.request_completed.connect(_on_http_request_request_completed)

    # Add as child node.
    add_child(_request)


func _on_http_request_request_completed(result, response_code, headers, body):
    # The event handler method for the event "request_completed".
    pass
Wir können nun die Variable "_request" nutzen, um mithilfe des HTTPRequest Knotens HTTP Abfragen and Hive API-Nodes durchzuführen. Die Ereignissrückruf-Funktion "_on_http_request_request_completed" wird angerufen, wenn die Abfrage eine Antwort erhielt.
Nicht immer erhält eine HTTP-Abfrage eine brauchbare Antwort. Zum Beispiel, im Falle eines Server-Fehlers oder weil die jeweilige Resource auf dem Server nicht länger abrufbar ist.
Uns interessieren nur die brauchbaren Antworten mit dem HTTP Status Code 200. Der Status Code der Antwort, liegt in der Parameter-Variable "response_code" vor.
func _on_http_request_request_completed(_result, response_code, _headers, body):

    if response_code != 200:
        print("Error %s." % response_code)
        return
Im nächsten Schritt erstellen muss die Antwort, die in der Parameter-Variable "body" vorliegt, vom JSON-Format in ein GDScript Dictionary übersetzt werden.
func _on_http_request_request_completed(_result, response_code, _headers, body):

    if response_code != 200:
        print("Error %s." % response_code)
        return

    var json = JSON.new()
    json.parse(body.get_string_from_utf8())
    var response = json.get_data()

    # Check if an error has occurred. In that case the "result" element is empty.
    if response["result"].is_empty():
        print("Response was empty.")
        return

    print(response["result"]) # Print response.
Noch immer kann das Script keine Abfragen übermitteln. Dies folgt im nächsten Schritt.
Dazu erstellen wir eine neue Methode namens "_perform_request". Hierin werden wir die Abfrage konfigurieren und absenden.
Für unsere Abfrage nutzen wir die API RPC-Funktion "condenser.get_ticker" wie in https://developers.hive.io/apidefinitions/#condenser_api.get_ticker beschrieben, um den Ticker des Blockchain internen HBD/HIVE Marktes abzufragen.
Die Anfrage muss als HTTP-Post versendet werden und im Datenteil müssen die Details der Abfrage als JSON-Zeichenkette hinterlegt sein. Hierzu kann die "stringify" Methode der JSON-Klasse verwendet werden.
func _perform_request():

    # See: https://developers.hive.io/apidefinitions/#condenser_api.get_ticker
    # Setting up the request body.
    var body = JSON.stringify(
        {
            "jsonrpc":"2.0",
            "method":"condenser_api.get_ticker",
            "params":[],
            "id":1
        }
    )

    # Submitting the request.
    var error = _request.request(
        "https://api.hive.blog",
        [
            "Content type: application/json"
        ],
        HTTPClient.METHOD_POST,
        body
    )

    # If an error occurs, the return value of the request method is not "OK".
    if error != OK:
        push_error("An error occurred in the HTTP request.")
Als letzten Schritt, lassen wir die "_perform_request" Methode am Ende der "_ready" Methode aufrufen.
Wenn wir die Applikation nun mit der Taste F5 vom Editor aus starten, solltest du nach ein paar Sekunden unter dem Reiter "Ausgabe" im Editor ungefähr folgendes vorfinden.
{
  "latest": "0.00000000000000000",
  "lowest_ask": "0.00000000000000000",
  "highest_bid": "0.00000000000000000",
  "percent_change": "0.00000000000000000",
  "hive_volume": "0.000 HIVE",
  "hbd_volume": "0.000 HIVE"
}

Complete Script
I have turned this little experiment into a slightly more exemplary application. The ticker is queried every 10 seconds and displayed as text in the application window.

Vollständiges Script
Ich habe aus dem kleinen Experiment eine etwas beispielhaftere Anwendung gemacht. Der Ticker wird alle 10 Sekungen abgefragt und als Text im Anwedungsfenster dargestellt.
class_name MarketTicker extends Control
## The market ticker is a simple UI control element that is able to
## retrieve and display data from the internal Hive/HBD market via API request.


var _text_edit: TextEdit
var _request: HTTPRequest
var _timer: Timer


# This is a template string we can use to fill in the API response data.
var _template: String = "Latest: {latest}\nLowest ask: {lowest_ask}\n" \
        + "Highest bid: {highest_bid}\nChanged: {percent_change}\nHive volume: {hive_volume}" \
        + "\nHBD volume: {hbd_volume}\n"


func _ready():

    # Setting up an UI element that we can use to display the data getting from Hive.
    _text_edit = TextEdit.new()
    _text_edit.set_anchors_preset(LayoutPreset.PRESET_FULL_RECT)
    _text_edit.editable = false
    _text_edit.text = "--- Data from Hive ---"
    add_child(_text_edit)

    # Setting up a HTTPRequet node we can use to get data from Hive.
    _request = HTTPRequest.new()
    _request.accept_gzip = false
    _request.request_completed.connect(_on_http_request_request_completed)
    add_child(_request)

    # Setting up a Timer node that triggers the Hive API request every 10 seconds.
    _timer = Timer.new()
    _timer.wait_time = 10.0 # Wait 10 seconds.
    _timer.one_shot = true
    _timer.timeout.connect(_perform_request)
    add_child(_timer)

    # Start the cycle of requesting->processing->waiting->...
    _perform_request()


func _perform_request():

    # See: https://developers.hive.io/apidefinitions/#condenser_api.get_ticker
    # Setting up the request body.
    var body = JSON.stringify(
        {
            "jsonrpc":"2.0",
            "method":"condenser_api.get_ticker",
            "params":[],
            "id":1
        }
    )

    _text_edit.text = "Loading ticker...\n"

    # Perform HTTP request to the api.hive.blog node.
    var error = _request.request(
        "https://api.hive.blog",
        [
            "Content type: application/json"
        ],
        HTTPClient.METHOD_POST,
        body
    )
    _text_edit.text += "Request submitted. Waiting for response...\n"

    # If an error occurs, the return value of the request method is not "OK".
    if error != OK:
        push_error("An error occurred in the HTTP request.")


func _on_http_request_request_completed(_result, response_code, _headers, body):

    # All except HTTP status code 200 are irrelevant for our application.
    if response_code != 200:
        _text_edit.text += "Replied with status code %s! Error!\n" % response_code

        _timer.start() # Let's give it another try in 10 seconds.
        return

    # Convert the JSON formatted response to a gdscript dictionary...
    var json = JSON.new()
    json.parse(body.get_string_from_utf8())
    var response = json.get_data()

    # Check if an error has occurred. If this is the case, the "result" element is empty.
    if response["result"].is_empty():
        _text_edit.text  += "Response was empty...\n"
        return

    # Display the content by formatting _template with the response.
    _text_edit.text += _template.format(
            response["result"]
        )

    _timer.start() # Let's wait 10 seconds for an update.

Practicality
Godot and GDScript may not be suitable for every type of application. Nevertheless, I can immediately think of a whole range of possible uses for Hive requests in a typical Godot application.
For example, to store and query game scores on the blockchain.
Or use it to develop graphical front-ends for post/comment-based games.
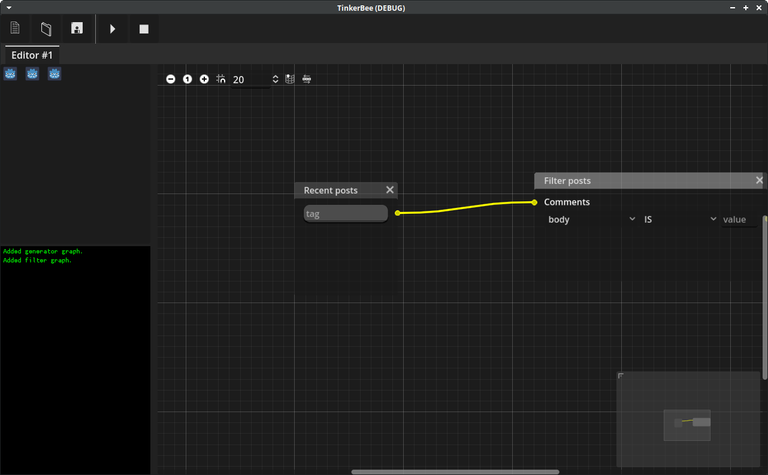
My own experiment with this topic in Godot went a little further.
A few hours later, I had built this nice (not yet finished) graph-based Hive bot editor.

Praxistauglichkeit
Nicht für jede Art Anwendung, mögen Godot und GDScript geeignet sein. Dennoch fallen mir auf anhieb eine ganze Reihe Anwendungsmöglichkeiten ein, wozu man Hive-Anfragen in einer typischen Godot-Anwendungen nutzen könnte.
Zum Beispiel zum Speichern und Abfragen von Spiel-Punkteständen auf der Blockchain.
Oder man könnte es verwenden, um grafische Frontends für post- und kommentargestützte Spiele zu entwickeln.
Mein eigenes Experiment mit diesem Thema in Godot, ging noch etwas weiter.
Ein paar Stunden später, hatte ich mir diesen beschaulichen (noch nicht fertigen), auf Graphen basierenden Hive-Bot Editor gebastelt.
Thanks for stopping by. | Danke fürs Reinschauen. 👋🙂
Best regards | Viele Grüße
QuantumG
╭━━━━━━━━━━━━━━━━━╮
╭━⋞ ☙ My NFT artworks ⋟━╮
╭━⋞ ֎ My LMAC collages and LIL posts ⋟━━╮
╰━━━━━━━━━⋞ 👽 My Alien Art ⋟━━━━━━━━━╯
╰━━━━━━━━━━━━━━━━━━╯
