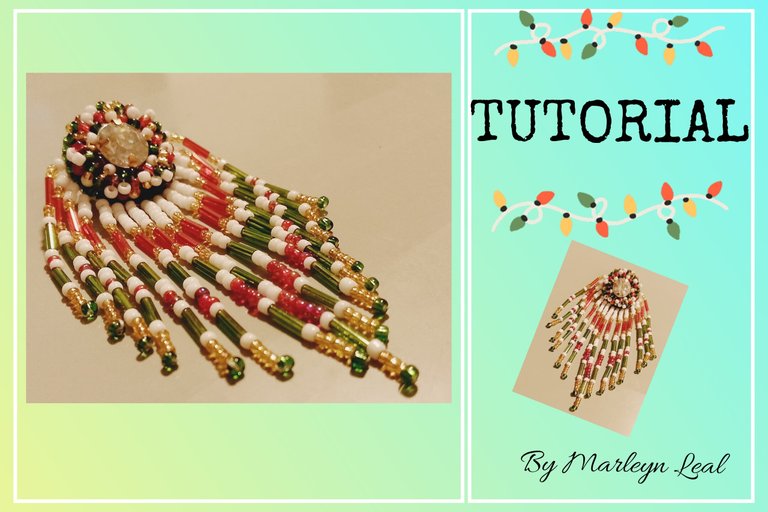
Feliz y bendecido día, espero se encuentren muy bien, llenos de buena energía, brillando, creciendo y sobre todo siendo cada día su mejor versión, el día de hoy les he realizado unos zarcillos en base a la temporada navideña este es un momento perfecto para expresar nuestra creatividad y estilo personal a través de la joyería. En este tutorial, te mostrare cómo hacer unos hermosos zarcillos inspirados en los colores tradicionales de la Navidad: rojo, verde y dorado, aunque yo agregue también blanco. Estos zarcillos serán un complemento festivo ideal para cualquier outfit navideño, aunque seré honesta el resultado final no me gusta mucho, no se no me parece navideño, se me parece a la bandera de Mexico, Aunque yo solo te muestro como hacerlo cada quien puede elegir los colores que mas representen tu personalidad que de seguro les quedara genial.
Happy and blessed day, I hope you are very well, full of good energy, shining, growing and above all being every day your best version, today I have made some tendrils based on the Christmas season, this is a perfect time to express our creativity and personal style through jewelry. In this tutorial, I will show you how to make beautiful earrings inspired by the traditional colors of Christmas: red, green and gold, although I also added white. These earrings will be an ideal festive complement to any Christmas outfit, although I'll be honest I don't really like the final result, I don't think it looks Christmasy, it looks like the Mexican flag, although I just show you how to do it, everyone can choose the colors that best represent your personality that will surely look great.
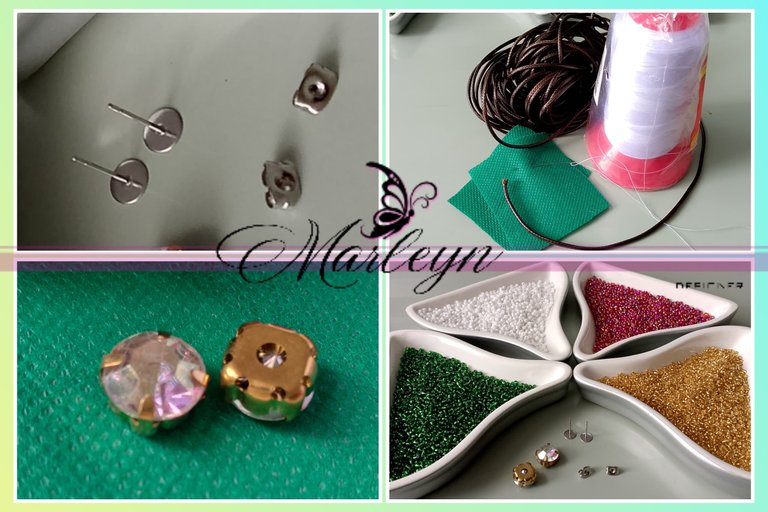
Antes de comenzar, estos son los materiales necesarios:
Bases para zarcillos planos con su tapita, Hilo o cordón grueso yo utilizo piel de serpiente de 2 milímetros de grosor, aplique engastado redondo de 0.8 milímetro de diámetro, mostacillas colores dorado, rojo, blanco y verde, Aguja e Hilo, Tela fina o tela POP para la base, Cuero o tela gruesa, hilo nailon transparente 0,20 milímetros, Tijera, encendedor.
Before we begin, these are the materials needed:
Bases for flat tendrils with its cap, Thick thread or cord I use snakeskin 2 millimeters thick, round crimped applique 0.8 millimeter in diameter, beads colors gold, red, white and green, Needle and thread, Thin fabric or POP fabric for the base, Leather or thick fabric, transparent nylon thread 0.20 millimeters, Scissors, lighter.
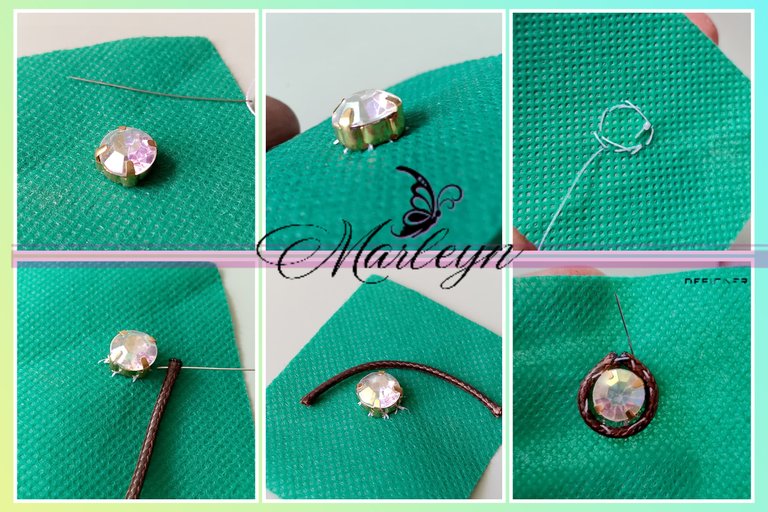
PASO 1: Vamos a comenzar insertando el hilo en la aguja con un largo de aproximadamente 50 centímetros, si ya eres experto cociendo deja un metro aproximadamente, en la tela POP vamos a cocer el aplique engastado, en la parte de atrás en el engaste tiene unos huecos por donde puedes introducir la aguja varias veces para asegurar la pieza, realiza un amarre en la parte de atrás como si fueras a cortar el hilo pero no lo cortes, pasa la aguja hacia arriba y ahora vamos a coser el hilo grueso, primero mide para formar un circulo alrededor del aplique, corta, quema las puntas del hilo grueso y ahora comienza a cocerlo con calma que quede redondo al finalizar nuevamente realiza un nudo el la parte de atrás como si fuéramos a cortar el hilo pero no lo cortes esto se realiza porque si se te enreda o se revienta o se acaba el hilo por alguna razón no se dañe todo el trabajo que hemos realizado ya que lo hemos estado asegurando desde el principio.
STEP 1: Let's start by inserting the thread in the needle with a length of approximately 50 centimeters, if you are already an expert in cooking leave about a meter, in the fabric POP we will cook the applique crimped, in the back in the crimping has some holes where you can insert the needle several times to secure the piece, makes a tie in the back as if you were going to cut the thread but do not cut it, pass the needle up and now we will sew the thick thread, first measure to form a circle around the applique, cut, burn the ends of the thick thread and now start to sew it calmly so that it is rounded at the end again tie a knot in the back as if we were going to cut the thread but do not cut it, this is done because if it gets tangled or bursts or the thread runs out for some reason it will not damage all the work we have done since we have been securing it from the beginning.

PASO 2: Vamos a seleccionar el patrón de los colores que vamos a utilizar, de 4 en 4 mostacillas yo inventando a ver que salía lo hice de esta manera que te muestro en la primera imagen aunque tu puedes hacerlo como mas te guste la idea es que aprendas la técnica, vamos a introducir la aguja de abajo hacia arriba pasando por un lado del hilo grueso, introduce las 4 mostacillas en la aguja y te regresas por el otro lado del hilo grueso como te muestro en la imagen 4, ahora esto es un proceso repetitivo hasta llegar nuevamente donde empezamos. Recuerda al terminar o cuando lleves una parte considerable sabes es mejor ir por lo seguro.
STEP 2: We are going to select the pattern of the colors that we are going to use, 4 by 4 beads I invented to see what came out I did it this way that I show you in the first image although you can do it as you like the idea is that you learn the technique, we are going to introduce the needle from bottom to top passing through one side of the thick thread, introduce the 4 beads in the needle and you return on the other side of the thick thread as I show you in the image 4, now this is a repetitive process until you get back to where we started. Remember when you finish or when you have a considerable part you know it is better to play it safe.

PASO 3: Cuando termines el proceso anterior te quedara de esta manera, se ve realmente hermoso si te gustan los aretes pequeños este es perfecto, puedes dejarlo así y no colocarle los flecos, si te gustan mas largos continuamos el proceso. Debemos tener cuidado, vamos a tomar una tijera y cortamos la tela sin cortar los hilos de atrás, quedara como te muestro en la ultima foto.
STEP 3: When you finish the previous process it will look like this, it looks really beautiful if you like small earrings this is perfect, you can leave it like this and not put the bangs, if you like them longer we continue the process. We must be careful, we will take a scissors and cut the fabric without cutting the back threads, it will look like I show you in the last picture.

PASO 4: Coloca un poco de silicon liquido en la parte de atrás de la pieza que acabamos de fabricar, y pega en el centro la base del zarcillo plano, déjalo secar un rato, ahora corta un trozo de cuero o tela gruesa y la pegaremos atrás con un poco mas de silicon liquido, atravesando el cuero con la base del zarcillo como te muestro en la imagen, deja secar un poco y corta el cuero sobrante con cuidado que quede redondo sin cortar los hilos de abajo.
STEP 4: Put some liquid silicone on the back of the piece we just made, and glue in the center the base of the flat tendril, let it dry for a while, now cut a piece of leather or thick fabric and glue it back with a little more liquid silicone, crossing the leather with the base of the tendril as I show you in the picture, let it dry a little and cut the excess leather carefully so that it is round without cutting the threads below.
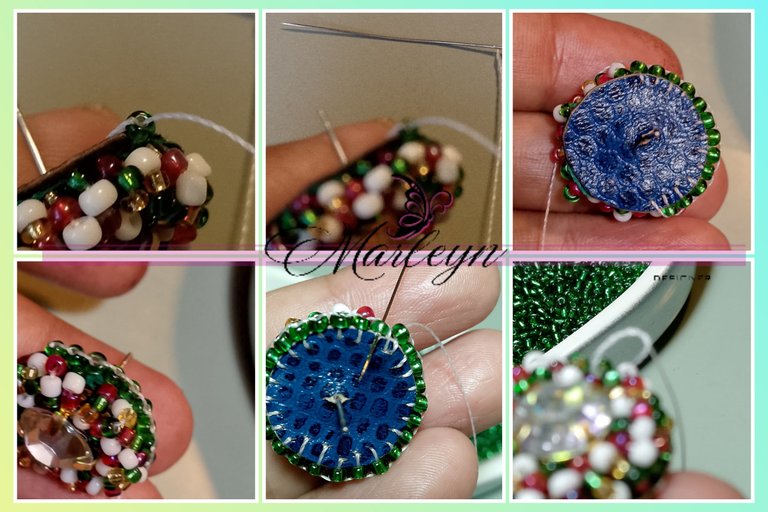
PASO 5: Vamos a bordar la orilla del zarcillo para darle un acabado genial, se ve complicado pero es realmente facil ya que todo es repetitivo, este paso yo lo realice con hilo blanco para que puedas ver las puntadas pero realmente debes hacerlo con nailon transparente de 0.20 milímetros. Comenzamos, pasa la aguja por atrás del cuero hacia afuera, de manera que si lo cortaste el hilo el nudo quede por la parte de abajo del zarcillo todo es estética, ahora introduce una mostacilla yo elegí el color verde pero tu puedes colocar el tono que mas te guste, ahora pasamos la aguja por la la orilla desde adelante nuevamente hacia atrás, ahora sube la aguja por la mostacilla y nuevamente introduce una mostacilla en la aguja, pasa la aguja por la parte de adelante del zarcillo traspasando el cuero hacia atrás y nuevamente sube la aguja por la mostacilla, así consecutivamente hasta que llegues a donde empezamos, allí subirás la aguja por la primera mostacilla que colocaste y la bajaras por la siguiente haces un nudo escondido y pasamos la aguja nuevamente por varias mostacillas para ocultar el nudo. Si te queda mucho hulo no lo cortes si te queda poco hilo es mejor cortar y nuevamente enhebrar la aguja.
STEP 5: Let's embroider the edge of the tendril to give it a great finish, it looks complicated but it is really easy because everything is repetitive, this step I did it with white thread so you can see the stitches but really you should do it with transparent nylon of 0.20 millimeters. We begin, pass the needle through the back of the leather outwards, so that if you cut the thread the knot is at the bottom of the tendril everything is aesthetic, now introduce a bead I chose the green color but you can place the tone that you like, now pass the needle through the edge from front to back again, now go up the needle through the bead and again introduce a bead in the needle, pass the needle through the front part of the tendril passing through the leather backwards and again raise the needle through the bead, so consecutively until you get to where we started, there you will raise the needle through the first bead you placed and lower it through the next one, make a hidden knot and pass the needle again through several beads to hide the knot. If you have a lot of yarn left do not cut it, if you have little yarn left it is better to cut it and thread the needle again.
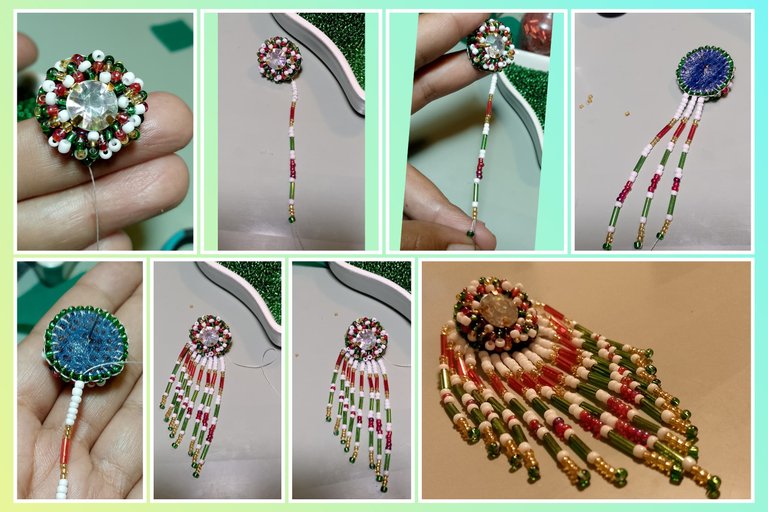
PASO 6: Para finalizar nuestra pieza vamos a sacar la aguja por una de las mostacillas verdes que bordaste en el paso anterior, esa mostacilla será nuestro centro, introduce el patrón que sea de tu gusto y tan largo como desees, ahora deja una mostacilla por fuera y regresa la aguja por entre todas las mostacillas que introducimos hasta llegar nuevamente a la mostacilla verde principal, vuelve a pasar la aguja por la misma mostacilla verde y ahora la sacaremos por la mostacilla verde que tiene a un lado, esta vez vamos a realizar el mismo patrón pero disminuye dos mostacillas del color que colocaste arriba, el mío fue el color blanco, realiza el mismo proceso y cada vez que introduzcas una tira reduce dos mostacillas tantas tiras como desees recuerda que esa es una mitad, luego vamos a colocarnos nuevamente en la mitad pasando la aguja por el zarcillo entre las mostacillas y haremos la otra mitad de nuestras tiras quedara como te muestro en la ultima imagen puedes colocar tantas tiras desees siempre reduciendo las mostacillas del color de arriba para darle ese toque de degradado visual que queda genial, espero te motives a realizar esta pieza de tantos colores como desees, de seguro unicolor se ve mejor! Gracias ante todo por el apoyo y por leerme.
STEP 6: To finish our piece we are going to take the needle out through one of the green beads that you embroidered in the previous step, that bead will be our center, introduce the pattern that is to your liking and as long as you want, now leave a bead on the outside and return the needle through all the beads that we introduced until you reach the main green bead again, pass the needle again through the same green bead and now we will take it out through the green bead on the side, this time we are going to make the same pattern but decreases two beads of the color that you placed above, mine was the white color, do the same process and every time you introduce a strip reduce two beads as many strips as you want, remember that this is one half, then we will place again in half passing the needle through the tendril between the beads and make the other half of our strips will be as I show you in the last picture you can place as many strips as you want always reducing the beads of the color above to give that touch of visual gradient that looks great, I hope you are motivated to make this piece of as many colors as you want, for sure unicolor looks better! Thank you for your support and for reading me.


IMAGENES CREADAS EN CANVA
IMAGES CREATED IN CANVA


