Hello community:
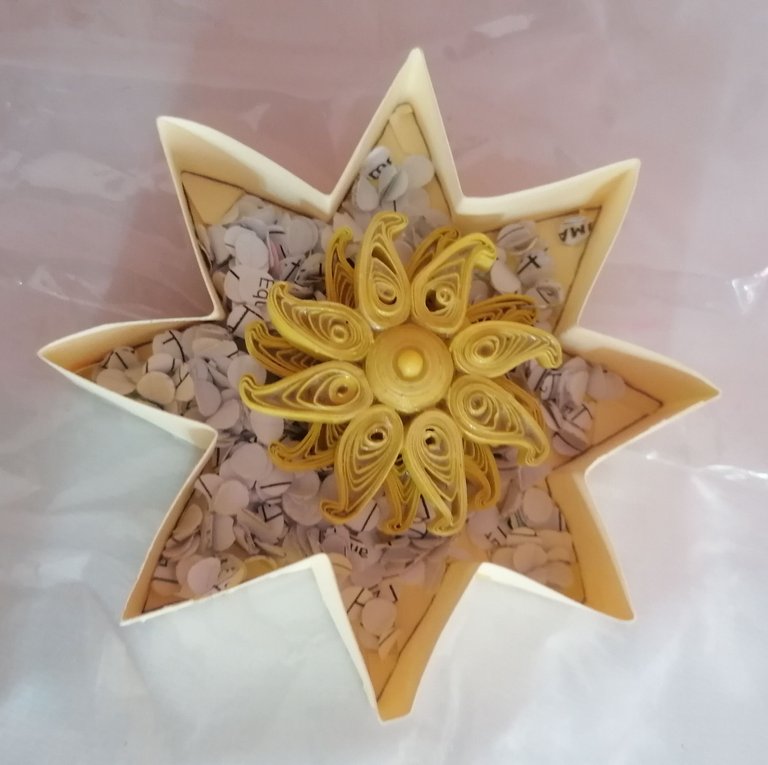
Today I want to share with you a craft based on the quilling technique: a sun in the shape of a pendant for a chain or necklace. I made it with a lot of love, inspired by all the lessons from the publications of a person I love very much and the final result is addressed to her mum.
It is not enough to dream, you also need to put interest and move your energies in order to achieve something you want. Nor is it enough to complain or wait for something that we want so much to come to us.
If we really want to achieve something, we must trust in our inner strength and start taking steps to make it possible. Not giving up in the face of difficulties makes us stronger and prepares us to face the future.
I happened to me that as I like crafts so much I got to know the quilling technique here at Hive and it always seemed attractive to me, but I didn't have the material resources or tools to try to practice it.
But my desire was so great that one day a force came out of me and I told myself that I was going to make it, even though I didn't have a strategy in place:
I arrived at work, talked to the carpenter and told him that I wanted a quilling needle, I explained how to make it and in less than five minutes (literally) I had it in my hands. I also told him I needed some white glue (acetate) and he kindly gave me some of his.
During that day I had a meeting and a colleague was carrying a yellow cardboard file, which caught my attention and I exchanged it for another one I had.
I already had the complement to make the sun that I had dreamed of in my mind, so I set about creating.
Hola comunidad:
Hoy quiero compartir con ustedes una manualidad basada en la técnica de quilling: un sol en forma de dije para cadena o collar. Lo realicé con mucho cariño, inspirada en todas las lecciones de las publicaciones de una persona a quien estimo mucho y el resultado final va dirigido a su mamá.
No basta con soñar, también se necesita poner interés y mover las energías en función de alcanzar algo deseado. Tampoco vale quejarse o esperar a que de alguna manera nos llegue eso que tanto queremos.
Si realmente anhelamos obtener un logro, debemos confiar en nuestra fortaleza interior y comenzar a dar pasos para hacerlo posible. No rendirnos ante las dificultades nos hace más fuertes y nos prepara para afrontar el futuro.
Sucedió conmigo que como me gustan tanto las manualidades conocí la técnica de quilling aquí en Hive y siempre me pareció atractiva, pero no contaba con los recursos materiales ni herramientas para intentar practicarlo.
Pero fue tan grande mi deseo que un día salió una fuerza dentro de mí y me dije que yo lo iba a lograr aunque no tenía una estrategia trazada:
Llegué a mi trabajo, hablé con el carpintero y le dije que quería una aguja para quilling, le expliqué cómo hacerla y en menos de cinco minutos (literalmente) ya la tenía en mis manos. También le comenté que necesitaba un poco de cola blanca (acetato) y amablemente me brindó de la suya.
Durante ese día tuve una reunión y una compañera portaba un file de cartulina amarillo, lo cual me llamó mucha la atención y se lo cambié por otro que yo tenía.
Ya tenía el complemento para realizar el sol que había soñado en mi mente, así que me dispuse a crear.
For this I used the following resources:
Materials and tools:
- Quilling needle.
- Cutter
- Millimetre ruler
- Yellow cardboard
- White glue (acetate)
- Brush
- Fine-tipped tweezers
- Yellow plastic bead
- A medium metal ring
Process:
The idea was to create a first layer with a central circle and eight rays coming out of it. In a second overlapping layer repeat the process with the rays displaced from the previous ones.
Para ello empleé los siguientes recursos:
Materiales y herramientas:
- Aguja para quilling.
- Cutter
- Regla milimetrada
- Cartulina amarilla
- Cola blanca (acetato)
- Pincel
- Pinza de punta fina
- Una perlita plástica amarilla
- Una argolla metálica mediana
Proceso:
La idea era en una primera capa crear un círculo central y ocho rayos que salieran de él. En una segunda capa superpuesta repetir el proceso con los rayos desplazados de los anteriores.
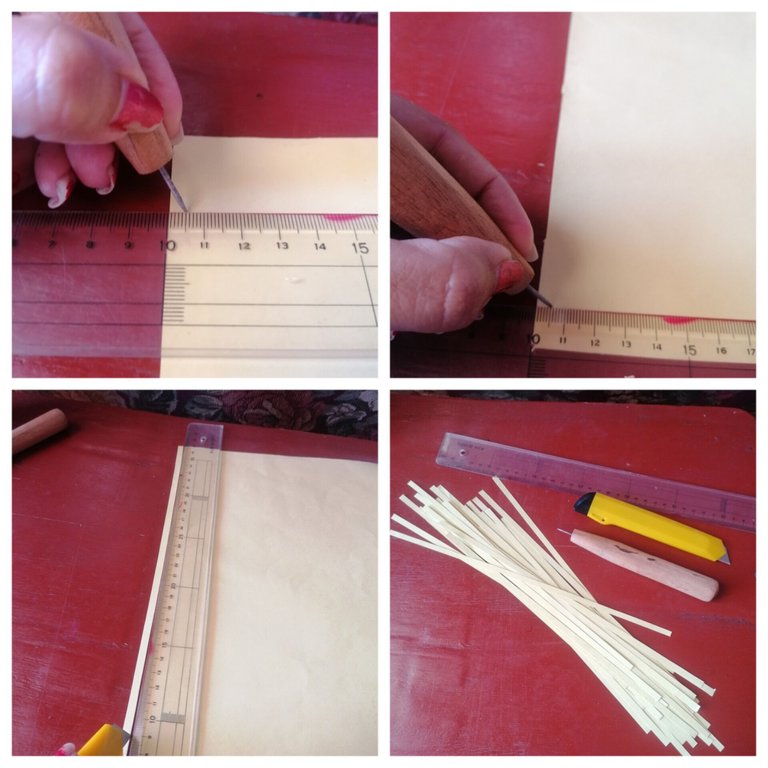
On a flat surface I placed the cardboard and made lists five centimetres wide and along the entire length of the piece (29.5 centimetres).
Sobre una superficie plana coloqué la cartulina y realicé listas de cinco centímetros de ancho y a todo lo largo de la pieza (29.5 centímetros).
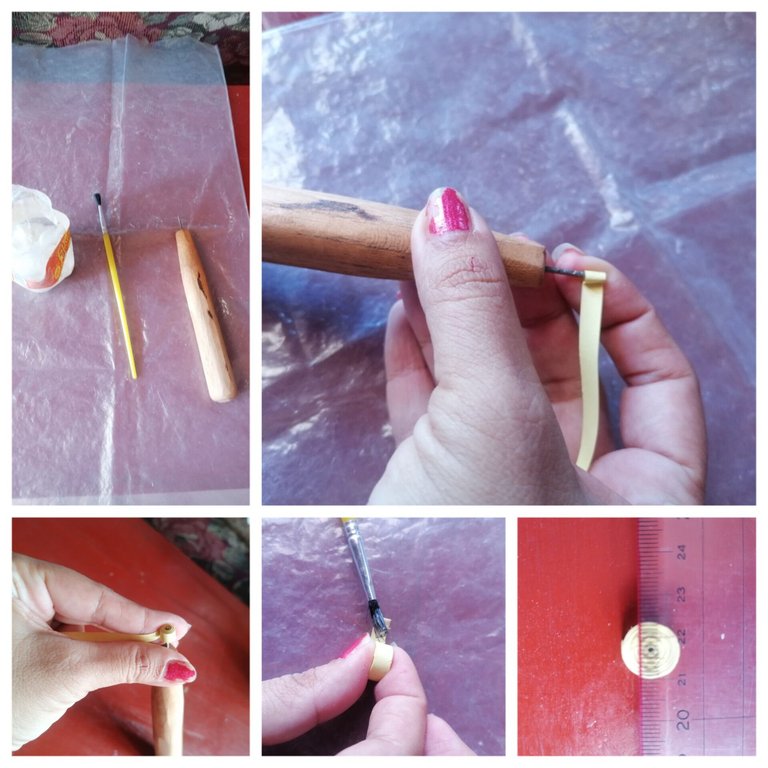
For the centres
I took a strip of ribbon and wrapped it completely around the quilling needle, but I found it too small and attached another complete strip to which I applied glue to fix it and keep the circle closed. In this way I achieved a diameter of 14 centimetres. I made two copies like this one and set them aside.
Para los centros
Tomé una cinta y la enrollé totalmente en la aguja para quilling, pero me pareció muy pequeño y le adosé otra tira completa a la cual apliqué pegamento para fijarla y mantener el círculo cerrado. De esta forma logré un diámetro de 14 centímetros. Realicé dos ejemplares como este y reservé.
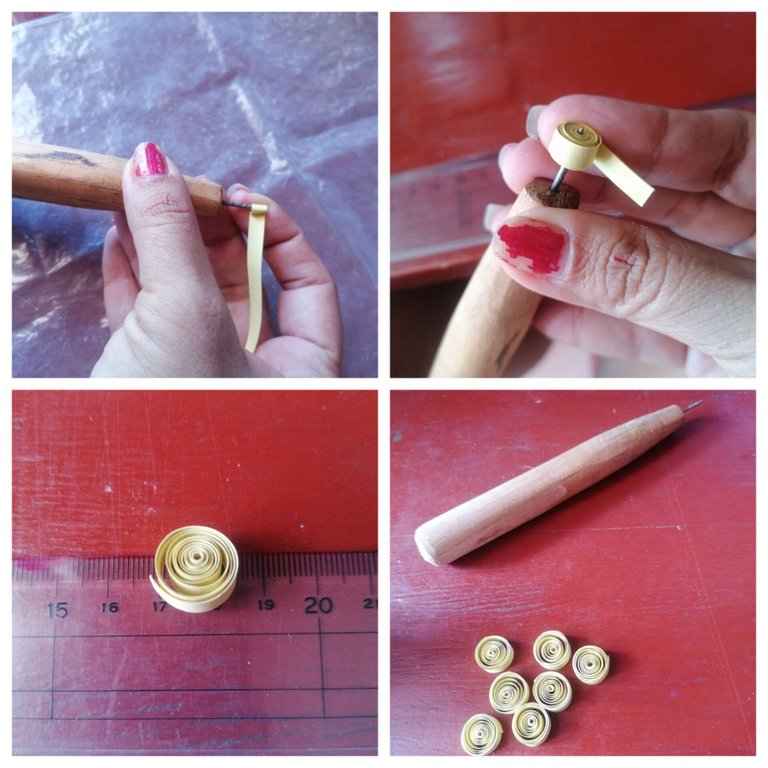
For the lightning bolts
I took a strip and rolled it onto the needle in its entirety, then placed it on the ruler, let the loose circle expand to a diameter of 14 centimetres and then fixed the end with glue. I made 16 copies like this one.
Para los rayos
Tomé una tira y enrollé en la aguja en su totalidad, luego coloqué sobre la regla, dejé que se ampliara el círculo suelto hasta obtener un diámetro de 14 centímetros y luego fijé el final con el pegamento. Realicé 16 ejemplares como este.
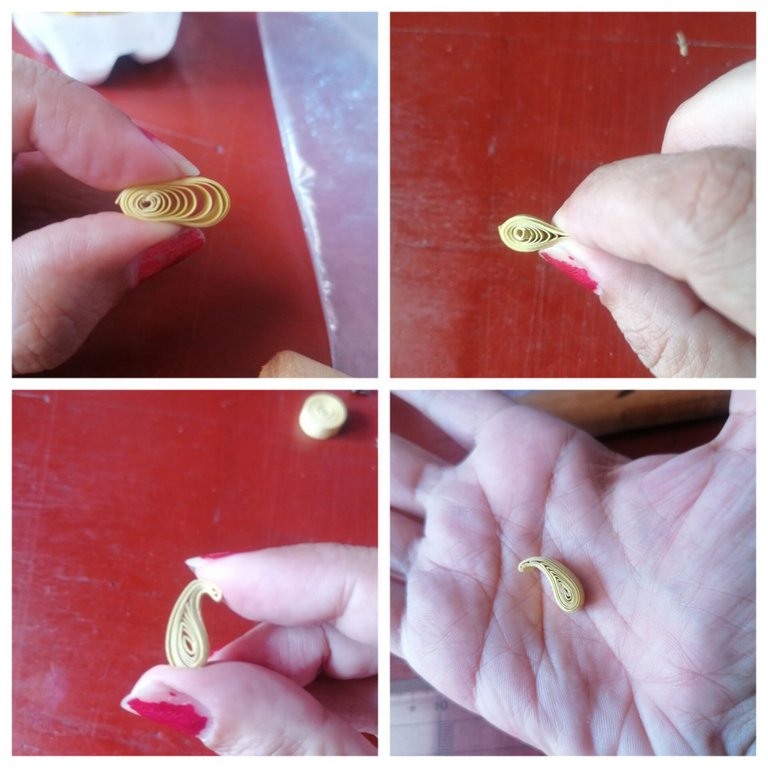
I held the circle at one point with two fingers and moved the centre towards that point and squeezed it. At the other end I also squeezed it and tilted the tip to the right so that the rays would have movement. This was the process of the 16 rays.
Sujeté el círculo por un punto con dos dedos y desplazando el centro hacia ese punto lo apreté. Por el otro extremo también lo apreté y la punta la incliné hacia la derecha para que los rayos tuvieran movimiento. Este fue el proceso de los 16 rayos.
It's time to splice!
The first layer:
I took a beam and applying the glue in the contact area, placed it glued to the circle. The next beam I placed was in the opposite direction to the first one. Then I placed another ray perpendicular to these and its opposite. Finally I covered the remaining spaces. I applied glue to reinforce these joints and let them dry.
Llegó la hora de empalmar
La primera capa:
Tomé un rayo y aplicando el pegamento en la zona de contacto, lo coloqué pegado al círculo. El próximo rayo que coloqué fue en dirección opuesta al primero. Luego coloqué otro rayo perpendicular a estos y su opuesto. Para finalizar cubrí los espacios restantes. Apliqué pegamento para reforzar estas uniones y dejé secar.
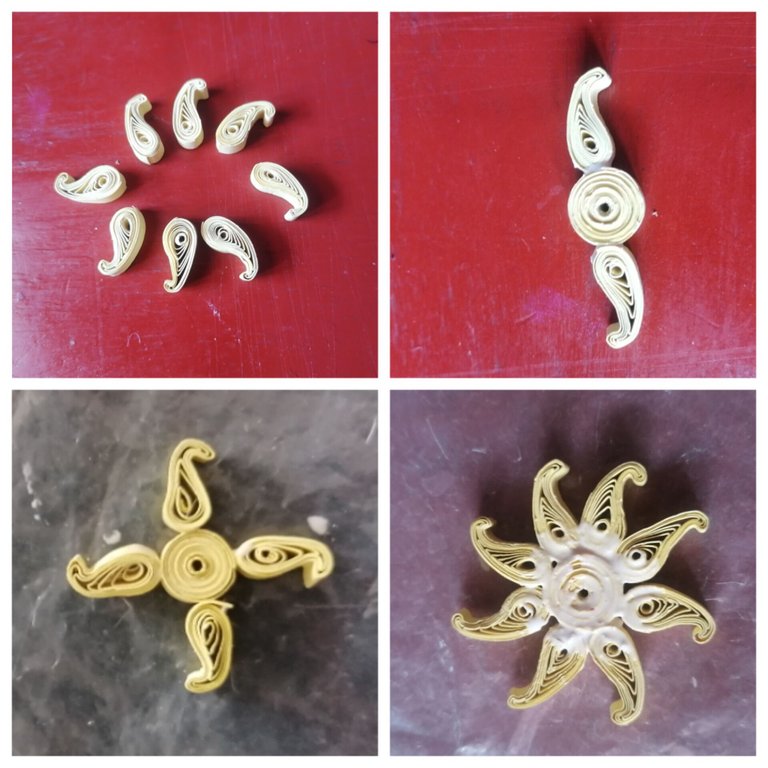
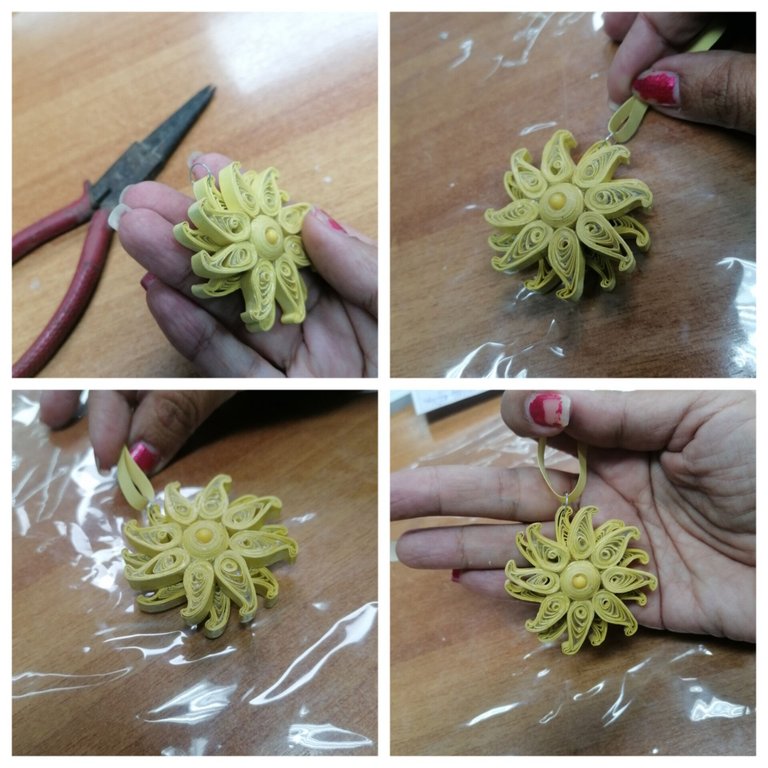
The second layer:
Taking the circle for the centre and with the help of the end of the brush, I pulled out its centre a little and placed it over the centre of the first layer. Then I arranged the rays in the same way as the previous layer, but shifted them to cover empty spaces. I applied glue to secure all the joints and make the piece strong. I placed the yellow bead by pressing it a little bit inwards and applied another layer of glue to reinforce it.
La segunda capa:
Tomando el círculo para centro y con la ayuda del cabo del pincel, saqué un poco su centro y lo coloqué sobre el centro de la primera capa. Luego dispuse los rayos de la misma manera que la capa anterior, pero desplazados para ir cubriendo espacios vacíos. Apliqué pegamento para asegurar todas las uniones y lograr resistencia de la pieza. Coloqué la perlita amarilla haciendo un poco de presión hacia adentro y volví a aplicar otra capa de pegamento para reforzar.
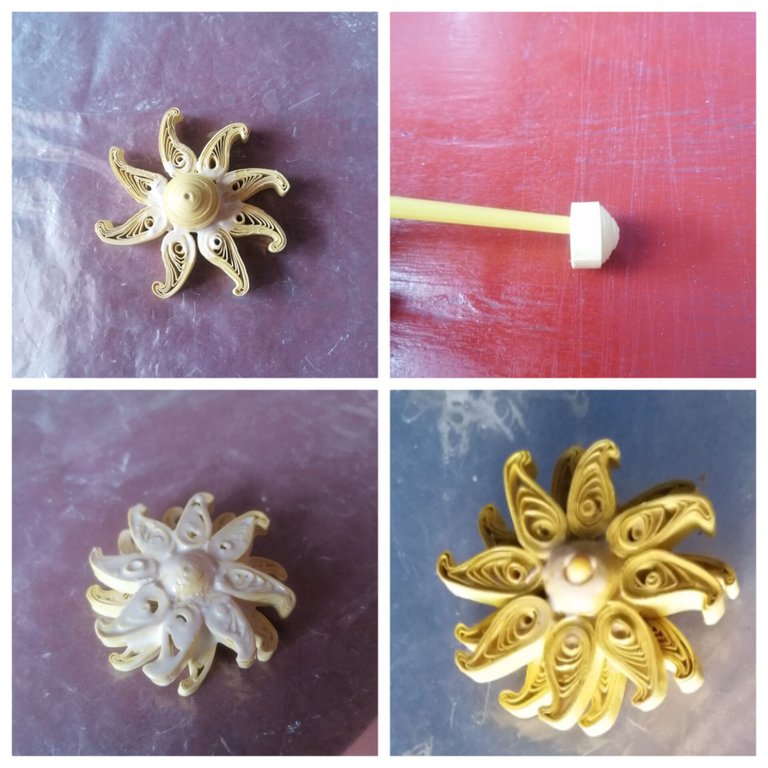
After the piece was completely dry, I attached the ring to one of the spokes and the sun charm was ready to be hung on a chain or necklace.
Después que estuvo seca la pieza completamente, le coloqué la argolla en uno de los rayos y quedó listo el dije de sol para ser colgar de una cadena o collar.
Since the beginning of this month's initiative I wanted to do this work, but unfortunately I didn't have the opportunity to finish it in time.
I hope you like my presentation, especially because it is made with a lot of love and dedicated to that inner strength that each one of us has and which we use to move forward and advance.
I hope that at some point I can get to Canada with this piece (since that is where the person to whom it is dedicated lives, but I think that with the strength of desire and the determination that characterises me, I will manage to make it possible.
Thank you very much for your reading time.
Desde que inició la iniciativa de este mes quería hacer este trabajo, pero desafortunadamente no tuve oportunidad de terminarlo a tiempo.
Espero que les guste mi presentación, sobre todo porque está hecha con mucho cariño y dedicada a esa fuerza interna que cada uno de nosotros tenemos y de la cual hacemos uso para salir adelante y avanzar.
Deseo que en algún momento pueda llegar a Canadá esta pieza (ya que es allá donde vive la persona a quien está dedicada, pero pienso que con la fuerza del deseo y el empeño que me caracteriza, ya me las arreglaré para hacerlo posible.
Muchas gracias por su tiempo de lectura.

Own content, translated into English by / Contenido propio, traducido al inglés por DeepL.
Images edited in InShot / Imágenes editadas en InShot
Twitter: @ylaffittep
Facebook: @ylaffittep