Introducción:
Antes que nada cordiales saludos, estoy realizando este post, ya que varias personas han comentado en la comunidad de Mundo Virtual en el Dicord la necesidad de cambiar las claves de Hive. También se ha dado el caso, de que muchos de ellos han tenido temor de hacer el proceso, ya que muchos son usuarios nuevos y lo hemos tenido que acompañar paso a paso, razón por la cual decidí hacer este post explicando paso a paso como se hace el cambio de claves.
First of all cordial greetings, I am making this post, since several people have commented in the Virtual World community in Dicord the need to change the Hive keys. It has also been the case that many of them have been afraid to do the process, since many of them are new users and we have had to accompany them step by step, which is why I decided to make this post explaining step by step how to change the passwords.
Lo primero que debemos tomar en cuenta y que es lo que dicen todos los tutoriales, es que para poder hacer el cambio de claves, debemos tener un respaldo de nuestras claves originales, debido a que si no tenemos la Owner Key o llame de dueño o maestra, no podremos realizar el proceso.
The first thing we must take into account and that is what all the tutorials say, is that in order to make the change of keys, we must have a backup of our original keys, because if we do not have the Owner Key or call owner or master, we will not be able to perform the process.
Así que lo primero que debemos tener en cuenta, es que una vez que se cambien las claves, lo primero que debemos hacer, es el respaldo de las claves que nos da la plataforma, ya que de perder las mismas perderemos nuestras cuentas y todo lo que hay en ella.
So the first thing to keep in mind is that once the passwords are changed, the first thing to do is to back up the passwords provided by the platform, because if we lose them we will lose our accounts and everything in them.
El último caso, que se presentó en el Discord, fue el de una compañera que perdió o se le olvidó la contraseña de la Keychain, y pensó que había perdido, todos sus tokens e ingresos, ella le pasó las claves a un amigo que le recuperó la cuenta y este le dijo después que debía cambiar las claves.
The last case, which was presented in the Discord, was that of a colleague who lost or forgot the password of the Keychain, and thought she had lost, all her tokens and income, she passed the keys to a friend who recovered the account and this one told her later that she should change the keys.
Para hacer el tutorial completo, enseñaré como cambiar las claves de Hive y como colocarlas en la Hive Keychain, esperando que este paso a paso cubra el proceso completo de lo expuesto, por los compañeros del chat, ya que así como ellos, debe haber muchas personas en la misma situación, por eso espero que este tutorial, sea de utilidad para las personas que lo necesiten.
To make the tutorial complete, I will show how to change the Hive keys and how to place them in the Hive Keychain, hoping that this step by step covers the complete process of what was exposed, by the chat partners, because as well as them, there must be many people in the same situation, so I hope that this tutorial, will be useful for people who need it.
Inicio del paso a paso / Start of the step by step:
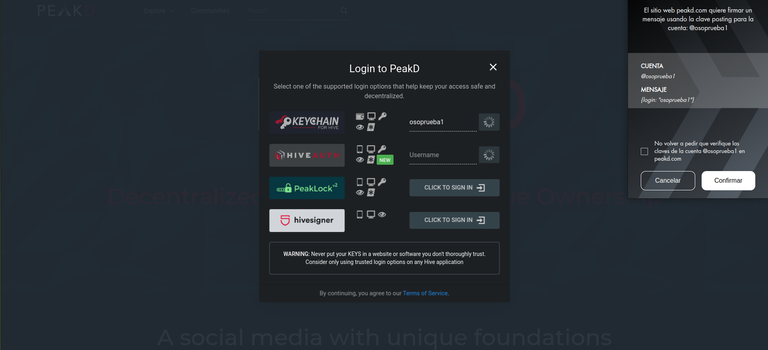
- Paso 1: Nos vamos a la página principal de Peakd y entramos a nuestra cuenta con la Hive Keychain.
- Step 1: Go to the Peakd home page and log into your account with the Hive Keychain.

- Paso 2: Una vez que estemos en nuestra cuenta, pisamos sobre nuestro avatar, se nos va a desplegar un menú, lo ignoramos y pisamos nuevamente la ventana y nos va a abrir una nueva ventana, hay vamos a hacer click sobre la pestaña, "Account Atcions" y se va a desplegar un menú, y nos dirigimos a la pestaña "Keys & Permissions", como nos muestran las imágenes a continuación.
- Step 2: Once we are in our account, we click on our avatar, a menu will be displayed, we ignore it and click again on the window and a new window will open, we will click on the tab, "Account Atcions" and a menu will be displayed, and we go to the tab "Keys & Permissions", as shown in the images below.


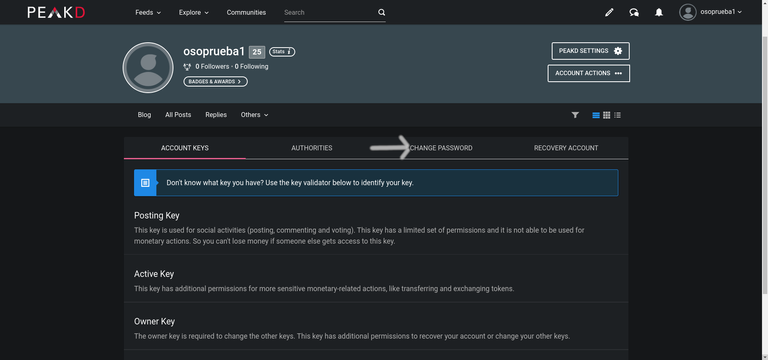
- Paso 3: Al hacer lo indicado arriba nos va abrir una ventana, cuando estemos ahí, nos vamos a dirigir a la pestaña "Change Password".
- Step 3: Doing the above will open a window, when we are there, we will go to the "Change Password" tab.
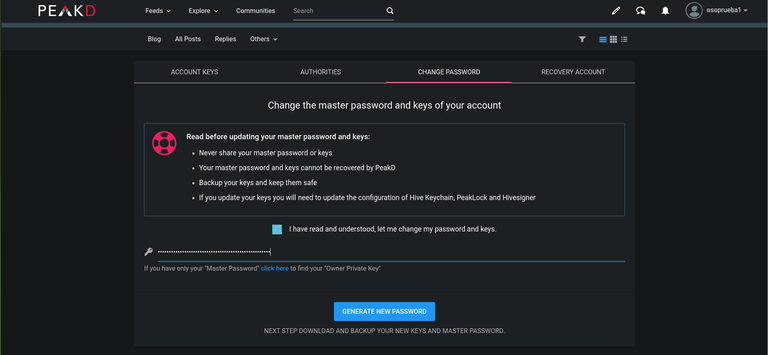
- Paso 4: Una vez en la nueva ventana, nos va a pedir que coloquemos la llave o clave "Owner Key", la colocamos, y y damos click en el cuadrado, conde aceptamos que estamos cambiando las claves y que leímos las indicaciones.
- Step 4: Once in the new window, we will be asked to enter the "Owner Key", enter it and click on the square, where we accept that we are changing the keys and that we have read the instructions.
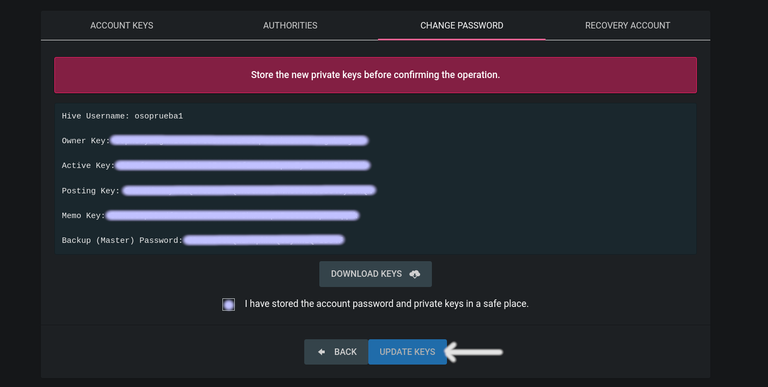
- Paso 5: Al realizar el paso anterior se nos abrirá una nueva ventana, con nuestras nuevas claves. Hay hay un botón que nos dice descargar las claves, hacemos click sobre ese botón y descargamos un respaldo de nuestras claves al dispositivo donde estamos trabajando. Yo recomiendo también, copiar las claves, guardarlas en archivo de texto y respaldar las mismas, en diferentes lugares seguros y finalmente y tal vez lo más importante, anotar con bolígrafo en un cuaderno nuestras nuevas claves. Así, evitamos que se pierdan y las tenemos a buen resguardo. Una vez que hayamos respaldado nuestras claves, hacemos click en el cuadrado, donde confirmamos que tenemos nuestras claves respaldadas y luego hacemos click, sobre la pestaña que dice "UPDATE KEYS". Ya al hacer eso habremos cambiado nuestras claves y el sistema, las abra actualizado, por lo que nos sacará de nuestra cuenta de Peadk, para que ingresemos con nuestras nuevas claves.
- Step 5: After the previous step a new window will open, with our new keys. There is a button that tells us to download the keys, we click on that button and download a backup of our keys to the device where we are working. I also recommend copying the keys, saving them in a text file and backing them up in different safe places and finally, and perhaps most importantly, writing down our new keys with a pen in a notebook. This way, we avoid losing them and keep them safe. Once we have backed up our passwords, we click on the square, where we confirm that we have our passwords backed up and then we click on the tab that says "UPDATE KEYS". Once we have done that, we will have changed our passwords and the system will update them, so it will log us out of our Peadk account, so that we can log in with our new passwords.

Una vez que hayamos cambiado las claves privadas nos toca cambiar las claves de la Hive Keychanin, lo cual hacemos de la siguiente manera:
Once we have changed the private keys it is time to change the keys of the Hive Keychanin, which we do as follows:
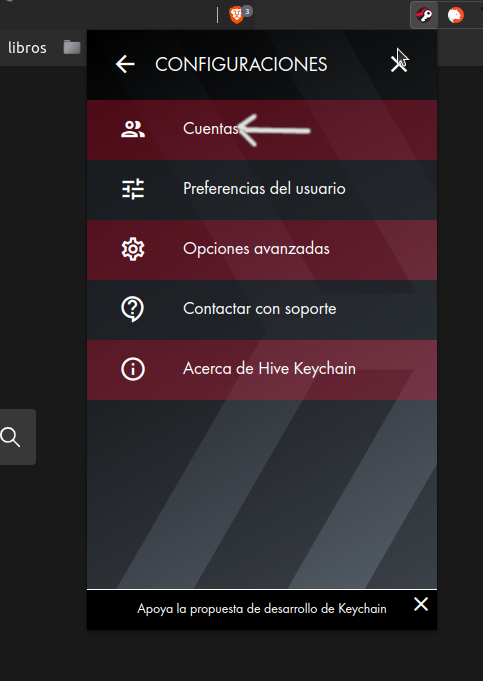
- Paso 1: Nos vamos a nuestra Hive Heychaing, va abrir igual, ya que no la desinstalamos, pero no nos va a permitir hacer nada, ya que las claves que tiene son las antiguas y debemos cambiarlas. Para hacerlo, nos vamos a las 3 barras horizontales que están en la parte superior derecha y hacemos click sobre ella, se nos abrirá un menú y nos dirigiremos a cuentas.
- Step 1: We go to our Hive Heychaing, it will open the same, since we did not uninstall it, but it will not allow us to do anything, since the keys that it has are the old ones and we must change them. To do this, we go to the 3 horizontal bars that are at the top right and click on it, it will open a menu and we will go to accounts.

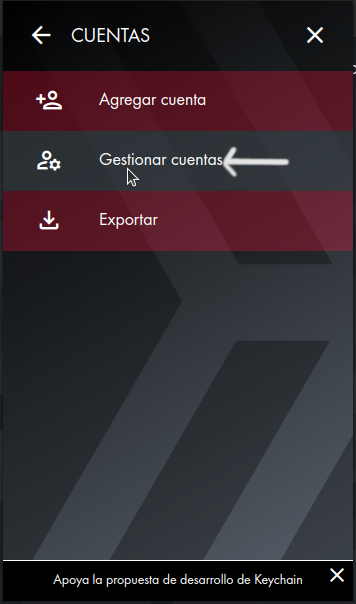
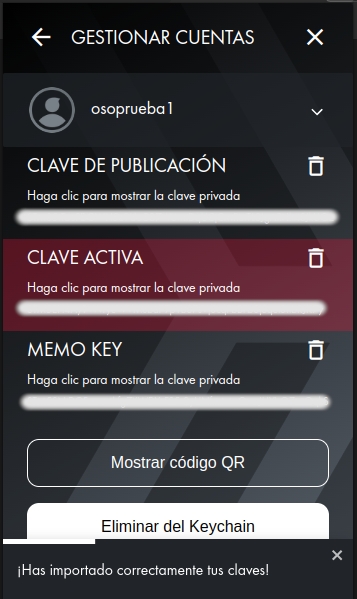
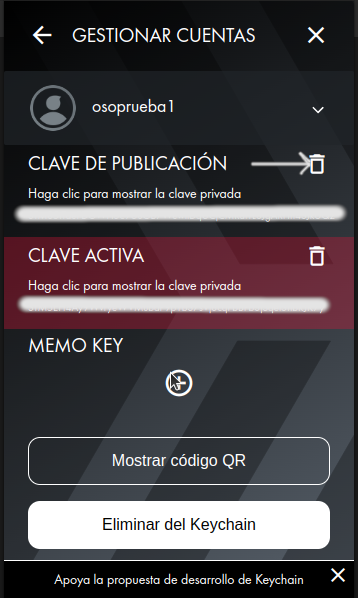
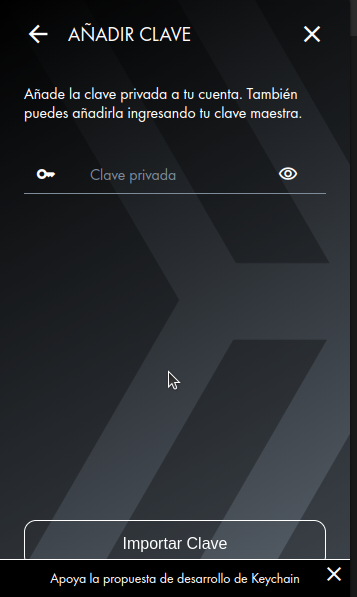
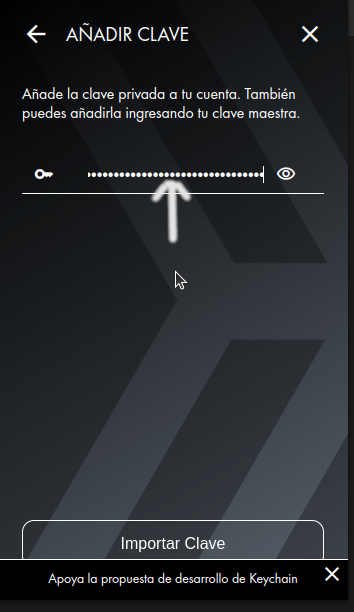
- Paso 2: Una vez que se nos abra está ventana le damos click sobre la pestaña cuentas y vamos a la pestaña que dice "Gestionar Cuentas" una vez que hagamos eso, se nos va a abrir una pestaña, donde nos van a aparecer todas nuestras claves, y al lado derecho abra un cesto de basura. Pisamos sobre el cesto de basura y borramos la primera clave que para este ejemplo será la de "MEMO". (Se pueden borrar las 3 a la vez, pero yo recomiendo borrar y cambiar una por una) Una vez que borremos la clave, nos aparecerá el signo más y al pisar sobre él, nos indicará que debemos colocar la nueva clave, la copiamos del archivo donde la tenemos, la pegamos, aprobamos la operación y listo, ya cambiamos la clave. Después hacemos lo mismos con las otras dos y ya tenemos nuestra cartera, lista para trabajar en todo el ecosistema de Hive. Ver imágenes.
- Step 2: Once we open this window we click on the tab accounts and we go to the tab that says "Manage Accounts" once we do that, we will open a tab, where we will see all our passwords, and on the right side open a trash can. We step on the trash can and delete the first password, which for this example will be "MEMO". (You can delete the 3 keys at the same time, but I recommend to delete and change one by one) Once we delete the key, the plus sign will appear and when we click on it, it will indicate us that we must place the new key, we copy it from the file where we have it, we paste it, we approve the operation and ready, we have changed the key. Then we do the same with the other two and we already have our wallet, ready to work in all the Hive ecosystem. See images.
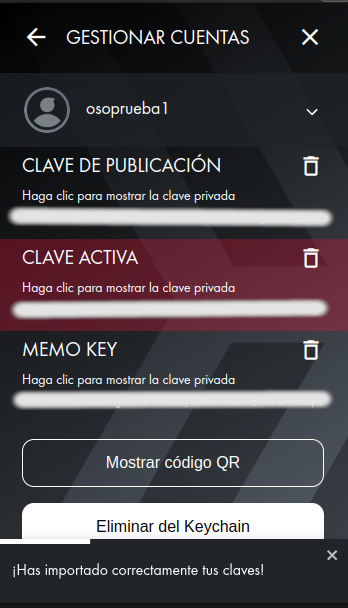
De esta forma cambiamos, las claves privadas de nuestra cuenta en HIve y las colocamos en nuestra cartera Hive Key Chaing.
In this way we change the private keys of our HIve account and place them in our Hive Key Chaing wallet.
Espero este tutorial paso a paso, les sea de ayuda y cualquier duda la dejan en los comentarios y con gusto la responderé. Gracias por leerme.
I hope this step by step tutorial will be helpful and if you have any questions, leave them in the comments and I will be happy to answer them. Thanks for reading.


