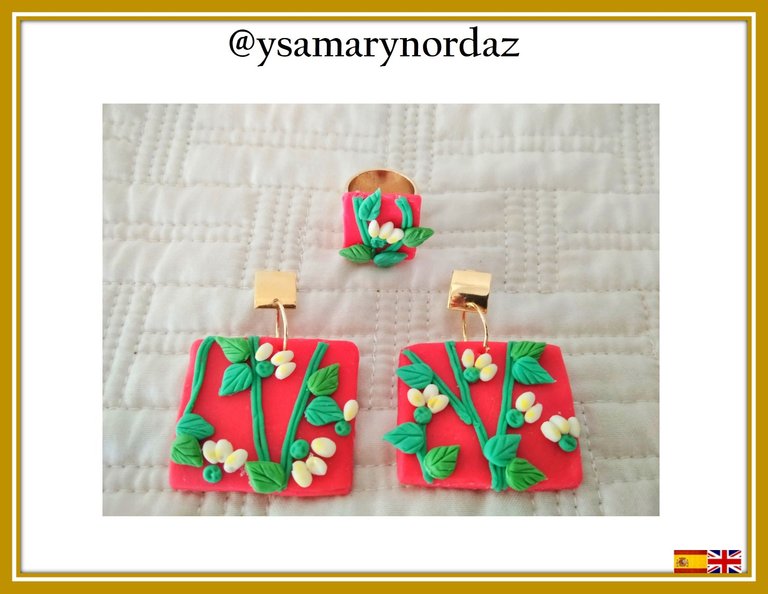
Hola amigos de esta gran comunidad de #jewelry. El día de hoy quiero compartir con ustedes un paso a paso muy creativo elaborado con masa flexible. Particularmente, me gusta mucho trabajar con esta masa ya que, con ella se pueden crear muchos accesorios hermosos de bisutería. Hay que tener paciencia debido a que a veces las piezas suelen ser muy pequeña, pero todo vale la pena cuando ves el resultado de tu trabajo. Para este proyecto trabajaré con el color rojo un color que da fuerza y combinado con el color verde y el color blanco luce genial. Te invito a seguir este paso a paso, espero te guste. ¡Vamos a comenzar!
Hello friends of this great community of #jewelry. Today I want to share with you a very creative step by step made with flexible clay. In particular, I really like working with this mass, since with it you can create many beautiful jewelry accessories. You have to be patient because sometimes the pieces tend to be very small, but it's all worth it when you see the result of your work. For this project I will work with red, a color that gives strength and combined with green and white it looks great. I invite you to follow this step by step, I hope you like it. Let's get started!

Materiales:
•Masa flexible de colores: rojo, verde claro, verde oscuro y blanco
•Crema humectante
•Pega blanca
•Rodillo
•Esteca de cuchilla
•Bolillo metálico
•Cortador de hoja pequeño
•Plantilla de cuadrado pequeño (2cm x 2cm) y mediano (4cmx3cm)
•Duya y disco
•Pinza
•2 aros de bisutería dorados
•2 base de zarcillos cuadrados
•Base para anillo
•Hisopo
•Tiza pastel de color amarillo
Materials:
•Flexible clay colors: red, light green, dark green and white
•Moisturizing lotion
•White glue
•Rolling pin
•Pottery clay cutter
•Metallic ball
•Leaf cutter
•Small (2cm x 2cm) and medium (4cm x 3cm) square template
•Clay gun extruder
•Plier
•2 gold jewelry rings
•2 bases of square earrings
•Base for ring
•Cotton bud
•Yellow pastel chalk
Paso 1
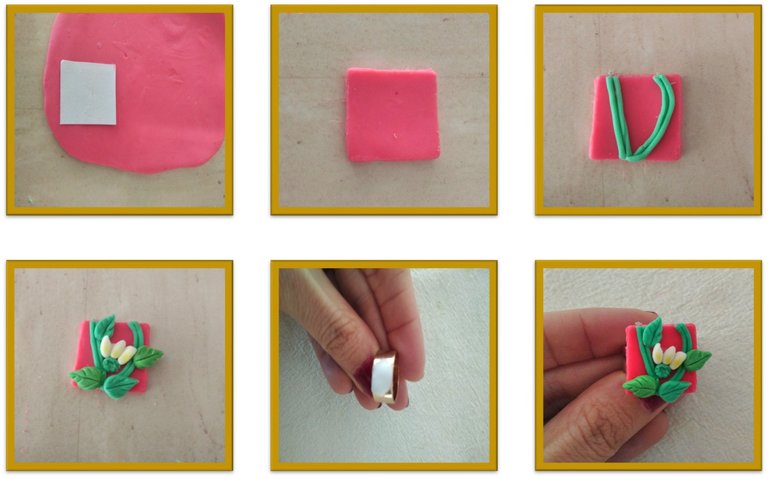
Limpia la superficie donde trabajarás la masa y unta un poco de crema humectante en ella, de esta manera evitarás que la masa se pegue. Igualmente, coloca en tus manos para que sea más fácil el amasado.
Step 1
Clean the surface where you will work the flexible clay and spread a little moisturizer on it, in this way you will prevent the flexible clay from sticking. Likewise, place it in your hands to make it easier to knead.

Paso 2
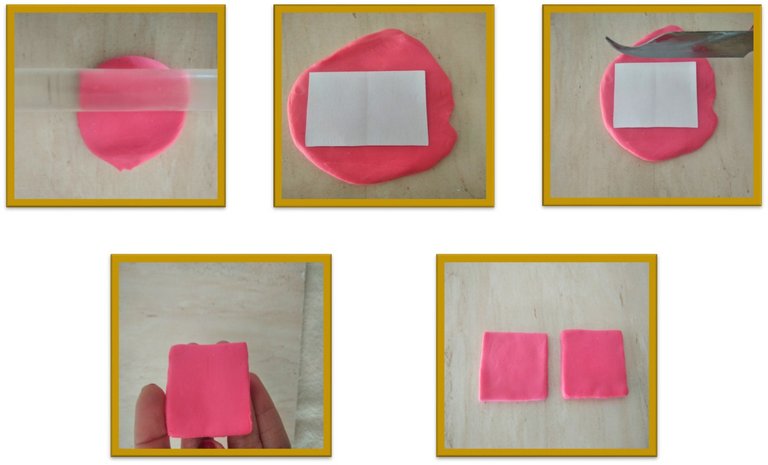
Toma la masa de color rojo y colócala sobre la superficie, con la ayuda del rodillo extiéndela. Una vez extendida, coloca la plantilla en forma de cuadrado de la medida (4cm x 3cm) sobre la masa y con la ayuda de la esteca de cuchilla corta y extraes el mismo, como se indica en la imagen. Luego, con la yema de tu dedo suaviza sus bordes.
Step 2
Take the red flexible clay and place it on the surface, with the help of the rolling pin, spread it out. Once extended, place the template in the form of a square of the size (4cm x 3cm) on the dough and with the help of the cutter extract it, as indicated in the image. Then, with your fingertip, smooth its edges.
Paso 3
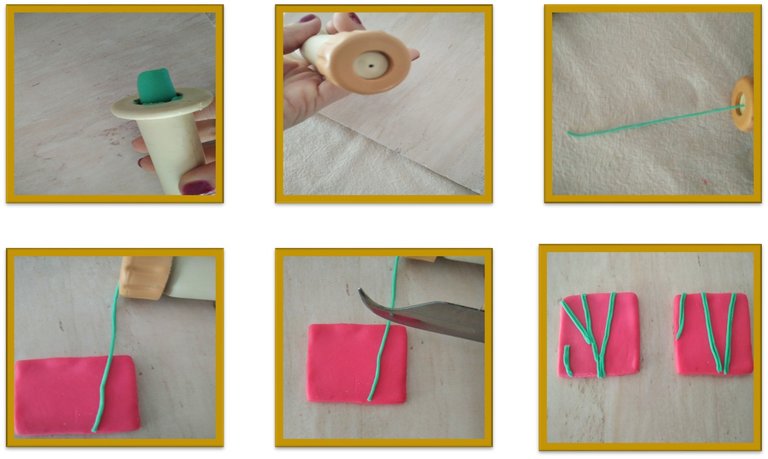
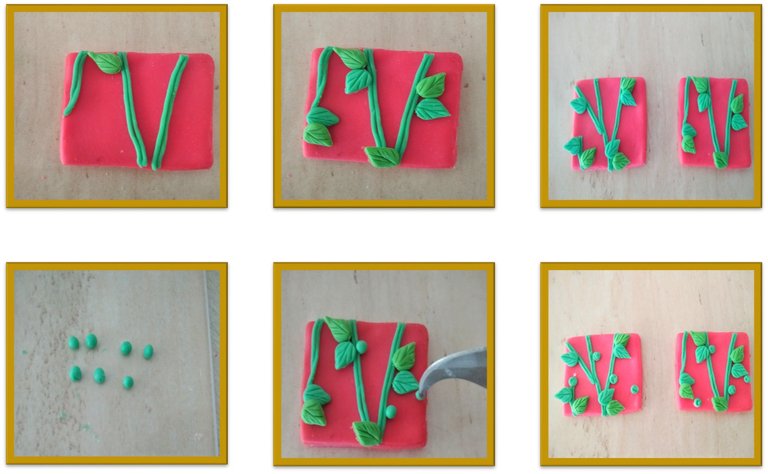
Para empezar a decorar las bases. Primero toma la masa de color verde oscuro y colócala dentro de la gruya con un disco con forma de círculo pequeño, luego presiona. Con la masa ve formando los tallos de las flores como se observa en las imágenes.
Step 3
To start decorating the bases. First take the dark green flexible clay and place it inside the crane with a small circle shaped disk, then press. With the clay, form the stems of the flowers as seen in the images.
Paso 4
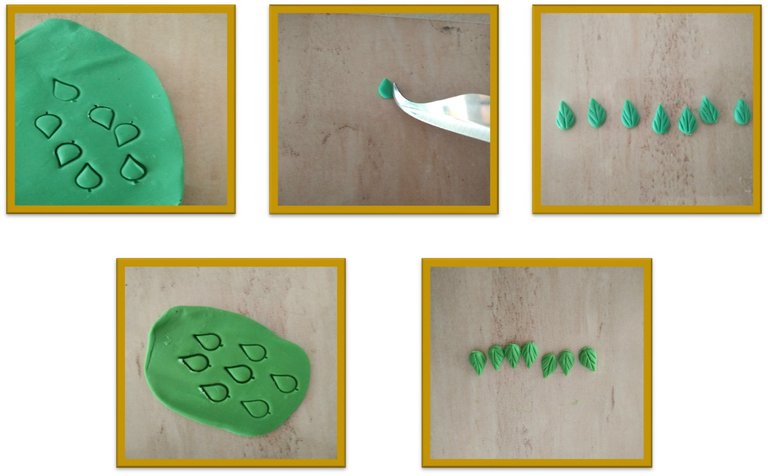
Con la ayuda del rodillo extiende la masa de color verde oscuro. Luego, coloca el cortador en forma de hoja sobre la masa para así cortar 7 hojas. Seguidamente, con la ayuda de la esteca de cuchilla, ve marcando las nervaduras de las mismas. Realiza el mismo procedimiento con la masa de color verde claro y extrae 7 hojas.
Step 4
With the help of the rolling pin, roll out the dark green clay. Then, place the leaf cutter on top of the dough to cut 7 leaves. Next, with the help of the pottery clay cutter, go marking the ribs of the same. Carry out the same procedure with the light green clay and extract 7 leaves
Paso 5
Coloca un poco de pega en las hojas y pégalas como se observa en la imagen. Luego, forma pequeñas bolitas de color verde oscuro y coloca 3 en una de las bases y, 4 en la otra. Por último, con la punta de la esteca presiona para hacer pequeñas marcas sobre ellas.
Step 5
Put some glue on the leaves and glue them as shown in the image. Then, form small dark green balls and place 3 in one of the bases and 4 in the other. Finally, with the tip of the cutter, press to make small marks on them.
Paso 6
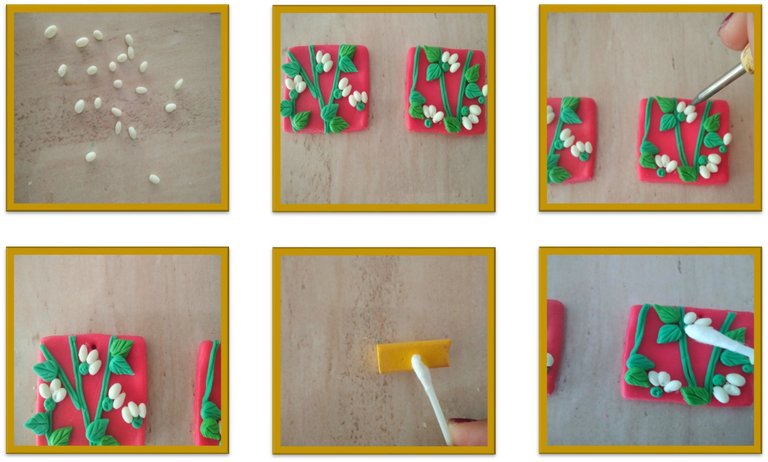
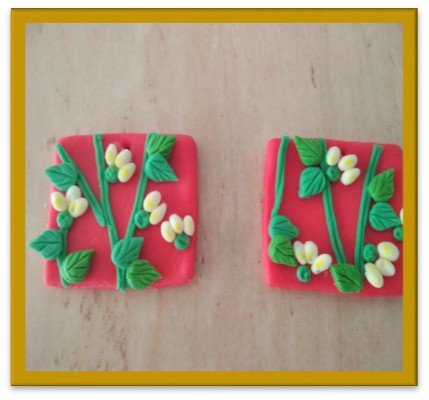
Toma la masa de color blanco y forma pequeños pétalos. Luego, pega los pétalos sobre las bolitas pequeñas. Toma el bolillo metálico y abre un orificio en la parte superior de las bases. Por último, toma el hisopo y pásalo por encima de la tiza de color amarillo y pinta suavemente los pétalos.
Step 6
Take the clay of white color and form small petals. Then glue the petals onto the small balls. Take the metal ball and open a hole in the upper part of the bases. Lastly, take the cotton budand run it over the yellow chalk and lightly paint the petals.
Paso 7
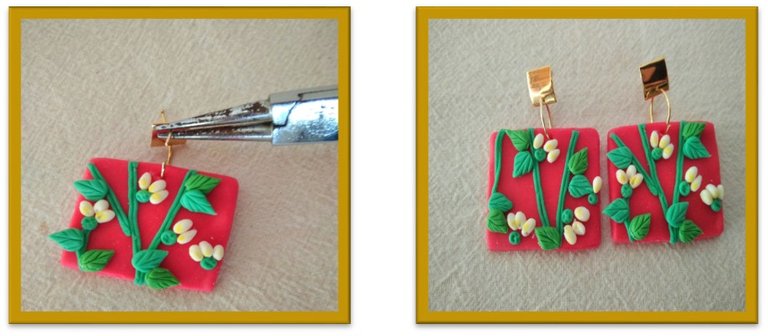
Para colocar las bases de zarcillos, introduce el anillo por el orificio y, con ayuda de la pinza ciérralo.
Step 7
To place the earring bases, insert the ring through the hole and, with the help of the pliers, close it.
Paso 8
Los zarcillos están listos. Ahora para realizar el anillo sigue los mismos pasos que realizaste anteriormente pero, esta vez utilizando la plantilla de cuadrado (2cm x 2cm). Una vez esté terminado, coloca pega en el anillo y pega la base.
Step 8
The earrings are ready. Now to make the ring, follow the same steps you did before, but this time using the square template (2cm x 2cm). Once it's finished, glue the ring and glue the base.
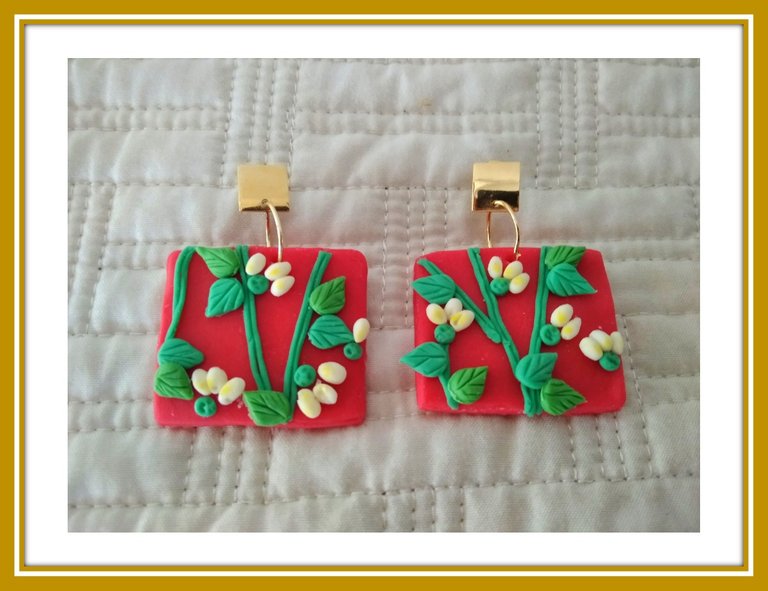
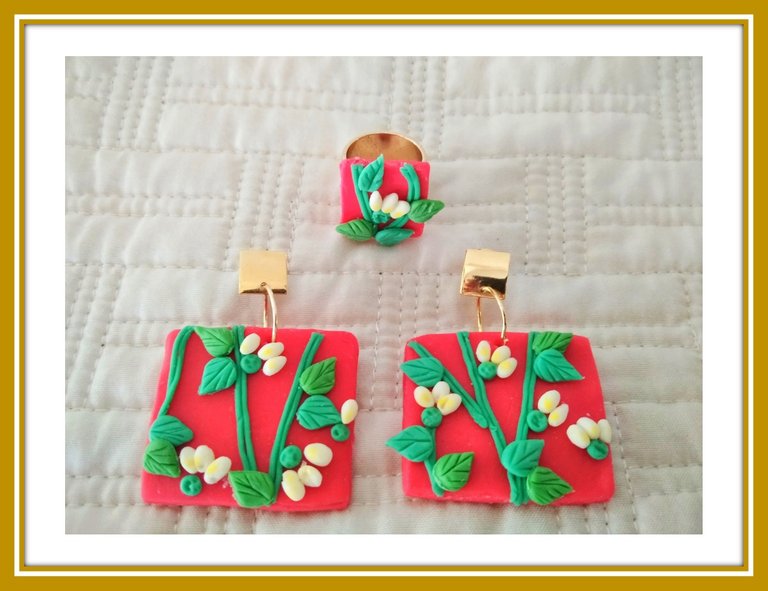
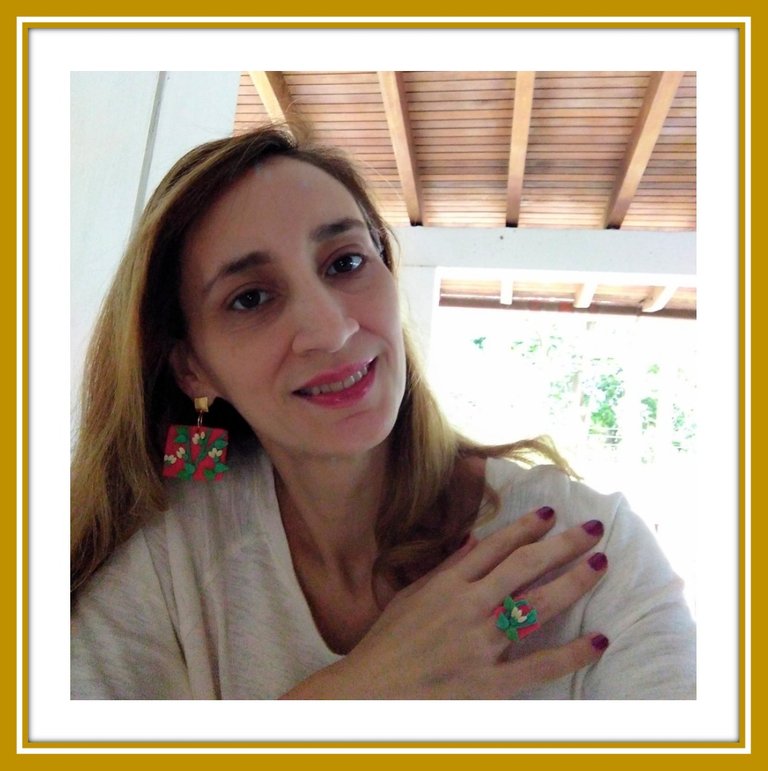
Los zarcillos y el anillo están terminados, estoy muy satisfecha con el resultado final; cada proyecto es un desafío. La combinación de los colores hace que este juego de accesorio se vea estupendo. Cada persona al momento de realizarlo puede darle su toque personal. Espero te animes a crear este juego de accesorio siguiendo este paso a paso. ¡Hasta una próxima oportunidad!
TThe earrings and the ring are finished, I am very satisfied with the final result; every project is a challenge. The combination of colors makes this accessory set look great. Each person at the time of doing it can give it their personal touch. I hope you will be encouraged to create this accessory game by following this step by step. See you soon!
Las fotografías fueron tomadas por mí con mi teléfono celular Redmi Note 8.
Utilicé el programa Microsoft Power point
Traducción: Google Translation
The images were taken by myself with my Redmi Note 8 cell phone.
Translation: Google Translation
I used the program Microsoft Power point
