Would you like some fermented tea? Some bacteria-infused yeasty goodness? A sweet blend of berry and matcha doused in acid? A bubbly, ever-so-slightly frothy brown liquid with the faint aroma of sweat? Perhaps not questions you'd pose at a high-tea... but that's the charm of kombucha, I guess.

This is the second instalment of my, uh, "fermentation initiation"... If you missed the first part where I delved into the initial steps of this kombucha brewing journey (in maybe a little too much detail, let's be honest) you can catch up by checking out kombucha preparations. There are also some delightful closeups of my wet specimen (aka scoby) to get you properly enthused.
Kombucha (makes three litres)
Step Two
Having left the kombucha to ferment for one week, pour off three quarters of the fermented kombucha into a second three litre jar. Leave roughly 200ml kombucha behind - with the deliciously sloppy, succulent, slimy scoby.
^^ With this you can then get your next batch of kombucha going by adding sweetened tea to the original jar and topping up with cold water - repeating Step One. It's that easy!

Over the course of this last week I diligently checked in on my steadily fermenting gloopy mess - and panicked at the first sign of what looked like its brown entrails (for want of a better word) beginning to mould. Dark floaties appeared on my wee scoby and it made me question whether or not I'd accidentally let the poor thing to die.
But, happy news - if this has happened/will happen to you don't fret - according to several very helpful sites I learned that these brown globs are yeast formations. And although they can be off-putting and discouraging, you can rest easy knowing that your yeast is active and doing its thing! This buggy texture is often mistaken for mould, but it is far from it. I'll tag in a few sites I found especially helpful in clarifying this.
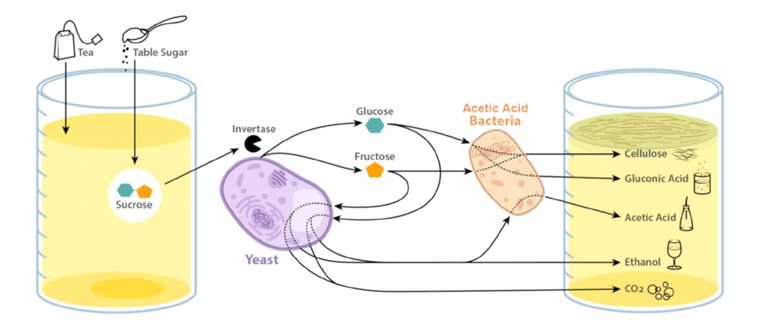
If you want to step away from more graphic images, but - like me - enjoy a good visual aid, the following diagrams really help to explain kombucha metabolism and microbial interactions. The source for these images is a 2020 paper by Tran, Grandvalet, Verdier, and Martin titled "Microbiological and technological parameters impacting the chemical composition and sensory quality of kombucha". If you're looking for a comprehensive study of kombucha's microbial interaction in symbiotic systems I recommend the read!


Diagram/chart of the elaborate process of interactions that occur during kombucha fermentation > source
Anyway, back to the recipe. Once decanted, you can add flavourings of your choice to the freshly fermented kombucha in the second jar. In my case, I added handfuls of fresh strawberries, raspberries, blueberries, and a teaspoon of ginger.


Then seal and leave to infuse at room temperature for 24 hours. Carefully open the container and strain the kombucha mixture to remove any solid particles. Once strained, transfer the liquid into clean, airtight bottles or jars.
And dus! Your kombucha is now ready to be enjoyed!
My immediate impression was the kombucha's effervescent tanginess, informing me that I'd at least succeeded in fermenting my tea. While the ginger didn't assert itself as much as expected, I have contemplated whether or not to experiment with introducing ginger beer for a stronger kick. The fruit infusion didn't add as much flavouring as I thought it might, but the mildness wasn't too bad either. All in all, not a bad debut for my inaugural batch!


** Final word to the wise: keep the finished product in the fridge so it doesn't continue to ferment!
If any kombucha makers out there want to share their favourite flavourings, do comment below!
P.S. I hope these awkward selfies tick your box @foodiesunite!
Disclaimer
Blogger: @actaylor
Photographs: unless otherwise noted, all images were taken by me with an iPhone 8


