🦝✨🍂🌺🦝✨🍂🌺🦝✨🍂🌺🦝✨
 🦝✨🍂🌺🦝✨🍂🌺🦝✨🍂🌺🦝✨
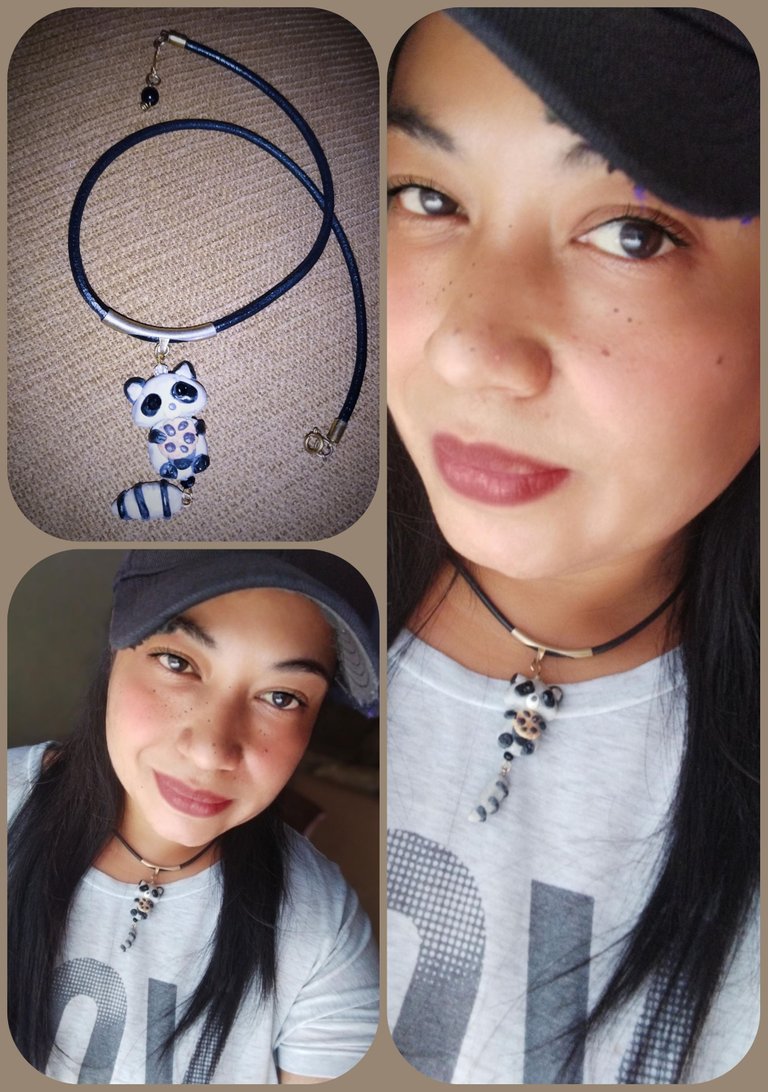
Hello hello how are my dear and appreciated friends and all those users who make life in this great platform and especially in this creative and wonderful community.
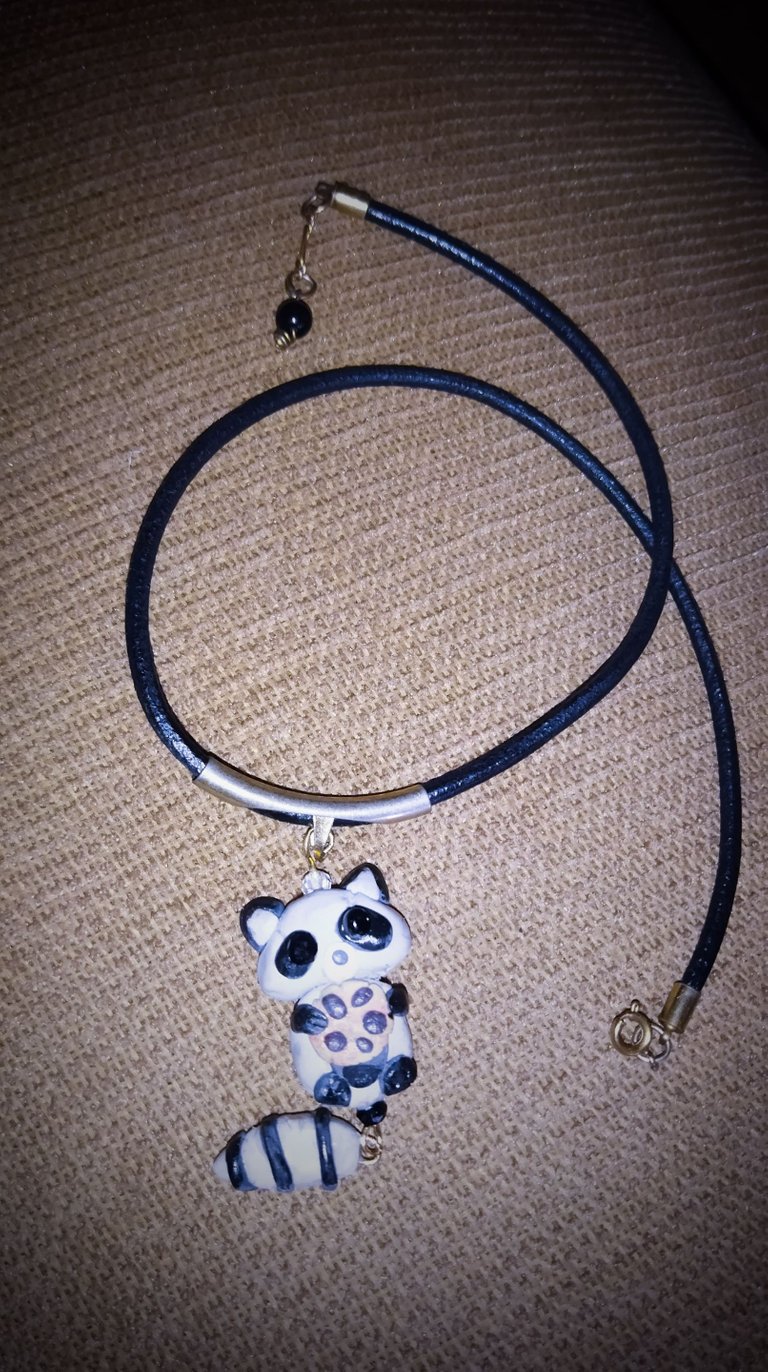
Today I want to share with you a very nice, ingenious and creative craft. It is a cute raccoon charm made of flexible dough ideal to give that original and unique touch to our outfits.
Hola hola qué tal mis queridos y apreciados amigos y todos aquellos usuarios que hacen vida en esta genial plataforma y en especial en esta creativa y maravillosa comunidad.
El día de hoy quiero compartir con ustedes una manualidad muy bonita ingeniosa y creativa se trata de un lindo dije de un mapache elaborado en masa flexible ideal para dar ese toque original y único a nuestros outfits.
🦝✨🍂🌺🦝✨🍂🌺🦝✨🍂🌺🦝✨
 🦝✨🍂🌺🦝✨🍂🌺🦝✨🍂🌺🦝✨
The flexible dough is an ideal material to capture all the ideas of decorative elements that we have in mind and thus be able to customize each of these either for gifts or for personal use.
La masa flexible es un material idóneo para poder plasmar todas las ideas de elementos decorativos que tengamos en mente y así poder personalizar cada uno de estos bien sean para regalos o para uso personal.
🦝✨🍂🌺🦝✨🍂🌺🦝✨🍂🌺🦝✨
 🦝✨🍂🌺🦝✨🍂🌺🦝✨🍂🌺🦝✨
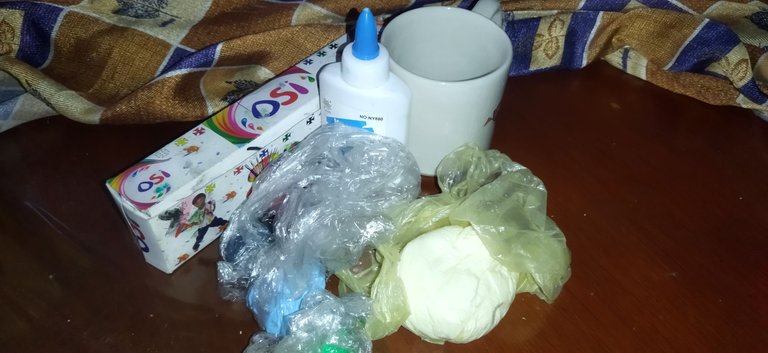
For this beautiful craft the materials to use were homemade flexible dough white glue white pigments colored metal rings brushes brushes, stick height and stakes.
Para esta bonita manualidad los materiales a utilizar fueron masa flexible casera pega blanca pigmentos de colores aros metálicos pinceles, palito de altura y estacas.
🦝✨🍂🌺🦝✨🍂🌺🦝✨🍂🌺🦝✨
 🦝✨🍂🌺🦝✨🍂🌺🦝✨🍂🌺🦝✨
Step by step for its elaboration
🦝✨🍂🌺🦝✨🍂🌺🦝✨🍂🌺🦝✨
Paso a paso para su elaboración
🦝✨🍂🌺🦝✨🍂🌺🦝✨🍂🌺🦝✨
🦝✨🍂🌺🦝✨🍂🌺🦝✨🍂🌺🦝✨
Step by step for its elaboration
🦝✨🍂🌺🦝✨🍂🌺🦝✨🍂🌺🦝✨
Paso a paso para su elaboración
🦝✨🍂🌺🦝✨🍂🌺🦝✨🍂🌺🦝✨
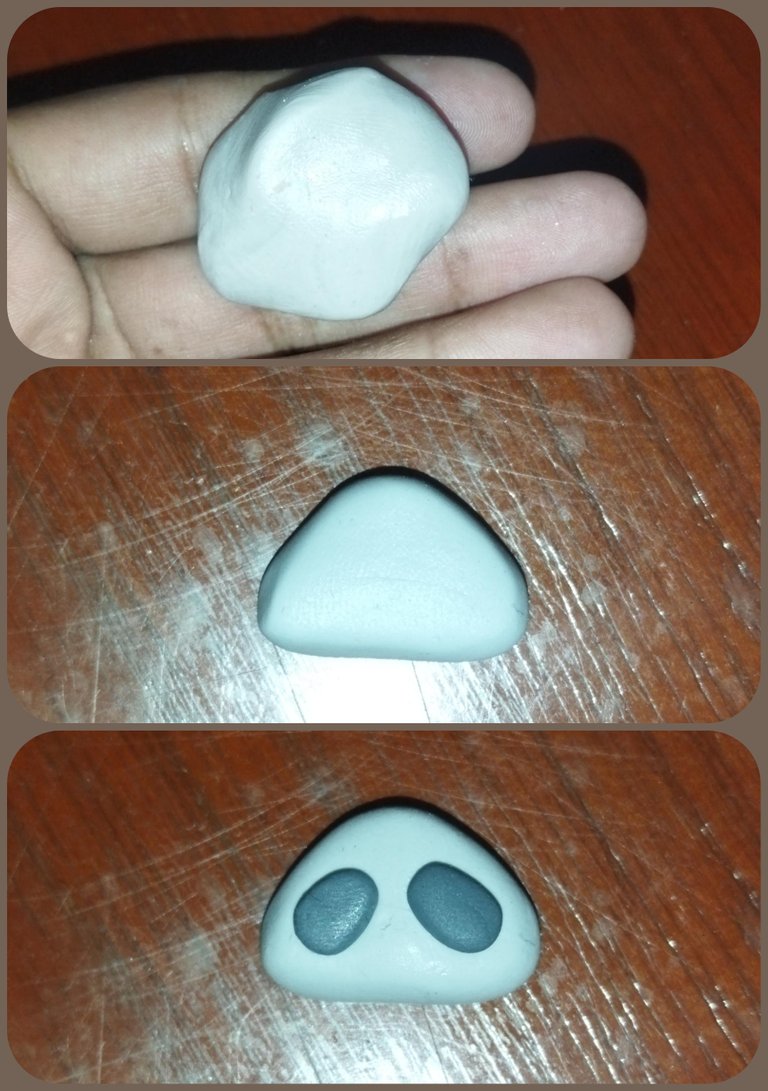
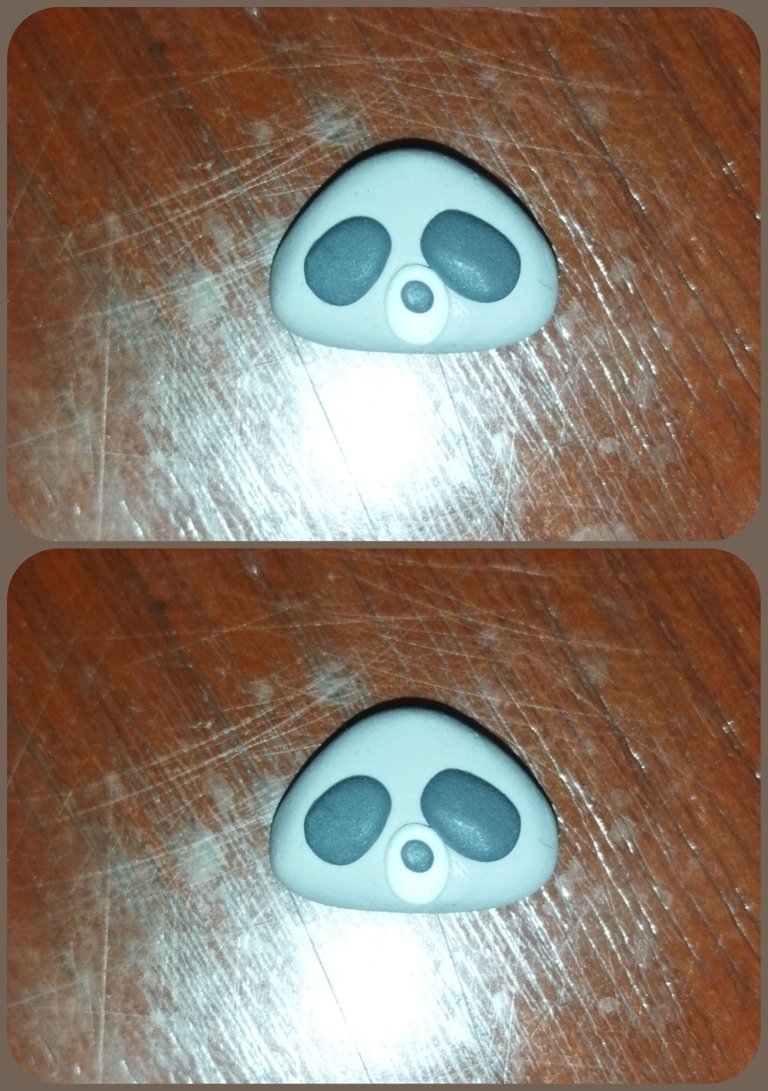
1. We begin by taking a small portion of flexible dough in gray color, we make a small ball that we are going to shape a little on the upper part of the head, then we are going to place two sticks in black color on the part of the eyes, to create the characteristic spots of this cute little animal.
1. Comenzamos tomando una pequeña porción de masa flexible en tono gris elaboramos una pequeña bolita que vamos a modelar un poco en la parte superior de la cabeza, seguidamente le vamos a colocar dos palitos en tono negro en la parte de los ojos, para crear las manchitas características de este lindo animalito.
🦝✨🍂🌺🦝✨🍂🌺🦝✨🍂🌺🦝✨
 🦝✨🍂🌺🦝✨🍂🌺🦝✨🍂🌺🦝✨
2. With a little bit of white flexible dough we are going to place the part of the mouth making a small ball and flattening a little with the help of the fingertips. And on top we place a small ball of white dough to give the effect of the nose.
2. Con un poquito de masa flexible tono blanco le vamos a colocar la parte de la boca haciendo una pequeña bolita y aplanando un poco con la ayuda de la yema de los dedos Y encima colocamos una pequeña pelotita de masa en tono blanco para dar el efecto de la nariz.
🦝✨🍂🌺🦝✨🍂🌺🦝✨🍂🌺🦝✨
 🦝✨🍂🌺🦝✨🍂🌺🦝✨🍂🌺🦝✨
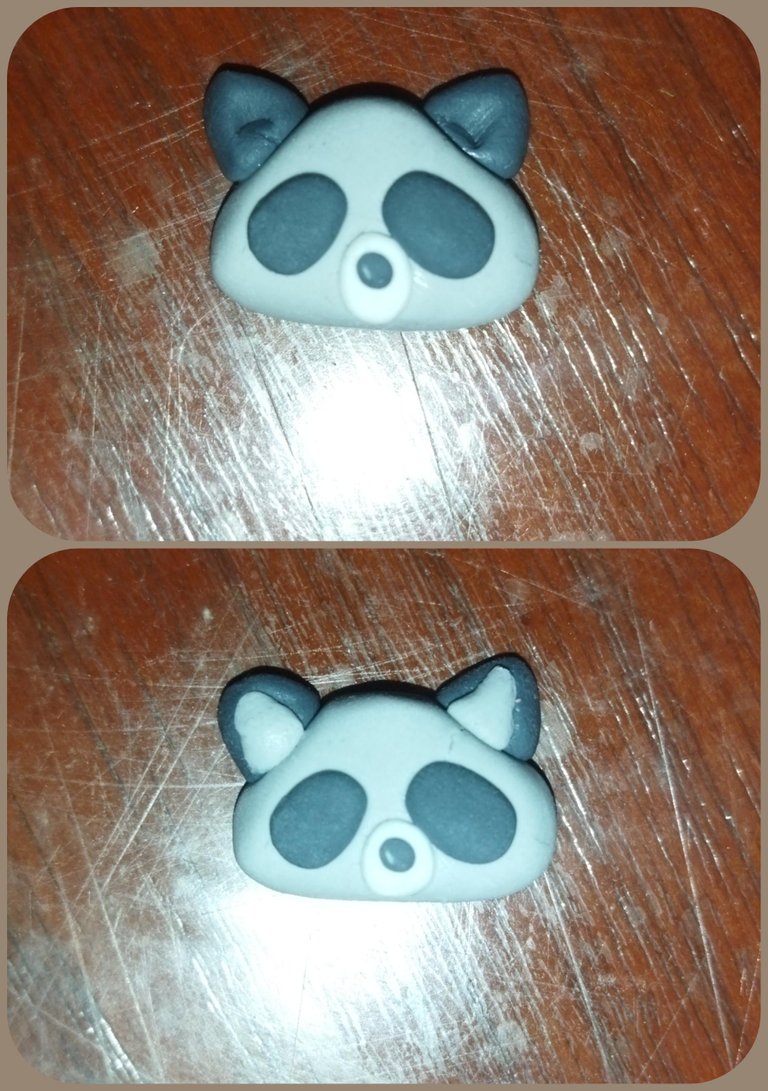
3. At this point we are going to create the ears with two small pieces of black dough making two small triangles and coughing and sticking them on both sides of the head and on top we are going to place two triangles a little smaller in gray tone.
3. En este punto vamos a crear las orejitas con dos trocitos de masa negra haciendo dos pequeños triángulo y tos y pegando los en ambos lados de la cabecita y encima le vamos a colocar dos triángulos un poco más pequeños en tono gris.
🦝✨🍂🌺🦝✨🍂🌺🦝✨🍂🌺🦝✨
 🦝✨🍂🌺🦝✨🍂🌺🦝✨🍂🌺🦝✨
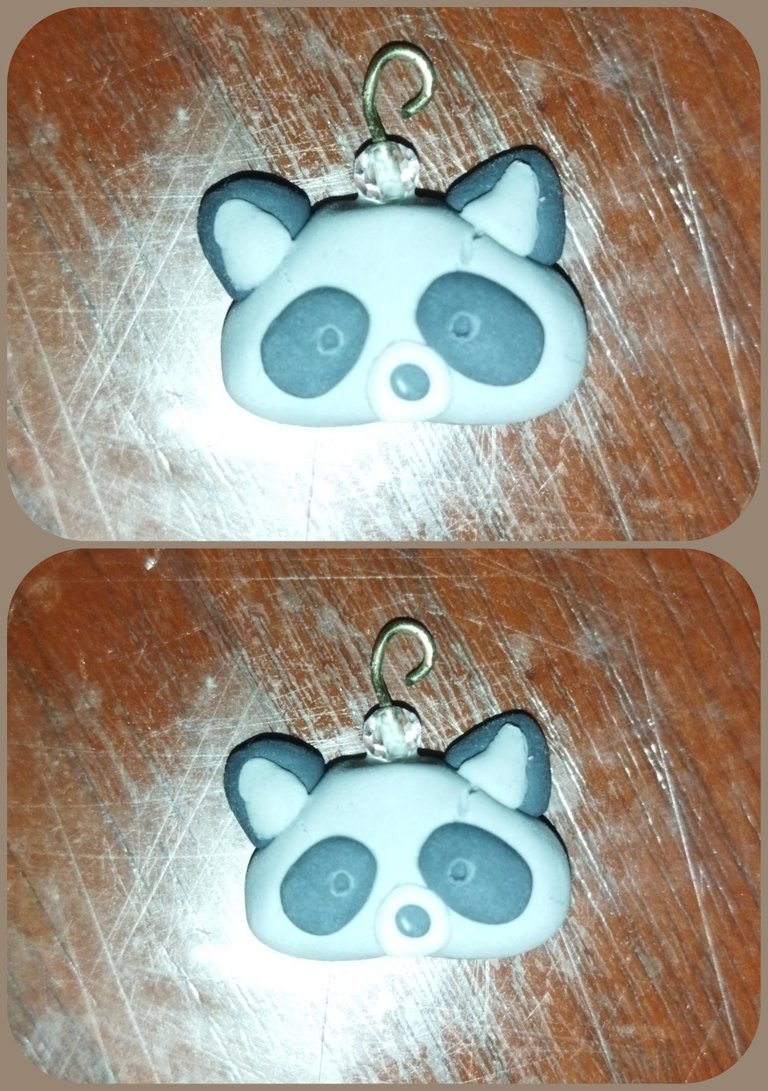
4. With the help of the wooden stick we are going to open a small hole in the middle of the head and with a little white glue we are going to introduce the wire ring to serve as a pendant and in both spots of the eyes we are going to make two holes with the same wooden stick that later will serve us to place the eye socket.
4. Con la ayuda del palito de madera vamos a abrir un pequeño orificio en la mitad de la cabecita y con un poco de pegamento blanco vamos a introducir el arito de alambre para que nos sirva de colgantes y en ambas manchitas de los ojos vamos a hacer dos orificios con el mismo palito de madera que más adelante nos servirán para colocar la cuenca de los ojos.
🦝✨🍂🌺🦝✨🍂🌺🦝✨🍂🌺🦝✨
 🦝✨🍂🌺🦝✨🍂🌺🦝✨🍂🌺🦝✨
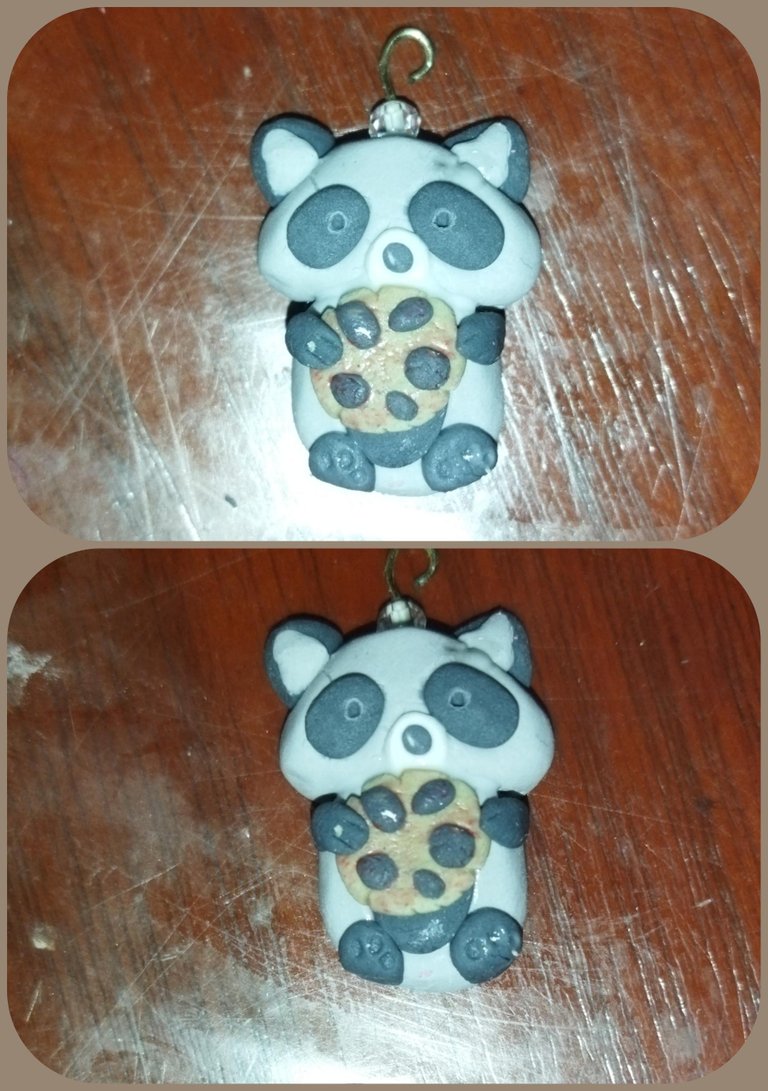
5. The part of the body we are going to elaborate with flexible dough in gray tone making a little ball and flattening it with the fingertips we make in the middle another little ball in black tone and we are going to flatten it so that it is very thin.
5. La parte del cuerpo la vamos a elaborar con masa flexible en tono gris haciendo una pelotita y aplanando la con la yema de los dedos realizamos en el medio otra pequeña bolita en tono negro y se la vamos a planear de manera que quede muy delgada.
🦝✨🍂🌺🦝✨🍂🌺🦝✨🍂🌺🦝✨
 🦝✨🍂🌺🦝✨🍂🌺🦝✨🍂🌺🦝✨
6. As a funny touch we are going to make a chocolate chip cookie which we are going to elaborate with dough in opaque yellow tone and the little brown sprinkles we are going to place it on top of the little black spot on the belly to give the effect that the cookie is being eaten.
6. Cómo toque gracioso le vamos a hacer una galleta de chispas de chocolate qué vamos a elaborar con masita en tono amarillo opaco y las pequeñas chispitas en tonos marrones la vamos a posicionar encima de la manchita negra de la pancita para que dé el efecto de que se está comiendo la galleta.
🦝✨🍂🌺🦝✨🍂🌺🦝✨🍂🌺🦝✨
 🦝✨🍂🌺🦝✨🍂🌺🦝✨🍂🌺🦝✨
7. And to finish the part of the little body we are going to make the little legs with flexible dough in black tone making small sticks that we are going to flatten in both ends, with the help of the stakes we are going to make the small marks in the little legs.
7. Y para terminar la parte del cuerpito vamos a hacerle las patitas con masa flexible en tono negro haciendo pequeños palitos que luego vamos a aplanar en ambos extremos, con la ayuda de las estacas le vamos a hacer las pequeñas marquitas en las patitas.
🦝✨🍂🌺🦝✨🍂🌺🦝✨🍂🌺🦝✨
 🦝✨🍂🌺🦝✨🍂🌺🦝✨🍂🌺🦝✨
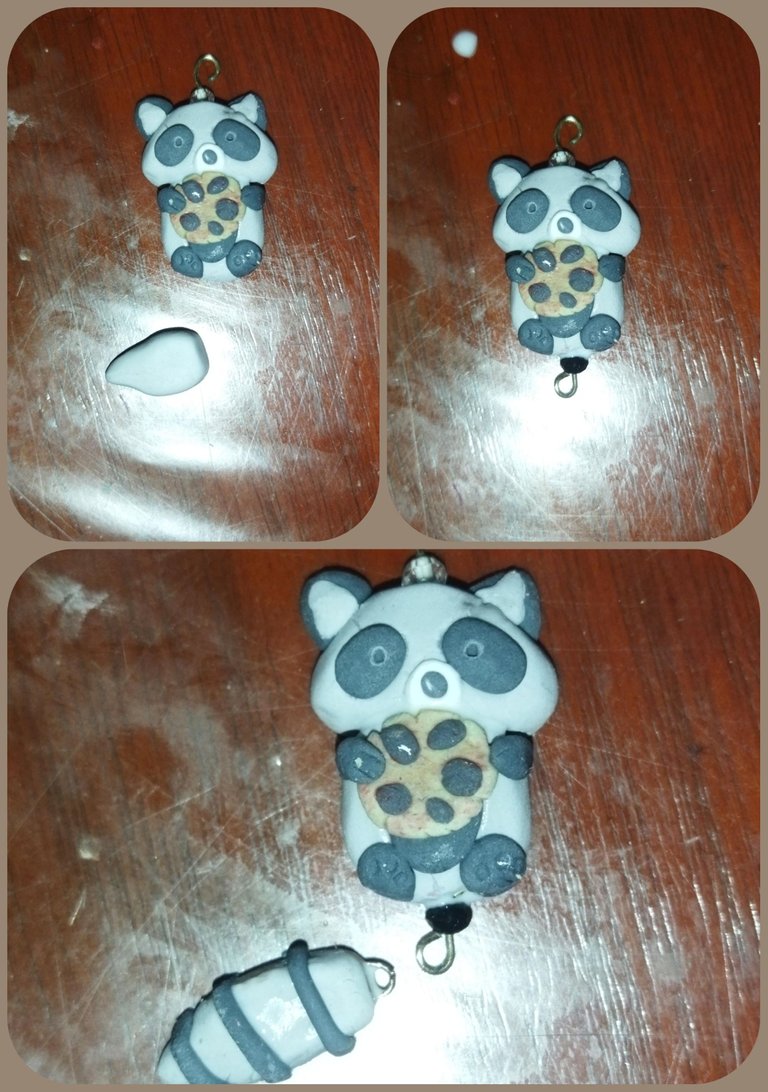
8. In the inferior part of the little body we are going to open again a small hole with the wooden stick and we are going to place another hoop, apart we are going to elaborate the little tail with flexible dough in gray tone making a small ball that we are going to lengthen little by little to give it the form and on top we place three lines in black tone of the same flexible dough in the tip we are going to place another small hoop with white glue and the wooden stick.
8. En la parte inferior del cuerpito vamos a abrir nuevamente un pequeño orificio con el palito de madera y vamos a colocar otro arito, aparte vamos a elaborar la colita con masa flexible en tono gris tilizando una pequeña bolita que vamos a ir alargando poco a poco para ir dándole la forma y encima le colocamos tres líneas en tono negro de la misma masa flexible en la punta vamos a colocar otro pequeño arito con pegamento blanco y el palito de madera.
🦝✨🍂🌺🦝✨🍂🌺🦝✨🍂🌺🦝✨
 🦝✨🍂🌺🦝✨🍂🌺🦝✨🍂🌺🦝✨
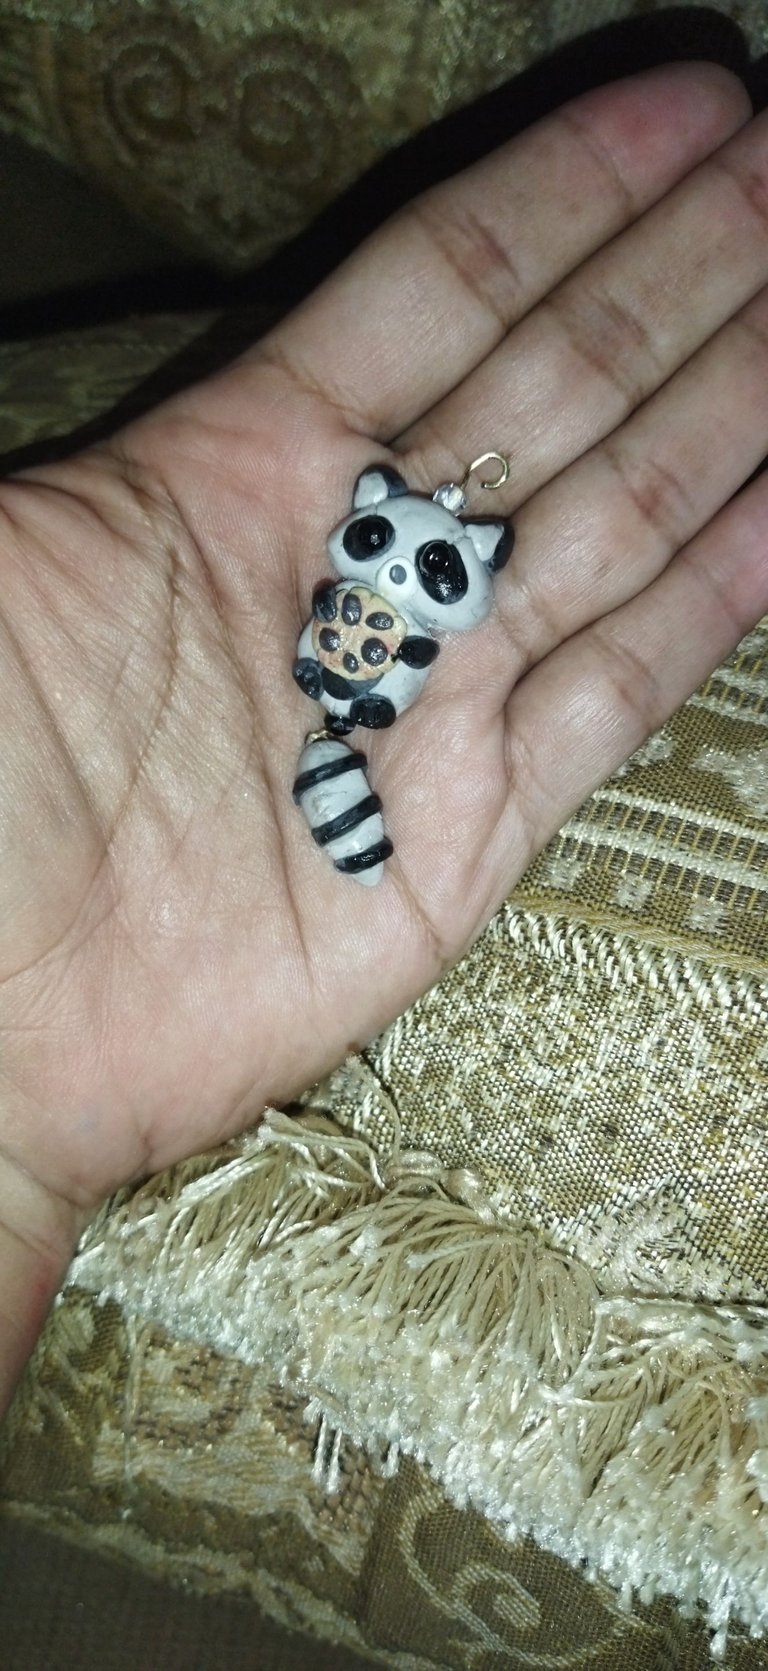
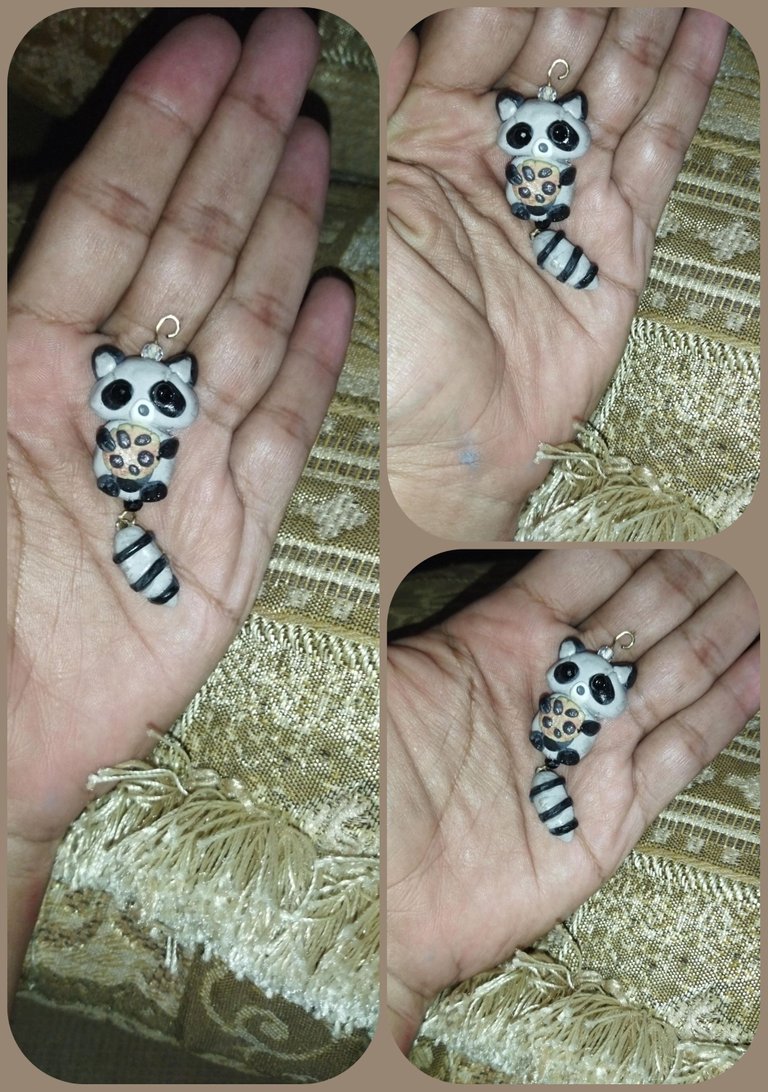
9. Once both pieces are finished, we only have to wait for them to dry very well and place the two shiny beads on the part of the raccoon's eyes securing it with glue, and to give it a little bit of enhancement we paint it with cold paint in black and apply a base of nail varnish to give it more shine and durability. We join the tail with the part of the doll and we would have ready this original pendant of a beautiful and cute raccoon.
9. Una vez culminada ambas piezas, solo nos quedaría esperar a que sequen muy bien y le colocamos las dos cuentas brillantes en la parte de los ojos al mapache asegurando con pegamento, y para darle un poquito de realce pintamos con pintura al frío en tono negro y aplicamos una base de barniz de uñas para darle mayor brillo y durabilidad. Unimos la colita con la parte del muñequito y ya tendríamos listo este colgante tan original de un precioso y simpático mapache.
🦝✨🍂🌺🦝✨🍂🌺🦝✨🍂🌺🦝✨
 🦝✨🍂🌺🦝✨🍂🌺🦝✨🍂🌺🦝✨
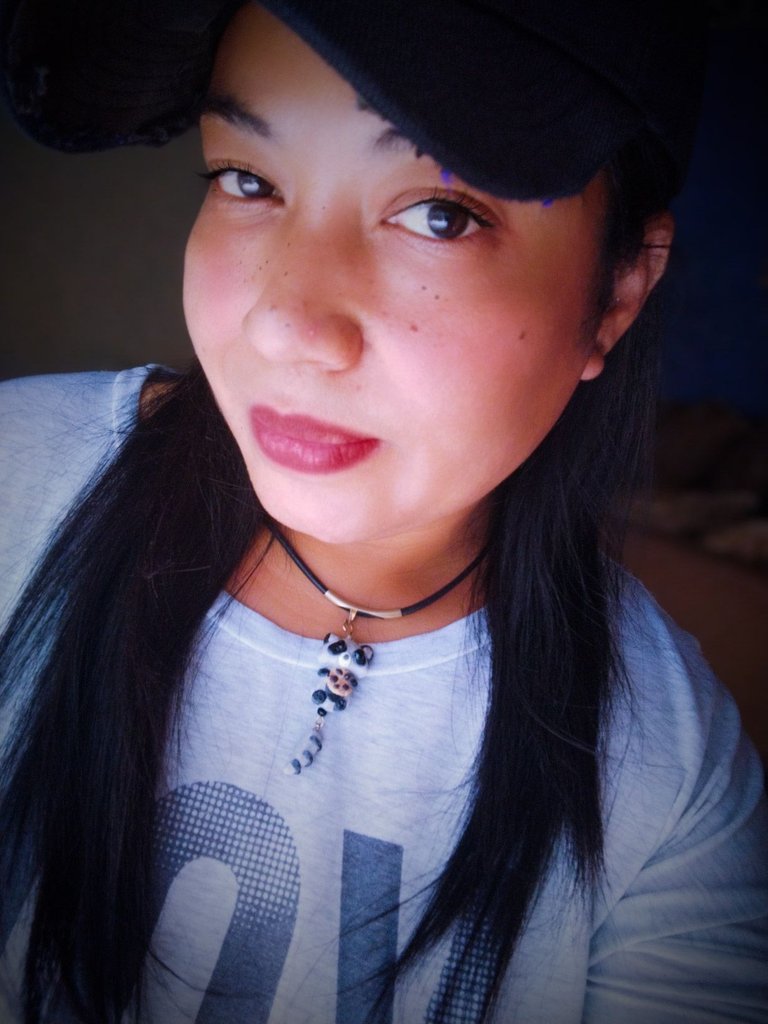
This idea is very original and perfect for all of us who love to make innovative with all the accessories we use. I thank you if you read my post and I thank you for your support and for all the support given.
Esta idea es muy original y viene perfecto para todas nosotras que nos encanta hacer innovadoras con todas los accesorios que utilizamos. Te agradezco si leíste mi post y te doy las gracias por el apoyo y por todo el respaldo brindado.
🦝✨🍂🌺🦝✨🍂🌺🦝✨🍂🌺🦝✨
 🦝✨🍂🌺🦝✨🍂🌺🦝✨🍂🌺🦝✨
For my part I say goodbye for this opportunity wishing you lots of success, health and blessings until next time.
Por mi parte me despido por esta oportunidad deseándole muchísimos éxitos salud y bendiciones hasta la próxima.
🦝✨🍂🌺🦝✨🍂🌺🦝✨🍂🌺🦝✨
 🦝✨🍂🌺🦝✨🍂🌺🦝✨🍂🌺🦝✨
All images are my own taken with Redmi 9t and edited with Photoshop Express for Android and translated with Deepl application.
🦝✨🍂🌺🦝✨🍂🌺🦝✨🍂🌺🦝✨
Todas las imágenes son de mi propiedad tomadas con Redmi 9t y editadas con Photoshop Express para Android y traducido con la aplicación Deepl.
🦝✨🍂🌺🦝✨🍂🌺🦝✨🍂🌺🦝✨