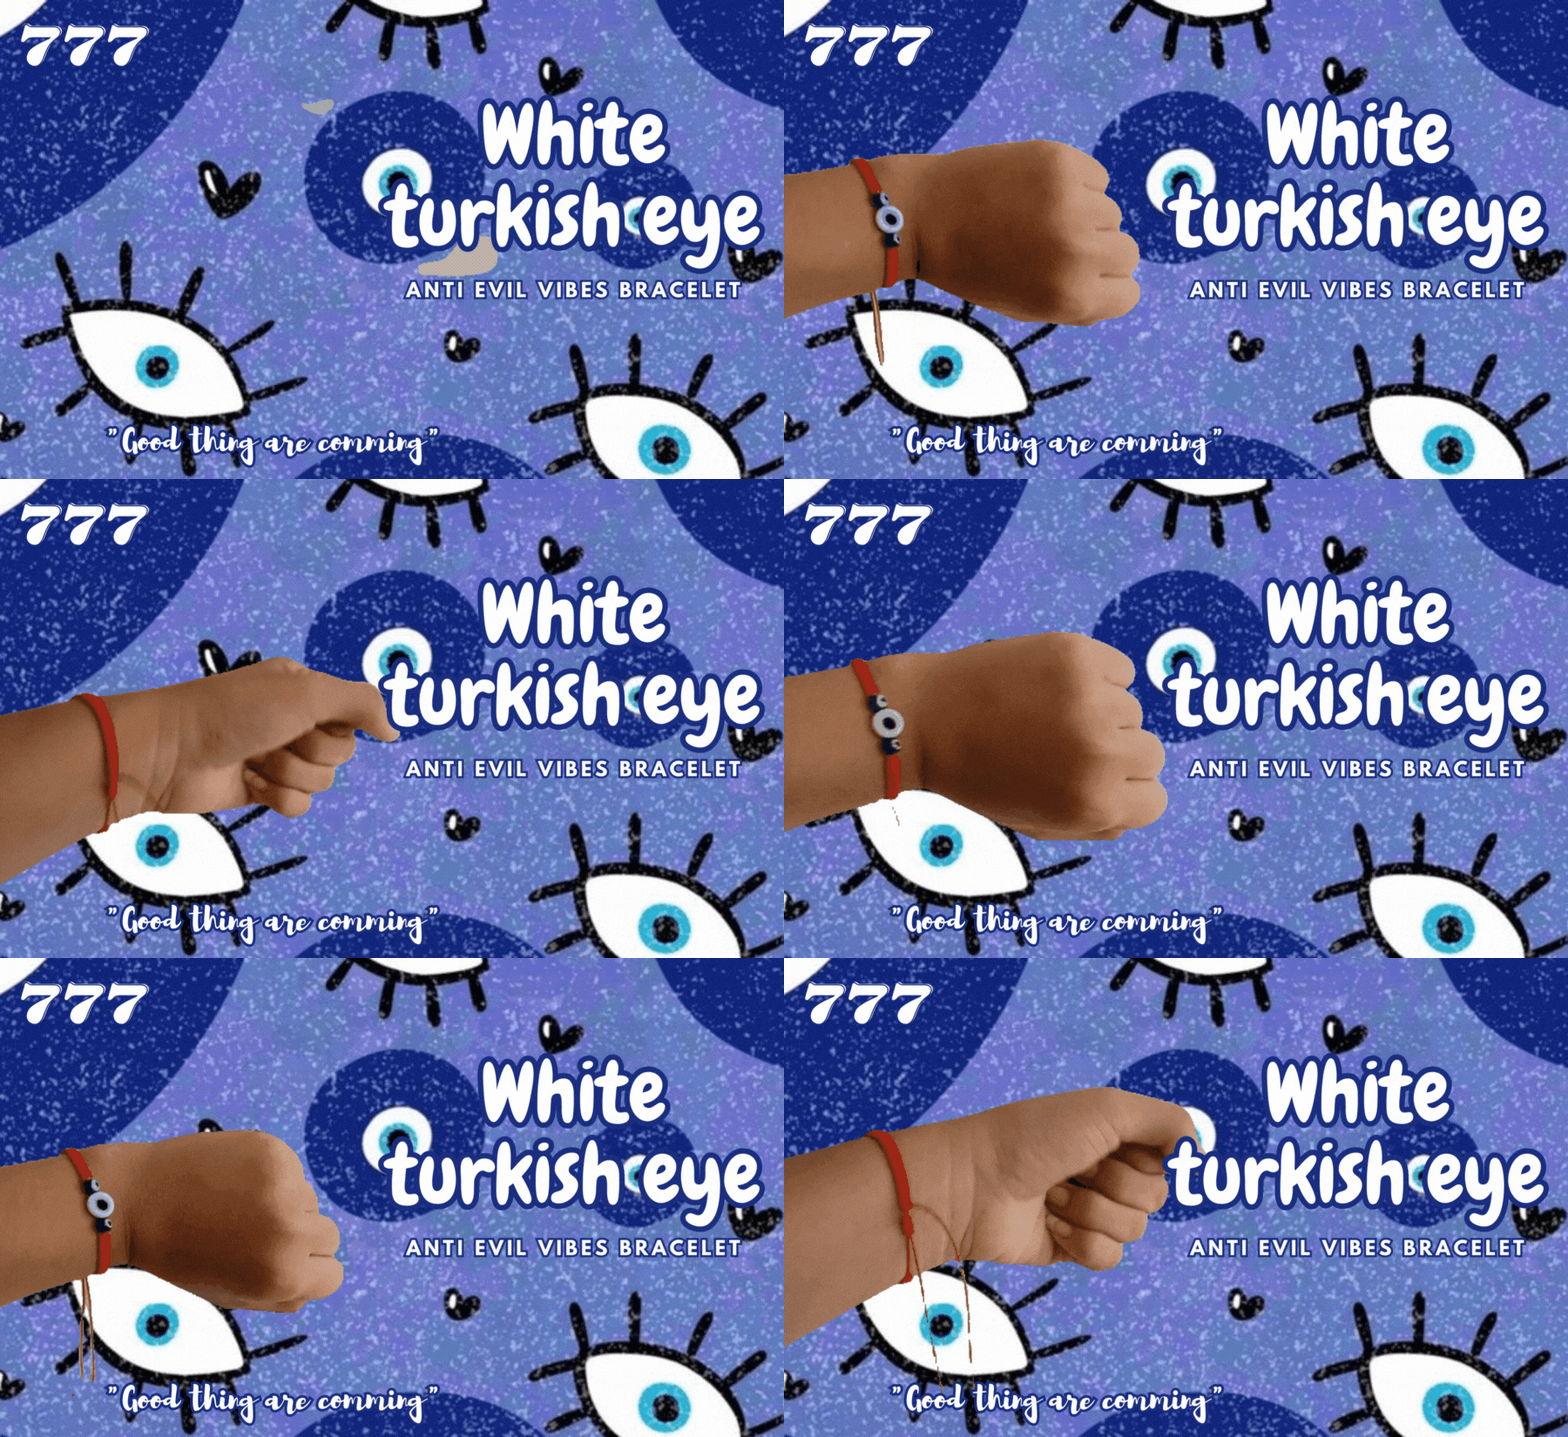
✨🧿Hello community! Welcome🧿✨
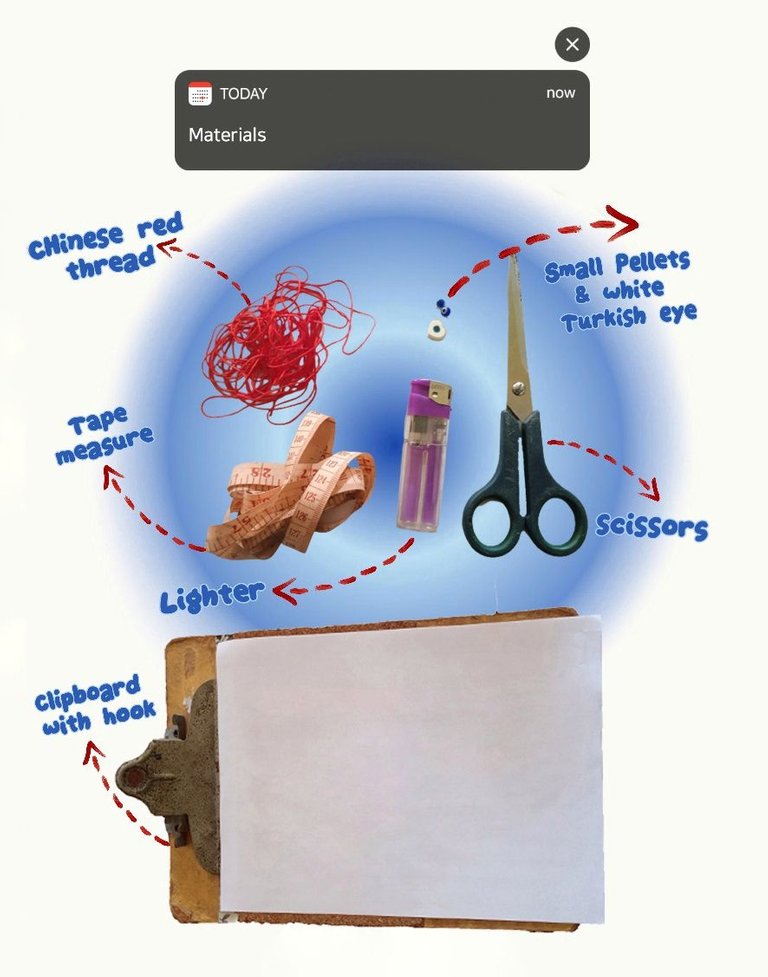
The use of this amulet is related to a belief, that a person can transmit through his gaze the evil or the happening of bad things for another person. In ancient times it was believed that witches used their gazes to make their victims sick, often on demand. However, the evil eye can come voluntarily and involuntarily, and is especially associated with envious people, who hold a lot of resentment within themselves and then radiate their hatred towards others through gazes. Lately it has become popular to use it and they are much sought after in jewelry stores these bracelets (or necklaces) and you can imagine why. That is why here I bring you a tutorial on "How to make your Turkish eye bracelet against bad vibes" without dying trying haha. Here the materials are:
Debido a que he visto por el centro de donde vivo muchas pulseras de ojo turco quise realizar un tutorial de la misma ya que yo si creo mucho en eso de las malas vibras, malas energías o como quieran llamarlo. Inconscientemente hice esta pulserita roja con dos ojos turco azul y un ojo turco blanco. Para quienes no sepan el significado del Ojo Turco Azul se asocia al agua, es el signo del buen Karma, se vincula a las buenas energías y a la protección contra el mal de ojo mientras que el Ojo Turco Blanco simboliza la riqueza, la bondad, la inocencia; es el color de la perfección, que limpia y purifica energías negativas y las transforma en positivas. Mencioné que inconsciente la hice así porque no me sabía los significados de los colores de ojo turco y justamente elegí los colores que necesitaba (siempre hay que utilizar amuletos de estos para protegerte de personas que quieren hacer mal).
El uso de este amuleto se relaciona con una creencia, que una persona puede transmitir mediante su mirada el mal o el suceso de malas cosas para otra persona. En la antigüedad se creía que las brujas hacían uso de las miradas para enfermar a las víctimas, muchas veces a pedido. No obstante, el mal de ojo puede llegar voluntaria e involuntariamente, y se lo asocia especialmente a las personas envidiosas, que guardan mucho resentimiento en sí mismas y luego irradian su odio hacia los demás mediante las miradas. Últimamente se ha popularizado el utilizarlo y que se buscan mucho en las tiendas de bisutería estas pulseritas (o collares) y ya te imaginas porque el motivo. Es por ello que aquí te traigo un tutorial de “Como hacer tu pulsera de ojo turco contra las malas vibras” sin morir en el intento haha. Aquí los materiales son:
*•🧿Materials to be used🧿•*
*•🧿Materials to be used🧿•*
| - Scissor | - Tijera | |
|---|---|---|
| -Chinese red Thread | - Hilo chino rojo | |
| - Tape measure | - Cinta métrica | |
| - Ligter | - Encendedor | |
| - 2 small Pellets & white Turkish eye | - 2 Balines de ojo turco azul y un ojo turco blanco | |
| - Clipboard with hook | - Portapapeles con gancho | |
| - Adhesive tape | - Cinta adhesiva |

*•🧿STEP BY STEP🧿•*
*•🧿STEP BY STEP🧿•* Vamos a cortar una hebra de hilo de 50 cm, quemamos la punta con el encendedor para que sea más fácil introducir los balines y la piedra de ojo turco. Para sujetar el hilo colocamos un extremo del hilo sujetándolo con el gancho del portapapeles mientras que el otro extremo lo sujetamos con la cinta adhesiva como se muestra en la foto esto es para que nuestro hilo al momento de tejer no se mueva ni mucho menos se salgan las piedritas.
Teniendo listo el primer paso pasamos a cortar dos (2) hebras de 60 cm cada una estas son para hacer el tejido en cada extremo de la pulsera. Pasamos el hilo por la parte de abajo del hilo base y lo juntamos hasta el centro y así comenzaremos a realizar el tejido de la pulsera.
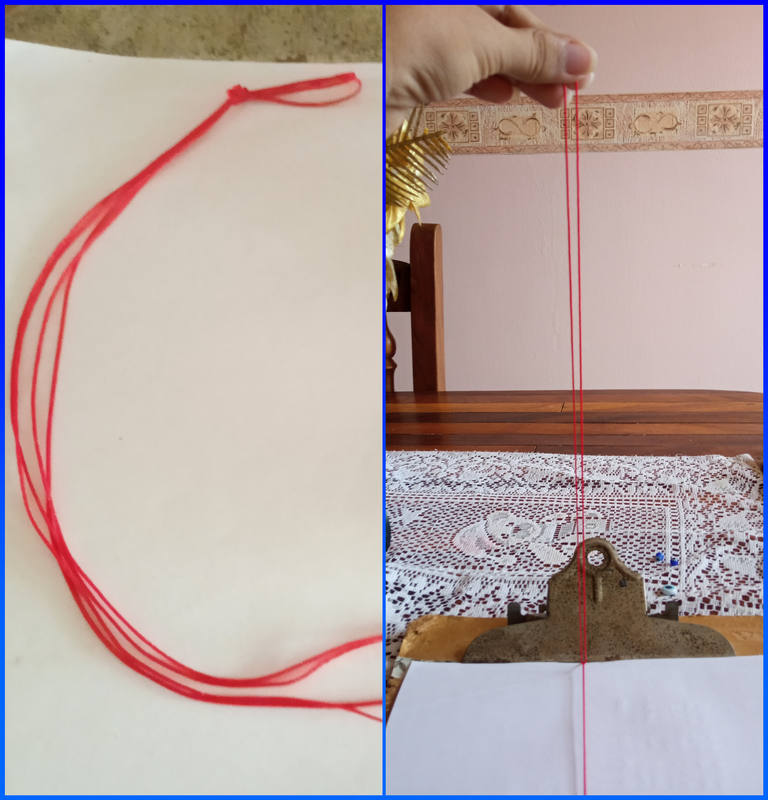
Tomaremos la hebra que está al lado derecho, aquí pisamos con los dedos para que no se mueva del centro realizando así una forma de D. Ahora vamos a tomar el hilo del lado izquierdo y lo vamos a pasar por debajo de la cruz que se está formando. Por debajo metemos el hilo y ya nuevamente lo sacamos halamos cada extremo y así apretamos fuerte el nudo. Repetimos el mismo procedimiento del otro lado. En el gif que se encuentra abajo se mostrará mucho más fácil lo que quiero decir.
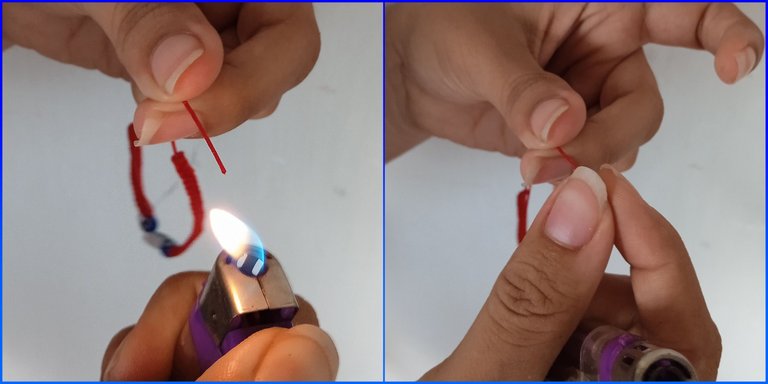
Cuando ya tengamos todo el tejido acabado, que no tenga más hilo para tejer introduciremos un balín de ojo turco azul, el ojo turco blanco y el otro balín de ojo turco azul para pasar a tejer el otro extremo realizando los mismos nudos. Teniendo ya las dos partes listas, cortamos las hebras de hilo excedentes del tejido y las quemamos con el encendedor como se puede ver en la imagen para que no se deshaga los nudos que realizamos.
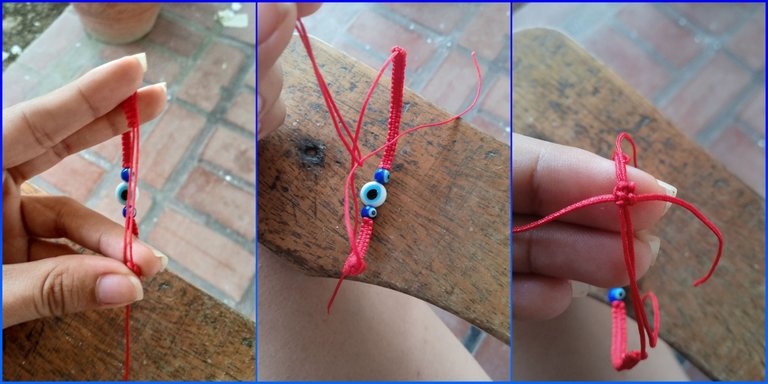
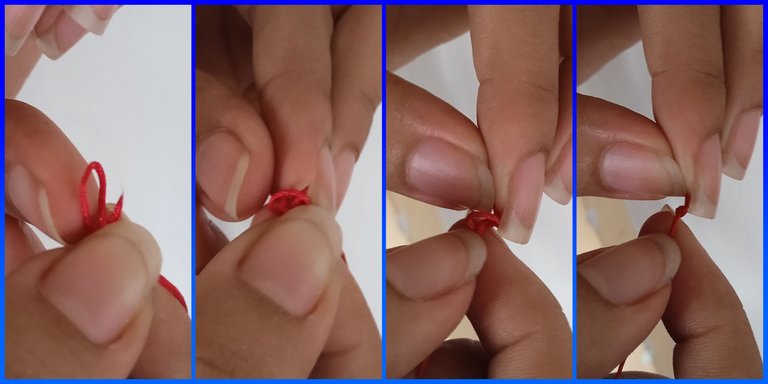
Ok, finalizando los detalles del paso anterior ahora realizaremos el nudo para cerrar nuestra pulsera y que esta no se nos pierda. Antes de ello tenemos que medirnos la muñeca y ver si nos queda un excedente de hilo, si no, cortamos un trozo de aproximadamente 7 cm juntamos los dos extremos tejidos de la pulsera y pasmos el extremo derecho al extremo izquierdo, lo sujetamos con los dedos para que no se muevan y pasamos por debajo de estos dos el hilo de 7 cm y tejemos como anteriormente hicimos con la pulsera, con la diferencia que aquí sería como unos cinco (5) o seis (6) nudos fuertes, esto con el efecto de un nudo corredizo. Este paso se puede observar bien en la imagen.
Finalizamos eliminando los excesos del nudo corredizo (como en el paso número 4 que recortamos y quemamos) para realizarle nudos sencillos a las puntas de los dos extremos de la pulsera tejida y ¡listo!
We are going to cut a 50 cm strand of thread, we burn the tip with the lighter to make it easier to introduce the pellets and the Turkish eye stone. To hold the thread we place one end of the thread holding it with the hook of the paper holder while the other end we hold it with the adhesive tape as shown in the photo this is so that our thread at the time of weaving does not move or much less the pebbles come out.
Having ready the first step we cut two (2) strands of 60 cm each, these are to make the weave at each end of the bracelet. We pass the thread through the bottom of the base thread and join it to the center and thus begin to make the weaving of the bracelet.
We will take the thread that is on the right side, here we step on it with our fingers so that it does not move from the center making a D shape. Now we will take the thread on the left side and we will pass it under the cross that is being formed. Underneath we put the thread and once we pull it out again, we pull each end and tighten the knot. Repeat the same procedure on the other side. The gif below will show much easier what I mean.
When we have all the fabric finished, we will introduce one ball of blue Turkish eye, the white Turkish eye and the other ball of blue Turkish eye to pass to weave the other end making the same knots. Once the two parts are ready, we cut the excess yarn strands and burn them with the lighter as shown in the picture so that the knots do not unravel.
Ok, finishing the details of the previous step now we will make the knot to close our bracelet and that this is not lost. Before we have to measure our wrist and see if we have a surplus of thread, if not, cut a piece of about 7 cm join the two woven ends of the bracelet and pass the right end to the left end, hold it with your fingers so they do not move and pass under these two 7 cm thread and weave as we did before with the bracelet, with the difference that here would be about five (5) or six (6) strong knots, this with the effect of a slip knot. This step can be seen well in the picture.
We finish by eliminating the excess of the slipknot (as in step number 4 that we cut and burned) to make simple knots at the ends of the two ends of the woven bracelet and that's it!

*•🧿IMAGES OF STEP 1&2🧿•*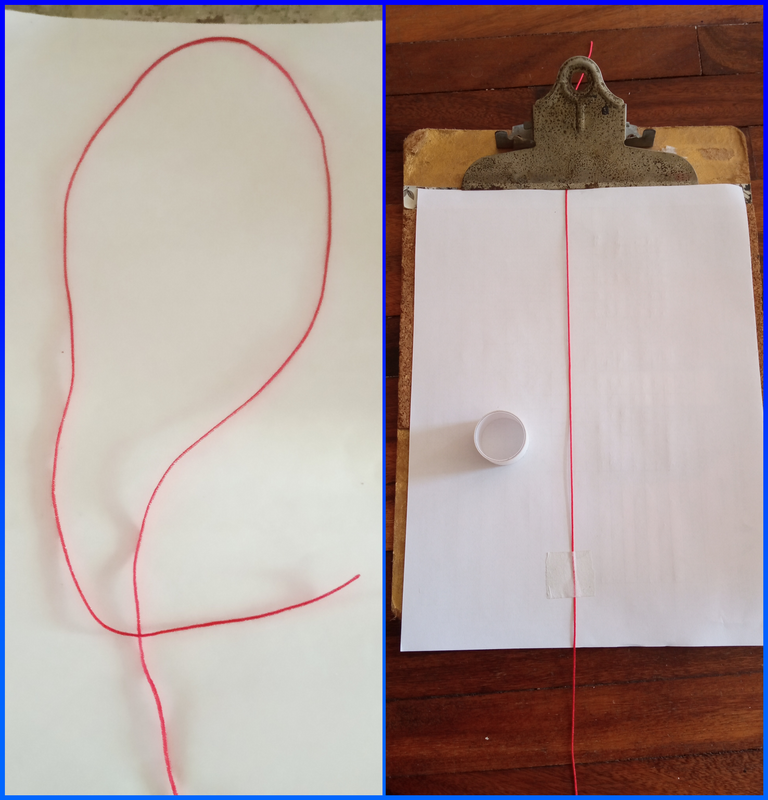
*•🧿IMAGES OF STEP 3🧿•*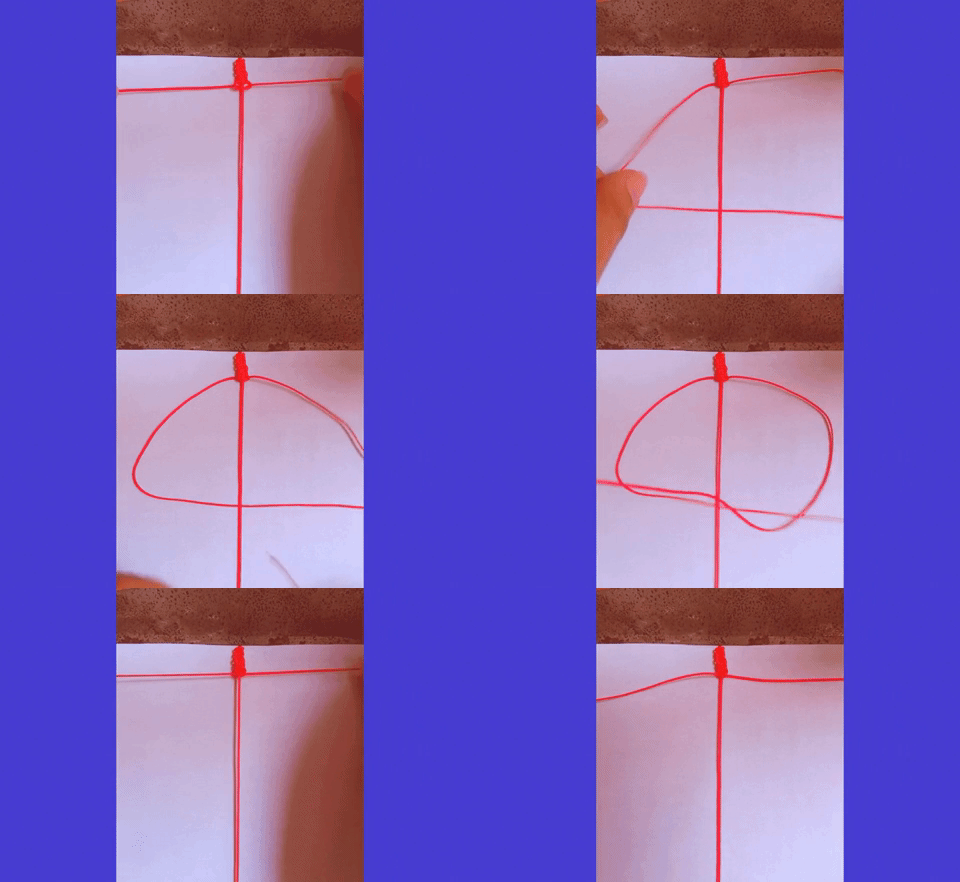
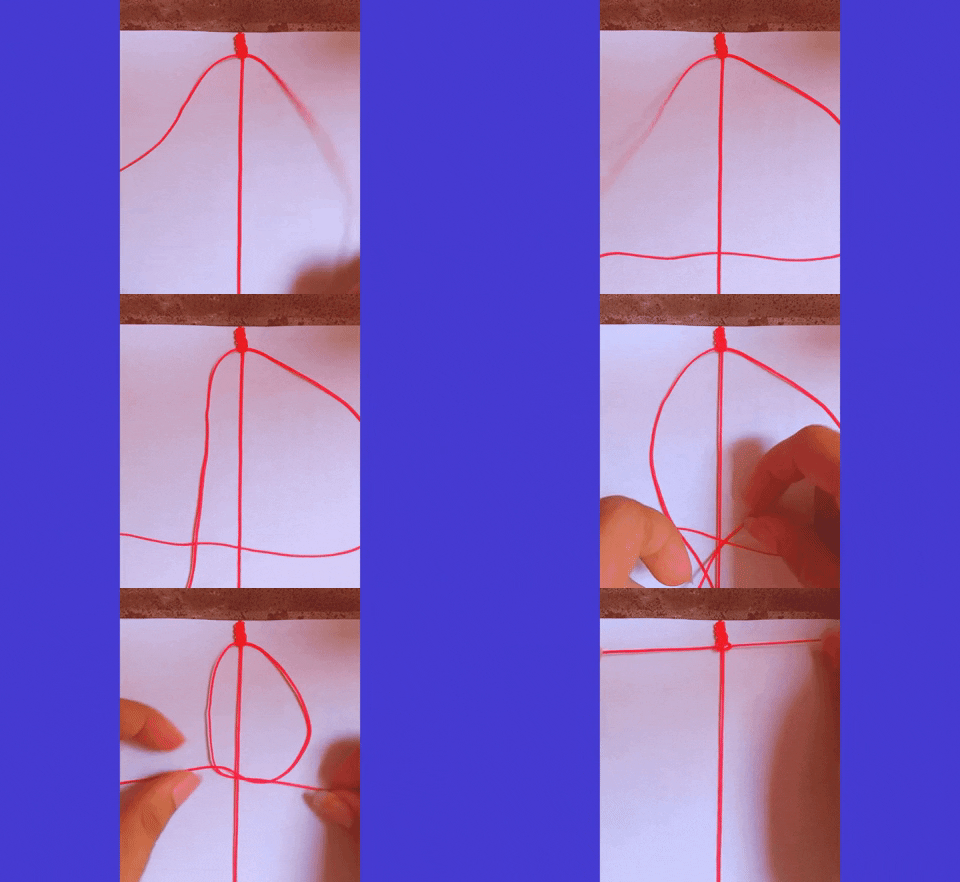
✨Note: You have to be very attentive to the weaving and do it as I am weaving it, first left and then right (from the image). Because if you don't, you will get a very bad weave and it won't look good.
✨Nota: Tienen que estar muy pendientes del tejido y hacerlo así como yo lo estoy tejiendo, primero izquierdo y luego derecho (de la imagen). Porque si no, les quedara un tejido muy mal hecho y no se observará bien.
*•🧿IMAGES OF STEP 4🧿•*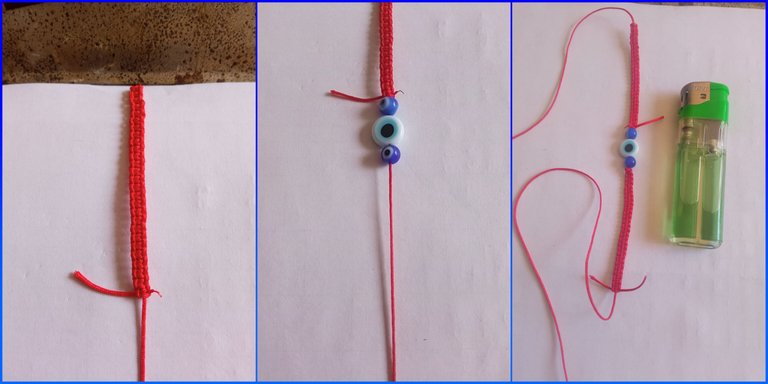
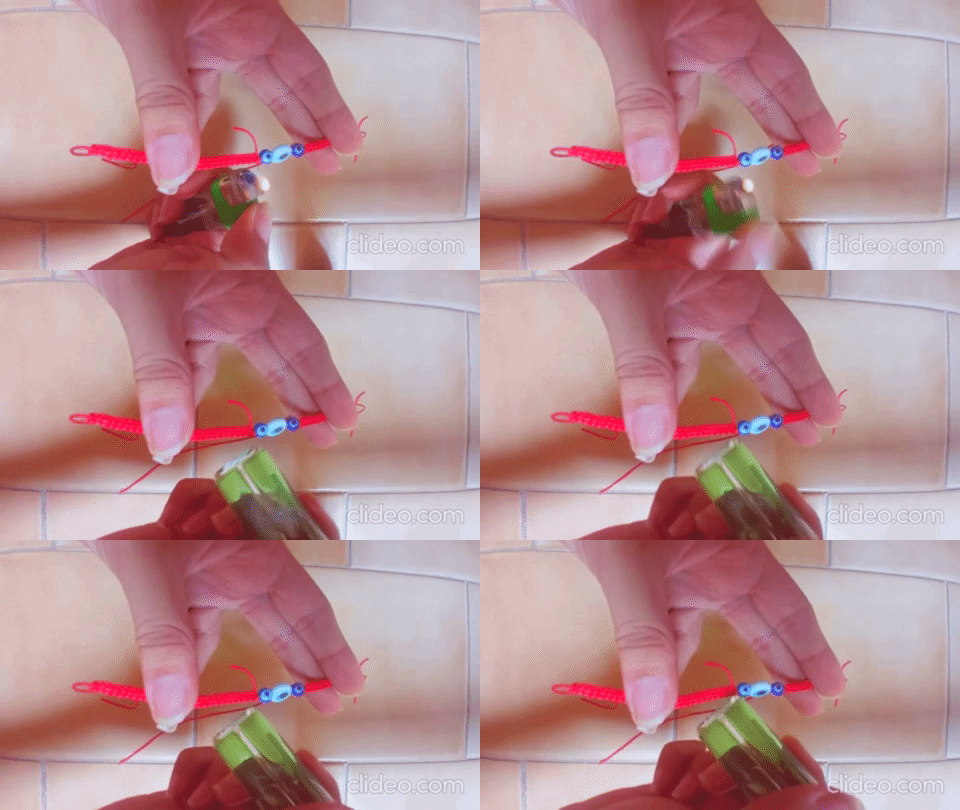
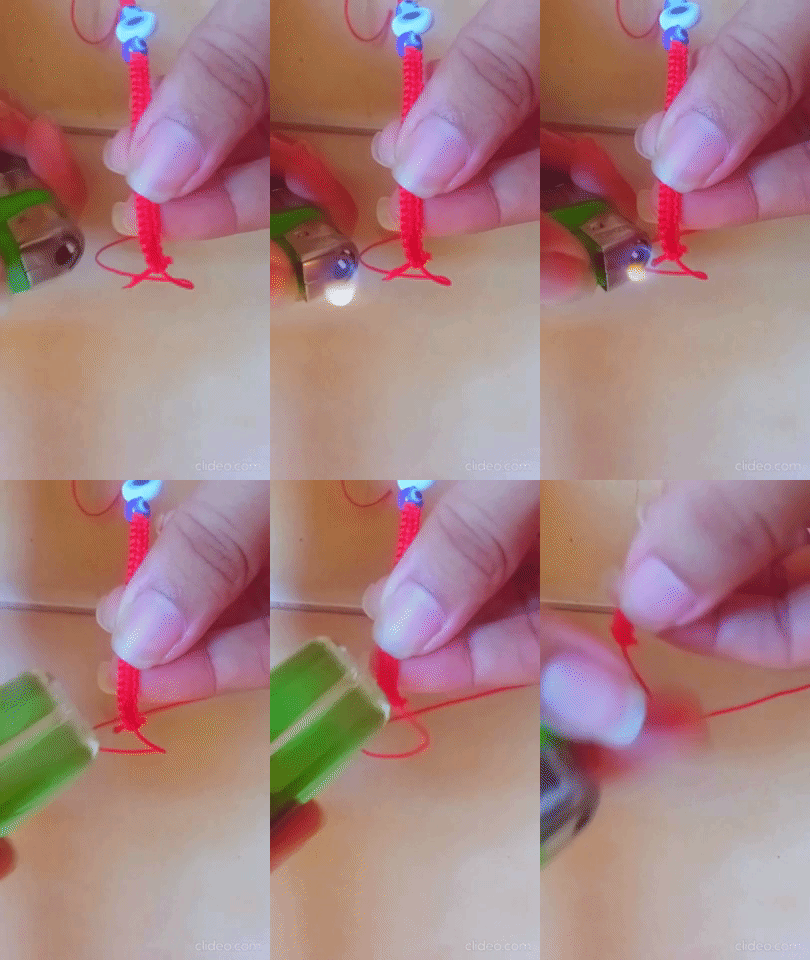
✨Note: You have to burn it and press it with the lighter so that the Chinese thread sticks well to the bracelet to avoid burning your fingers.
✨Nota: Tienen que quemarlo y apretarlo con el encendedor para que el hilo chino se pegue bien a la pulserita para así evitar que se quemen los dedos.
*•🧿IMAGES OF STEP 5🧿•*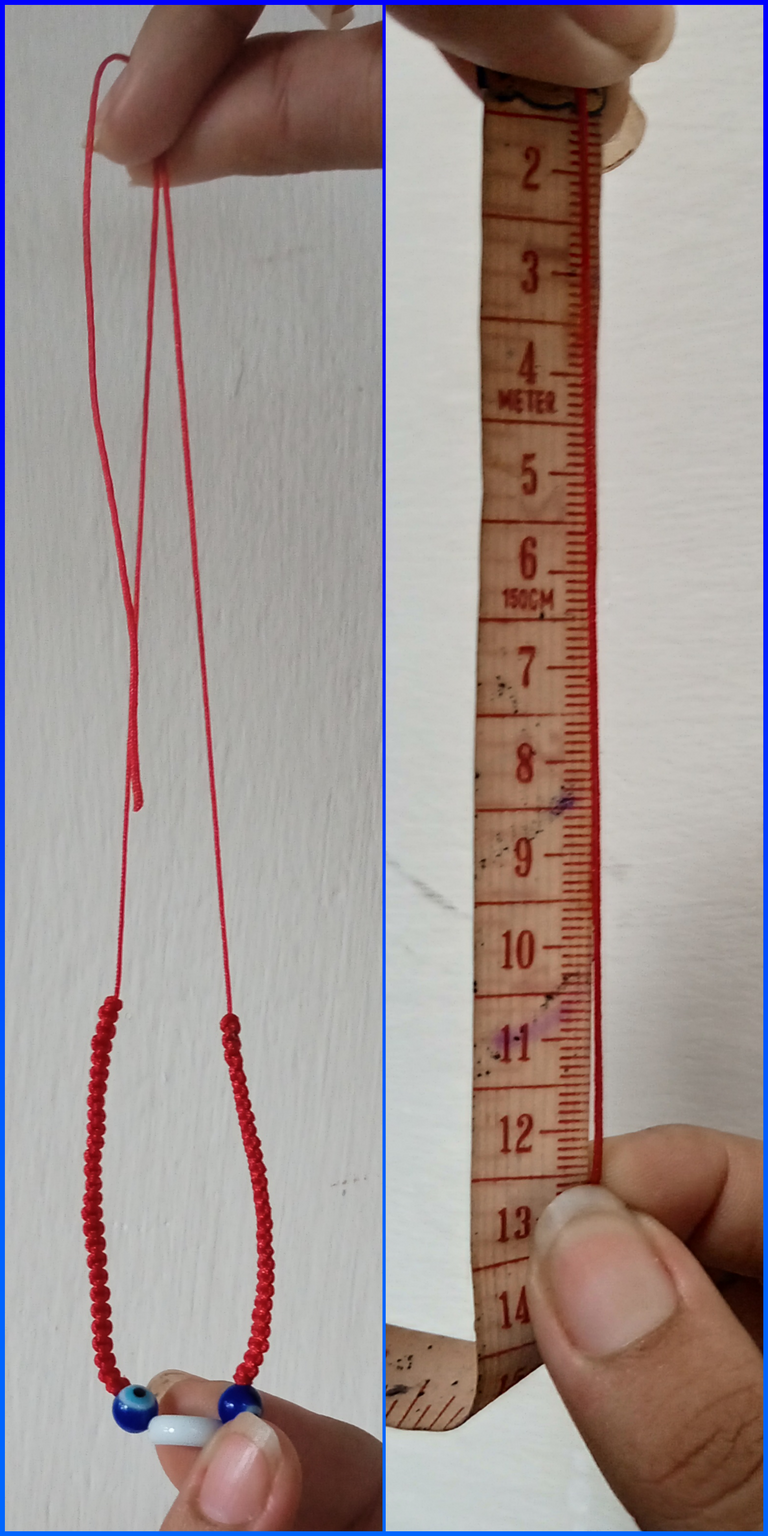
*•🧿IMAGES OF STEP 6🧿•*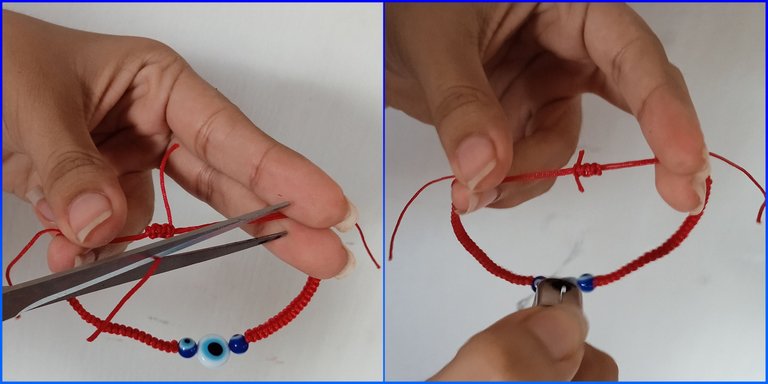

*•🧿 Result 🧿•*
*•🧿 Result 🧿•*
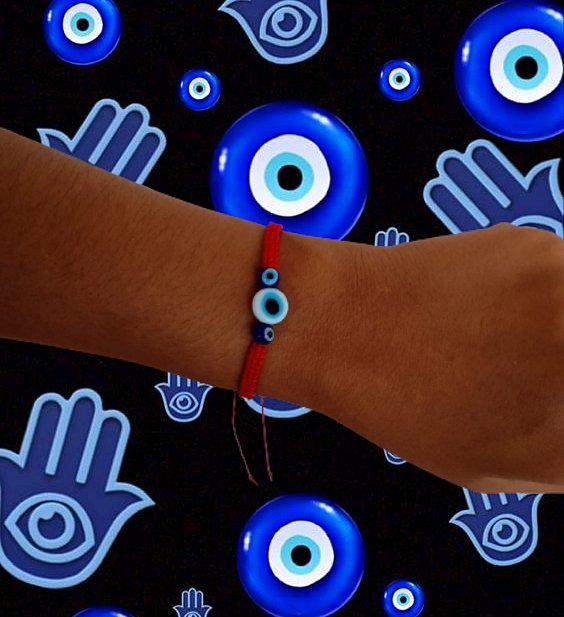

I hope that you can make this bracelet, that when you make it you can transmit your good vibes so that it fills you with prosperity and protection against those who want to do you harm💞.
Espero que puedan realizar esta pulserita, que ustedes cuando la realicen puedan transmitirle sus buenas vibras para que se les llene de prosperidad y de protección contra aquel que les quiera hacer mal💞.

💞Thank you so much for making it this far! I hope you liked my post, I'll see you next time!💞
💞¡Muchas gracias por llegar hasta aquí! Espero que te halla gustado mi post. ¡Nos vemos en una próxima oportunidad!💞
📲 Todas las fotografías fueron tomadas con un teléfono Xiaomi Redmi 10C y Xiaomi Redmi 9
📷 TODAS LAS FOTOS SON DE MI PROPIEDAD

✨"Buenas vibras y energía positiva te deseo hoy para que veas el mundo de otro color"✨.


