EN
First steps with hive-js
Hive-js can be found under different links, but always ends up here. There you will also find the documentation where you can find all functions of hive.api.
There are several ways to use hive-js. You can find them all here. The easiest one in my opinion is the CDN version. Just include the CDN version in your project.
Create a file in a text editor*, name it index.html and insert the following:
<html>
<head>
<script src="https://cdn.jsdelivr.net/npm/@hiveio/hive-js/dist/hive.min.js"></script>
</head>
<body>
</body>
</html>
You have already integrated Hive-js. It's quite simple, isn't it?
Of course nothing happens yet, because you only included it.
To make something happen, you have to call a function. You can find all of them in the documentation. Unfortunately it is not always explained how to pass the parameters.
Here is a first example, how you can get information about an account:
<html>
<head>
<script src="https://cdn.jsdelivr.net/npm/@hiveio/hive-js/dist/hive.min.js"></script>
<script src="https://code.jquery.com/jquery-3.6.0.min.js" integrity="sha256-/xUj+3OJU5yExlq6GSYGSHk7tPXikynS7ogEvDej/m4=" crossorigin="anonymous"></script>
</head>
<body>

Username: <input id="username"><button id="btnShowAccount">Show Account information</button>

<h2>Ausgabe/Output:</h2>
<div id="log"></div>
<script>
$("#btnShowAccount").click(function(){
let username= $("#username").val();
hive.api.getAccounts([username], function(err, result) {
$("#log").html(JSON.stringify(result));
  console.log(err, result);
});
});
</script>
</body>
</html>
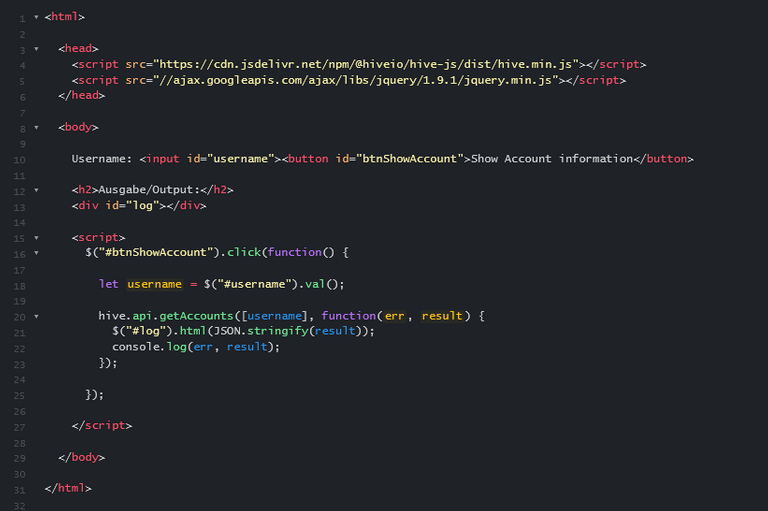
I added jQuery on line 5, which is a JavaScript library.
I like to use it because you have to write much less code to accomplish the same thing.
On line 10 I added an input field and a button so you can enter a username you want to query.
In line 13 another DIV where the output should be.
Lines 16-25 define what should happen when you click on the button.
First the username is read from the input field (line 18) and passed to the hive.api.getAccounts function in line 20. The function expects an array, because you can query multiple usernames at the same time, so username must be specified in square brackets.
With line 21 we output the response of the api in the div. Since the return value is a Javascrip object, I use JSON.stringify() to convert it to a string.
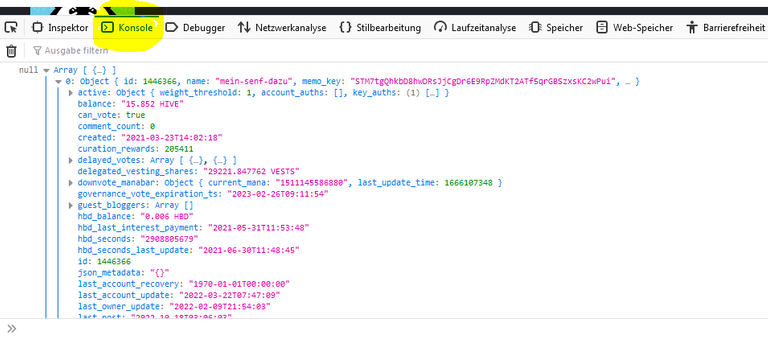
With console.log() we can output it to the browser's console, this is accessible in Firefox and in Chrome (on Windows at least) via F12.
The output from the browser is of course much more readable:
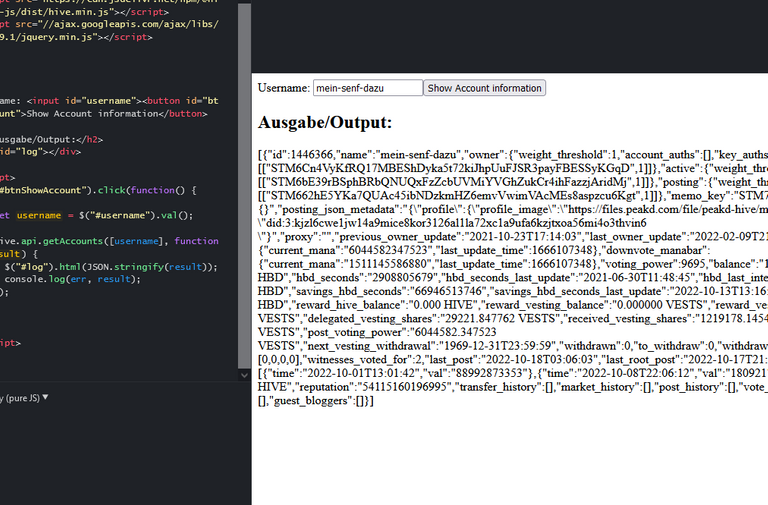
This is how it looks in the div:
You can test the whole thing here and also play around directly:
https://jsfiddle.net/hive_coding/x1q4L0of/
here is another example, where you can enter multiple usernames, separated by a comma:
https://jsfiddle.net/hive_coding/tgv581hd/
Caution! If you use jsfiddle, then only with calls that do not require passwords!.
*I like to use EditPad lite, have for years, don't ask me why, but there are many others and also many that are designed directly for HTML and javascript.
I hope you enjoyed the first part of my series about Hive-JS and it was understandable so far.
Translated with www.DeepL.com/Translator (free version)
DE
Erste Schritte mit hive-js
Hive-js findet ihr unter verschiedenen Links, landet aber an sich immer hier. Dort gelangt ihr auch zur Dokumentation in der ihr alle Funktionen von hive.api findet.
Um hive-js zu nutzen, gibt es mehrere Möglichkeiten. Diese findet ihr alle hier. Die einfachste ist meiner Meinung nach die CDN-Variante. Einfach die CDN-Version in euer Projekt einbinden.
Erstellt eine Datei in einem Texteditor*, nennt diese index.html und fügt Folgendes ein:
<html>
<head>
<script src="https://cdn.jsdelivr.net/npm/@hiveio/hive-js/dist/hive.min.js"></script>
</head>
<body>
</body>
</html>
Schon habt ihr Hive-js eingebunden. Ist doch ganz simpel oder?
Natürlich passiert bisher nichts, denn ihr habt es ja nur eingebunden.
Damit auch irgendwas passiert, muss eine Funktion aufgerufen werden. Diese findet ihr alle in der Dokumentation. Leider nicht immer erklärt, wie die Parameter übergeben werden müssen.
Hier ein erstes Beispiel, wie ihr Informationen zu einem Account abrufen könnt:
<html>
<head>
<script src="https://cdn.jsdelivr.net/npm/@hiveio/hive-js/dist/hive.min.js"></script>
<script src="https://code.jquery.com/jquery-3.6.0.min.js" integrity="sha256-/xUj+3OJU5yExlq6GSYGSHk7tPXikynS7ogEvDej/m4=" crossorigin="anonymous"></script>
</head>
<body>

Username: <input id="username"><button id="btnShowAccount">Show Account information</button>

<h2>Ausgabe/Output:</h2>
<div id="log"></div>
<script>
$("#btnShowAccount").click(function(){
let username= $("#username").val();
hive.api.getAccounts([username], function(err, result) {
$("#log").html(JSON.stringify(result));
  console.log(err, result);
});
});
</script>
</body>
</html>
Ich habe in Zeile 5 noch jQuery eingefügt, das ist eine JavaScript-Bibliothek.
Ich nutze es gern, weil man damit viel weniger Code schreiben muss, um das Gleiche zu bezwecken.
In Zeile 10 habe ich ein Input-Feld eingefügt und ein Button, sodass man einen Usernamen eingeben kann, den man abfragen möchte.
In Zeile 13 noch ein DIV, in dem die Ausgabe erfolgen soll.
Durch Zeile 16-25 wird festgelegt, was passieren soll, wenn man auf den Button klickt.
Zunächst wird der Username aus dem Inputfeld eingelesen (Zeile 18) und in Zeile 20 an die hive.api.getAccounts Funktion übergeben. Die Funktion erwartet ein Array, denn man kann mehrere Usernamen gleichzeitig abfragen, daher muss Username in eckigen Klammern angegeben werden.
Mit Zeile 21 geben wir die Antwort der Api im Div aus. Da der Rückgabewert ein Javascrip Object ist, nutze ich JSON.stringify() um es in einen String umzuwandeln.
Mit console.log() können wir es in der Konsole des Browsers ausgeben, diese ist in Firefox und in Chrome (bei Windows zumindest) über F12 zu erreichen.
Die Ausgabe vom Browser ist natürlich deutlich leserlicher:
So sieht es im Div aus:
Das ganze könnt ihr hier testen und direkt auch herumspielen:
https://jsfiddle.net/hive_coding/x1q4L0of/
hier noch ein Beispiel, bei dem man mehrere Usernamen, getrennt durch ein Komma eingeben kann:
https://jsfiddle.net/hive_coding/tgv581hd/
Achtung! Wenn ihr jsfiddle nutzt, dann nur mit Aufrufen, die keine Passwörter benötigen!
*Ich nutze gern EditPad lite, schon seit Jahren, fragt nicht wiese, es gibt aber viele weitere und auch viele, die direkt für HTML und Javascript ausgelegt sind.
Ich hoffe euch hat der erste Teil meiner Reihe zu Hive-JS gefallen und es war soweit verständlich.
