Welcome back to class! I am happy to see you returning to learn some coding and app development on M365 with me.

My hopes as of writing this post, I will be able to get two sections into this post. However, we will have to see, I tend to get wordy when writing these. Not a good kind of wordy though 😄
Continuing from the last post, we are just going to jump right into the next section called "Understand the Format of Actionable Messages in Outlook".
Jumping right in, the important key to Actionable Messages are the message cards, or the card displayed at the top of the message. These message cards need to be efficient at catching attention. When prominently at the top, users are much more likely to use/see it which can be effective for communication and requesting action.
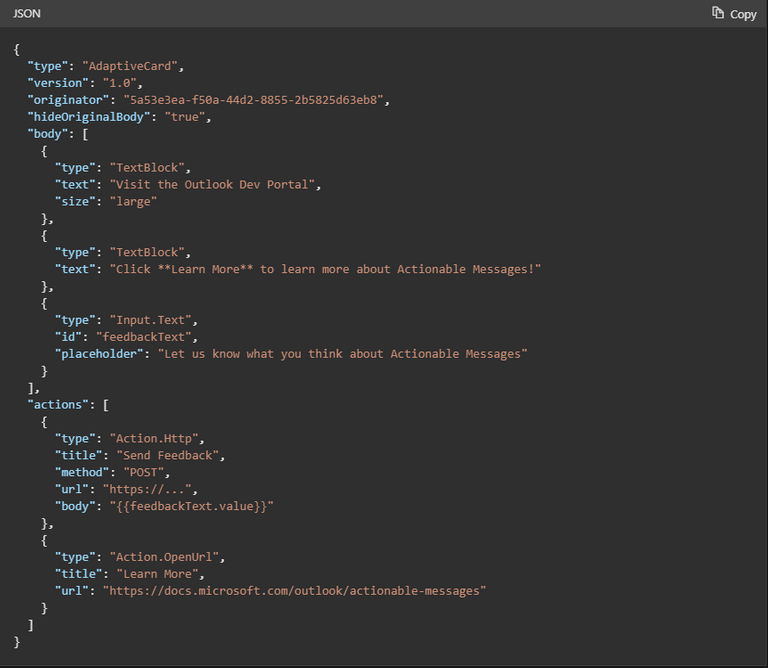
When building, these actionable messages are implemented using standard adaptive card syntax and features, along with some Outlook-specific features. An example of this is the JSON card pictured below.

Now that we have seen a basic example of an actionable message. Let's look at the specific parts that are in the code, identifying these sections can be beneficial to understanding the structure of actionable messages. We can see that TextBlock, Input.text, and Action.OpenURL are being used for some basic functionality. and As mentioned before, we also have some Outlook-specific elements that can be included.
As mentioned before, we also have some Outlook-Specific elements. So let's take a look at some of them.
• originator - This contains the provider ID assigned during registration of our service (Covered in later modules)
• hideOriginalBody - This controls whether the Outlook client displays the HTML body of the email message. It is up to the builder, but some older unsupported clients wont show actionable messages. So it is always good to have a backup just in case
• Action.Http - This element will send the recipients input to the HTTPS endpoint specified in the URL properties. My best way of understanding this, is that we take information but we also need to send it somewhere. So essentially we are adding an element that sends it to an "address"

Beyond this, have some other information so that our AM will work correctly and do what we want. One includes the endpoint, which has been mentioned above. An endpoint is a web API that is implemented to receive information from actionable messages and process it.
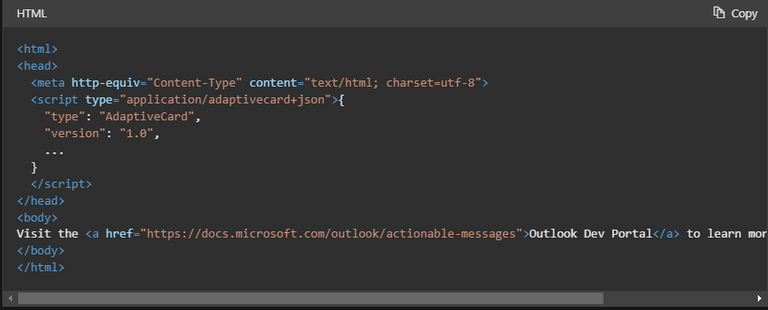
"Okay, so I understand the sections that make an AM.. but how do I actually use this in an email?" Good question! The image below shows the <#head> and <#script> tags which will direct them to the right place. (Ignore hashtags, I could not get the tags to come up without it)

By looking through this bit of code, we can understand how it is getting called upon and where to go. Which would be the "https://docs.microsoft . . ." link at the bottom. The <#script> tag is what is adding the actionable message to the emails.
We did it! The section is done! Unfortunately we hit my "limit" and it would be too long of a post to continue on. But hopefully this is fun for you as it is for me!
Writing these posts are asking tough questions that really make me wonder if I read it at all. I am asking myself so many different questions to understand better and to allow someone that didn't read the module I did, to understand.
If you did not read part 1, I highly suggest going back and reading it to better understand some terms that I have used in this post. As well, I have a disclaimer as I am human and do make mistakes. I am learning as well and may not portray the lesson perfectly or the right way.
Until next time...


