Hello good evening my creative Hive Diy family! I hope you are feeling great. Today is already the first of June, we enter this new month and I wish with all my heart that it will be a beautiful month for everyone, greatly blessed, that you do not lack happiness, creativity, productivity and the desire to continue creating to share in the community, for a month full of beautiful crafts and tutorials.♡
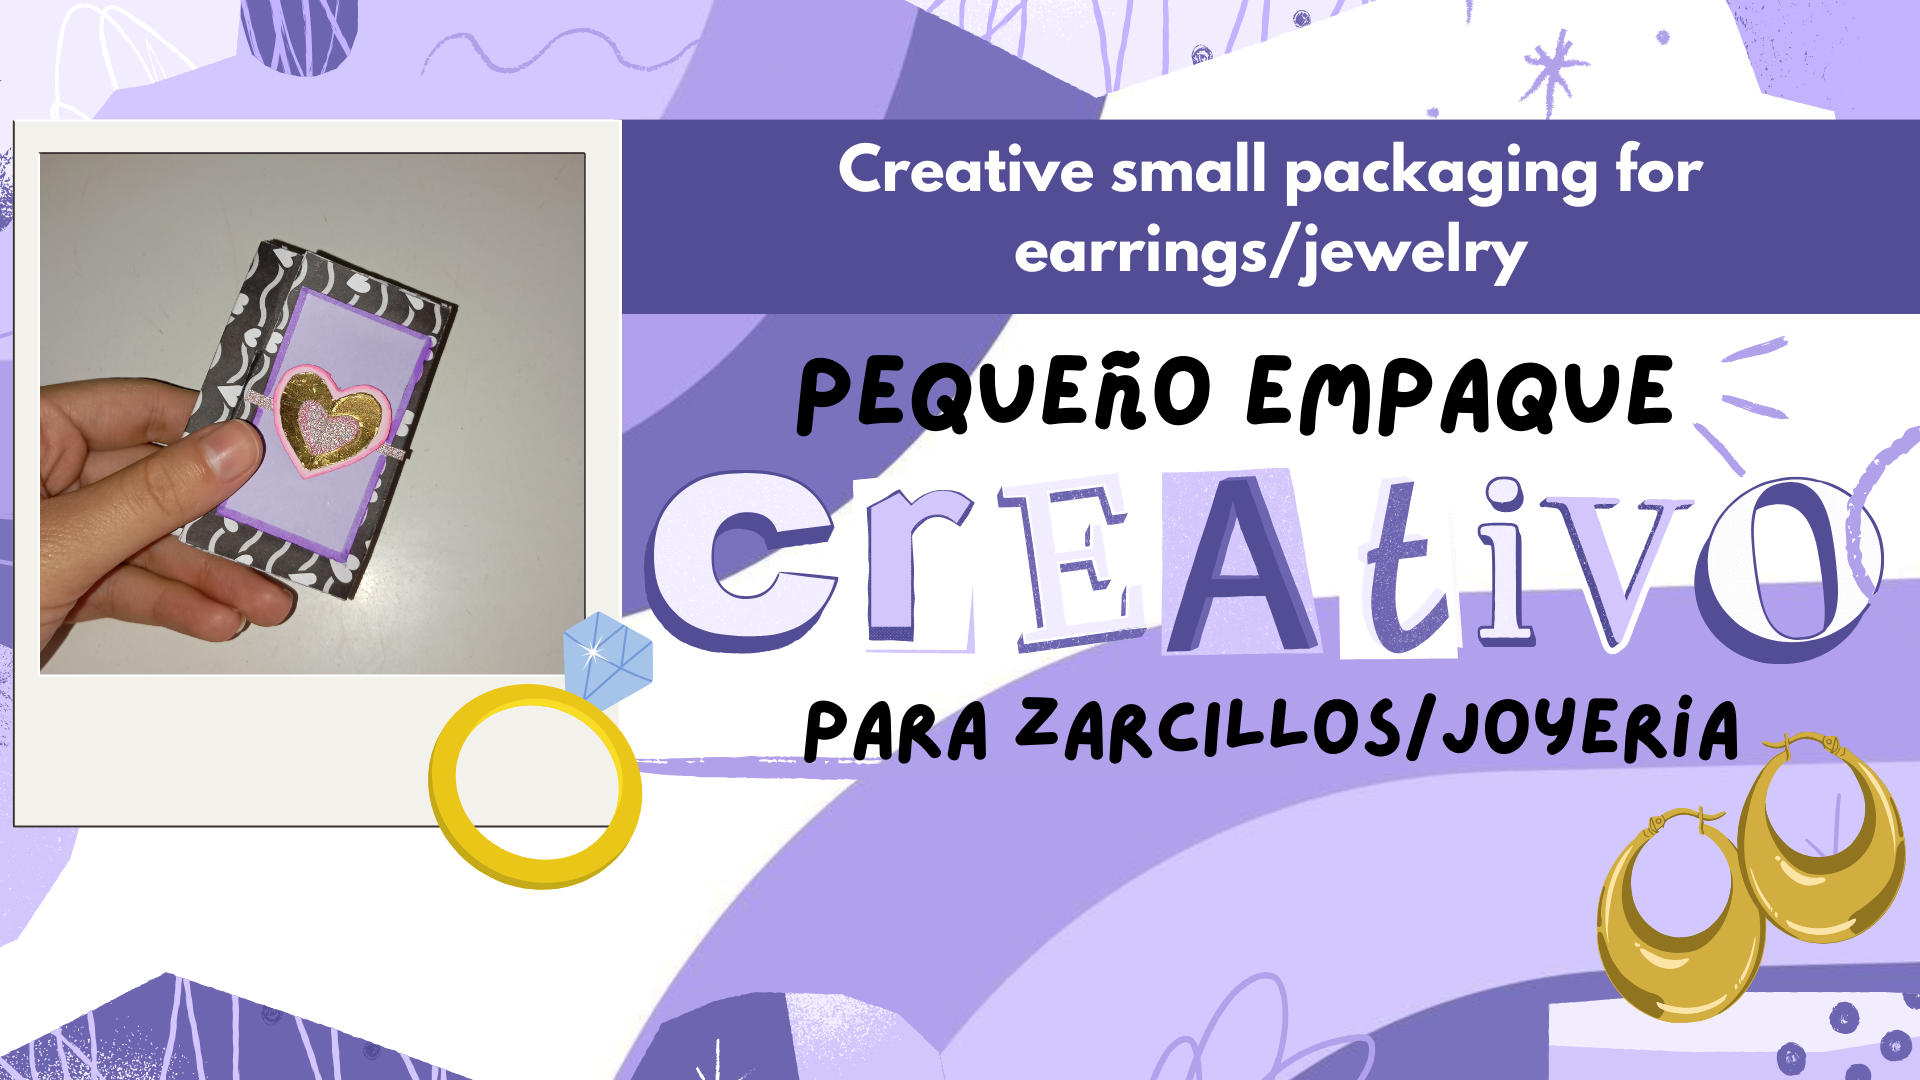
¡Bienvenidos a una nueva manualidad familia! En está ocasión quise compartirles una manualidad sencilla, pero muy bonita y útil en ciertas ocasiones. Así, les hablo de una pequeña tarjeta, que hace la función de una mini caja para regalar zarcillos, por lo tanto es un empaque pequeño, justo para tal obsequio, ideal para cuando no hayamos dónde poner este regalo algo pequeño, además podemos ajustar a nuestro tamaño deseado y personalizarlo a nuestro gusto.
Welcome to a new craft family! This time I wanted to share with you a simple craft, but very nice and useful on certain occasions. So, I'm talking about a small card, which serves as a mini box to give earrings, so it is a small package, just right for such a gift, ideal for when we have nowhere to put this gift something small, plus we can adjust to our desired size and customize it to our liking.
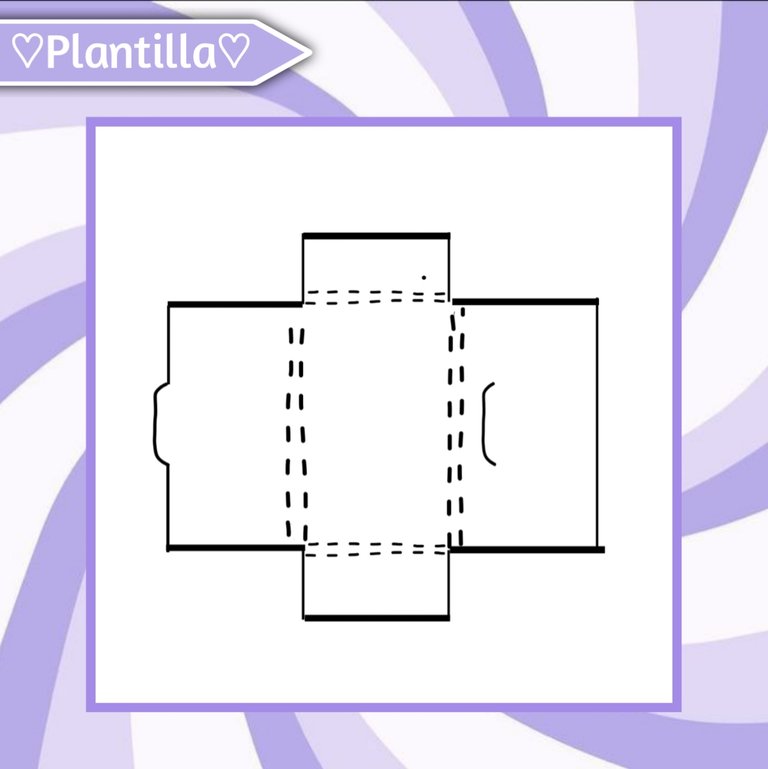
♡💜💗Template💗💜♡
Está es una plantilla sencilla que hice lo mejor que pude, la pueden adaptar a su tamaño deseado.💜
This is a simple template that I did the best I could, you can adapt it to your desired size.💜
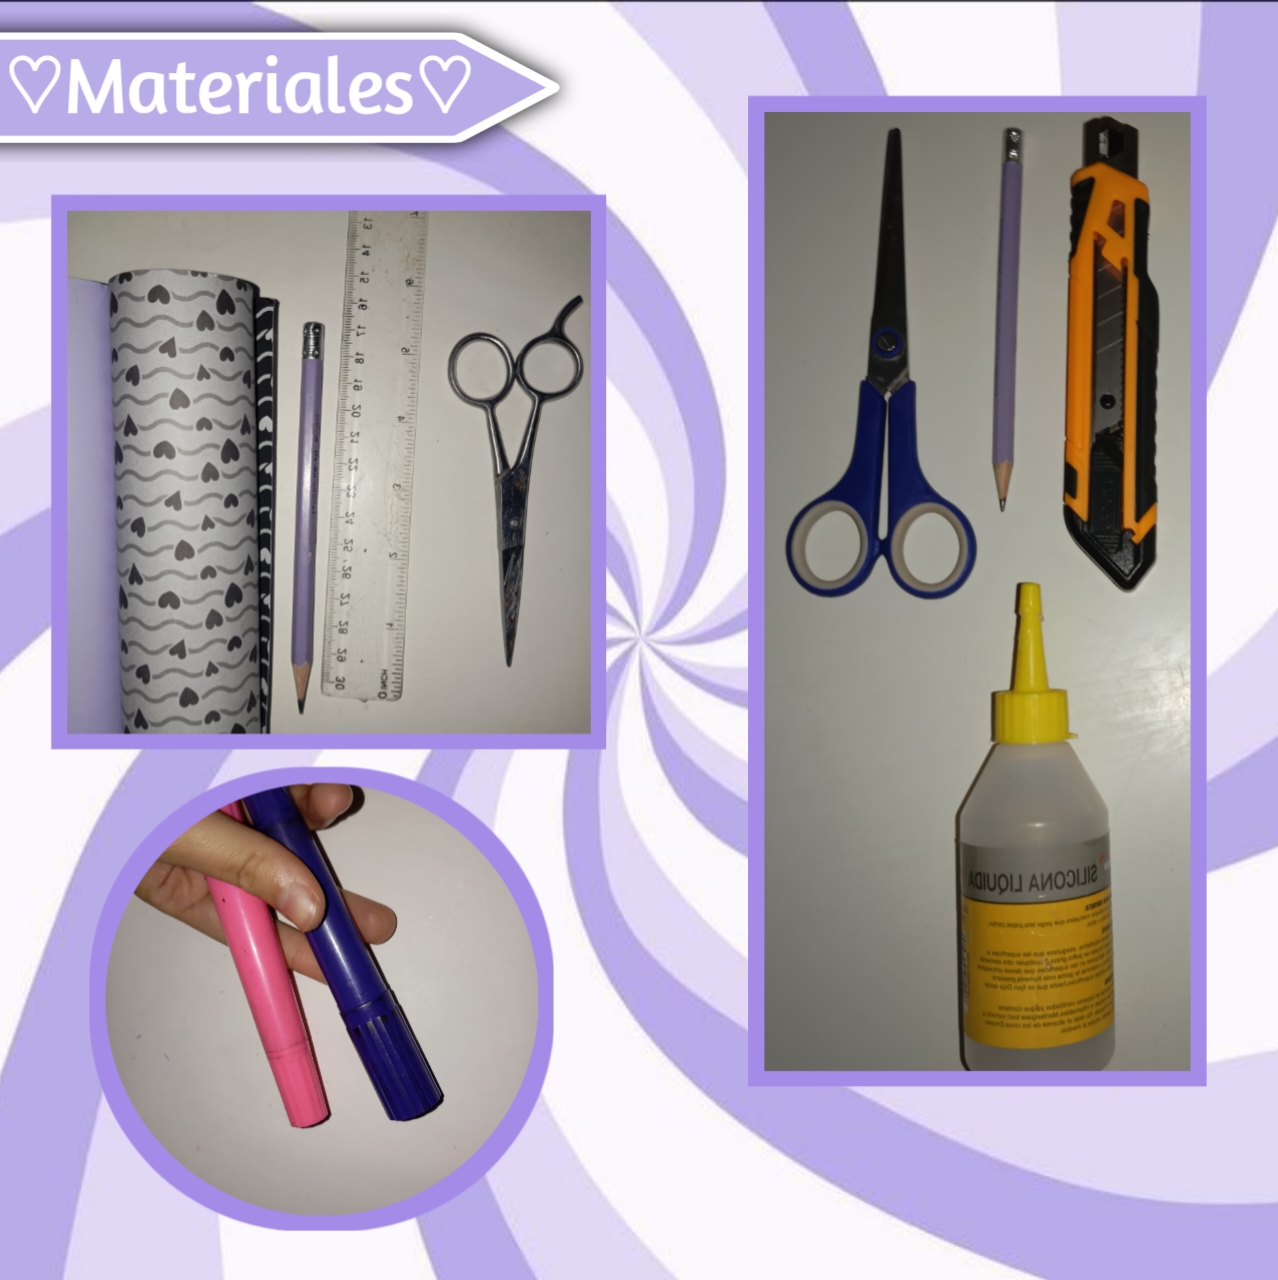
♡💜💗Materials💗💜♡
Solo necesitaremos estos materiales:
We will only need these materials:
- Cartulinas
- Silicón
- Regla
- Lápiz
- Cutter
- Cardboard
- Silicone
- Ruler
- Pencil
- Cutter
♡💗✨Step by Step✨💗♡
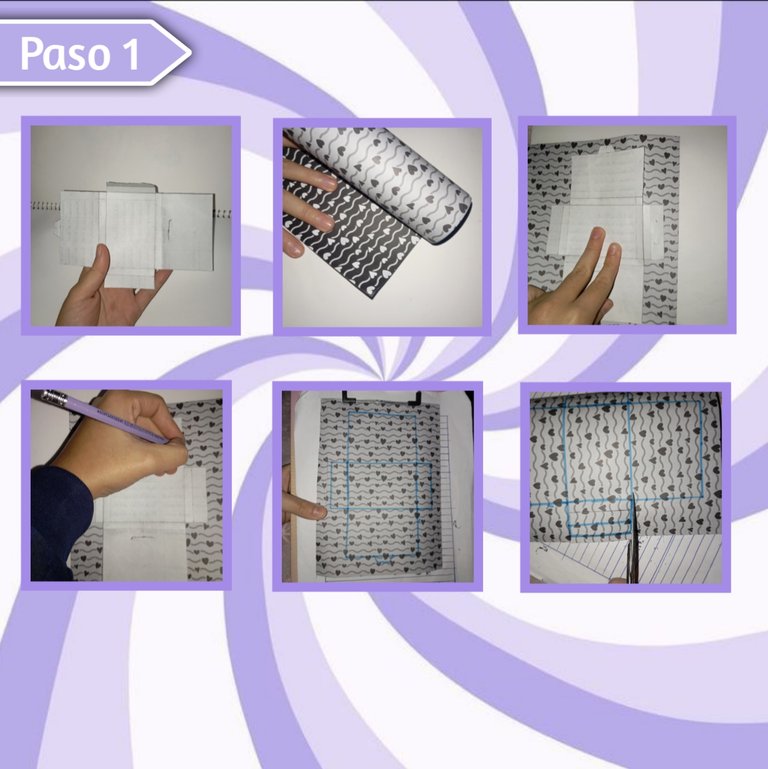
Paso 1:
Step 1:
Comenzaremos sacando nuestra plantilla, esto lo pueden imprimir o incluso pasarlo a mano adaptándolo al tamaño que gusten, así lo hice yo. Continuamos extendiendo nuestra cartulina base, que puede ser del color o diseño que más nos guste, luego colocaremos la plantilla encima y marcaremos muy bien con un lápiz (yo lo marque con marcador para que se apreciará en la foto) y recortamos está parte con ayuda de una tijera.
We will start by taking out our template, you can print it or even pass it by hand adapting it to the size you like, this is how I did it. We continue extending our cardboard base, which can be the color or design that we like, then place the template on top and mark very well with a pencil (I marked it with marker to be seen in the photo) and cut this part with the help of scissors.
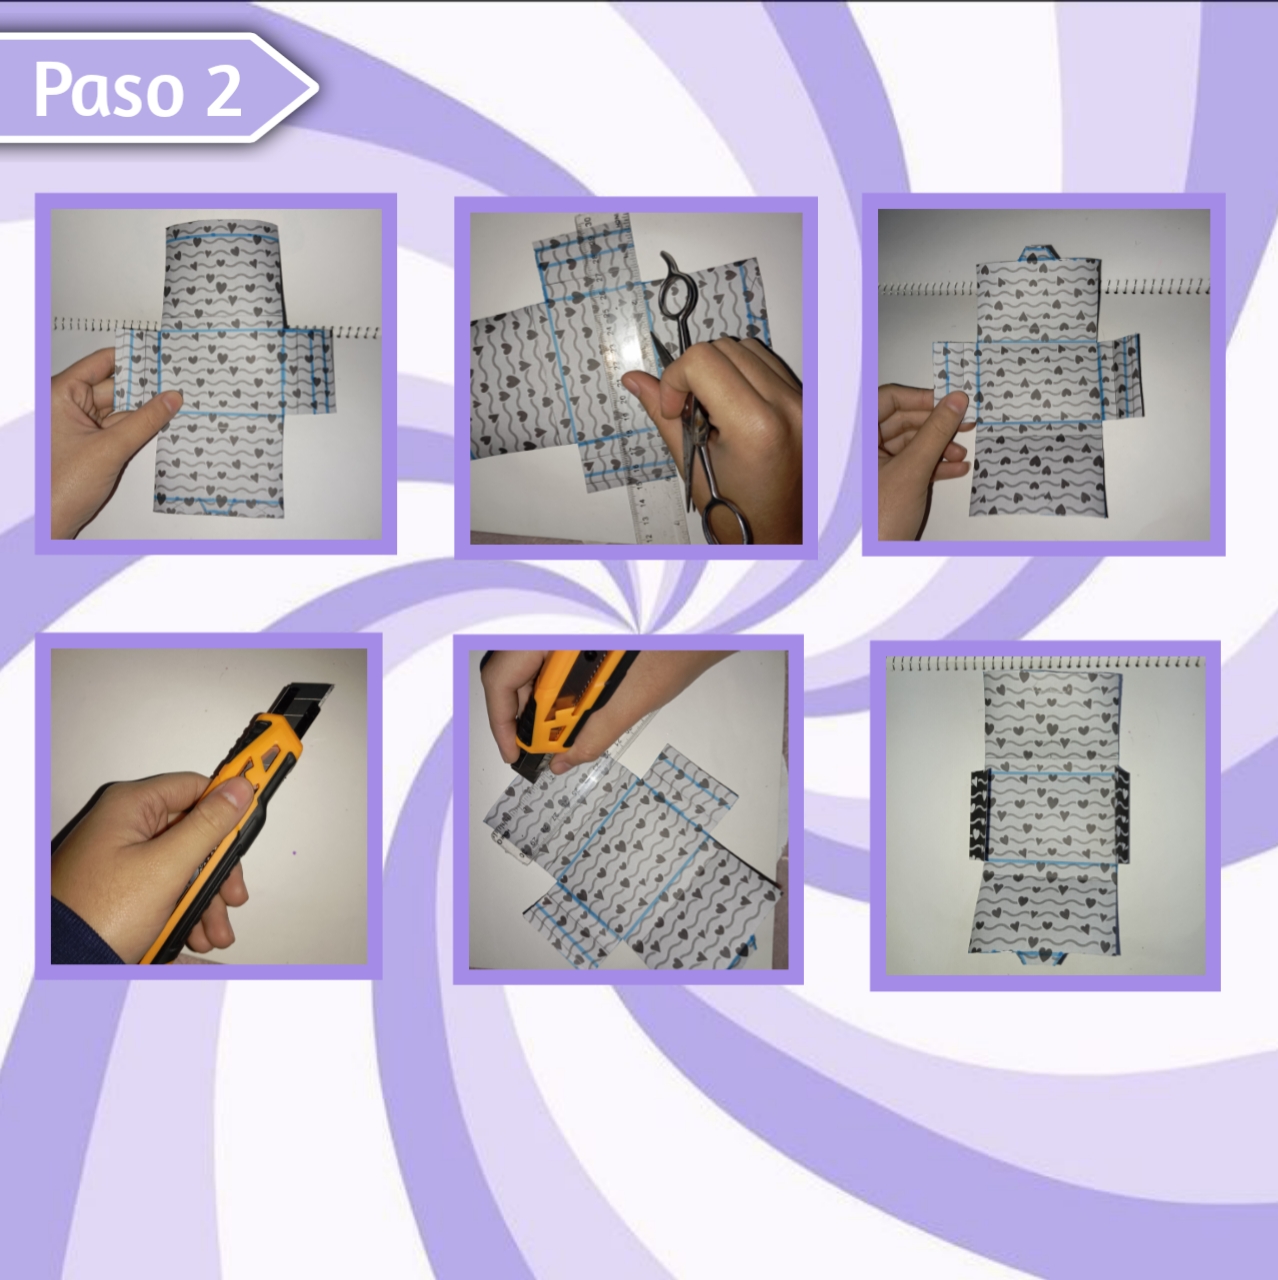
Paso 2:
Step 2:
Ya con nuestra forma recortada, con ayuda de una regla y la punta de una tijera marcaremos uno a uno nuestros dobleces y los sobresalientes lo doblaremos de tal forma que queden hacia adentro, como se puede ver. Así, seguimos tomando nuestro cutter (exacto) y apoyándonos de la regla lo pasaremos cuidadosamente por toda la línea que nos ayudará a cerrar está cajita, abriendo este pequeño orificio.
Once we have our shape cut out, with the help of a ruler and the tip of a pair of scissors we will mark one by one our folds and the protruding ones we will fold them in such a way that they are facing inwards, as you can see. So, we continue taking our cutter (exact) and leaning on the ruler we will carefully pass it all along the line that will help us to close this little box, opening this small hole.
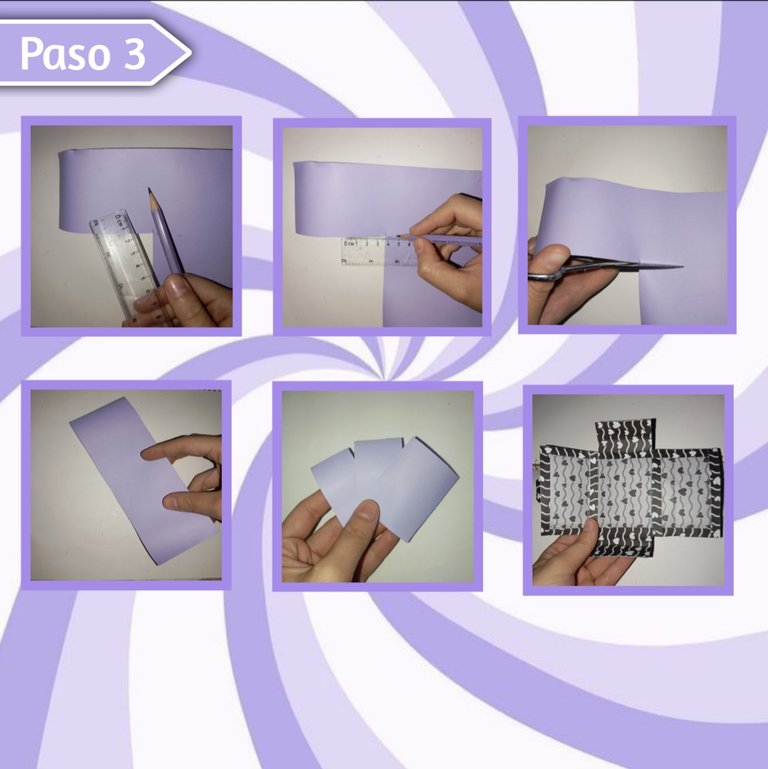
Paso 3:
Step 3:
Ahora vamos con el decorado interno de la cajita, para esto tomamos una cartulina unicolor del color de nuestra preferencia, yo utilicé lila, así con una regla y lápiz, vamos a marcar y recortar muy bien un rectángulo alargado del cual sacaremos tres mini rectángulos, de acuerdo al tamaño de cada espacio interno de la cajita, quitándo unos pequeños milímetros y tomaremos la otra pieza anterior.
Now we go with the internal decoration of the box, for this we take a unicolor cardboard of the color of our preference, I used lilac, so with a ruler and pencil, we will mark and cut very well an elongated rectangle from which we will take three mini rectangles, according to the size of each internal space of the box, removing a few millimeters and we will take the other previous piece.
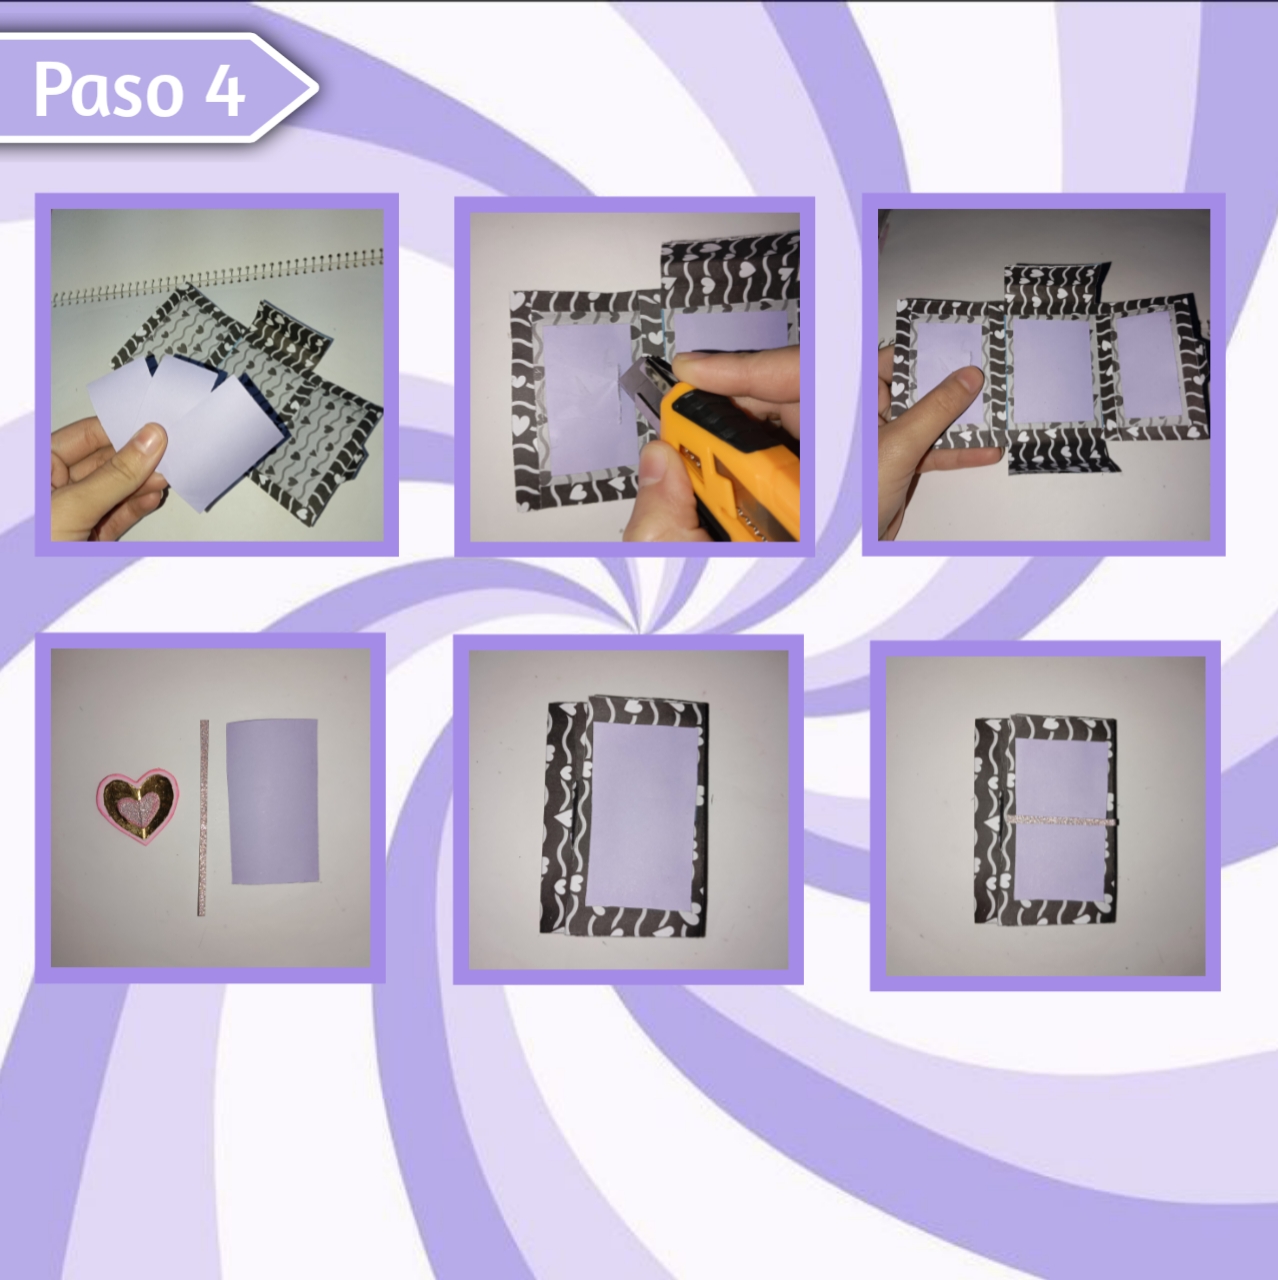
Paso 4:
Step 4:
Tomaremos la pieza anterior, a la cuál le agregué unos bordes de cartulina en el interior, también vamos a tomar nuestros tres rectángulos, les agregaremos pegamento o silicón y pegaremos centrando bien en cada espacio. Ahora bien, volvemos a remarcar con el cutter y la regla la línea que nos ayudará a cerrar, además para el decorado, yo hice un corazón con capas, recorte una tira en cartulina rosa escarchada y otro rectángulo en color de cartulina lila, así pegué el rectángulo lila en un espacio de la "portada" de la caja y encima y en medio la tira rosa.
We will take the previous piece, to which I added some cardboard borders on the inside, we will also take our three rectangles, we will add glue or silicone and glue centering well in each space. Now, we return to mark with the cutter and the ruler the line that will help us to close, also for the decoration, I made a heart with layers, I cut a strip in frosted pink cardboard and another rectangle in lilac cardboard color, so I glued the lilac rectangle in a space of the "cover" of the box and above and in the middle of the pink strip.
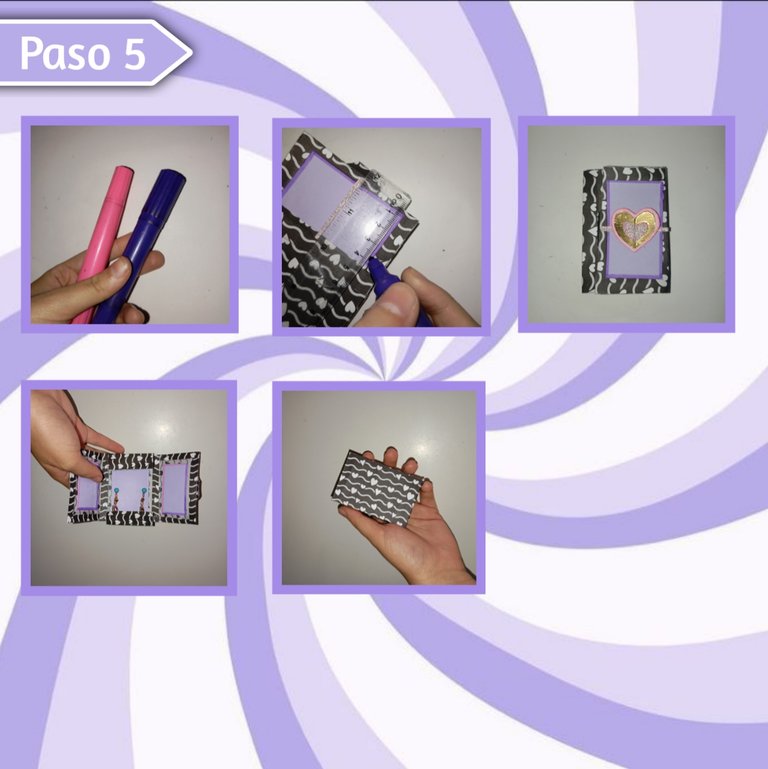
Paso 5:
Step 5:
Para continuar con la decoración, tomaremos unos marcadores y haremos la decoración de nuestra preferencia, así yo hice un marco complementando con los dos colores cada rectángulo a excepción de el del medio, también lo hice en la portada. Por último pegue el corazón de forma centrada en la portada con silicón, además agregué los zarcillos y para cerrar introduje la pestaña en el orificio.
To continue with the decoration, we will take some markers and make the decoration of our preference, so I made a frame complementing with the two colors each rectangle except for the middle one, I also did it on the cover. Finally I glued the heart centered on the cover with silicone, I also added the tendrils and to close I inserted the tab in the hole.
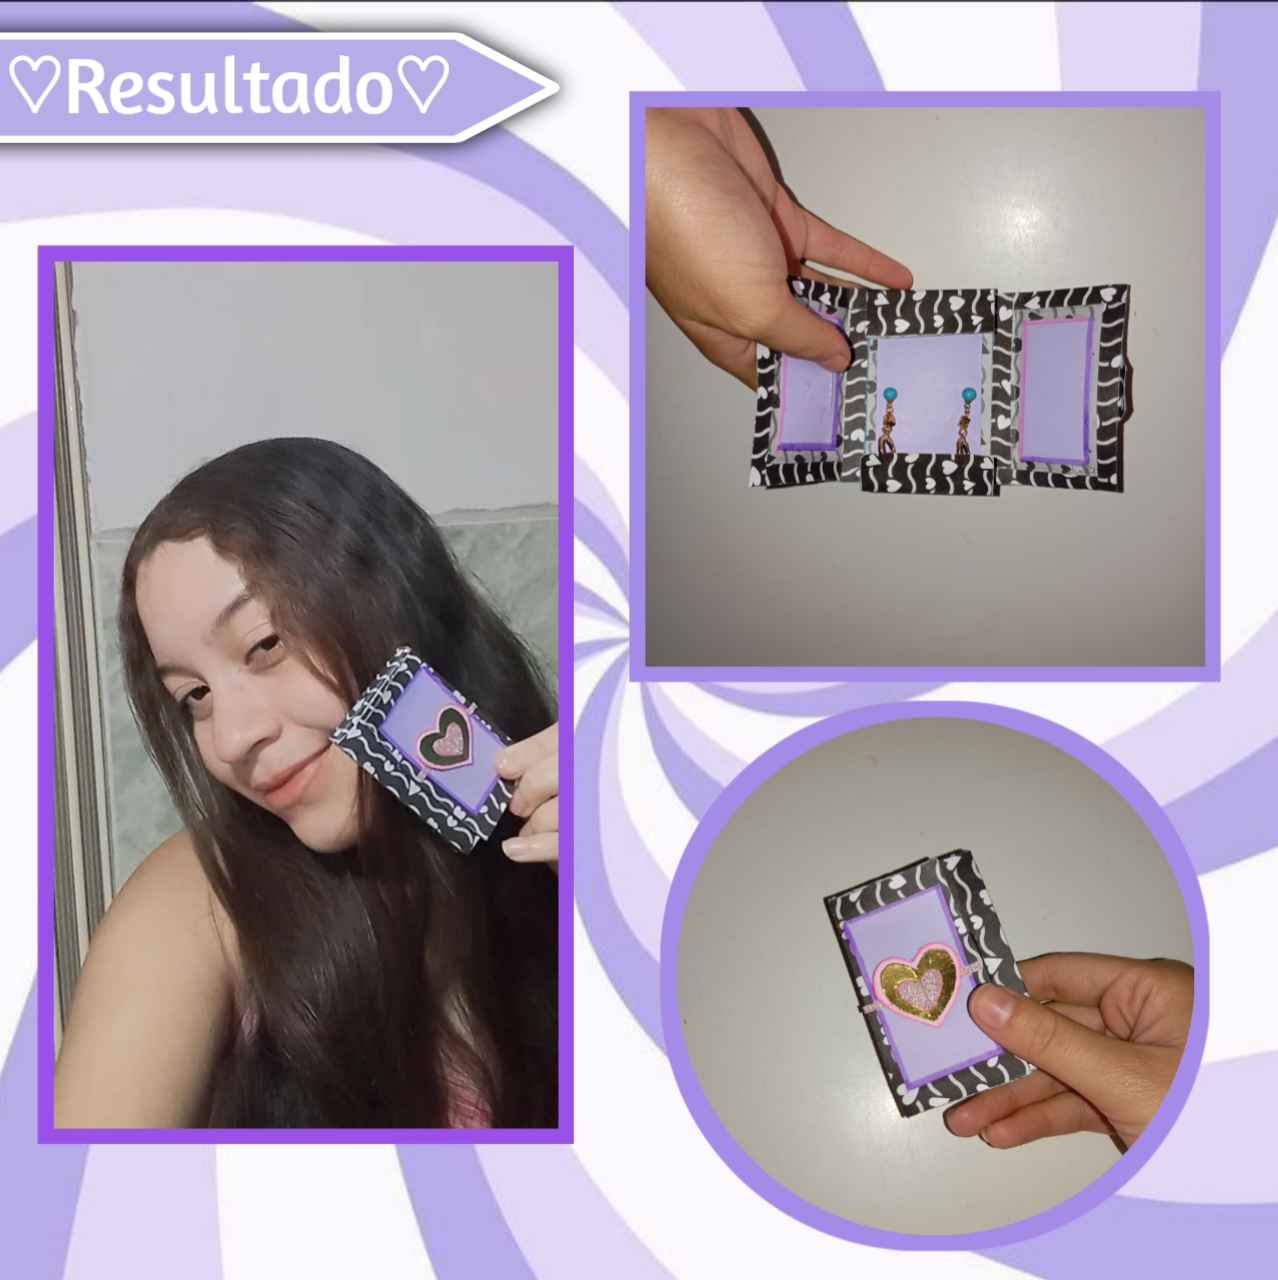
Así es como en unos sencillos pasos podemos obtener una hermosa mini caja, ideal para regalar joyería pequeña, como zarcillos, anillos pulseras, entre otros. Lo podemos personalizar a nuestro gusto y total elección, haciéndolo con cualquier temática que queramos, además la podemos adaptar el tamaño que necesitemos , modificando sencillamente la plantilla.✨
This is how in a few simple steps we can get a beautiful mini box, ideal for giving small jewelry, such as earrings, rings, bracelets, among others. We can customize it to our taste and total choice, making it with any theme we want, we can also adapt the size we need, simply by modifying the template.✨
Hemos llegado al final de la publicación, espero les haya gustado está idea y que sobre todo les sea de gran utilidad en algún momento o circunstancia. Encantada de compartir con ustedes la noche de hoy, me despido, un abrazo enorme mi gente creativa.🤍💜✨
We have reached the end of the publication, I hope you liked this idea and that above all you find it useful at some point or circumstance. Delighted to share with you tonight, I say goodbye, a big hug my creative people.
🤍💜¡Gracias por leer! Los leo en los comentarios💜🤍
🤍💜Thanks for reading! I read them in the comments💜🤍
Photos of my authorship taken from my Xiaomi Redmi 13C phone, edited in the free version of PixelLab and its cover in Canva.✨


